
Introduction
Keycloak is an open source Identity and Access Management solution, which allows teams to easily secure their applications and services. Administrative tasks such as creating realms, clients, and users within Keycloak can be automated using the Keycloak Operator. The Operator is based off of the Operator SDK and follows the Kubernetes Operator pattern.
I was looking to extend the functionality offered by the Operator and wanted to test out my changes locally. The following blog walks through a local setup using kind as the cluster and the Lens IDE for managing the cluster. Designed for testing Kubernetes, kind is a tool for running local Kubernetes clusters using Docker container nodes that may be used for local development or CI.
Prerequisites
To execute the steps described in this blog, you will need to install the following prerequisites:
- kubectl
- kind
- Lens (great tool for managing K8s clusters)
- Go programming language
- Keycloak Operator repository has been cloned
Create a Local Docker Repository and Cluster
First, we need to create a local Docker registry as well as a kind cluster. The kind cluster should be created with extraPortMapping and node-labels (this will allow us to forward ports from the host to an ingress controller).
The local Docker registry is needed if we want to use an updated Operator image. See Using The Registry for more information on pulling, tagging, and pushing images to the local Docker registry.
To create the kind cluster, copy the contents below into a file called cluster-with-registry.sh. Ensure the file is executable, then execute the script from the terminal.
#!/bin/sh
set -o errexit

# create registry container unless it already exists
reg_name='kind-registry'
reg_port='5000'
running="$(docker inspect -f '{{.State.Running}}' "${reg_name}" 2>/dev/null || true)"
if [ "${running}" != 'true' ]; then
  docker run \
    -d --restart=always -p "127.0.0.1:${reg_port}:5000" --name "${reg_name}" \
    registry:2
fi

# create a cluster with the local registry enabled in containerd
cat <<EOF | kind create cluster --config=-
kind: Cluster
apiVersion: kind.x-k8s.io/v1alpha4
nodes:
- role: control-plane
  kubeadmConfigPatches:
  - |
    kind: InitConfiguration
    nodeRegistration:
      kubeletExtraArgs:
        node-labels: "ingress-ready=true"
  extraPortMappings:
  - containerPort: 80
    hostPort: 80
    protocol: TCP
  - containerPort: 443
    hostPort: 443
    protocol: TCP
containerdConfigPatches:
- |-
  [plugins."io.containerd.grpc.v1.cri".registry.mirrors."localhost:${reg_port}"]
    endpoint = ["http://${reg_name}:${reg_port}"]
EOF

# connect the registry to the cluster network
# (the network may already be connected)
docker network connect "kind" "${reg_name}" || true

# Document the local registry
# https://github.com/kubernetes/enhancements/tree/master/keps/sig-cluster-lifecycle/generic/1755-communicating-a-local-registry
cat <<EOF | kubectl apply -f -
apiVersion: v1
kind: ConfigMap
metadata:
  name: local-registry-hosting
  namespace: kube-public
data:
  localRegistryHosting.v1: |
    host: "localhost:${reg_port}"
    help: "https://kind.sigs.k8s.io/docs/user/local-registry/"
EOF
Set kubectl context
Next, we need to set the kubectl context to the newly created cluster.
$ kubectl cluster-info --context kind-kindAdd NGINX Ingress
Finally we are going to add an NGINX Ingress to our cluster.
$ VERSION=$(curl https://raw.githubusercontent.com/kubernetes/ingress-nginx/master/stable.txt)
$ kubectl apply -f https://raw.githubusercontent.com/kubernetes/ingress-nginx/${VERSION}/deploy/static/provider/kind/deploy.yaml
Ensure the ingress is setup and its process is running. (This may take a few seconds)
$ kubectl wait --namespace ingress-nginx \
  --for=condition=ready pod \
  --selector=app.kubernetes.io/component=controller \
  --timeout=90s
Keycloak Operator Installation
Now that the cluster has been created, we are ready to install the Keycloak Operator. An operator can be configured to watch and manage resources in a single Namespace or cluster-wide. Check out the operator scope documentation to learn more about when to use which configuration. The documentation also describes how to configure which namespaces a cluster-scoped operator will watch and maintain.
The operator installed in the steps below will be a namespace-scoped operator watching the keycloak namespace.
Prep the cluster
Executing the cluster/prepare rule located in the Makefile of the keycloak operator’s root directory will perform the following:
- create a namespace
- install the custom resource definitions from the deploy/crds directory
- install the role, role binding, and service account from the deploy directory.
Execute the following command from the Keycloak Operator’s root directory:
$ make cluster/prepareAdd the Keycloak Operator
Now that the cluster is prepped we are ready to add the Keycloak Operator. Execute the following command from the Keycloak Operator’s root directory:
$ kubectl apply -f deploy/operator.yaml -n keycloakCreate a Keycloak Instance
The operator is now installed and watching the keycloak namespace. Execute the following command from the Keycloak Operator’s root directory to create a Keycloak instance which will be managed via the operator.
$ kubectl apply -f deploy/examples/keycloak/keycloak.yaml -n keycloakIt will take a few minutes for the Keycloak instance to be up and running. The operator sets the default host for the ingress to keycloak.local.
IMPORTANT: The etc/hosts file needs to be updated to include the following line: 127.0.0.1 keycloak.local.
Once the instance is running and the etc/hosts file has been updated, the Keycloak instance can be reached at http://keycloak.local.
Find the Admin Credentials
To view the admin credentials for logging into Keycloak, either execute the following command from the terminal:
$ kubectl get secret credential-example-keycloak -o go-template='{{range $k,$v := .data}}{{printf "%s: " $k}}{{if not $v}}{{$v}}{{else}}{{$v | base64decode}}{{end}}{{"\n"}}{{end}}' -n keycloakor, if Lens is installed, open the details for the keycloak-0 pod and click the `show` icon for the admin username and password as shown below. (Make sure you have the keycloak namespace selected).

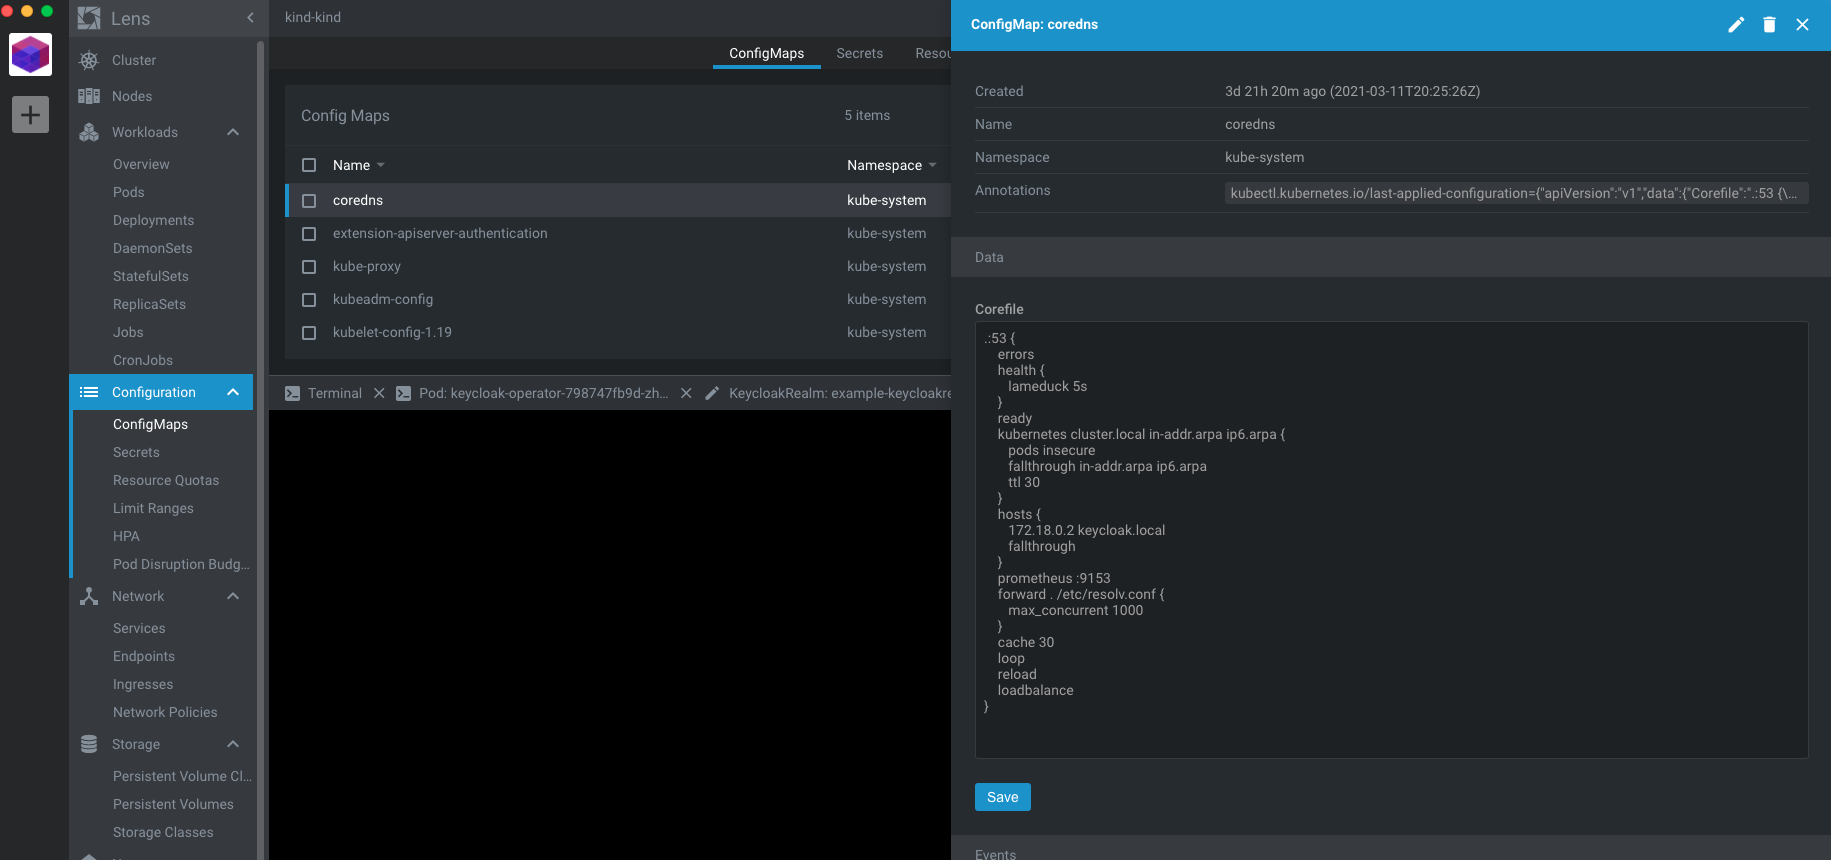
Update the CoreDNS ConfigMap
The Keycloak Operator currently has a bug resolving keycloak.local for internal communication across pods. Until this bug is resolved, we can work around this issue by updating the coredns ConfigMap (CoreDNS is used for service discovery in kind cluster).
First, using Lens, find the Internal IP of kind-control-plane Node.
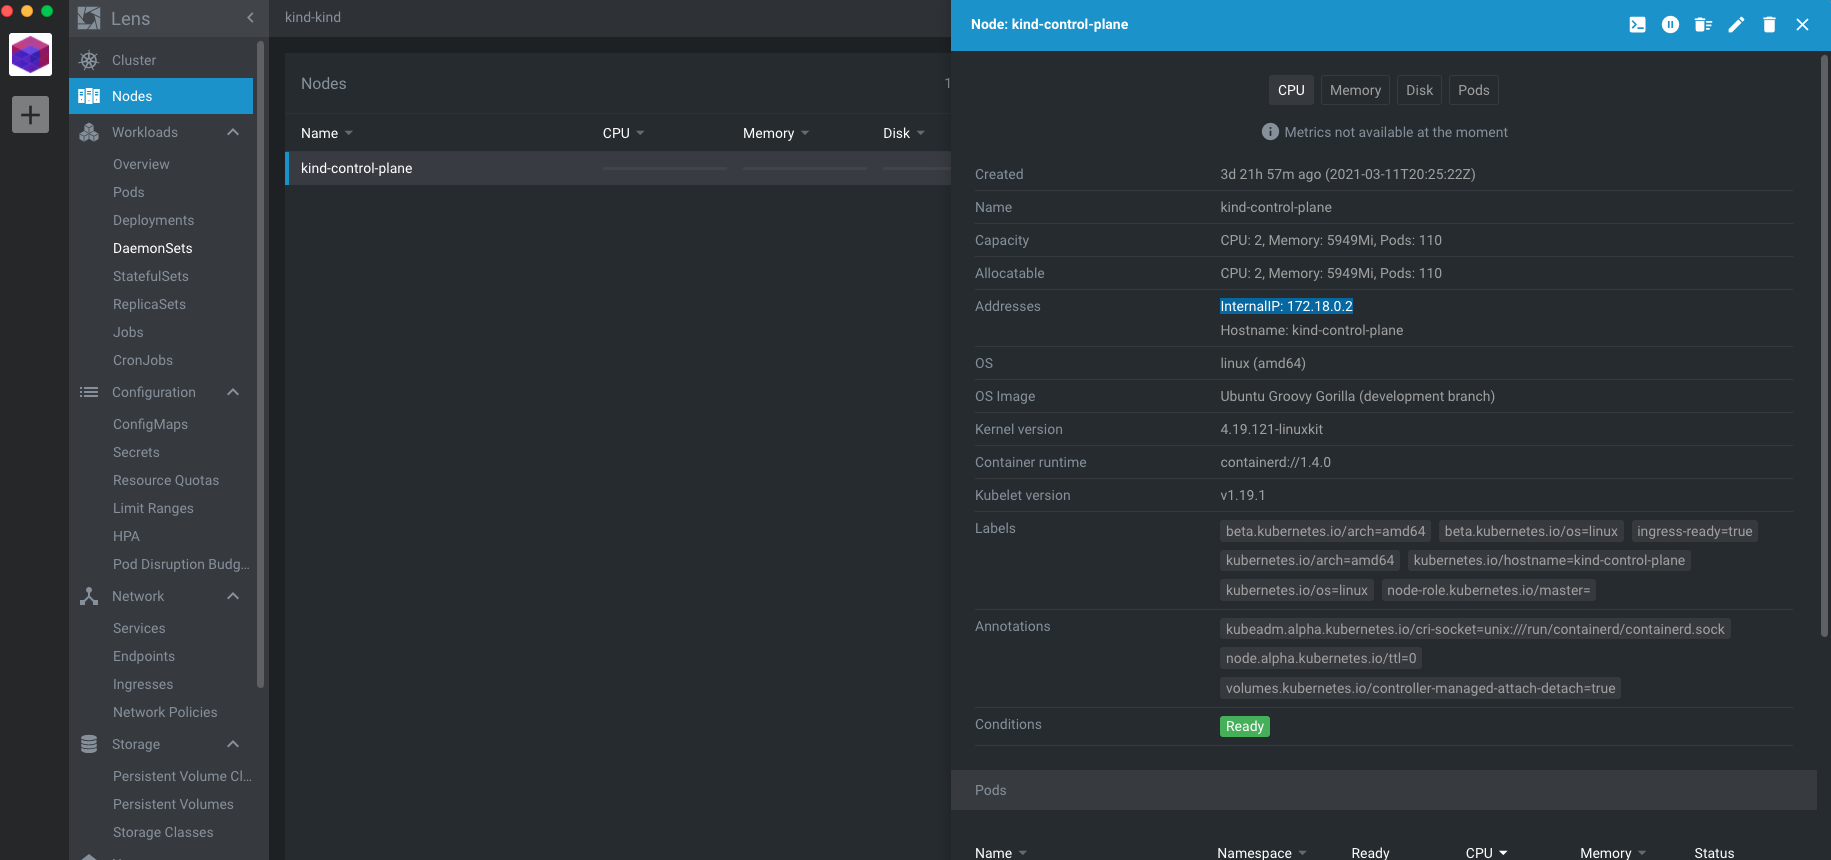
Then, update the coredns ConfigMap by adding the following to the Corefile.
IMPORTANT: Make sure you replace the IP ‘172.18.0.2’ with the Internal IP for your Node.
hosts {
   172.18.0.2 keycloak.local
   fallthrough
}
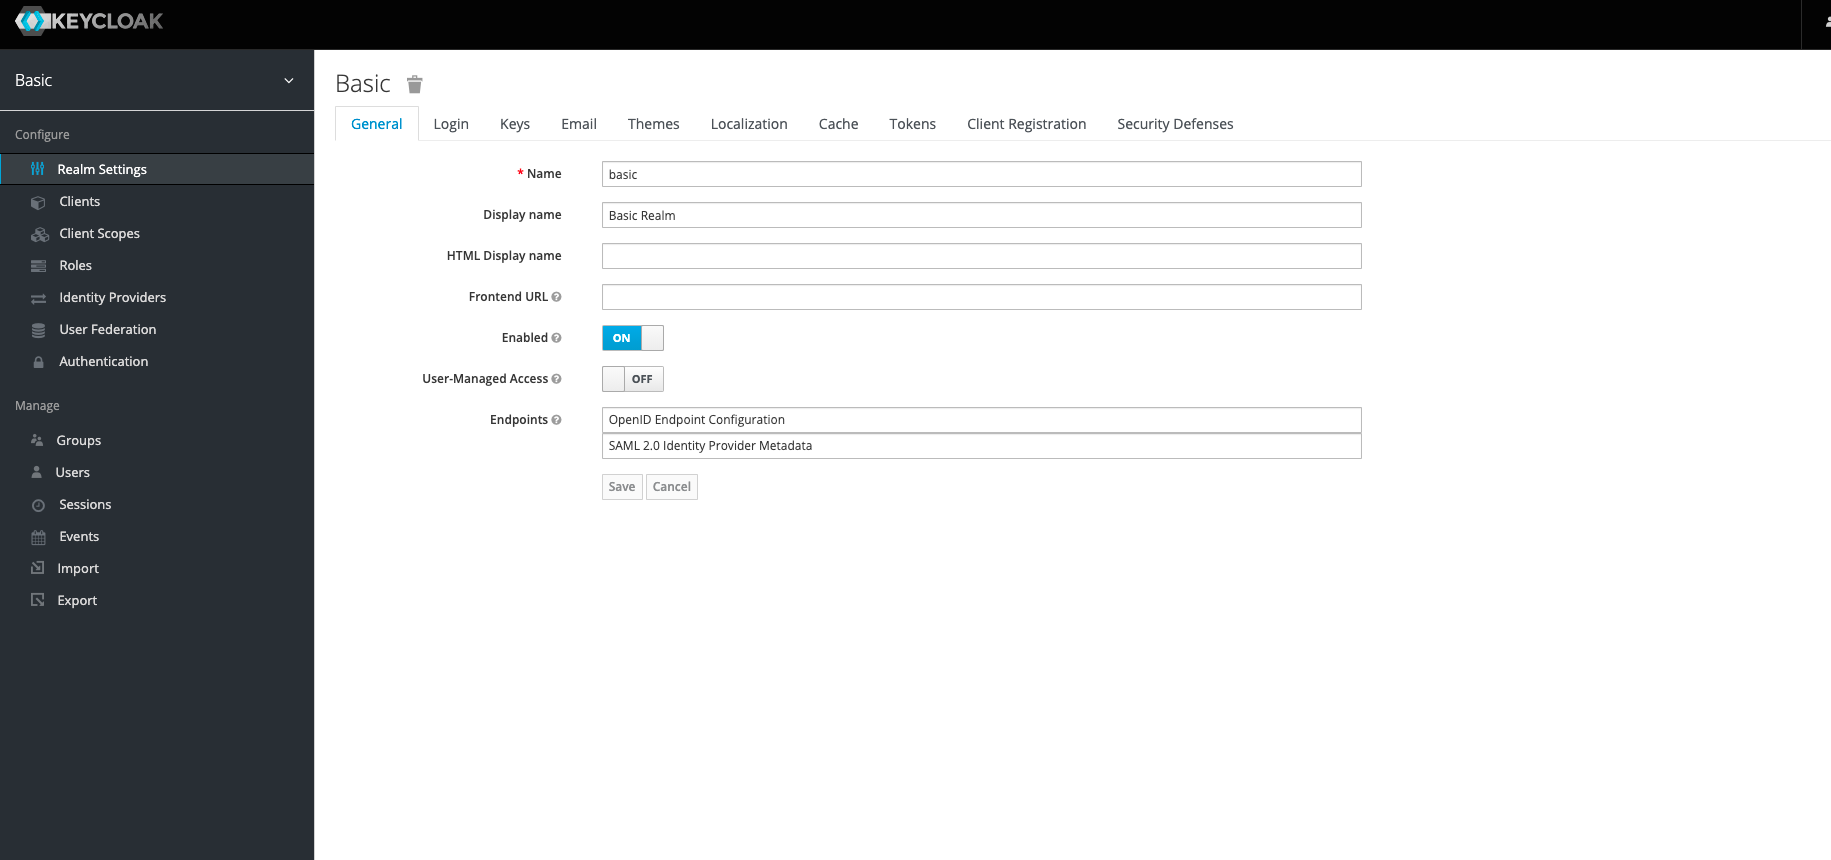
Add a Keycloak Realm
Now the Operator is ready to start administering the Keycloak instance. Let’s create a simple realm by executing the following command from the Keycloak Operator’s root directory:
$ kubectl apply -f deploy/examples/realm/basic_realm.yaml -n keycloakAn additional realm now exists in Keycloak titled ‘Basic’.
Local Keycloak Operator Development
Run Keycloak Operator Locally
To run the operator locally, execute the following command from the Keycloak Operator’s root directory:
$ make code/runUsing a Locally Built Image
To start, build a local image named keycloak-operator:local by executing the following from the keycloak operator’s root directory:
$ docker build . -t keycloak-operator:localTo view a list of images, execute the following:
$ docker imagesNext, tag the image to use the local Docker registry.
$ docker tag keycloak-operator:local localhost:5000/keycloak-operator:localThen push the image to the local Docker registry.
$ docker push localhost:5000/keycloak-operator:localUpdate the deploy/operator.yaml to use the pushed image.
image: localhost:5000/keycloak-operator:localFinally, reapply the operator.yaml (It will take a few minutes for the keycloak instance to be up and running again)
$ kubectl apply -f deploy/operator.yaml -n keycloakRun Keycloak Operator Unit Tests
To run the unit tests, execute the following command from the Keycloak Operator’s root directory:
$ make test/unitRun Keycloak Operator E2E Tests
IMPORTANT: The rule ‘test/e2e’ has a dependency on rule ‘setup/operator-sdk’ which will overwrite the executable for the operator-sdk. If you needed to build the executable locally, you will want to comment out the commands in the ‘setup/operator-sdk’ rule. Read the Operator SDK Setup section below to determine if you need to build the operator-sdk executable locally.
To run the e2e test, execute the following command from the Keycloak Operator’s root directory:
$ make test/e2eIf you see the following error when running the e2e tests, you need to clean up your cluster. This should not occur if you are going through these steps for the first time.
keycloak_main_test.go:87: persistentvolumeclaims "keycloak-postgresql-claim" already exists
Debugging the Keycloak Operator
To debug the Operator in VS Code, follow these instructions.
Read about Creating a Launch Script for debugging.
The launch script configuration will look something like this:
{
    // Use IntelliSense to learn about possible attributes.
    // Hover to view descriptions of existing attributes.
    // For more information, visit: https://go.microsoft.com/fwlink/?linkid=830387
    "version": "0.2.0",
    "configurations": [
        {
            "name": "Keycloak Operator",
            "type": "go",
            "request": "launch",
            "mode": "auto",
            "program": "${workspaceFolder}/cmd/manager/main.go",
            "env": {
              "WATCH_NAMESPACE": "keycloak",
              "KUBERNETES_CONFIG": "<your kube config path>"
            },
            "cwd": "${workspaceFolder}",
            "args": []
        }
    ]
}
Operator SDK Setup
The Operator SDK provides the tools to build, test, and package Operators. You can find more detailed information about the Operator SDK here:
Version 0.18.2 of the Operator SDK is used to build, test and package the Keycloak Operator. The operator’s makefile rule ‘setup/operator-sdk’ is what installs this version. However, the binary installed via this rule is not executable on the Mac OS. Therefore, if you are using a Mac, you will need to build the Operator SDK locally.
While the Operator SDK can be installed using Homebrew, it installs a newer version containing updated commands and subcommands. The Operator SDK rules would need to be modified to work with the updated version of the Operator SDK
Build the Operator SDK locally
First, clone the Operator SDK GitHub Repository
Next, execute the following two rules from the root directory of the Operator SDK to test, build, and install the Operator SDK executable:
$ make all
$ make install
The executable will be installed to the the $GOPATH/bin directory. To locate where the $GOPATH directory exists, run the following command:
$ go env GOPATHFinally, copy the operator-sdk executable to `/usr/local/bin`
In Conclusion
When I began researching the Keycloak Operator, I only found documentation which discussed using OpenShift or MicroK8s. The goal of this blog was to give a step by step example of running the Operator locally using kind. In addition, I wanted to document the issues I faced while setting up the Operator. I encourage you to continue exploring the Keycloak Operator’s capabilities. Some additional features to investigate are:
- Creating a Client
- Creating a User
- Creating a cluster-scoped operator
- Making a change locally and observing the change either by:
- running the Operator locally or
- building and pushing a new image to your local registry (Make sure to update the operator.yaml to pull the new image)


2 thoughts to “Keycloak Operator: Running Locally With Kind”
Hey man, Thank you. I mean really….thank you. The documentation was so convoluted. I couldn’t follow it. Anyway Im up and running Thumbs Up!!!!!
Tony, great to hear this was able to help!!