
One of the main challenges developers face is how to manage security risks when deploying applications to Kubernetes clusters. A great way to address this early is by applying security hardening to the application manifests during the development process. In this post, we run down 10 ways that developers can apply hardening to their applications.
The following techniques allow the hardened version to be tested during development, reducing the risk that controls applied in production environments will cause an adverse effect to the running workload. Also, in clusters that don’t have mandatory controls like Pod Security Policies in place, voluntary hardening can help reduce the risk of a container breakout attack.
General approach
When writing a Kubernetes workload manifest, be it a pod object or something higher-level like a deployment or daemonset, there is a section of the manifest called securityContext that allows you to specify security parameters that should be applied to the workload.
For example, the snippet below shows a manifest that changes its capabilities and sets a read-only root filesystem.
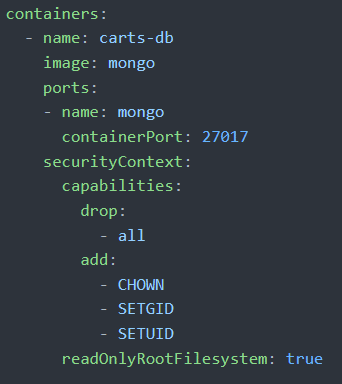
We’ll go into the details of how those different sections work later, but from this you can see the general structure used.
runAsUser, runAsGroup
By default, Docker containers run as the root user, which isn’t ideal from a security standpoint. While there are still constraints on what access is available from inside a container, there have been multiple container vulnerabilities over the past year that could be exploited only if the container was running as the root user. Ensuring that all containers run as a non-root user is a good hardening step.
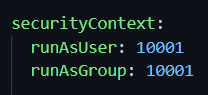
At a basic level, configuring this in a pod manifest is fairly straightforward. The best approach is to use the runAsUser and runAsGroup fields in securityContext to a non-0 value.
However, when doing this, it’s important to ensure that the container will work when running as a non-root user. If the original container image was designed to run as root and has restrictive file permissions, it might cause issues with the operation of the application.
The best way to do this is to ensure that the same UID/GID combination is set in the container’s Dockerfile, so that it will run using that combination throughout the development and test process. You can do this by setting the USER directive in the Dockerfile. Following the example above, this line would set the same UID and GID combination:
![]()
Privileged
Docker and similar container runtimes provide the privileged flag as a convenient way to remove the security isolation from the container. This should never be used in application workloads, and should be used only where completely necessary.
In general, Linux containers have quite a flexible security model, so if a specific permission is required for the operation of the container, it can be added without using the blanket privileged setting.
In designing container manifests, the key is to just default to setting privileged to false in the securityContext of every manifest, so it’s clear that it should run without those rights.
![]()
Capabilities
Linux capabilities are used to provide a process with one or more aspects of the rights traditionally reserved for the root user. By default, Docker and other container runtimes will provide a sub-set of the available capabilities to containers.
A good hardening step is to allow only the capabilities that your application specifically needs. If your application is designed to run as a non-root user, it might need no capabilities at all.
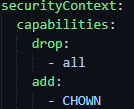
In general, the approach for capabilities should be first to drop all of them, then add back specific capabilities if your application requires them. So, for example, if you need the CHOWN capability, you would have a securityContext like this:
readOnlyRootFilesystem
You can use this setting to take advantage of the ephemeral nature of containers. In general, running containers should not store any state about the application in the container file system. This is because they might, at any time, be spun down and a new version created elsewhere in the cluster.
Given that this is the case, you can set the readOnlyRootFilesystem flag in the workload manifest, which will make the container’s root file system read-only. This is likely to frustrate attackers who are trying to install tools in the container when they’ve found an application vulnerability.
A common question in relation to this setting is how to handle temporary files that the application process needs while it’s running. The best way to handle these is to mount an emptyDir volume into the container, which will allow files to be written to a location and then removed automatically when the container is destroyed.
Setting readOnlyRootFilesystem is a simple Boolean in the securityContext.

AllowPrivilegeEscalation
Another security setting exposed by the Linux kernel, this one is usually a good, low-impact hardening option. This flag controls whether a child process can gain more privileges than its parent, and with application processes running in containers, that’s rarely necessary for their operation.
Setting this is another straightforward setting in the securityContext, which looks like this:

Seccomp
The last security layer that’s worth looking at in your manifests is seccomp. Seccomp profiles prevent access to specific Linux syscalls that could cause security risks. By default, container runtimes like Docker provide a syscall filter that blocks access to a number of specific calls. However, when run under Kubernetes, this filter is disabled by default.
So it’s an important addition to workload manifests to make sure the filter is re-enabled. You can either use the runtime default profile or (like AppArmorand SELinux) provide a custom one.
The seccomp filter can be re-enabled in one of two places, depending on which version of Kubernetes you’re using. In 1.18 and below, it’s done via an annotation in the metadata section of the manifest, as with AppArmor. A sample annotation would look like this:

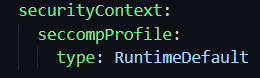
In 1.19 and later, the seccomp filter has been integrated into the securityContext field, so to set a pod to use the default seccomp filter you would use something like this:
Resource limits
Because Kubernetes workloads share underlying nodes, it’s important to ensure that an individual container can’t use all the resources on the node, which could cause performance issues for other containers running in the cluster. At the container level, it’s possible to set resource limits that specify the amount of resources needed by the container and the limit on how much resource should be allowed.
An example of a container resource request would look like this. This isn’t set in securityContext, but instead in the general container specification.
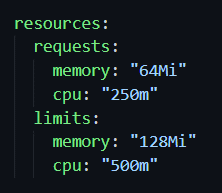
While the memory request and limit are fairly straightforward to read, the CPU limits can be a bit less obvious. They’re effectively measured in “millicpus,” where 1,000 is equal to a CPU core or hyperthread. So, in the example above, the request is for 25% of one core, and the limit is 50% of one core.
Another thing to note when designing resource limits is how the container runtime will react when the limit is exceeded. For CPU, the process will be throttled, effectively reducing its performance. If the memory limit is exceeded, however, the container runtime may kill the process, so it’s important to ensure that limits fit with what the application may reasonably request in normal operation.
imageTag
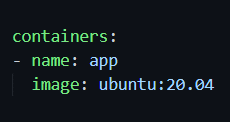
Docker-style containers generally are specified by providing an image name and tag name. Docker has one special case, which is that if no tag is specified, the “latest” tag will be used. However, which exact image will be used can change as the image registry is updated. For example, if a new release of an operating system is made, the latest tag may change to be a new version.
This lack of a fixed target makes it a bad idea to use either an unspecified tag or specifically the “latest” tag when specifying the container image to be used in a pod. Instead, use an explicit tag. You can do this either with a named tag that exists in the registry or by specifying an image using a SHA-256 hash, which uniquely identifies it.
With the first option, the image and tag are specified for each container. With this approach, you are still relying on the maintainer not to modify the image in a way that will harm your deployment, as tags are generally mutable pointers and can be redirected to another image.
If you specify a SHA-256 hash, then only the image that specifically corresponds to that hash will be used. This is a high-maintenance option, though, because manifests must be updated to reflect new hashes every time the image is patched.
At the time of writing, the equivalent to the image specified above is:

AppArmor
This option applies to Linux distributions that use AppArmor (mainly the Debian-derived ones). AppArmor can add a level of mandatory security enforcement that provides protection, even when other layers of isolation fail or are bypassed by an attacker.
If you don’t specify an AppArmor policy, the default for the container runtime will apply, so in many cases it’s not necessary to add an explicit statement to your application manifests. However, if you do want to add a custom AppArmor profile to further harden your containers, it’s important to note that, unlike most of the other hardening settings, it’s not set in the securityContext field. Instead, it’s done via a custom annotation in the manifest metadata (there is a proposal open to change this behavior in a future version of Kubernetes).
The profile specified has to be placed on the cluster nodes in advance and is then specified in place of <profile> in the example below.
![]()
SELinux
This option applies to Linux distributions that use SELinux (mainly the Red Hat family). SELinux works like AppArmor to add an additional layer of security to a process. However, it is somewhat more complex to configure policies, and it will depend on your combination of container runtime and host operating system as to whether it’s enabled or not. As with AppArmor, creating custom SELinux policies can be useful in higher-security environments, but in most cases, using a default policy will provide a useful additional layer of security.
Wrap up
Creating a secure Kubernetes environment has a number of aspects, from the control plane to the applications running on the cluster. Pro-actively hardening the Kubernetes manifests used to deploy workloads is a vital part of this process and, when done early in the development life cycle, can significantly improve security and reduce the risks of compromise.