
Automating the delivery of software can solve many of the problems associated with manual deployments. The goal of this post is to provide insight into continuous integration/continuous deployment (CI/CD) for Node.js projects. The tutorial will feature the use of several tools: [Docker](https://www.docker.com/ to help us in containerization, Kubernetes will be used as our orchestration tool, Google Cloud Platform (GCP) will be the cloud service provider, and finally, CircleCI.
By going through this post, you will gain a better understanding of deployment automation. This will decrease the amount of time needed for software delivery and improve productivity. It is a great skill that will benefit many developers.
The following are the key steps we’re going to follow:
- Build the app and add tests
- Define a new Docker image for this app via the Dockerfile
- Setup Google Cloud Platform
- Configure Kubernetes
- Add some scripting
- CircleCI setup
Building the app
First, create an index.html file and populate it with the following:
<html>
 <head>
  <title></title>
<link href="https://maxcdn.bootstrapcdn.com/bootstrap/3.4.0/css/bootstrap.min.css" rel="stylesheet">
 </head>
 <body>

  <div class="col-md-10 col-md-offset-1" style="margin-top:20px">
   <div class="panel panel-primary">
     <div class="panel-heading">
       <h3 class="panel-title">Welcome To My Demo App</h3>
     </div>
      <div class="panel-body">
       <div class="alert alert-success">
          <p>This is a basic app used to demonstrate CI/CD on Google Cloud using K8s, CircleCI and Docker </p>
       </div>
         <div class="col-md-9">
           <p>Author:</p>
           <div class="col-md-3">
             <a href="https://twitter.com/delan_hype">@delan_hype</a>
           </div>
         </div>
      </div>
  </div>
  </div>

<script src="https://code.jquery.com/jquery-3.1.1.slim.min.js"></script>
<script src="https://maxcdn.bootstrapcdn.com/bootstrap/4.0.0-alpha.6/js/bootstrap.min.js"></script>
 </body>
</html>
Next, create a server file named server.js with the following contents:
const express = require('express');
const path = require('path');
const morgan = require('morgan');
const bodyParser = require('body-parser');

/* eslint-disable no-console */

const port = process.env.PORT || 3000;
const app = express();

app.use(morgan('dev'));
app.use(bodyParser.json());
app.use(bodyParser.urlencoded({ extended: 'true' }));
app.use(bodyParser.json({ type: 'application/vnd.api+json' }));

app.use(express.static(path.join(__dirname, './')));

app.get('*', (req, res) => {
  res.sendFile(path.join(__dirname, './index.html'));
});

app.listen(port, (err) => {
  if (err) {
    console.log(err);
  } else {
    console.log(`App at: http://localhost:${port}`);
  }
});
module.exports = app;
The other important file to be created is a package.json file which will hold the Node.js packages required for this project. Create the file and copy the following:
{
  "name": "gcloud-deploy-node-app-ci-ci-circleci",
  "version": "1.0.0",
  "description": "Tutorial leading to a deployment of a simple Node.js app to gcloud",
  "main": "server.js",
  "scripts": {
    "start": "node server.js",
    "test": "mocha"
  },
  "keywords": [
    "gcloud",
    "node"
  ],
  "author": "Collins",
  "license": "MIT",
  "dependencies": {
    "body-parser": "^1.17.2",
    "express": "^4.15.3",
    "morgan": "^1.8.2"
  },
  "devDependencies": {
    "chai": "^4.1.2",
    "mocha": "^5.2.0",
    "request": "^2.88.0"
  }
}
Running the application locally
Navigate to the directory where you have the above project. Install the required Node.js packages by running the following command:
npm install
Now you can start the application using this command:
npm start
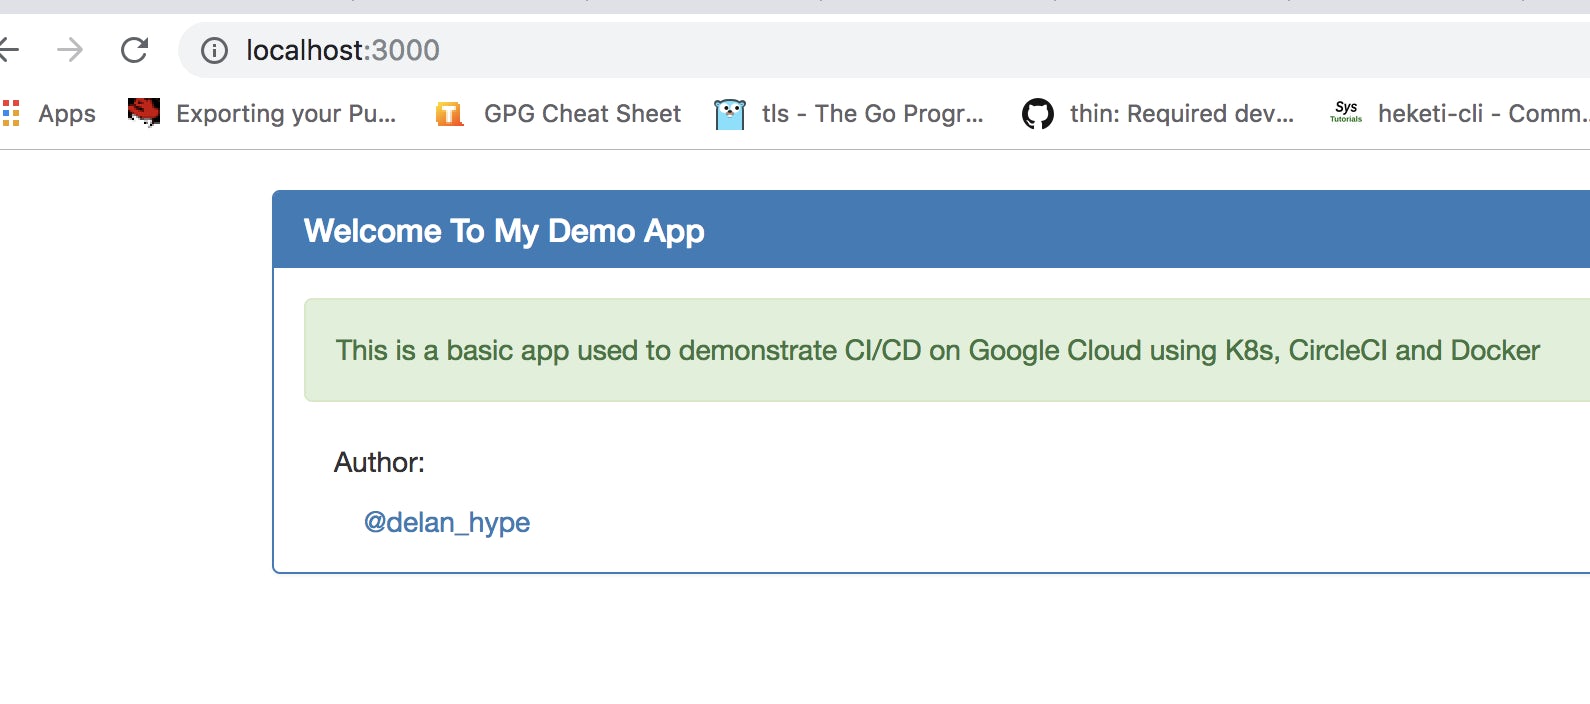
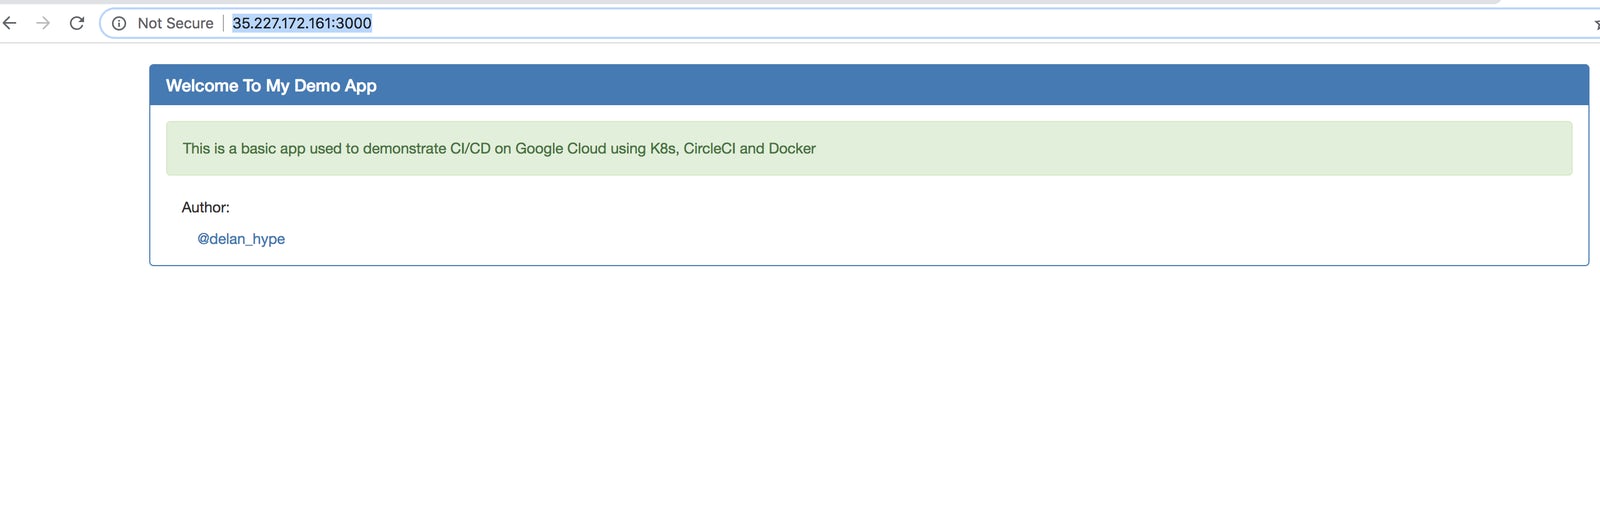
In a browser, navigate to http://localhost:3000. The application should be running as shown:
Docker setup
Follow the instructions from this link to install Docker. When you open the link above, you’ll find the basic steps for installing Docker specifically for your operating system.
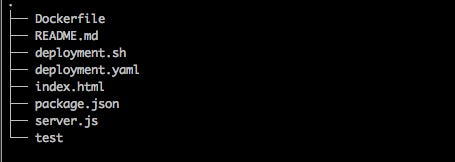
If you want to follow along but don’t want to build the project yourself, you can find the repo on GitHub here. It is a simple Node.js application which serves an HTML page. I built the project to make this article hands-on and I kept it simple so that I can clearly demonstrate the CI/CD process. In the repository, you’ll find various files as shown below:
To dockerize the project, we need to create a Dockerfile with these lines:
FROM node
ENV NPM_CONFIG_LOGLEVEL warn
RUN mkdir -p /usr/src/app
EXPOSE 3000
WORKDIR /usr/src/app
ADD package.json /usr/src/app/
RUN npm install --production
ADD . /usr/src/app/
ENTRYPOINT ["npm", "start"]
Open a text editor and copy the lines into it. Save the file as Dockerfile in your project’s root directory.
I won’t go into much about Docker in this article, but for those new to Docker, let me explain some of the commands in the above file:
FROM - The base image for building a new image in our case is the node. This command must be on top of the Dockerfile.
ENV - It defines an environment variable.
RUN - This is used to execute a command during the build process of the docker image.
ADD - Copies a file from the host machine to the new docker image.
ENTRYPOINT - Defines the default command that will be executed when the container is running.
WORKDIR - This is directive for ENTRYPOINT command to be executed.
EXPOSE - Exposes a specified port on which the container will run.
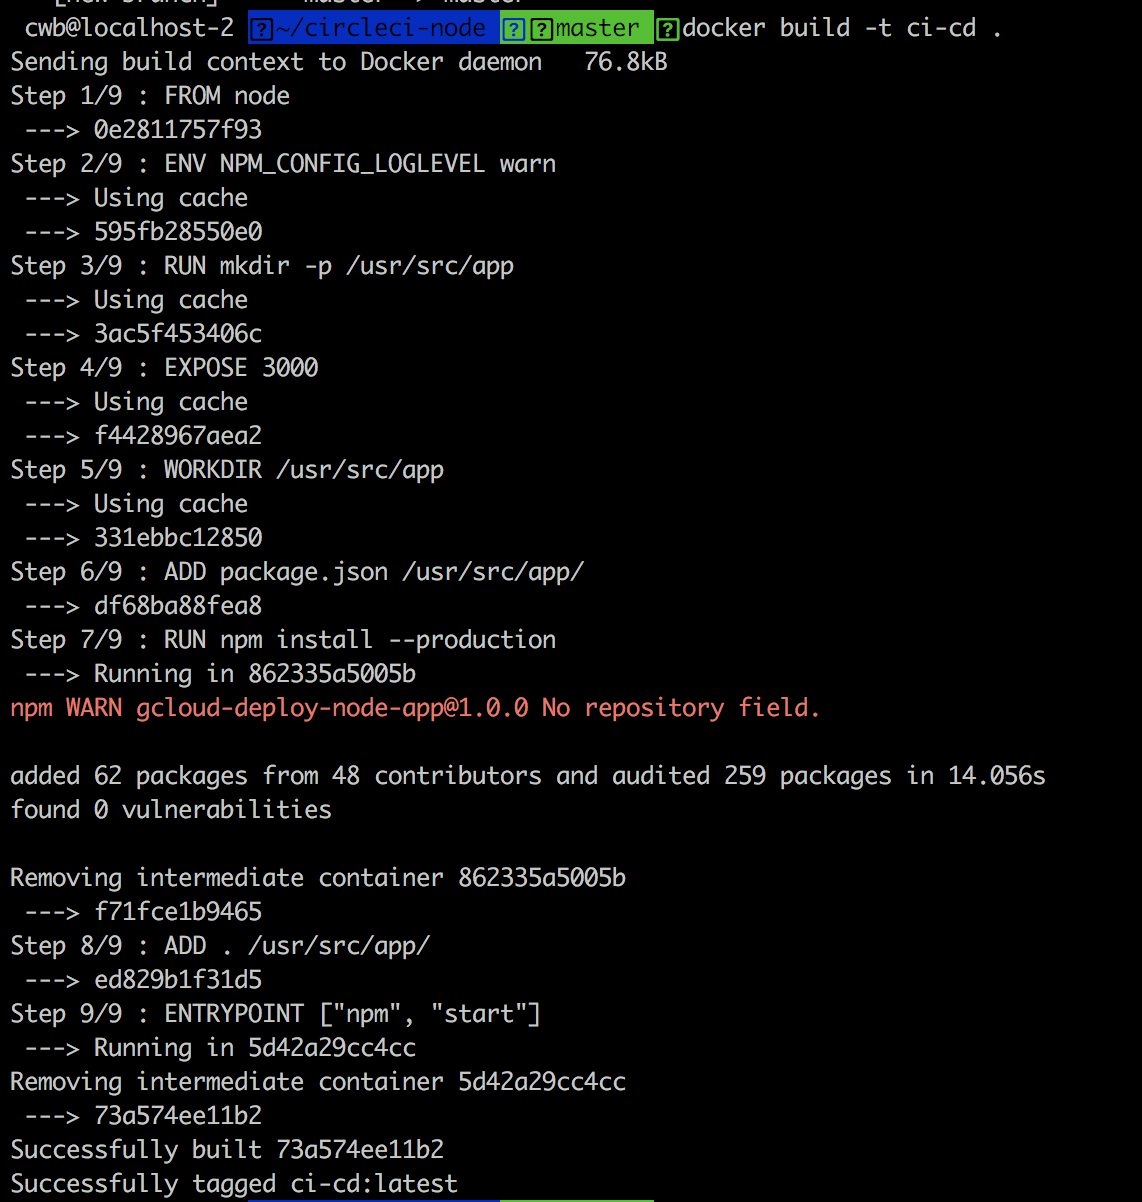
Now, let’s build our image. Run:
docker build -t ci-cd .
The result will be something similar to:
To test if the image was well built, let’s run it and see if we can access our application.
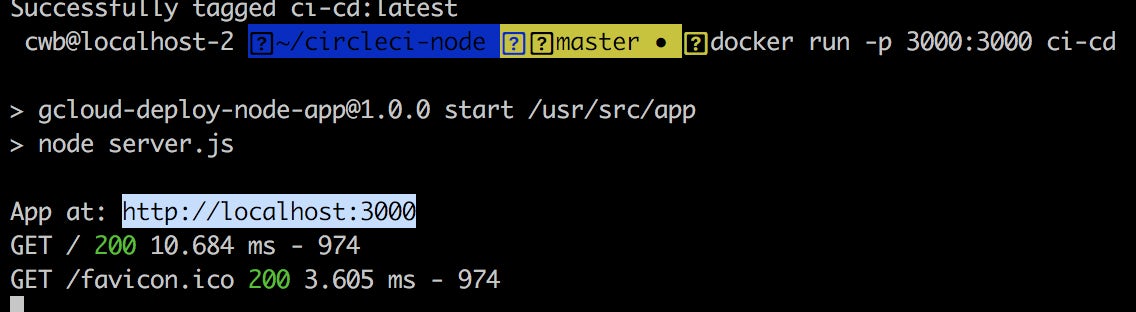
Navigating to http://localhost:3000 should result in the following:
This shows that the project builds successfully. The next thing we need to do is push it to a Docker registry. This is where the images will be stored. Google Compute Registry (GCR) will be used here because we are using GCP.
Tag the image:
docker tag <HOSTNAME>/<YOUR-PROJECT-ID>/<IMAGE-NAME>
Example:
docker tag ci-cd gcr.io/ci-cd-12347/ci-cd:0.1.0
Push the image:
gcloud docker -- push <HOSTNAME>/<YOUR-PROJECT-ID/<IMAGE-NAME>
Example:
gcloud docker -- push gcr.io/ci-cd-12347/ci-cd:0.1.0
Google Cloud Platform setup
I will be using GCP as the cloud service provider where the application will be deployed. The first thing you will need to do is install and configure gcloud. If you don’t have a Google Cloud account, you can create one here.
Mac OS/Linux
On your terminal, run:
curl https://sdk.cloud.google.com | bash
Restart the shell when the above step is done:
exec -l $SHELL
Initialize the gcloud environment:
gcloud init
Windows
Download the installer here and launch it. When the installation is done, start the cloud SDK shell and initialize gcloud using the command:
gcloud init
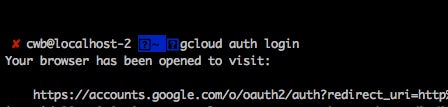
The next thing to do is to authenticate gcloud by running the command:
gcloud auth login
A browser will be opened automatically serving a link that will be shown on the terminal. Something like:
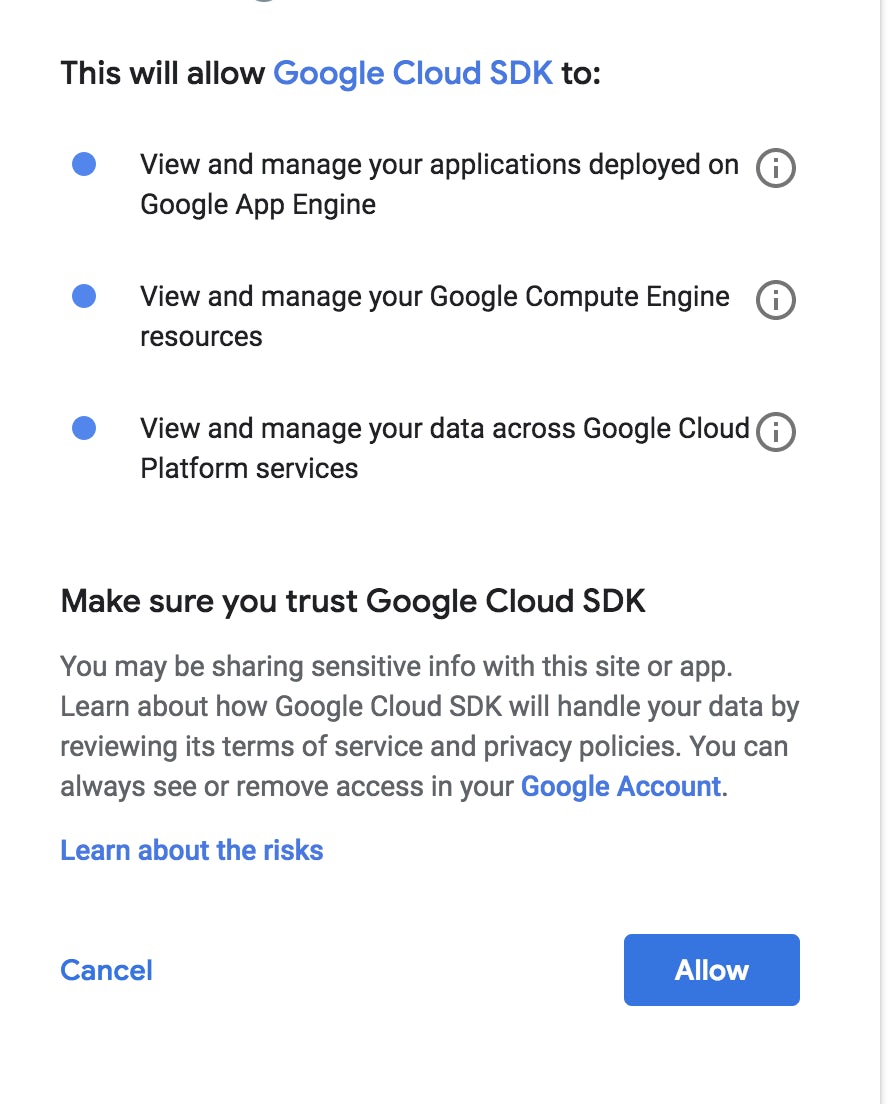
On the opened browser tab, click Allow to authenticate gcloud:
Kubernetes Setup
We’ll use Kubernetes for the orchestration and management of containers in this example. There are various methods of installing Kubernetes. The straightforward one is downloading the kubectl binary as part of the Google Cloud SDK using the command below:
gcloud components install kubectl
Confirm that Kubernetes is correctly installed by running this:
kubectl version
The output will be something like:
Client Version: version.Info{Major:"1", Minor:"8", GitVersion:"v1.8.6", GitCommit:"6260bb08c46c31eea6cb538b34a9ceb3e406689c", GitTreeState:"clean", BuildDate:"2017-12-21T06:34:11Z", GoVersion:"go1.8.3", Compiler:"gc", Platform:"darwin/amd64"}
Server Version: version.Info{Major:"1", Minor:"8", GitVersion:"v1.8.0", GitCommit:"0b9efaeb34a2fc51ff8e4d34ad9bc6375459c4a4", GitTreeState:"clean", BuildDate:"2017-11-29T22:43:34Z", GoVersion:"go1.9.1", Compiler:"gc", Platform:"linux/amd64"}
For a successful installation, you should see both Client and Server Versions.
Next, create a GCP project following the steps outlined here. The project will help us to create, enable, and use all of the GCP services such as Kubernetes Engine and Container Registry. Thereafter, follow these steps to create and set up a zonal Kubernetes cluster. A cluster is the foundation of a Kubernetes Engine. All containerized applications run on top of a cluster. Hence, we need the cluster to run and manage our application.
For example, to create a cluster using your terminal, run the following command, replacing the defaults with your values:
gcloud container clusters create CLUSTER_NAME
Where CLUSTER_NAME is the name you choose for the cluster.
Lastly, set up the cluster locally by running the following command on your terminal:
gcloud container clusters get-credentials <CLUSTER_NAME> --zone <TIME_ZONE> --project <PROJECT_ID>
For example:
gcloud container clusters get-credentials ci-cd --zone us-west1-a --project ci-cd-12347
You can confirm if the cluster set is correct by running:
kubectl config current-context
The output should be the name of the created cluster, from the previous step.
Kubernetes configuration
This involves the creation of the manifests using YAML. Let’s put service and deployment in one file as shown below, separating each document with ---. If you are familiar with YAML, then this should be a familiar concept.
apiVersion: v1
kind: Service
metadata:
  name: ci-cd
  labels:
    app: ci-cd
spec:
  ports:
    - port: 3000
  selector:
    app: ci-cd
    tier: frontend
  type: LoadBalancer
---
apiVersion: apps/v1beta1
kind: Deployment
metadata:
  name: ci-cd
  labels:
    app: ci-cd
spec:
  selector:
    matchLabels:
      app: ci-cd
      tier: frontend
  strategy:
    type: Recreate
  template:
    metadata:
      labels:
        app: ci-cd
        tier: frontend
    spec:
      containers:
      - image: gcr.io/ci-cd-217118/ci-cd:0.1.0
        name: ci-cd
        ports:
        - containerPort: 3000
          name: ci-cd
It’s not too tough to follow what’s going on in the above file if you are a bit familiar with Kubernetes, but I’ll briefly describe the highlights below:
apiVersion - Specifies the Kubernetes API version.
kind - Specifies what resource needs to be provisioned, e.g service, deployment etc.
metadata - Gives more description of a resource, e.g name, which specifies a resource name.
spec - Gives resource specification, e.g ports, containers, etc.
image - Specifies an image to be used by a container. It expects an URL to the image.
Copy and paste the lines above into a text editor and save it as deployment.yaml in your project’s root directory.
Let’s now create/trigger an initial deployment using this command:
kubectl create -f deployment.yaml
Confirm that the status of the pods is Running, that an external IP address exposed on port 3000, and that the AVAILABLE tag is at least 1:
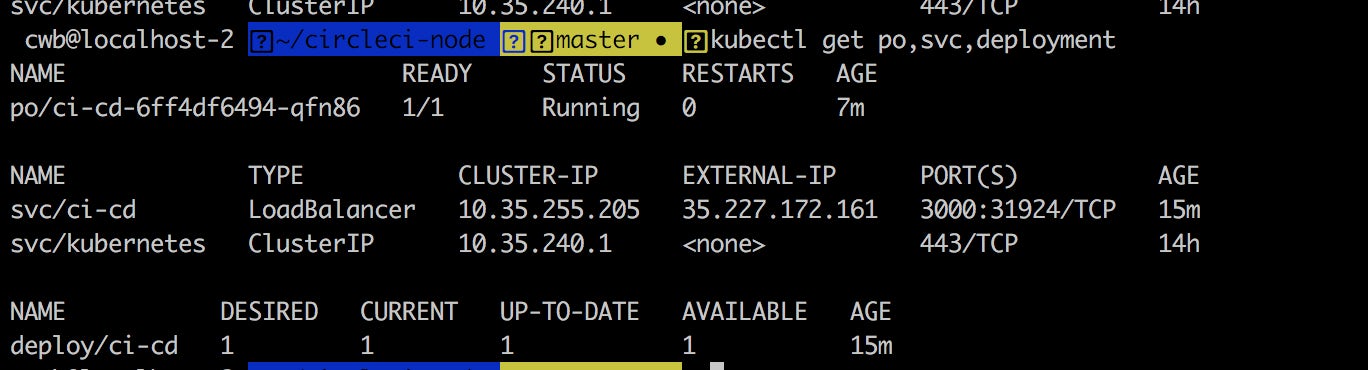
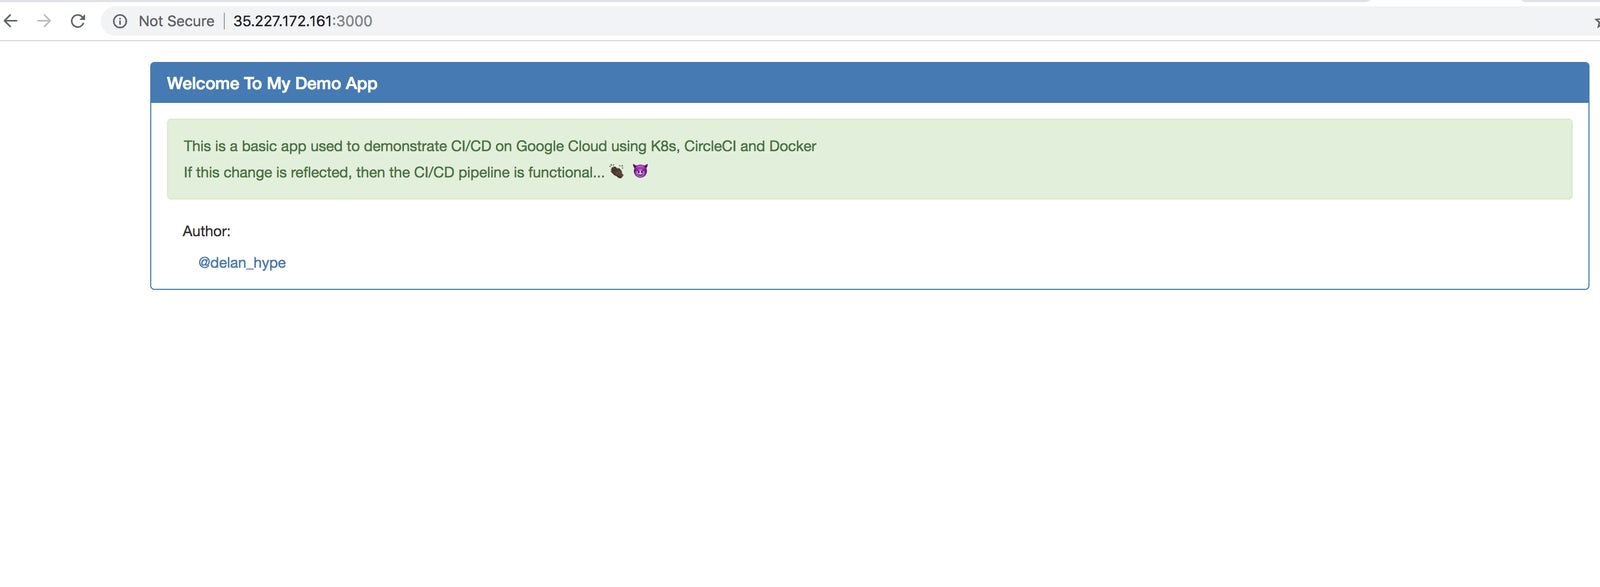
As you can see, the deployment, service, and pods are up and running. In my case, the application is running on http://35.227.172.161:3000/, as shown in the image above. If you’ve been following along, your application will be running on a different IP. Navigate to it on port 3000.
Note: By the time you read this article, I’ll have destroyed the cluster to save costs, so this IP won’t be functional.
To delete your cluster, run this command in your terminal:
gcloud container clusters delete [CLUSTER_NAME]
Then delete the GCP project which had the cluster:
gcloud projects delete [PROJECT_NAME]
As you saw, we had to run the kubectl command manually during our deployment. This would be laborious if you had to run it every time there’s a change to the application. Next, we are going to automate this using CircleCI.
Scripting
This involves a simple shell script that will aid in deployment. This script will be run by CircleCI as a build step for deploying the application. The script is shown below:
# !/bin/bash
set -e
echo "Deploying to ${DEPLOYMENT_ENVIRONMENT}"
echo $ACCOUNT_KEY_STAGING > service_key.txt
base64 -i service_key.txt -d > ${HOME}/gcloud-service-key.json
gcloud auth activate-service-account ${ACCOUNT_ID} --key-file ${HOME}/gcloud-service-key.json
gcloud config set project $PROJECT_ID
gcloud --quiet config set container/cluster $CLUSTER_NAME
gcloud config set compute/zone $CLOUDSDK_COMPUTE_ZONE
gcloud --quiet container clusters get-credentials $CLUSTER_NAME
docker build -t gcr.io/${PROJECT_ID}/${REG_ID}:$CIRCLE_SHA1 .
gcloud docker -- push gcr.io/${PROJECT_ID}/${REG_ID}:$CIRCLE_SHA1
kubectl set image deployment/${DEPLOYMENT_NAME} ${CONTAINER_NAME}=gcr.io/${PROJECT_ID}/${REG_ID}:$CIRCLE_SHA1
echo " Successfully deployed to ${DEPLOYMENT_ENVIRONMENT}"
Create a file called deployment.sh and fill it with the above contents.
CircleCI configuration
The configuration file will be under a .circleci folder in your root directory. If you’re curious, check here to read more about how to configure CircleCI.
The final configuration is shown below, which you can copy paste into your .circleci/config.yml file:
version: 2
jobs:
  build:
    docker:
      - image: wecs/circle-ci-gcloud-node:0.1.0
    working_directory: ~/workspace
    environment:
      DEPLOYMENT_NAME: ci-cd
      PROJECT_ID: ci-cd-217118
      CLUSTER_NAME: ci-cd
      CLUSTER_NAME_STAG: ci-cd-stag
      CLOUDSDK_COMPUTE_ZONE: us-west1-a
      CONTAINER_NAME: ci-cd
      IMAGE: ci-cd
      REG_ID: ci-cd
      REG_ID_PROD: ci-cd-prod
      IMG_TAG: 0.1.0
      PROJECT_NAME: ci-cd
      DEPLOYMENT_ENVIRONMENT: staging
    steps:
      - checkout
      - setup_remote_docker
      - restore_cache:
          keys:
          - v1-dependencies-{{ checksum "package.json" }}
          - v1-dependencies-
      - run:
          name: Install node packages
          command: |
            npm install

      - run:
          name: Start app
          command: |
            npm start &
      - run:
          name: Run tests
          command: |
            npm test
      - restore_cache:
          keys:
          - v1-dependencies-{{ checksum "package.json" }}
          - v1-dependencies-
      - save_cache:
          paths:
            - node_modules
          key: v1-dependencies-{{ checksum "package.json" }}

      - run:
          name: Build and Deploy
          command: |
            if [ "${CIRCLE_BRANCH}" == "master" ]; then
              ./deployment.sh
            fi
Next, commit the changes and push to GitHub:
To understand the core steps of a CircleCI config file, please read this walkthrough.
One more thing to note is that I have used a custom base image, wecs/circle-ci-gcloud-node:0.1.0, which has gcloud, kubectl, docker, node, etc installed. The reason for using a custom image is that I wanted a base image that has all the required tools for this project.
To integrate CircleCI with your project, first sign up for CircleCI account, if you don’t already have one. Then, on the console click Add Projects. It is on the far left of the dashboard’s page. A list of projects will appear as shown below:
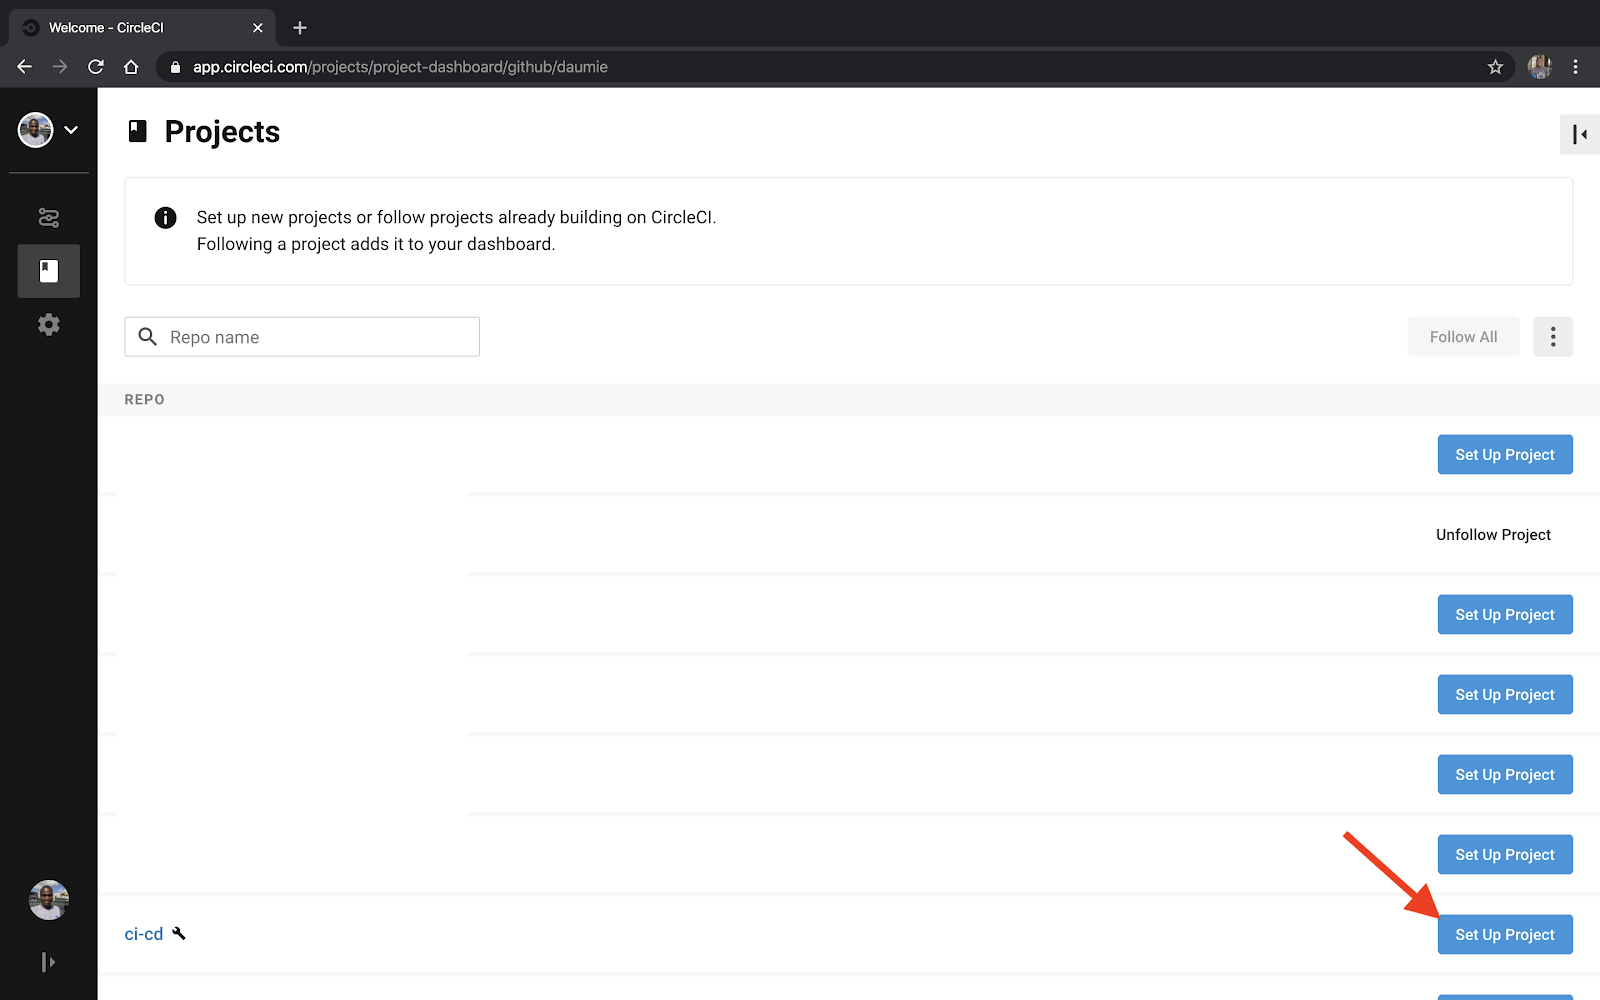
Next, navigate to the far right of the page and click Set Up Project:
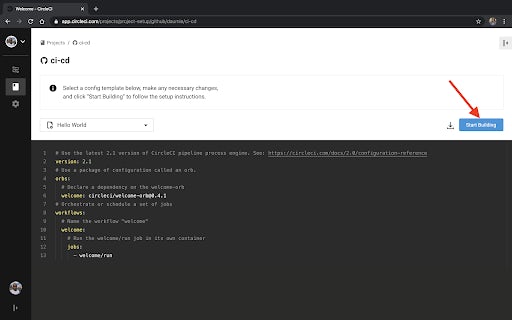
A page like the one shown below will appear. Click Start Building and observe the build. The build will fail because we haven’t authenticated CircleCI to write/read from GCP.
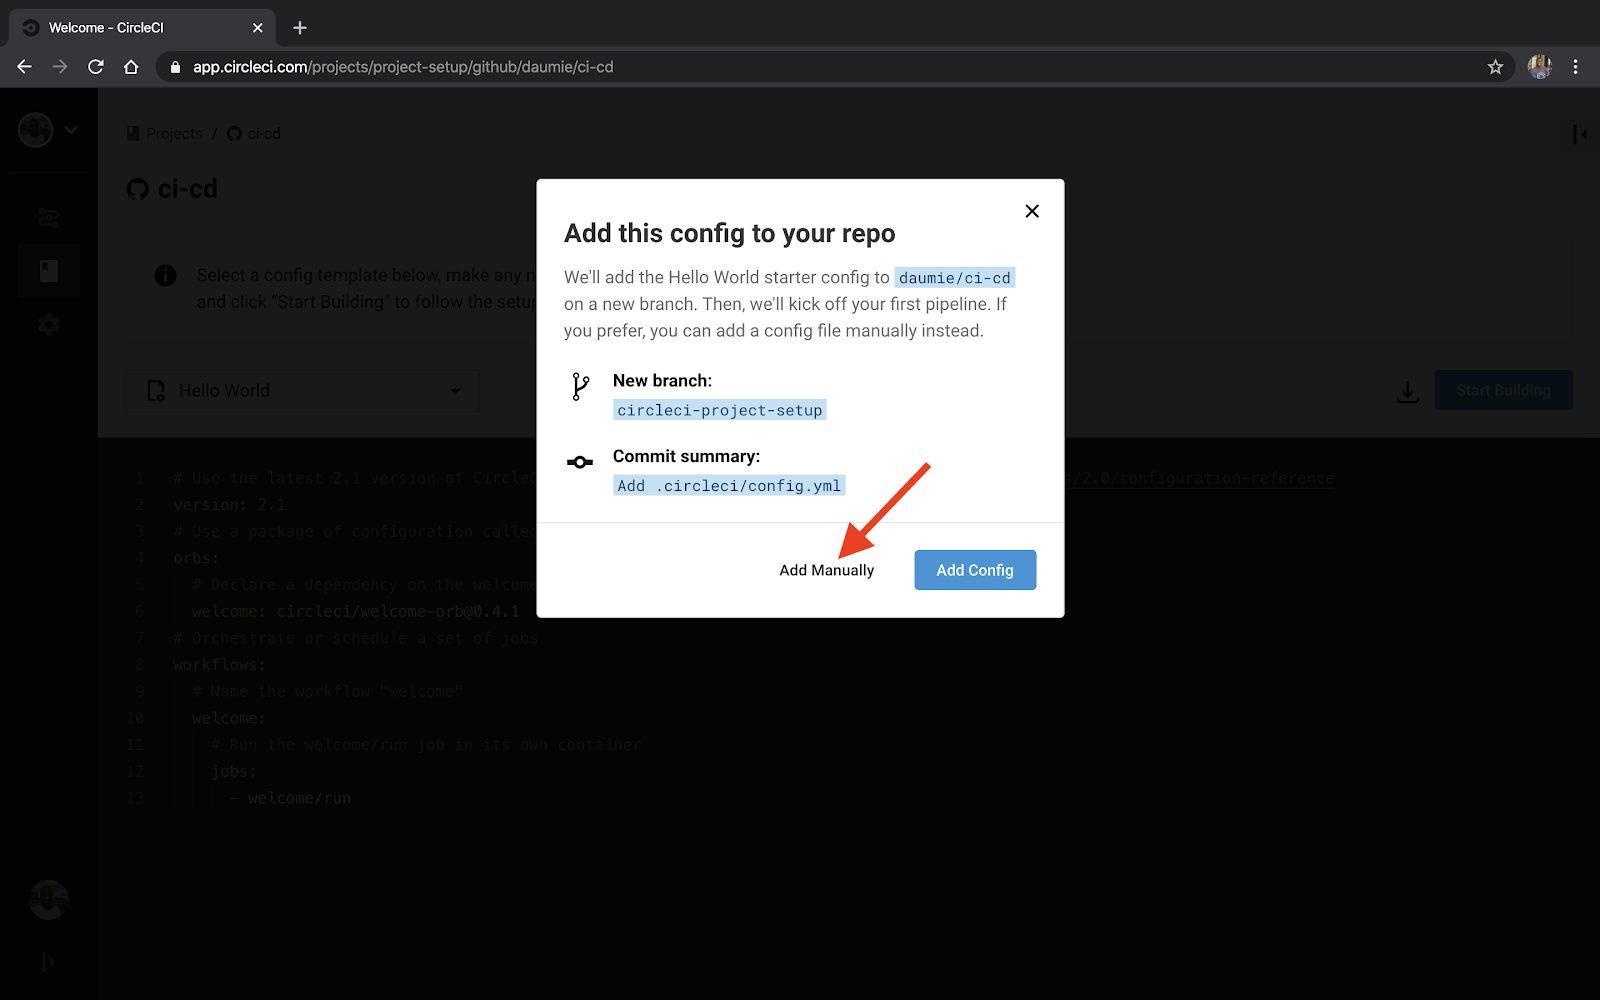
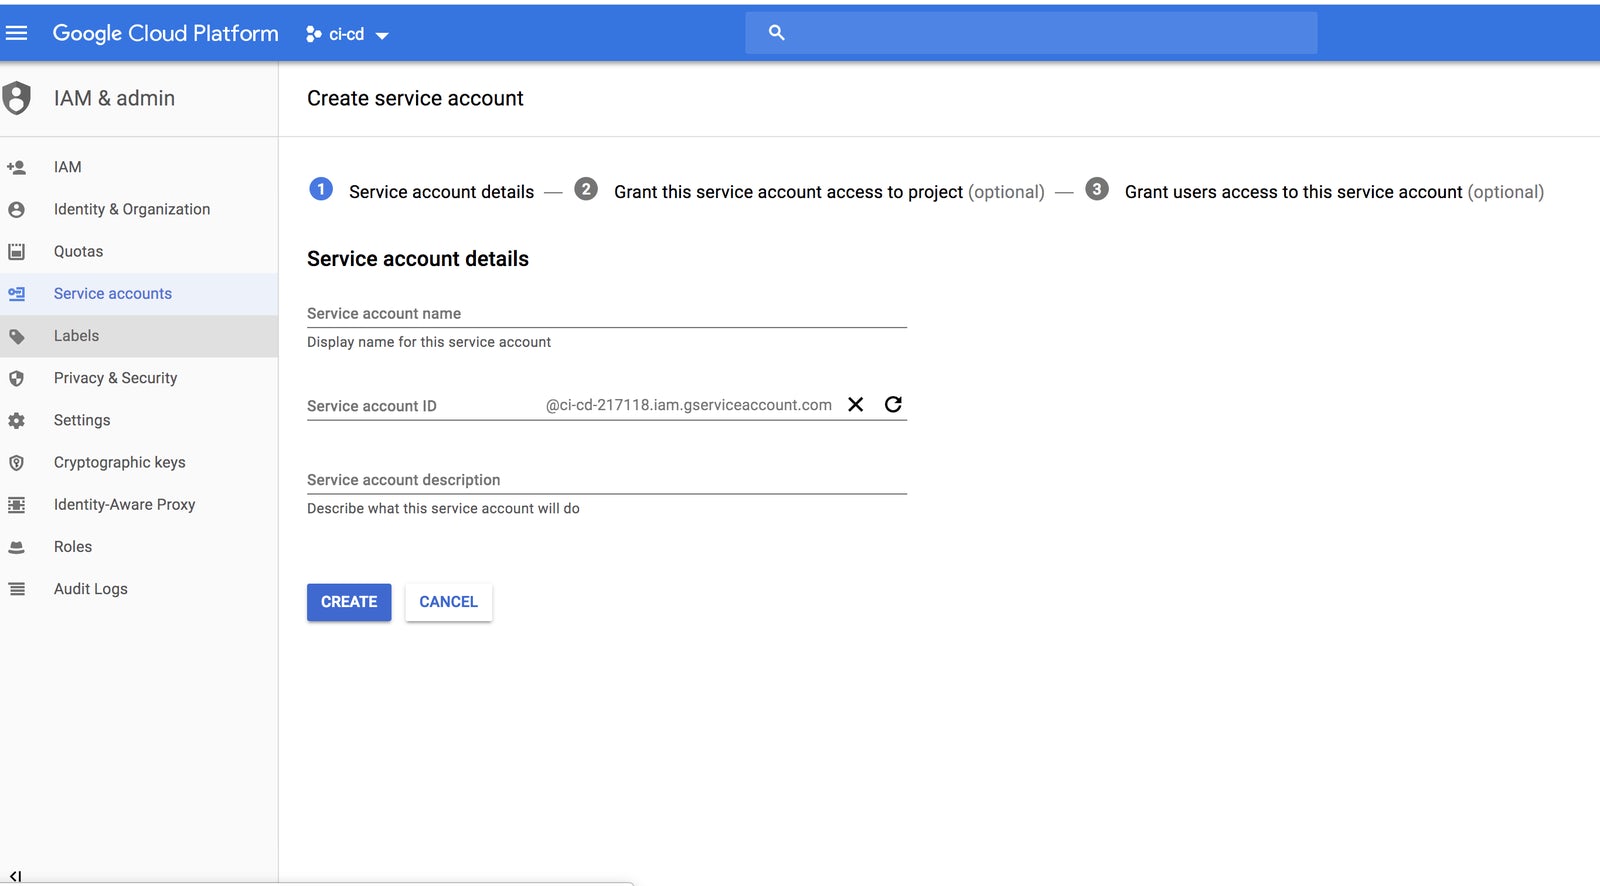
CircleCI will need a way to authenticate itself on GCP. We’ll use a service account. Head over to the GCP console and create a service account by following the steps outlined there.
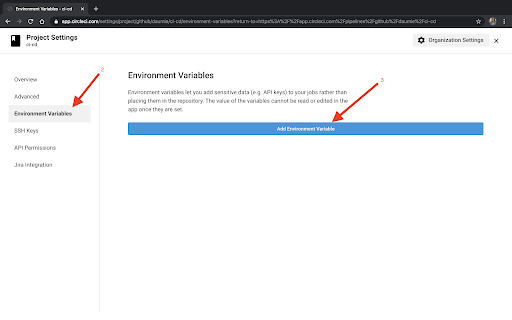
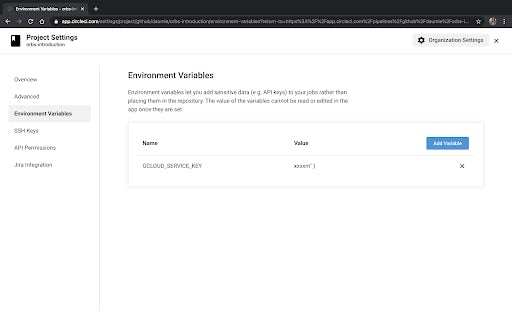
Then, copy the contents of the file that downloaded after creating the service account as an environment variable in CircleCI, first encoding it:
base64 ci-cd-2328-6575986.json
And then copy the result into a CircleCI environment variable.
Testing
Let’s now test our CI/CD pipeline.
This is the initial HTML file. The file should be located in the same directory as the Dockerfile. Please refer to the folder structure of the project I shared above.
<html>
 <head>
  <title></title>
<link href="https://maxcdn.bootstrapcdn.com/bootstrap/3.4.0/css/bootstrap.min.css" rel="stylesheet">
 </head>
 <body>
  <div class="col-md-10 col-md-offset-1" style="margin-top:20px">
   <div class="panel panel-primary">
     <div class="panel-heading">
       <h3 class="panel-title">Welcome To My Demo App</h3>
     </div>
      <div class="panel-body">
       <div class="alert alert-success">
          <p>This is a basic app used to demonstrate CI/CD on Google Cloud using K8s, CircleCI and Docker </p>
       </div>
         <div class="col-md-9">
           <p>Author:</p>
           <div class="col-md-3">
             <a href="https://twitter.com/delan_hype">@delan_hype</a>
           </div>
         </div>
      </div>
  </div>
  </div>
<script src="https://code.jquery.com/jquery-3.1.1.slim.min.js"></script>
<script src="https://maxcdn.bootstrapcdn.com/bootstrap/4.0.0-alpha.6/js/bootstrap.min.js"></script>
 </body>
</html>
Let’s modify it and see if the CI/CD pipeline will deploy the new changes. Try adding something to the body section of the HTML file. For example, replace this:
<p>This is a basic app used to demonstrate CI/CD on Google Cloud using K8s, CircleCI and Docker </p>
With this:
<p>If this change is reflected, then the CI/CD pipeline is functional...</p>
Push the changes to master or merge a PR to master if you were on a different Git branch.
![Successful build steps]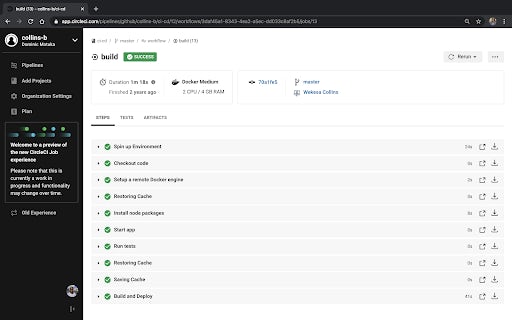

Yay! It worked! You can now play around with the pipeline, but make sure to go through the steps above to delete your cluster and avoid incurring any charges when you are finished.
Conclusion
We’ve successfully set up a CI/CD pipeline for Node.js project using CircleCI 2.0 on GCP. You can now set up a CI/CD pipeline for your own Node.js projects and dockerize and deploy your application to GCP leveraging Kubernetes for orchestration following the steps above!
The complete project can be found here.
Collins Wekesa is a Kenyan DevOps Engineer at Andela and a blockchain enthusiast. In his free time, he enjoys writing technical blog posts.


