
Checkmarx is an industry-leading application security analysis tool. Security is of ever growing importance as IT becomes more integral to business (see how FlexDeploy was affected by the recent log4j vulnerability) and Checkmarx can help find security issues before they become a major problem. In this blog we’ll cover how you can seamlessly and easily integrate Checkmarx into your existing delivery pipelines with FlexDeploy.
Checkmarx Plugin Overview
FlexDeploy’s Checkmarx plugin has the following operations:
FlexDeploy has support for both Static Application Security Testing (SAST) and Open Source Analysis (OSA) scans. SAST scans take in source code and analyze it for any known security issues. OSA scans will take in a build package and analyze if there are any vulnerable libraries included.
There are corresponding run and read operations for each of these types of scans. The run operations will initiate a scan, and then wait or not based on an input. The run OSA scan operation uses anything in the artifact directory and uploads it to scan. This is usually just your build. The read operations will take in a scan id and read that scan.
Now that we understand the Checkmarx Plugin’s different operations, let’s dig into an example of how to integrate this into your existing pipeline.
Setup Checkmarx Account
Before we begin setting up, this example has some assumptions. First, we’ll assume you already have an existing project configured with Git. Second, you have a release and pipeline configured to automatically deploy to Dev, and then to QA with an approval. This should be in line with many use cases, however you may need to modify the example for your use case.
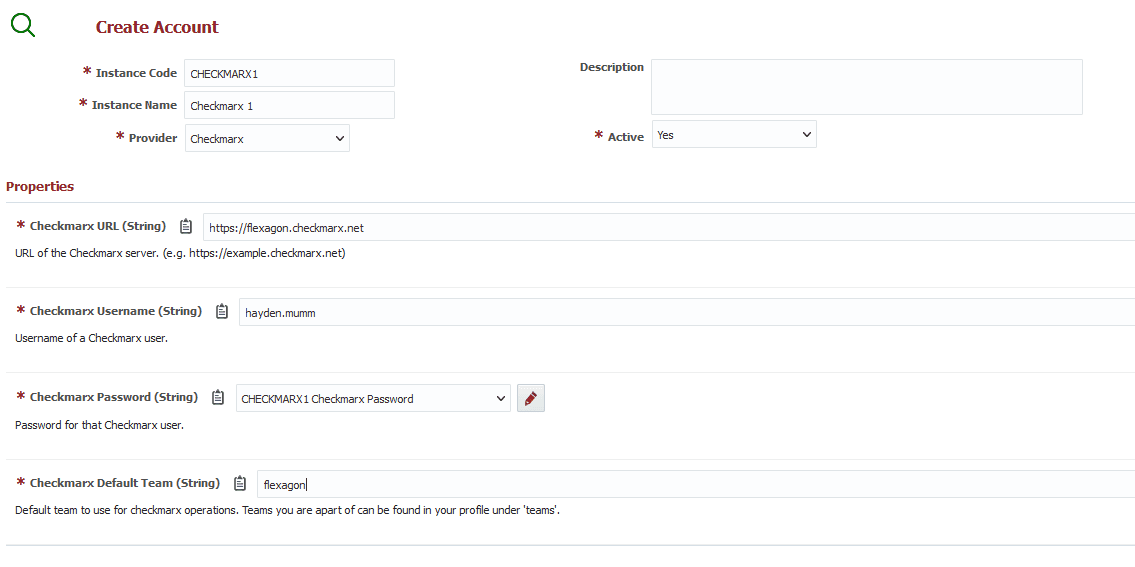
With that out of the way, the first step is to add a Checkmarx account to FlexDeploy. To do this, head to Topology, then Integrations, then Analysis Tool.
Next click the plus button to create an account and select Checkmarx as the provider. Enter an instance code and name. Then fill in the rest of the details of the account similar to the following.
Add Checkmarx Operations to Existing Workflow
In this example we’ll configure Checkmarx to run a SAST and OSA scan using the runCxSASTScan, readCxSASTScan, and runCxOSAScan operations. To configure this in our build Workflow we’ll:
- Identify the correct build workflow.
- Configure the Run CxSASTScan Operation – This will initiate the SAST scan.
- Configure the Read CxSASTScan Operation – This will read the results of the SAST scan.
- Configure the Run CxOSAScan Operation – This will initiate and read the results of the OSA scan.
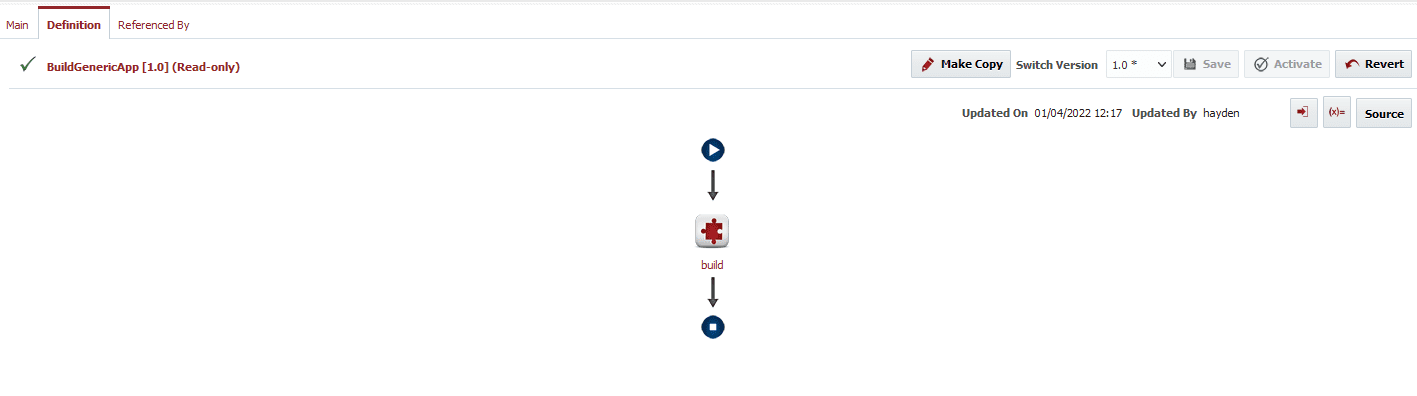
Below is the simple build workflow we are starting with.
RunCxSASTScan operation
Variables
Begin by setting the workflow variables like the following.
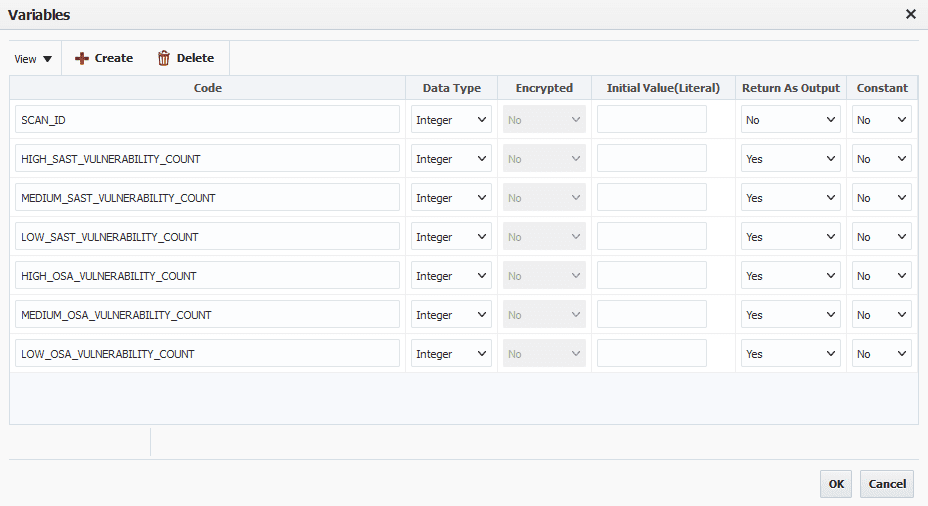
SCAN_ID will be used to pass the scan id from the run operation to the read operation. More on this later.
The vulnerability counts will be used to determine the status of a gate in our pipeline, which is why they need to be Outputs.
Inputs
Next let’s add the runCxSASTScan operation. Here is our configuration for the inputs.
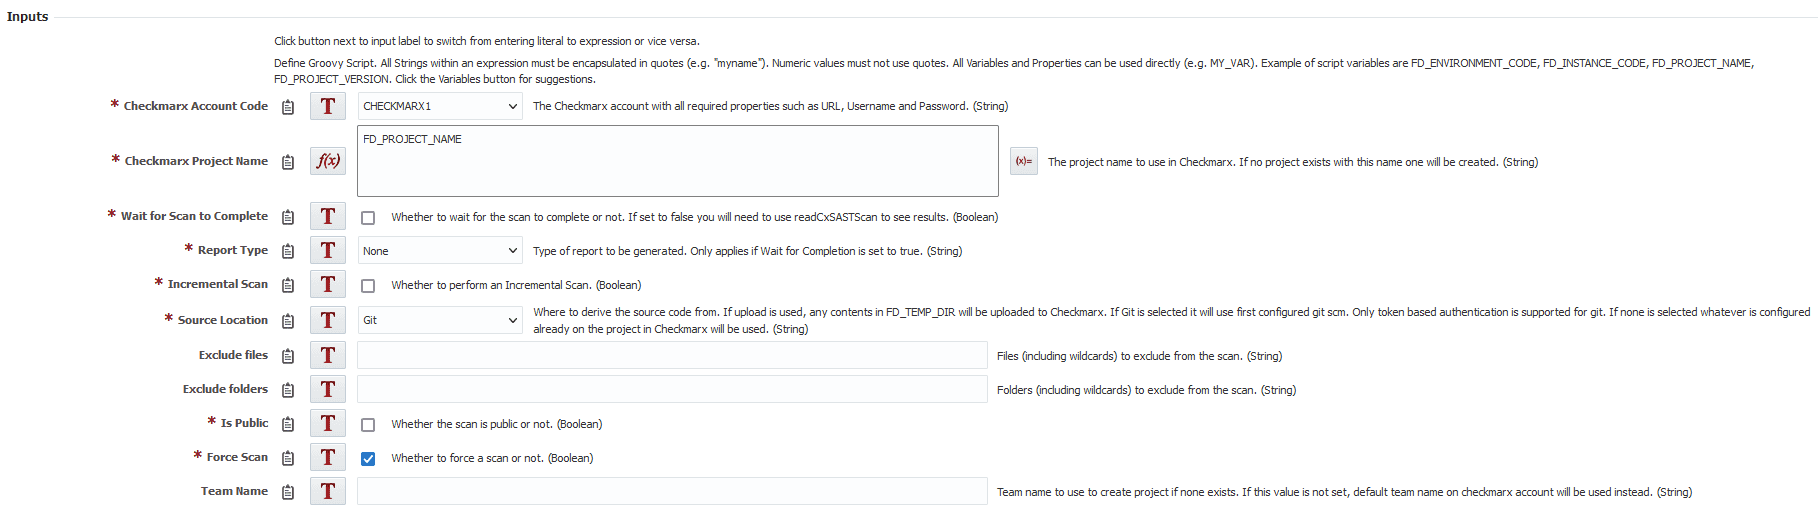
Here’s a description of what and why we want these options for each input:
- Checkmarx Account Code – The account you created earlier.
- Checkmarx Project Name – The name of the project in Checkmarx used to run the scan. We are using the default, and passing in whatever the name of our project in FlexDeploy is. If no project exists with this name, one will be created. In this case this is what we want to happen since we have not yet configured anything in Checkmarx for the project.
- Wait for Scan to Complete – We do not want to wait for this scan to complete. That way while the scan is running we can run our build. So this operation will initiate a scan, then our build will run and then we will wait for the scan to finish and read the results.
- Report Type – This only matters if you are waiting for the scan to complete.
- Incremental Scan – We’ll want to do a full scan every time.
- Source Location – We’re going to choose git since this project has already been configured with Git. It will automatically update the git details of the project in Checkmarx so we do not have to configure anything.
- Exclude Files – We don’t want to exclude any files.
- Exclude Folders – Same thing for Folders.
- Is Public – We’ll keep this scan as private.
- Force Scan – We’ll force this scan to run every time.
- Team Name – This can stay blank since we set the default team to the team we want.
Outputs
For the outputs put the scan id into the SCAN_ID variable we created, so we can use it to read the scan later.

ReadCxSASTScan operation
Inputs
Place the read operation after the build. Here is what the inputs will look like.

- Checkmarx Account Code – Same account code as before
- Checkmarx Project Name – Same project name as before
- Report Type – We’ll generate a PDF report, which can be viewed on the reports tab of an execution.
- Scan Id – Input the scan id we stored into a variable. Make sure you change from a literal to an expression to use that variable.
Outputs
For the output we want to output the different vulnerability counts to the previously created variables like this.

RunCxOSAScan operation
Inputs
Place the run OSA operation after the read SAST operation. Here are the inputs.

- Checkmarx Account Code – Same account code as before.
- Checkmarx Project Name – Same project name as before.
- Wait for Scan to Complete – Our build is already complete so we have nothing else to wait for. Let’s just wait for the scan to complete here.
- Scan Directory – Use the artifacts directory where our build was created.
Outputs
Put our vulnerability counts into the outputs.

FlexDeploy offers plugins for many SAST and DAST tools, allowing users to seamlessly integrate industry-leading scanning tools into your current DevOps practices.
Result
Here’s what our workflow looks like now that it’s complete.

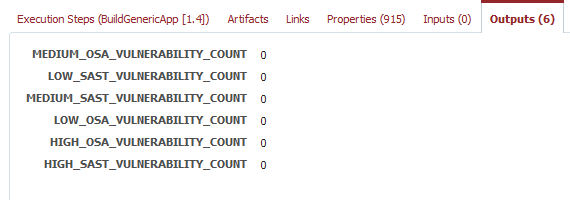
Next we can run a build on our project and make sure everything is working correctly. We can view our vulnerability counts on the outputs tab.
And on the reports tab we can see our generated report is available to download.

Add Custom Gate To Pipeline
In this section we are going to:
- Identify the correct pipeline.
- Add a custom gate to the necessary stage to control if the SAST scan was acceptable.
- Add a custom gate to the necessary stage to control if the OSA scan was acceptable.
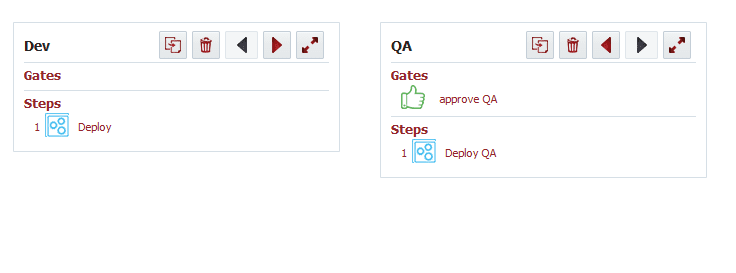
Here is a basic pipeline example we are starting with. This pipeline is deploying to Dev, then waiting for a manual approval and deploying to QA.
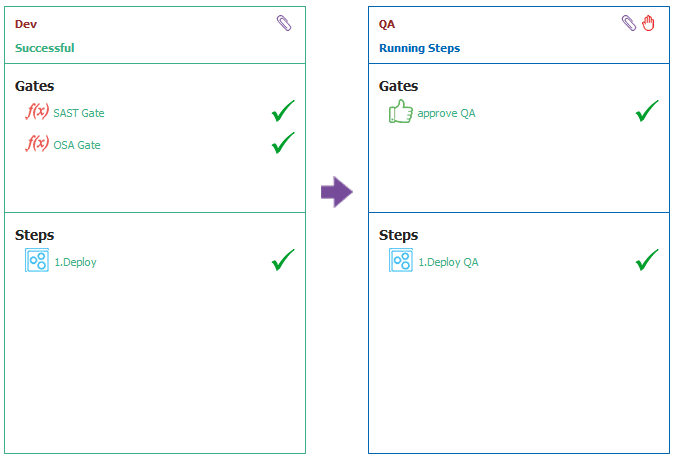
Let’s add two custom gates for the Dev environment, so it only gets deployed if no vulnerabilities were found in either scan. Here’s what that script will look like for the SAST scan gate.
highSastCount = stgexec.getProjectWorkflowOutputValues("HIGH_SAST_VULNERABILITY_COUNT")[0];
mediumSastCount = stgexec.getProjectWorkflowOutputValues("MEDIUM_SAST_VULNERABILITY_COUNT")[0];
lowSastCount = stgexec.getProjectWorkflowOutputValues("LOW_SAST_VULNERABILITY_COUNT")[0];

if(highSastCount > 0 || mediumSastCount > 0 || lowSastCount > 0)
{
  return "FAILED";
}
else {
 return "SUCCESSFUL";
}
stgexec.getProjectWorkflowOutputValues returns an array of the values from every output with that name. In our case we only have one for each variable output, so we assume it’s at the 0 index in the array and get that value. Then we check if the values are greater than 0 and fail if they are, otherwise it was successful and we can pass through the gate. This script could easily be modified to allow different counts for each level or whatever else you might need.
Next let’s add a separate gate for OSA vulnerabilities. It will be very similar.
highOsaCount = stgexec.getProjectWorkflowOutputValues("HIGH_OSA_VULNERABILITY_COUNT")[0];
mediumOsaCount = stgexec.getProjectWorkflowOutputValues("MEDIUM_OSA_VULNERABILITY_COUNT")[0];
lowOsaCount = stgexec.getProjectWorkflowOutputValues("LOW_OSA_VULNERABILITY_COUNT")[0];

if(highOsaCount > 0 || mediumOsaCount > 0 || lowOsaCount > 0) {
  return "FAILED";
} else {
  return "SUCCESSFUL";
}
Here’s what a successful snapshot looks like.
As you can see from this example, the Checkmarx plugin has been designed to be very easy to integrate within your existing pipeline. You get the advantages of a highly customizable tool like FlexDeploy paired with the security power of Checkmarx.
Interested in integrating with another analysis tools? FlexDeploy also has plugins available for:
Want to learn more about the Checkmarx plugin? Check out our plugin guide.