

If you work with video on the internet, you know how resource-intensive encoding can be. While moving from in-house to cloud-hosted servers can save you a lot of money, that doesn’t change the fact that processing large videos with modern codecs takes significant computing power.
“Video transcoding is one of the most computationally challenging things you can do right now. As we’re moving toward more advanced codecs, those challenges become even bigger… [Bitmovin is] trying to deliver the best quality per bit so we can reach users on their mobile device or lower quality connections, while saving on their CDN spend.” – Paul MacDougall, Principal Sales Engineer, Bitmovin
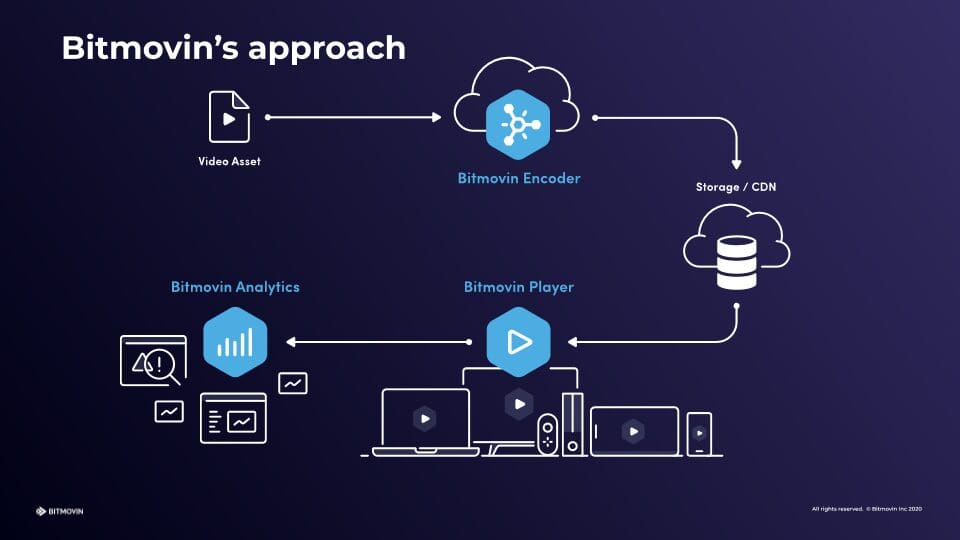
Bitmovin’s video-encoding service and its unique parallelized architecture gives your developers access to the best codecs and encoding algorithms in the industry, allowing them to efficiently transcode videos in the cloud without maintaining their own custom software or hardware. This is how you can set up your very own cloud-based encoding workflow using Bitmovin Encoding with AWS.
Why Per-Title Encoding?
One of the biggest advantages of using Bitmovin is per-title encoding. Unlike standard encoding ladders, Per-Title Encoding offers you the best perceivable quality at the lowest possible bitrate. This can lead to fewer encoded files to store and lower bandwidth usage when your video is streamed.
When you compare Per-Title and standard encoding, you’ll notice that the video quality is essentially the same, but the bitrate savings are significant.

Serving video at a lower bitrate means you will stream less data, which in turn means lower hosting costs. As you can see from some of the data obtained during Bitmovin’s AWS Hackathon in 2020, Per-Title Encoding can lead to a large cost saving compared with a standard ladder (up to 69% for some of the assets used in this particular application).
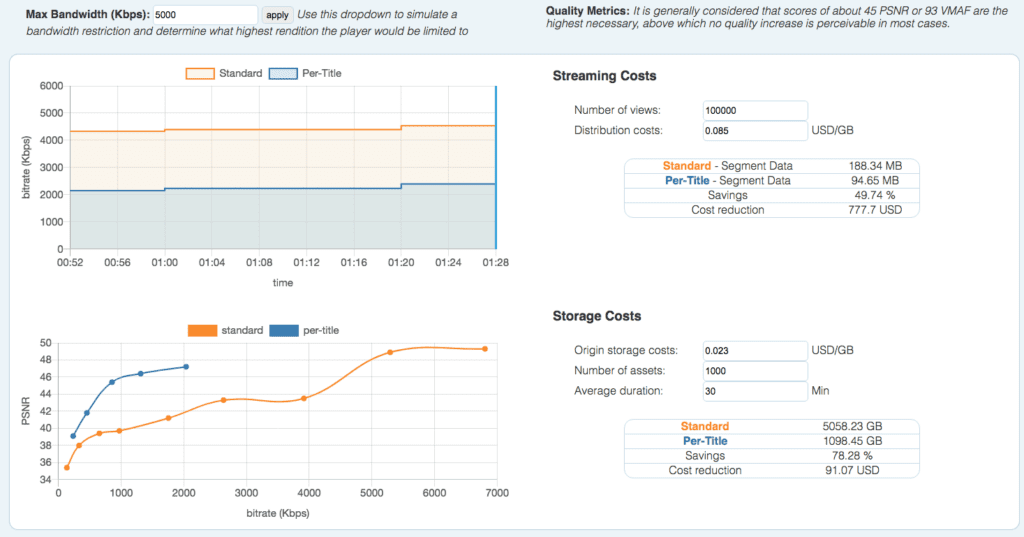
Finally, Per-Title Encoding typically means fewer encoded files to store, which also reduces your hosting costs. While results will vary depending on the complexity of your video, Per-Title Encoding is almost always the right choice, as it optimizes the ladder for every asset individually.
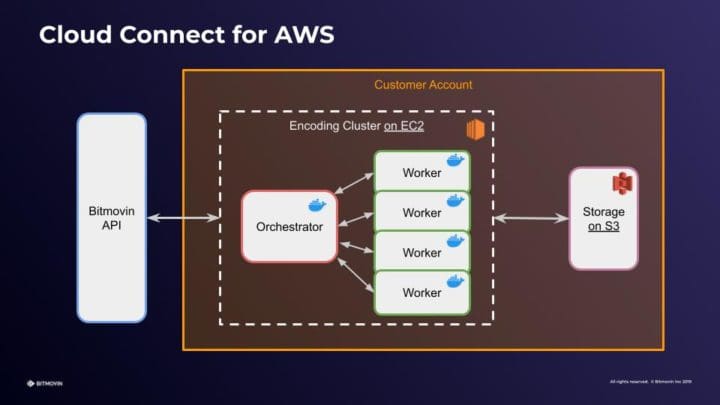
Bitmovin Cloud Connect on AWS
With Bitmovin’s new Cloud Connect encoding option, you can now deploy Bitmovin’s software to your own public cloud account, including Amazon Web Services.
Bitmovin’s Cloud Connect option can help you further reduce your costs, allowing you to take advantage of bulk pricing deals by letting you run Bitmovin’s encoding process on your own AWS infrastructure, including with the Per-Title algorithm. Cloud Connect also gives you more control over how your infrastructure is deployed and lets you apply your own security policies while getting complete access to Bitmovin’s robust software and auto-scaling for maximum performance.
Per-Title Encoding in the Real World using Cloud-Based Workflows (with AWS)
In this three-part series, you’ll see how to deploy a real-world application that uses Bitmovin’s Per-Title Encoding in a standard cloud-based AWS workflow and with Cloud Connect. This series is based on a workflow that we built in a 2-day winter 2020 hackathon between Bitmovin and AWS.
This first part will give you an overview of the high-level architecture and AWS resources you need to run Bitmovin Per-Title Encoding. In the second part, we’ll dive into the code so you can see some of the important details your engineers will need to run encoding on your AWS architecture with the Per-Title algorithm, and in the third part, you’ll learn how to use the Bitmovin Player to gather analytics and examine how users are consuming your videos in real-time.
What We’re Building
This demo application allows users to upload a video, and then view that video. Behind the scenes, we’ll use both our classic Bitmovin Per-Title as well as our new Cloud Connect options to process and encode the video using a Per-Title ladder.
Before starting, it’s important to understand Bitmovin’s services. We offer three services that will be used throughout this application:
– Encoder: Breaks the uploaded video into chunks, transcodes each piece, and stitches them back together when complete.
– Player: Allows users to view the transcoded video on any device and any browser.
– Video Analytics: Give you insight into how users interact with your video, their bitrate, and the amount of data streamed.
When using Cloud Connect, you still use the Bitmovin platform via its APIs to orchestrate your encoding workflow, but the encoding tasks are performed in your own AWS account. While Cloud Connect runs on your infrastructure, Bitmovin handles most of the hard work of scaling up the number of instances for encoding, so you’ll just need a few Amazon services to glue the pieces together.
Key AWS Services
AWS has several great products that we’ll use together to handle authentication, file uploads, calling the Bitmovin API, and storing transcoded files and URLs. Let’s look at the key pieces required for this application and what their roles are.
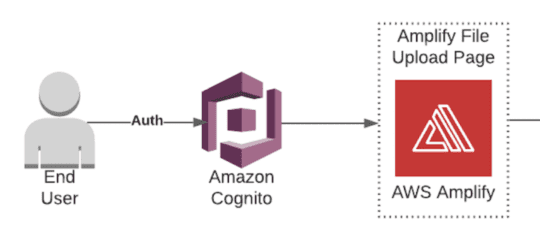
Cognito
AWS Cognito handles user authentication so that only authenticated users can upload a video to your portal. While you could build your own authentication, Cognito saves you a lot of time by integrating with your existing SSO solution and Amazon’s other services.
Amplify
AWS Amplify will power your upload page. It integrates with Cognito and AWS’s various data storage options, so you can focus on the core parts of your application logic rather than the glue that moves data into and out of your backend.
Simple Storage Service (S3)
AWS S3 offers fast, affordable file hosting. We’ll use it to store the raw video files uploaded by users and the encoded files processed by Bitmovin.
Lambda
AWS Lambda is Amazon’s serverless hosting option, which allows you to write a few lines of code and instantly make them available to run in the cloud rather than having to build and deploy a robust application from scratch. Our Lambda functions will trigger the Bitmovin encoding cluster and handle the results when the encoding is finished.
EC2
Bitmovin’s encoder runs on Amazon EC2 and takes advantage of the pricing discounts for Spot Instances to help you keep your costs low. While you won’t need to manually spin up any EC2 instances to process videos (Bitmovin handles this for you), it may be helpful to know that this is what’s running under the hood.
API Gateway
Amazon API Gateway will provide a webhook URL that Bitmovin will notify when encoding is complete. API Gateway can then pass data to other Amazon services, so we’ll use it to post encoding information when the processing of a new video is done, to trigger our post-processing Lambda.
DynamoDB
Amazon’s proprietary database, DynamoDB, will store the encoded videos’ URLs. The Bitmovin Player will use these URLs to stream video to the user at the appropriate bitrate and resolution.
CloudFront
Finally, we’ll use AWS CloudFront to cache the encoded video files. A CDN is essential for streaming video because it ensures that viewers around the world will be able to watch your videos with minimal latency.
Building a Cloud-based Encoding Architecture with AWS
Now that we’ve reviewed how each Amazon service will be used, let’s walk through the flow of data through your application.
There’s a lot going on in the diagram above, so let’s break it down:
- A user logs in using Cognito and is directed to a simple upload page hosted on Amplify.

- The user can upload a file, which is then stored in an S3 bucket.
- An S3 event notification triggers a first Lambda function.
- The Lambda function configures and triggers a new Bitmovin encoding using the API, taking as parameter the new file’s location on S3.
- Bitmovin spins up Spot Instances as needed to encode the file, and saves the outputs of the encoding to another S3 bucket.
- On completion (or failure) of the encoding, Bitmovin calls a webhook hosted on Amazon API Gateway.
- The API gateway endpoint triggers a second Lambda function, which retrieves the manifest URLs from the finished encoding job.
- The Lambda saves these URLs to DynamoDB along with some video metadata.
- The Demo Page with embedded Bitmovin player retrieves the data from DynamoDB and triggers playback.
- The video files are served from S3 through CloudFront to the Bitmovin Player.
- The Player sends data to Bitmovin Analytics.
The application built for the Bitmovin-AWS hackathon actually triggered 2 encodings, one for a static ladder and the other one with Per-Title. This allowed us to compare and contrast the two types of encodings. It goes without saying that you are unlikely to need to do this in a real-life application, but the principles remain the same. We will highlight in the remainder of this 3-part blog when a step is taken specifically to enable this demo use case.
Other Options
While the architecture discussed here takes advantage of many of AWS’s latest services and features, you might want to integrate the Bitmovin Encoder into an existing application that’s set up very differently. Fortunately, the encoder can be called from any codebase and Bitmovin offers SDKs and getting started guides for using the API.
For example, you don’t need to use Lambdas to call the Bitmovin API or API gateway to listen for the completed encoding jobs. You can easily call the encoder’s API from an application deployed to EC2 or ECS. Similarly, there’s no reason you have to use DynamoDB (or a NoSQL data store at all) if you prefer MySQL or Postgres.
What’s Next?
Now that you have a high-level view of how you can deploy Bitmovin Per-Title Encoding with Cloud Connect to your AWS account, you’re probably ready to see some real API calls so you can replicate this yourself. In the next part of this series, I’ll get more tactical, showing some of the code you can use to run this application. Finally, in the third part of this series, you can learn how to use Bitmovin Analytics to understand how your users interact with your content delivered through the player.
In the meantime, you can check out our API documentation or our step-by-step tutorial for deploying Cloud Connect to learn more. When you’re ready to implement Bitmovin, contact us so we can help you get started.