
This is the first blog in the FlexDeploy Loves OIC blog series:
- FlexDeploy Loves OIC: Series Overview
- FlexDeploy Loves OIC: Manage Integrations with Connections
- FlexDeploy Loves OIC: Manage Connection Property Replacement
- FlexDeploy Loves OIC: Continuous Integration
- FlexDeploy Loves OIC: Automated Testing
- FlexDeploy Loves OIC: Continuous Delivery with Pipelines and Releases
- FlexDeploy Loves OIC: Manage Connections, Lookups and Libraries
Oracle Integration Cloud (OIC) provides the ability to develop an integration in the cloud. The integration can connect cloud and/or on-premise applications, however, these integrations are maintained directly in the cloud and not in any Source Code Management (SCM) system. Deploying an integration from one OIC instance to another OIC instance is a manual process. It requires exporting an integration from one instance and importing that integration into the next instance. In addition, the associated connections must be sync’d between instances. Due to the manual nature of managing the integrations, there is very limited delivery lifecycle management.
FlexDeploy provides build, deploy, release automation and delivery lifecycle management to eliminate the manual deployment process and easily show what integration version is in which environment. In this blog, we will show how to configure FlexDeploy to
- communicate with an OIC instance
- export/import an integration
- manage the associated connections in a single operation to simplify the integration deployment
At a high level we will walk through the following steps:
- Create the workflows for building and deploying OIC Integrations
- Create the OIC Cloud Account
- Update all of the topology with the Cloud Account
- Configure the Project
- Revel in our glorious work
The setup process outlined throughout this article can be expedited by using FlexDeploy Blueprints.
Ditch limited delivery lifecycle management and switch to agile, high quality, and cost-effective software delivery.
Workflows
This section will walk through the process of creating the build and deploy workflows for OIC. The source code for the workflows is available here:
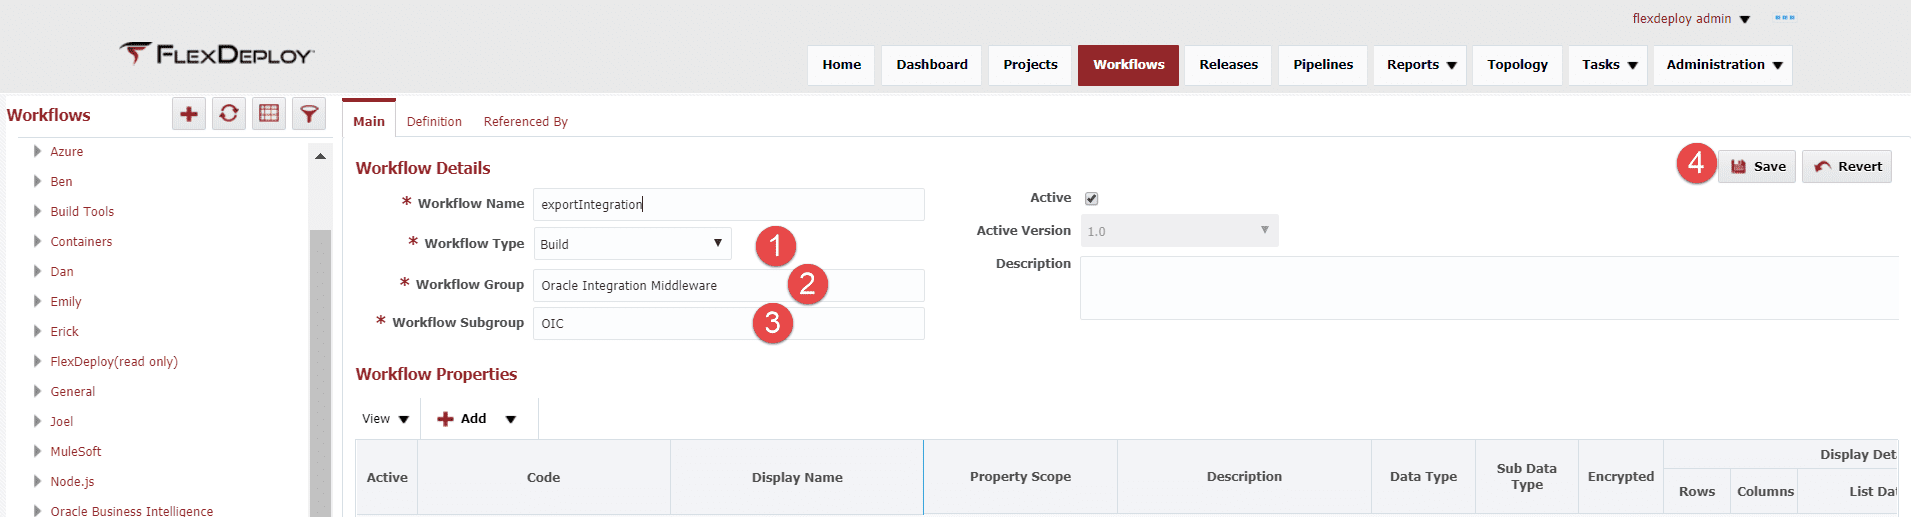
To create the build workflow, select Workflows and click on the plus icon in the upper left corner to create a new workflow. This will be the configuration for the build workflow:
After clicking on Save, the Definition tab will be available. Click on the Definition tab to configure the workflow. Workflows are sequences of plugin operations that will be executed by FlexDeploy to achieve the build process. Workflows can be as simple or as complicated as needed. Drag the exportIntegration(Oracle Integration Cloud) operation from the plugin palette (lower right pane) on to the workflow canvas. Once the operation is placed on the canvas, it will open up for additional configuration as shown below.
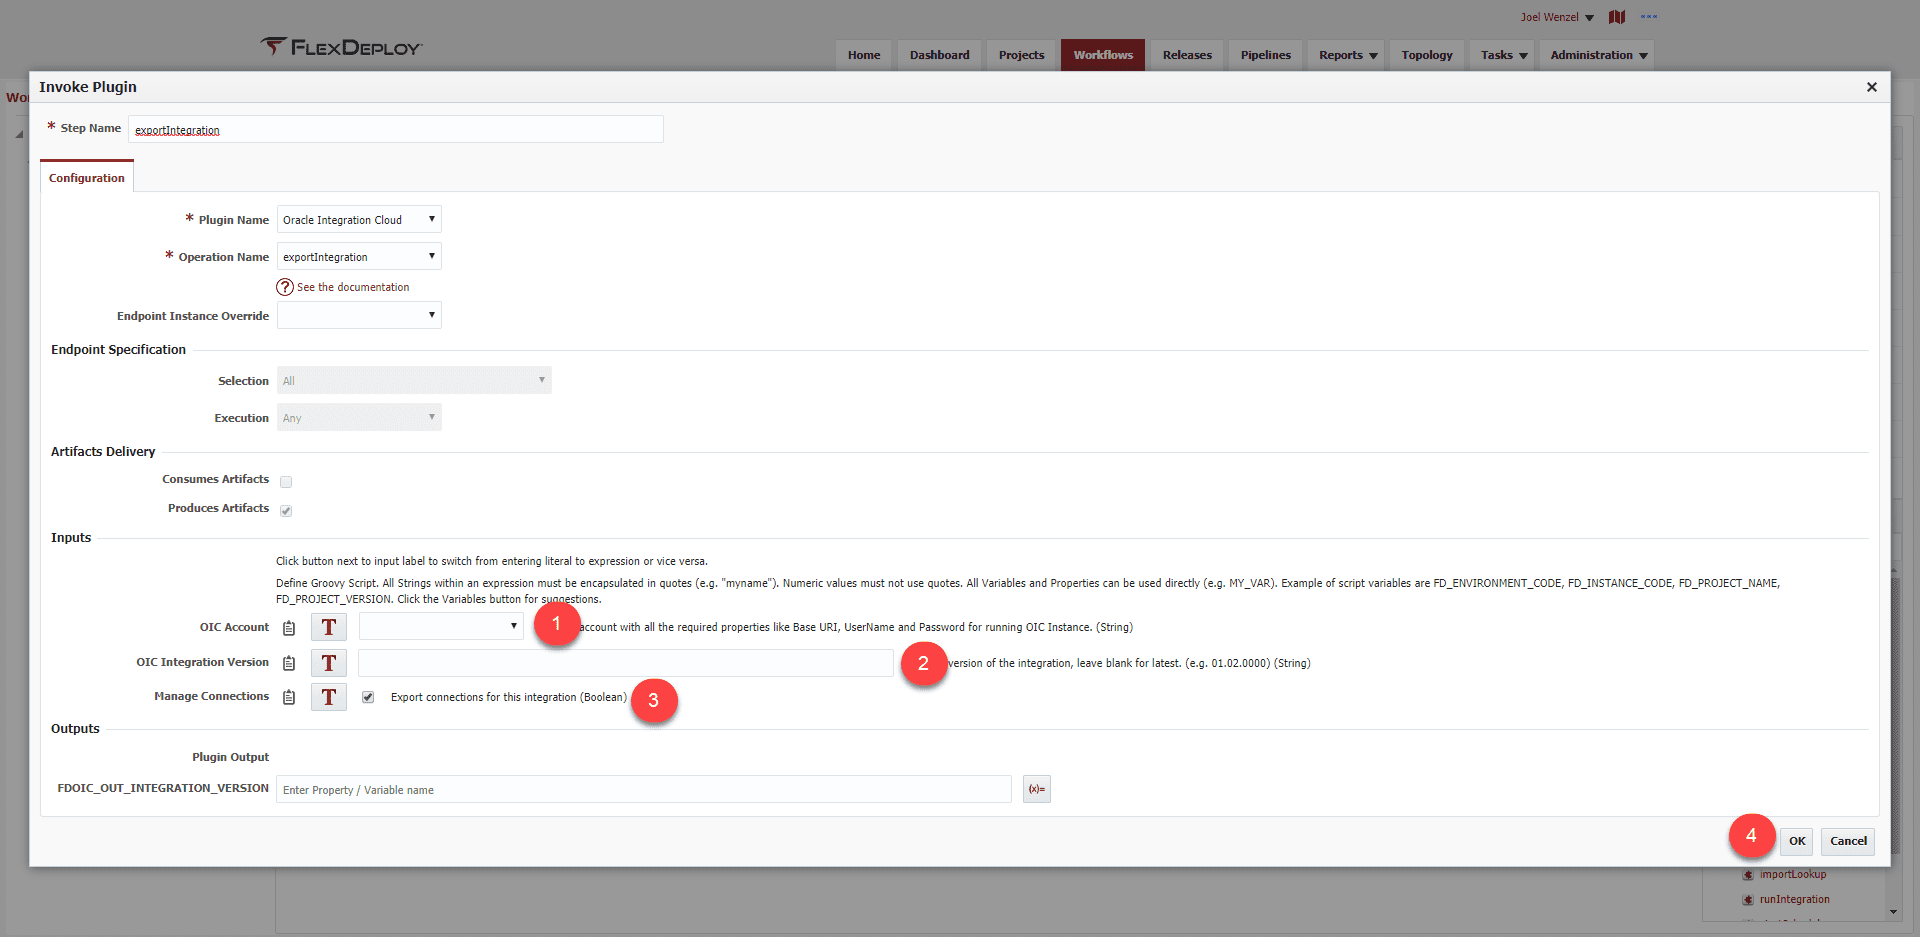
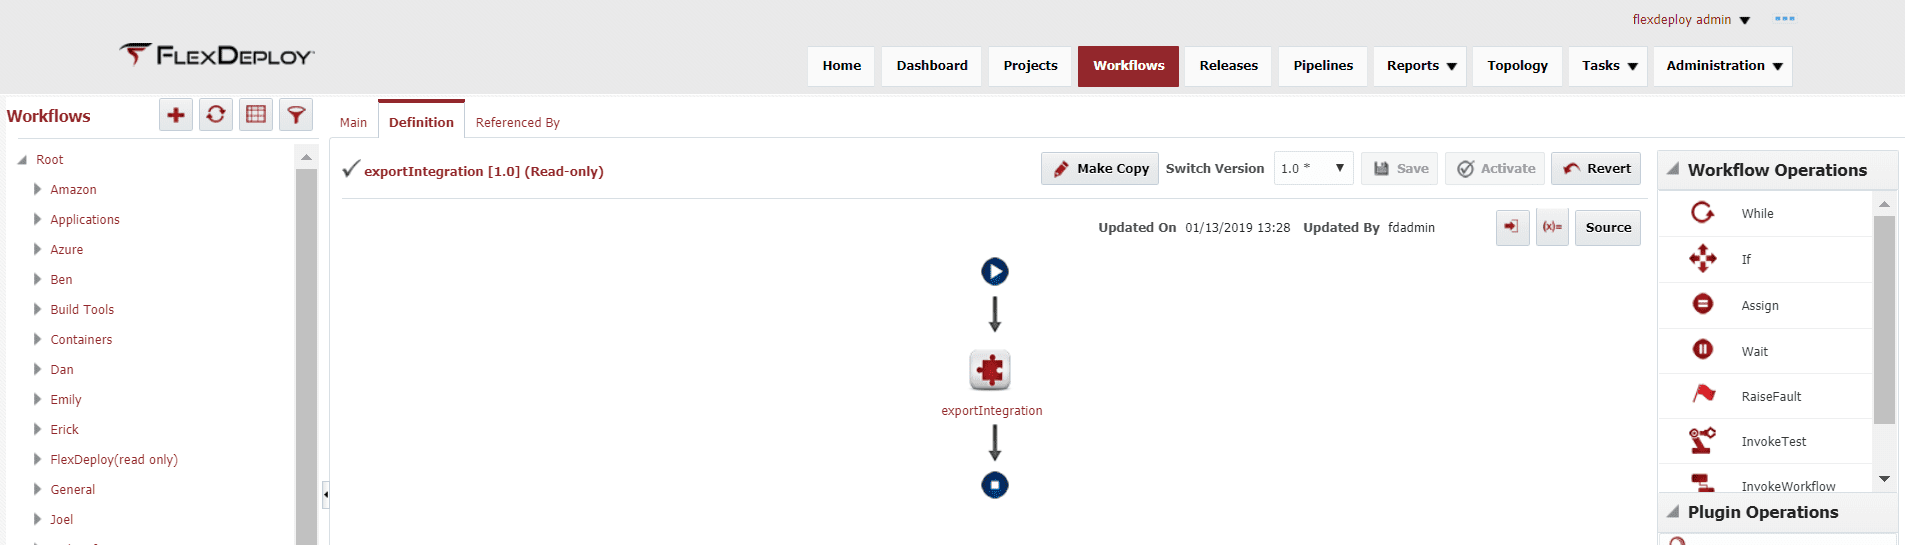
There are 3 inputs that can be configured and we will leave everything as defaulted. If Manage Connections is unchecked, the user will have to manage the connections in a different manner such as using the exportConnections/updateConnections operations within the same or a different workflow. Click OK and head back on the definition page, we need to activate this workflow so it can be executed. The workflow should look like this:
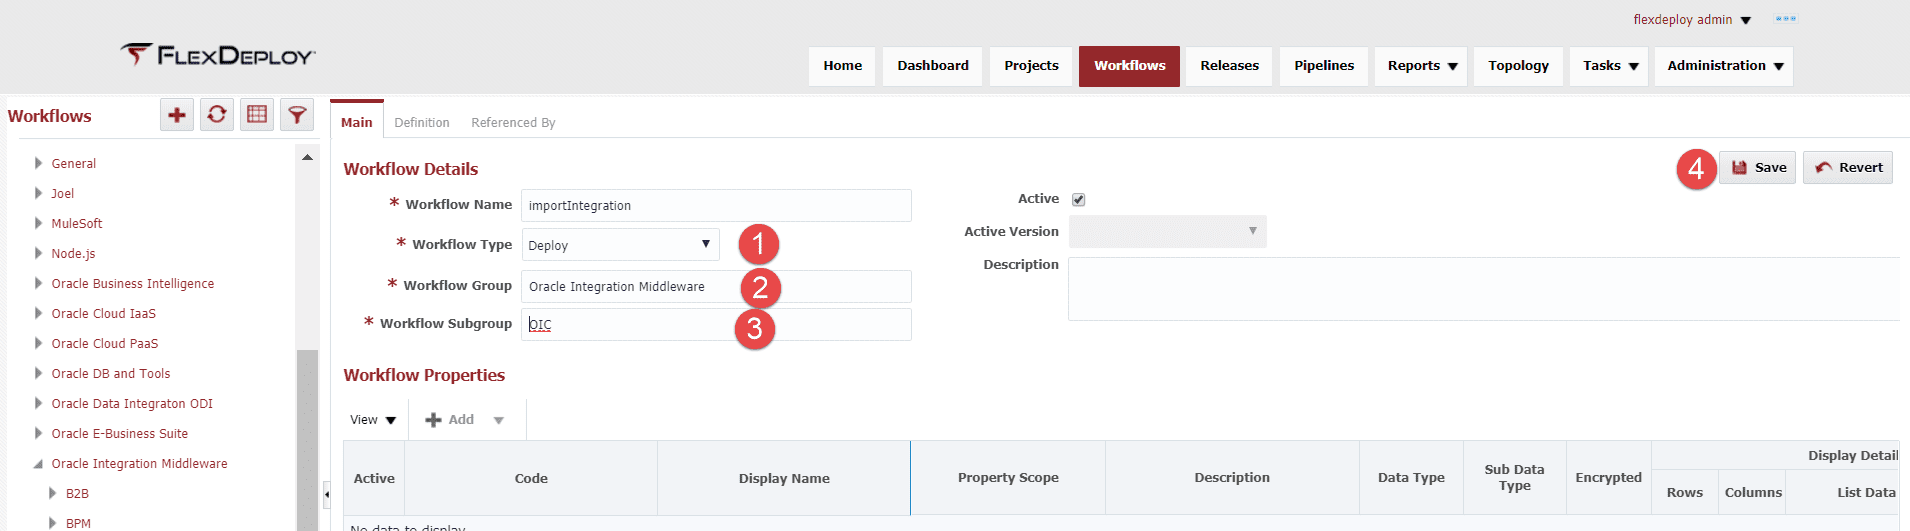
Now we need to create the deploy workflow. Select Workflows and click on the plus icon in the upper left corner to create a new workflow. This will be the configuration for the deploy workflow:
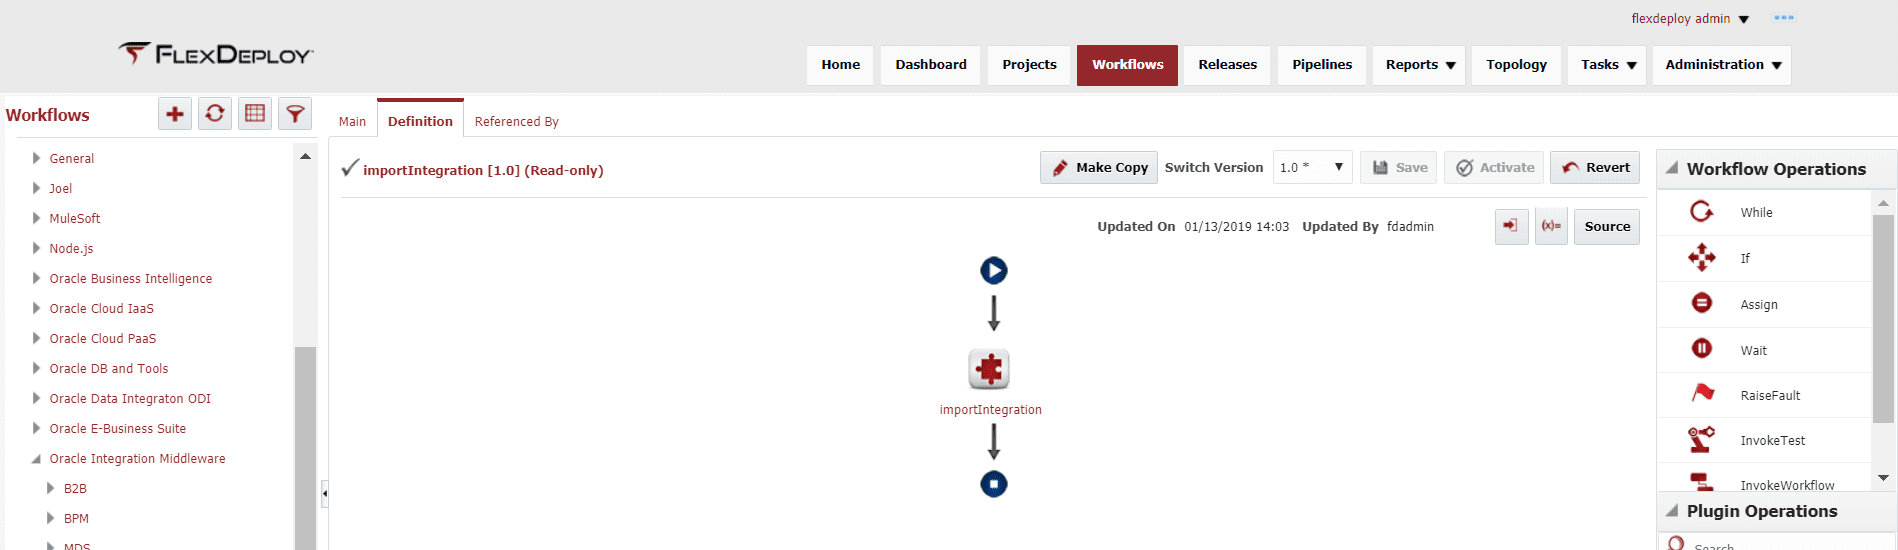
After clicking on Save, the Definition tab will be available. Click on the Definition tab to configure the workflow. We only need to import the integration so drag the importIntegration (Oracle Integration Cloud) operation from the plugin palette (lower right pane) on to the workflow canvas.
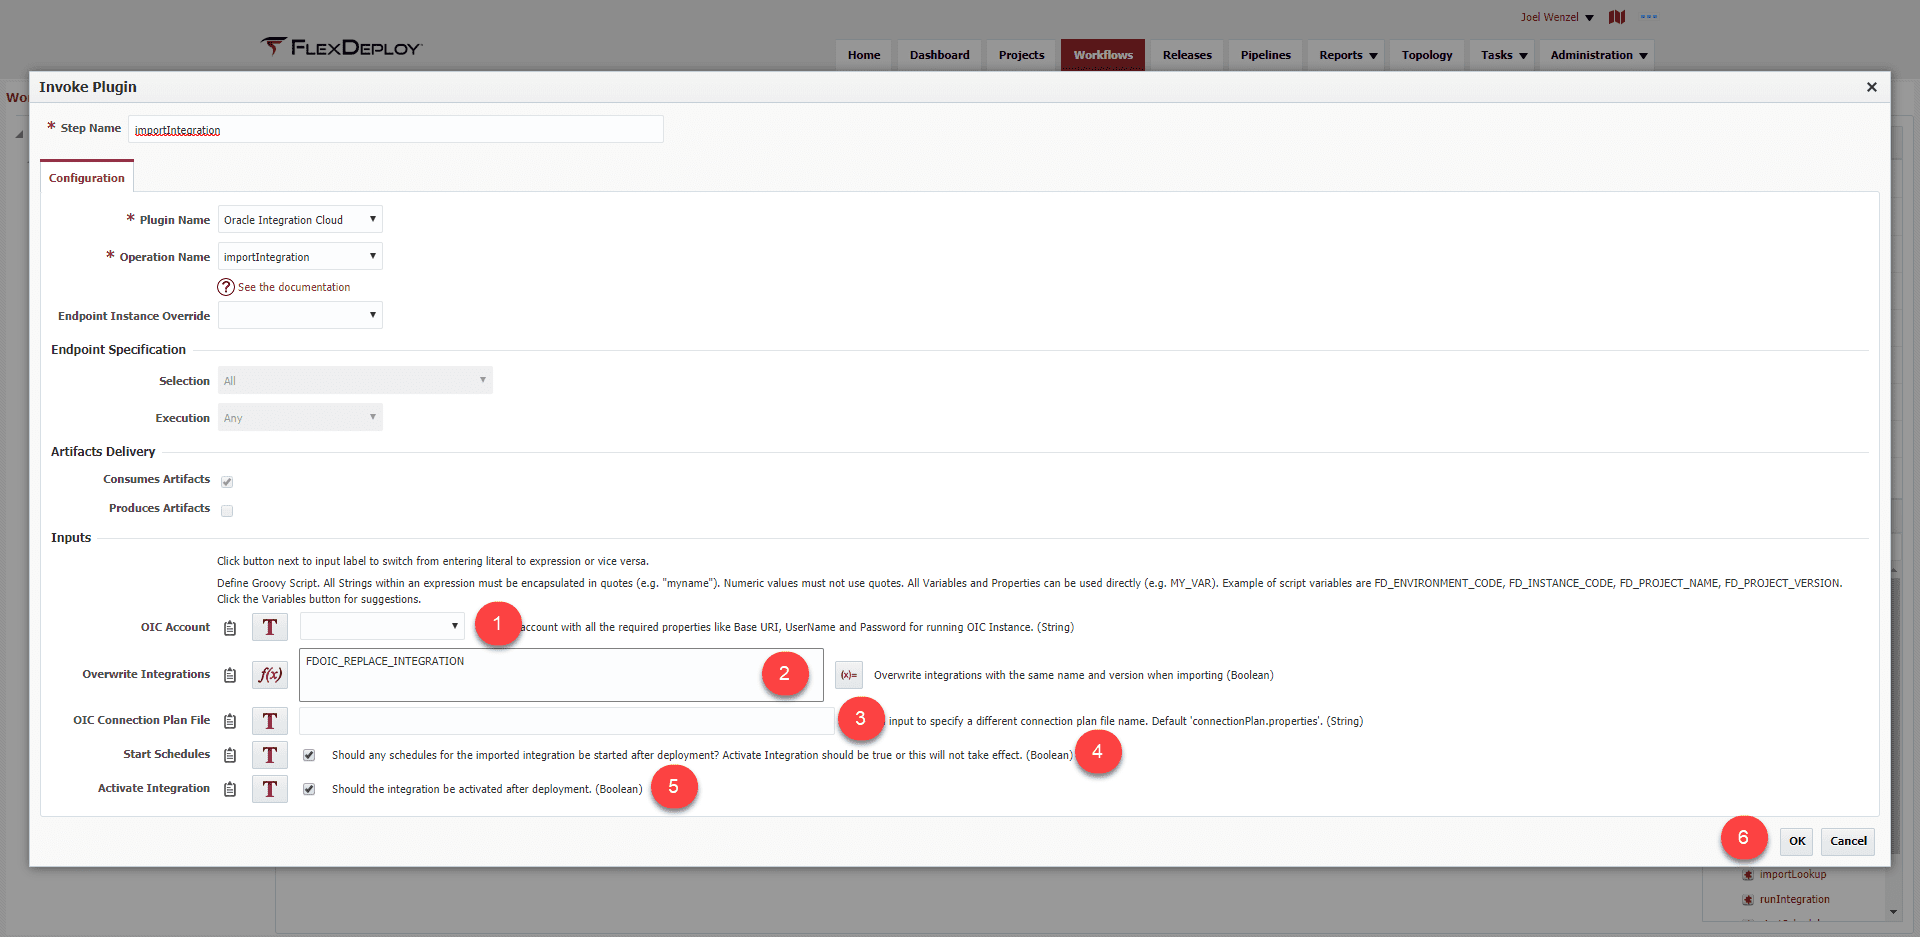
Similar to the build workflow, we are going to leave everything as default here. The most noteworthy input, OIC Connection Plan, allows the user to provide a connection plan file that would allow a connection property to be changed by environment through the use of FlexDeploy property replacement. If no file is provided, the connection information will be the same in each environment. Click OK, and activate the workflow. The workflow should look like this:
Cloud Account
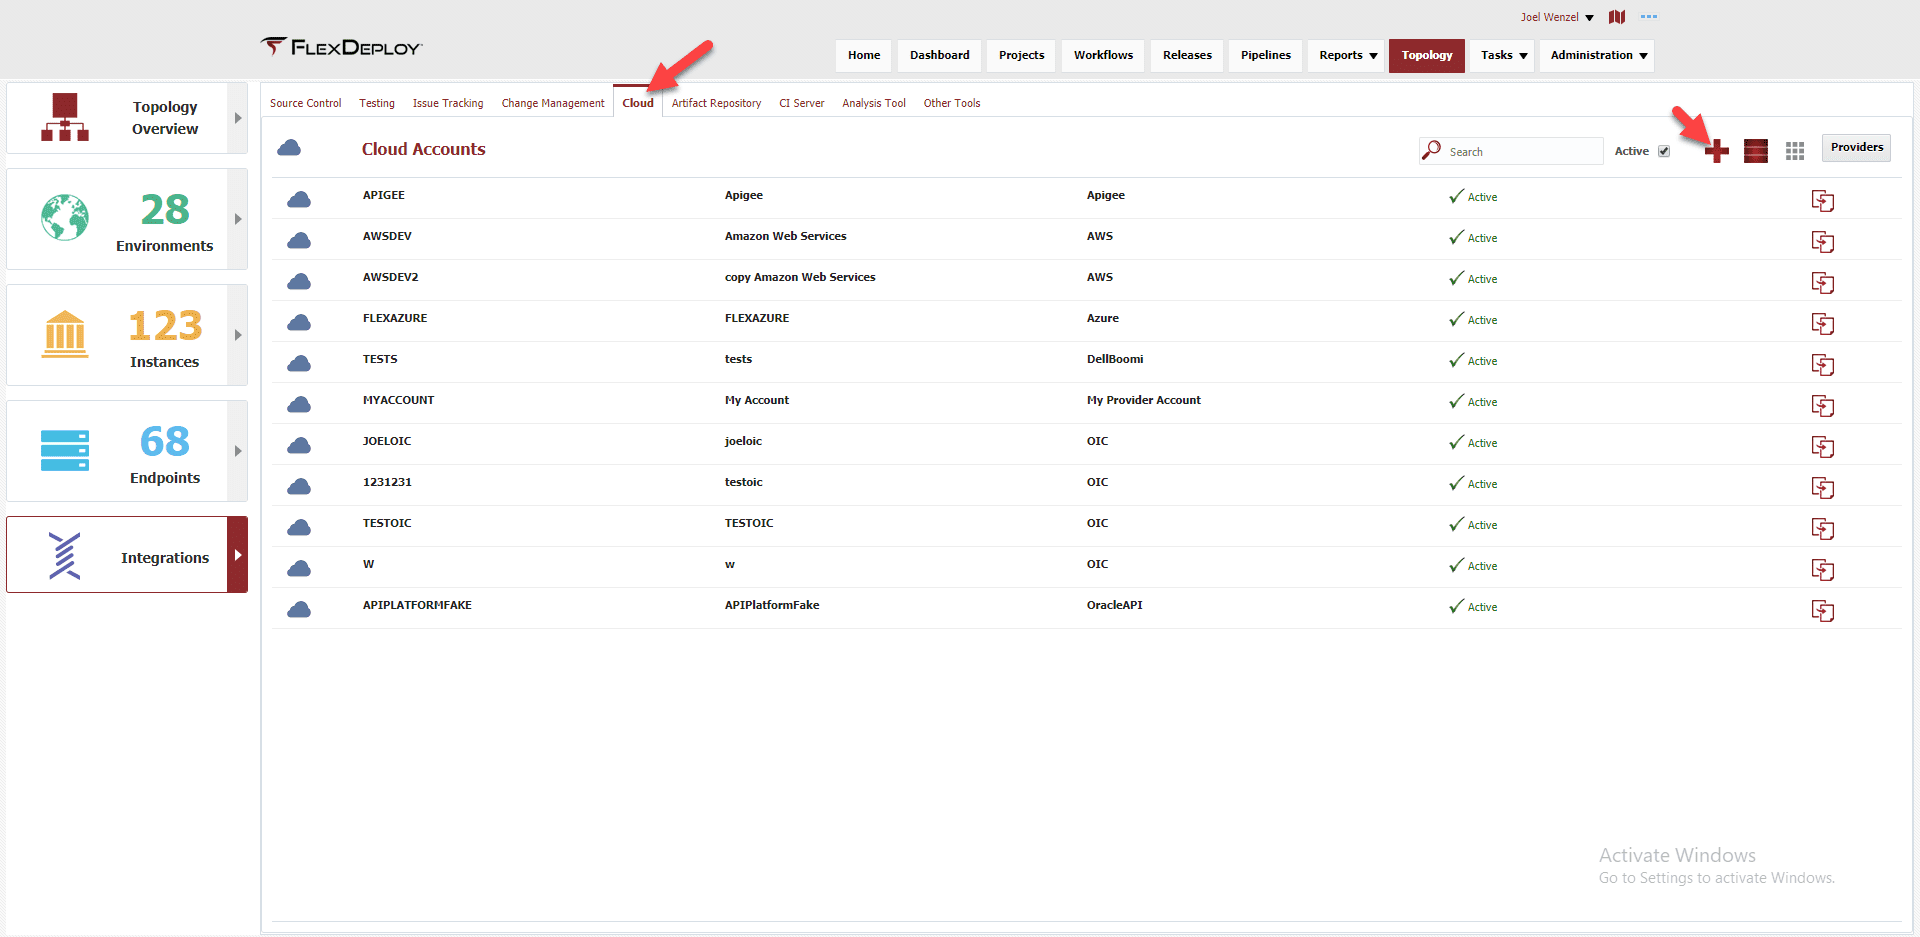
OIC, being a cloud platform, makes use of FlexDeploy Cloud Accounts to reduce repeated information throughout FlexDeploy. We are going to create a Cloud Account for the OIC development environment. Navigate to Topology->Integrations->Cloud and click the Plus button to create a new Account.
A new page will have you enter the url for the OIC instance as well as the username/password. Be sure to set the Provider as OIC!
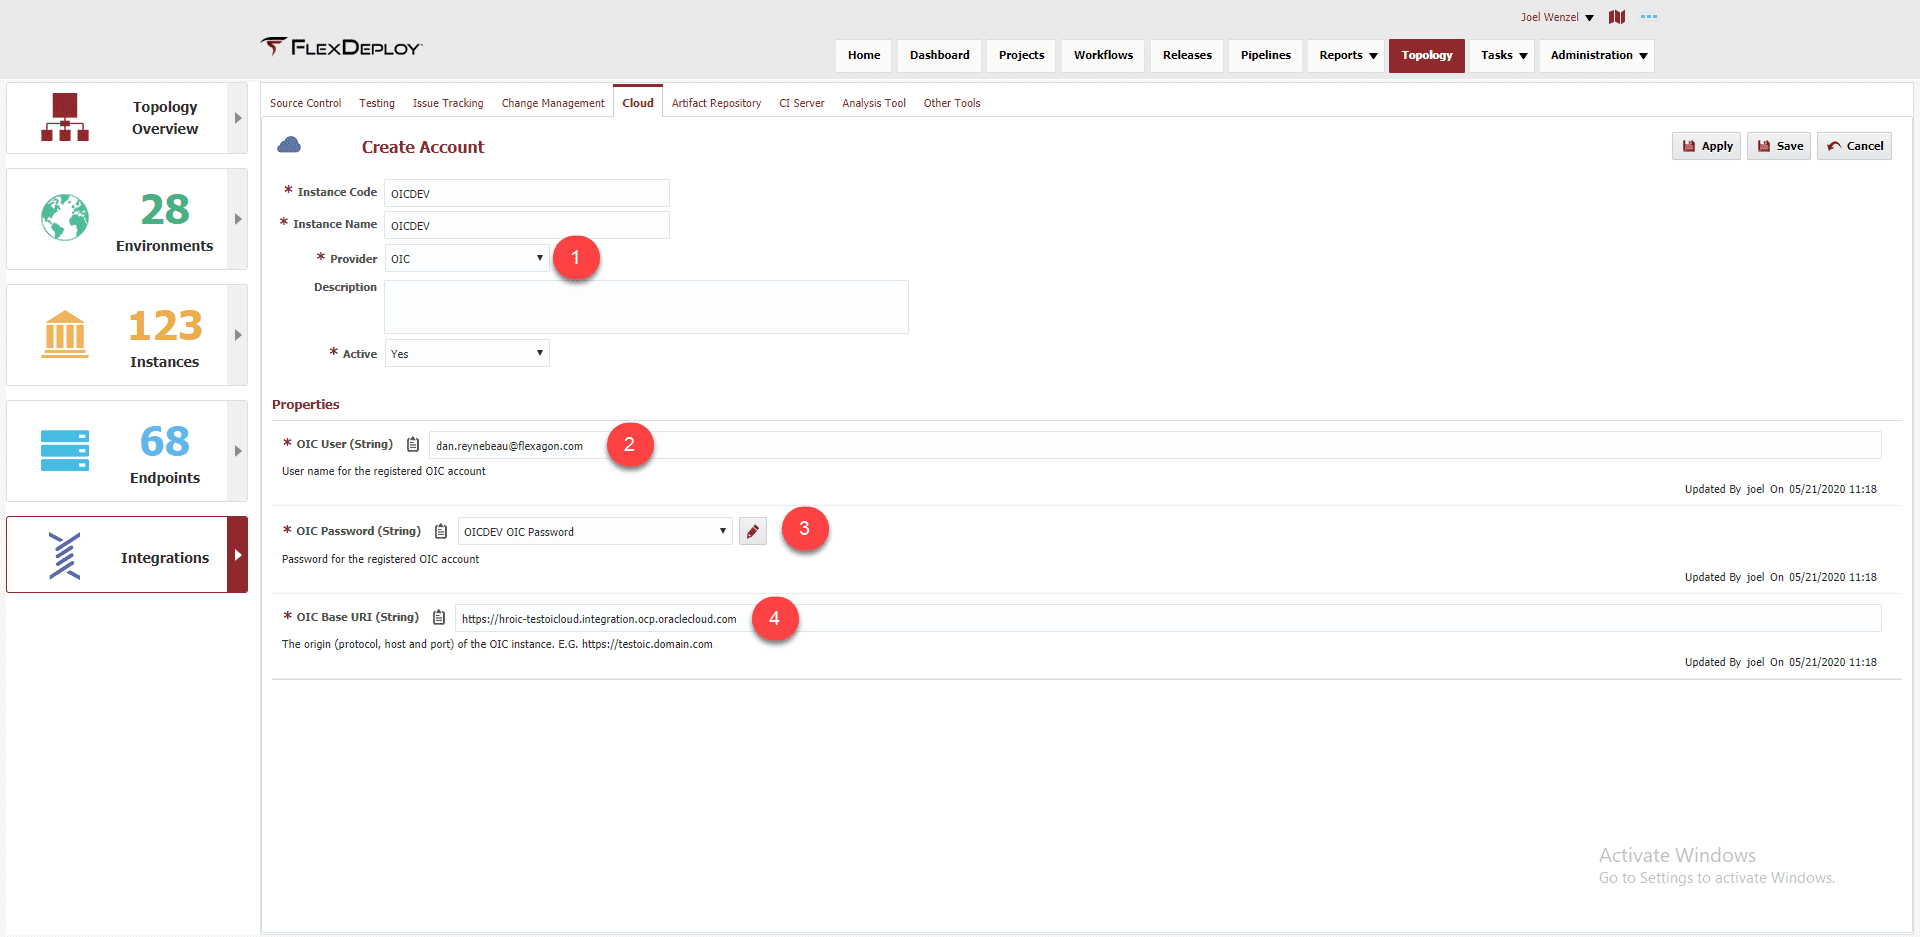
This account can now be referenced throughout the application rather than specifying these properties over and over.
Topology Configuration
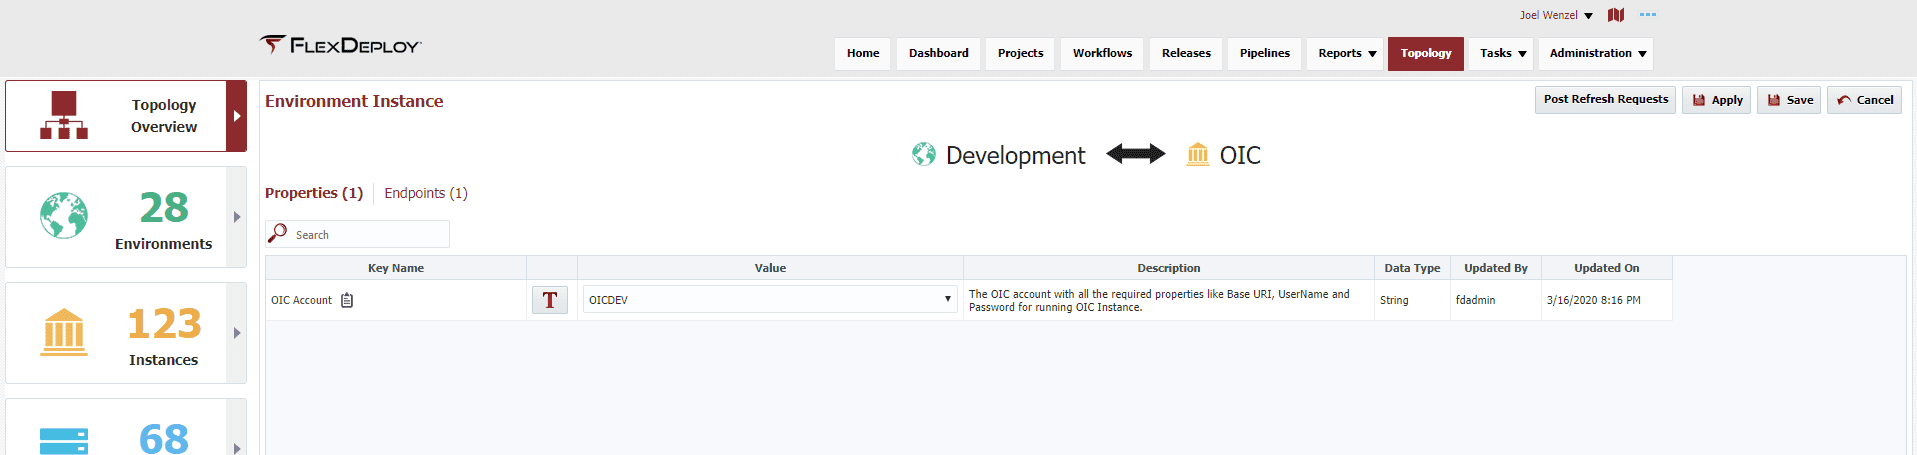
The configuration starts with the creation of several topology components such as environments, instances and endpoints. I won’t cover the creation of these components however each of the links will provide the user guide pages for each component. Once the topology components and workflows are created and associated with each other, the environment/instances will be created on the topology overview and allow configuration of each environment/instance combination. This will be the main configuration to be able to communicate with the OIC instance. Select Topology->Topology Overview. The page will show a colored circle per environment with red meaning not configured to green meaning fully configured.
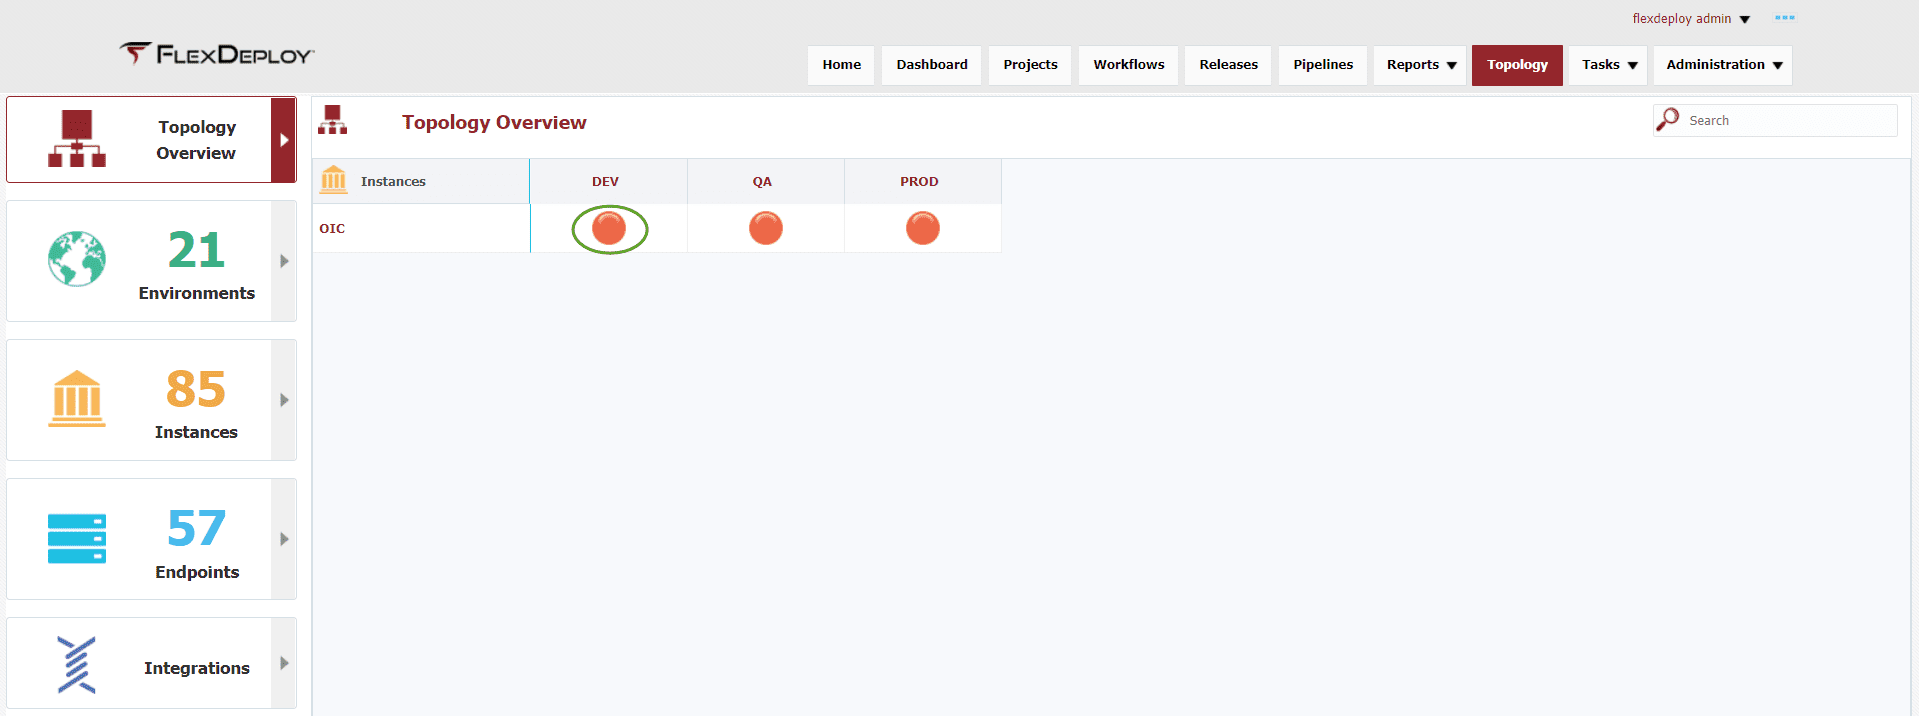
Clicking on the circle allows the user to configure the env/instance with the necessary properties.
Once we have the environments created, we need to create an endpoint to communicate with the OIC instance in each environment. Since we are communicating with OIC through REST services, we just need to have a server to make the calls from. We will utilize the LOCALHOST endpoint (FlexDeploy server) that is provided out of box. No additional configuration is required.

Repeat this setup for QA and PROD creating necessary cloud accounts along the way. The topology overview should look like the following with all green circles once completed.

Now we can create the project that will utilize these configurations and allow us to execute the build and deploy processes. Select Projects to show the Project Explorer.
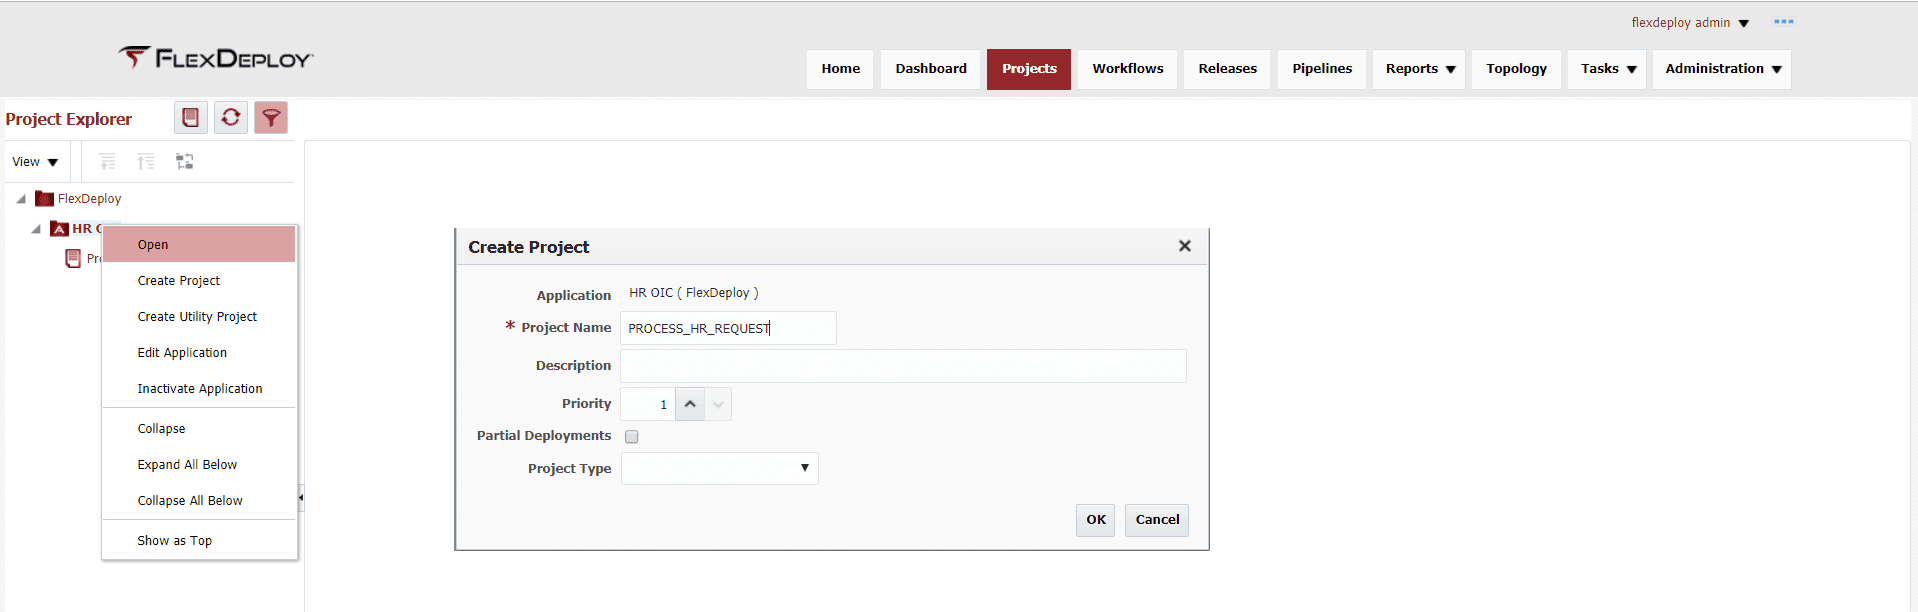
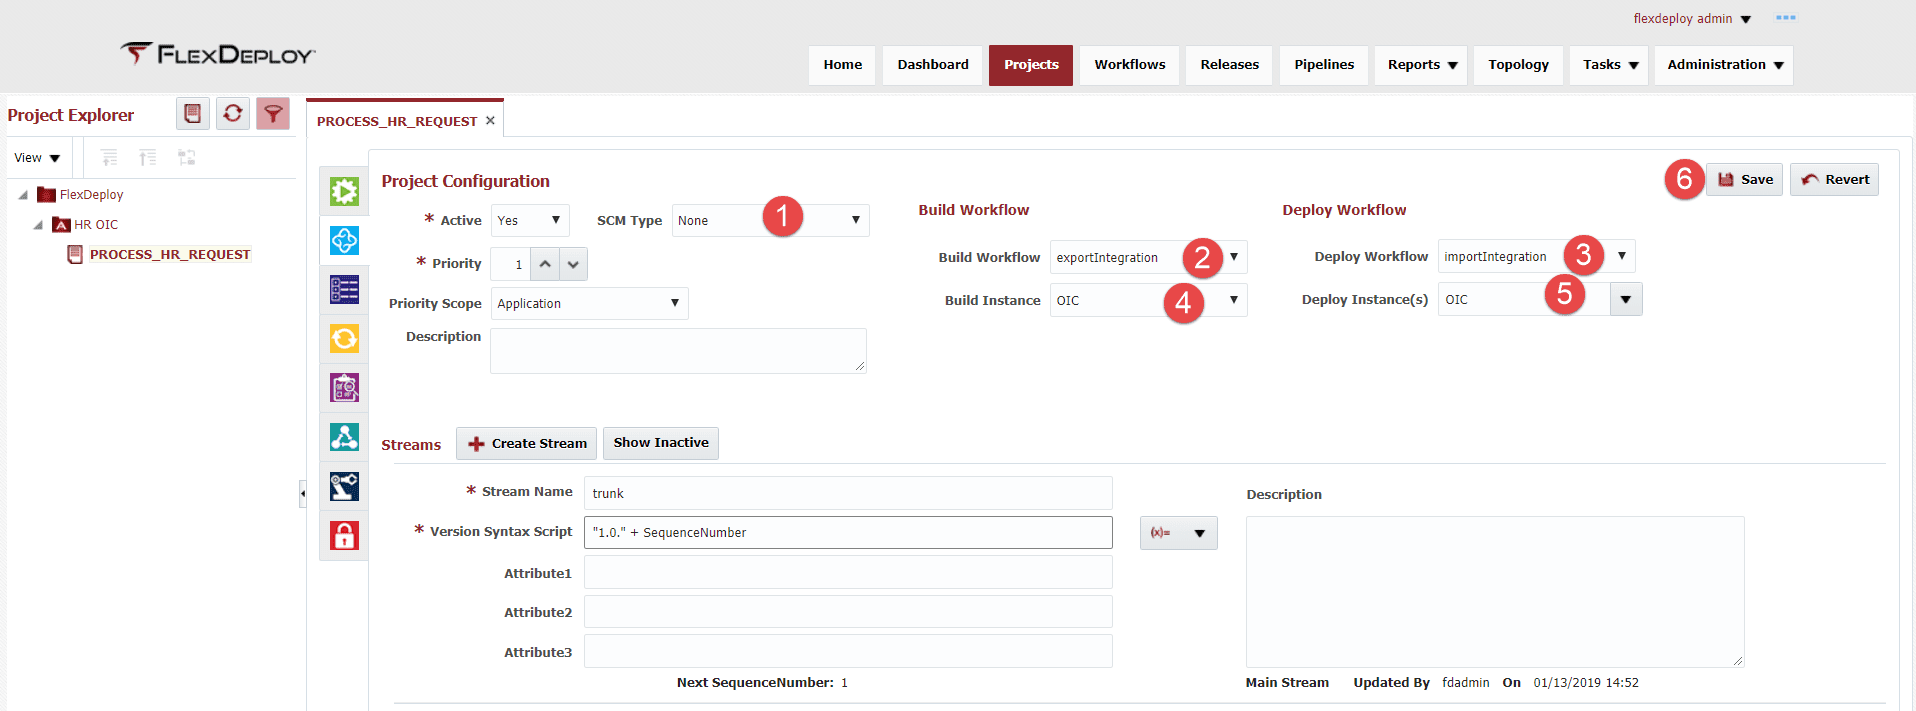
Open the project and select the second tab (light blue – Configuration). We need to configure the following:
- SCM Type – select none as there is no SCM associated with OIC
- Build Workflow – select the build workflow that was created
- Deploy Workflow – select the deploy workflow that was created
- Build Instance – select the instance that was created
- Deploy Instance – select the instance that was created
- Save the configuration
Select the third tab (dark blue – Properties) on the project to see the available properties that can be configured per project. The OIC Integration Identifier is defaulted to the name of the FlexDeploy project.

We are now ready to start executing the project.
Execution
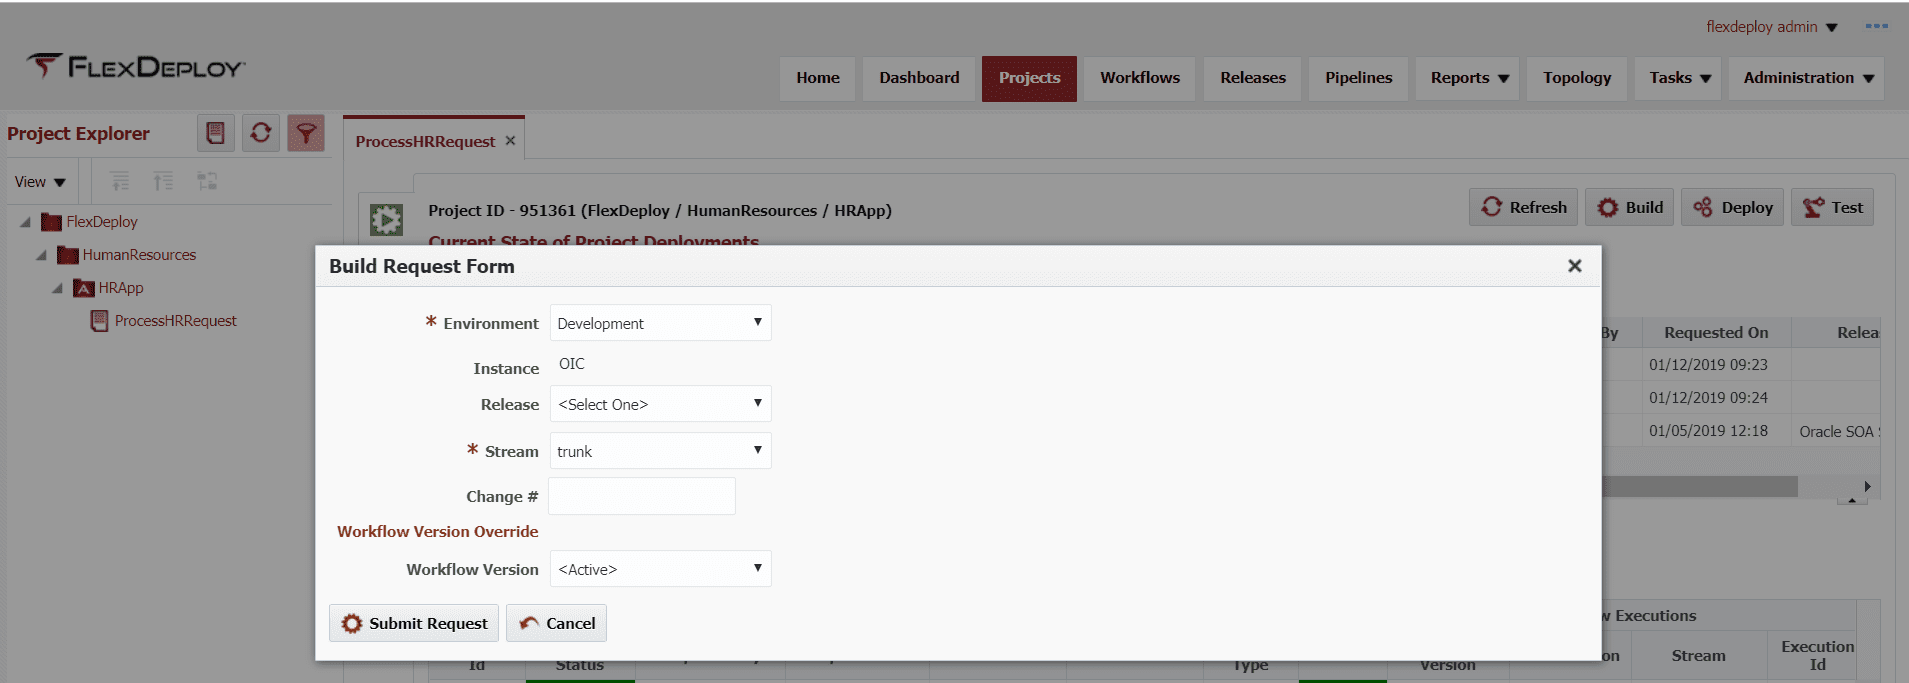
Now that we have everything configured, it is time to execute the build workflow that will export the given integration and create the appropriate artifacts. Then we will be able to deploy this artifact to any number of environments and understand what version of the integration is in an environment at any given time. On the project, click the Build button to initiate the Build Request Form. Select the build environment and click on Submit Request to start the execution.
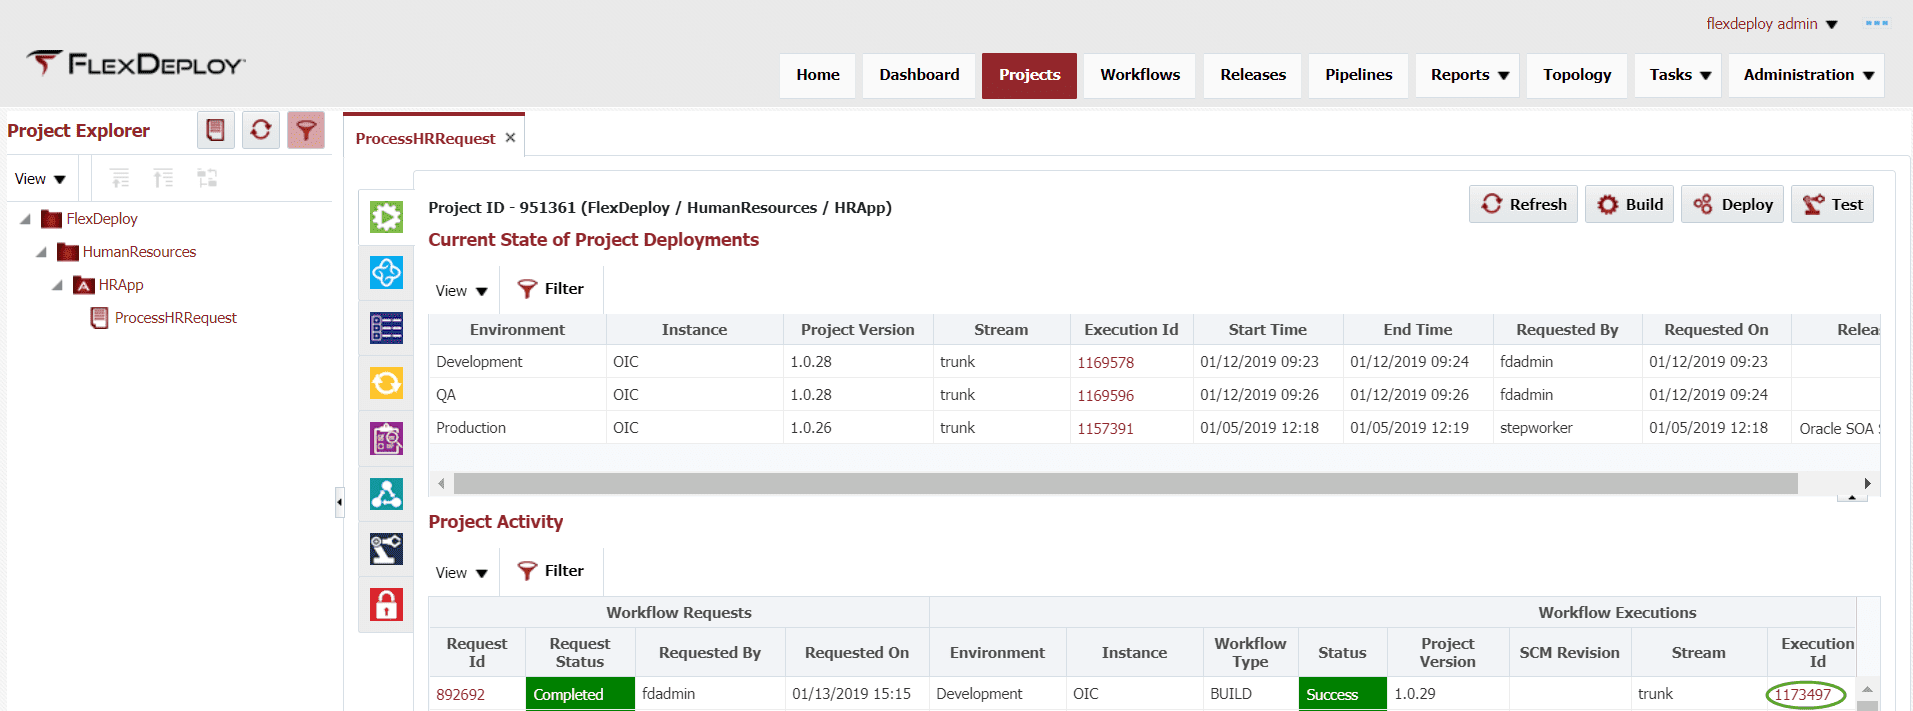
Upon completion of the build, a project version is associated to this build and an executionId link will be available that will allow you to see the workflow execution, created artifacts, logs and current state of properties.
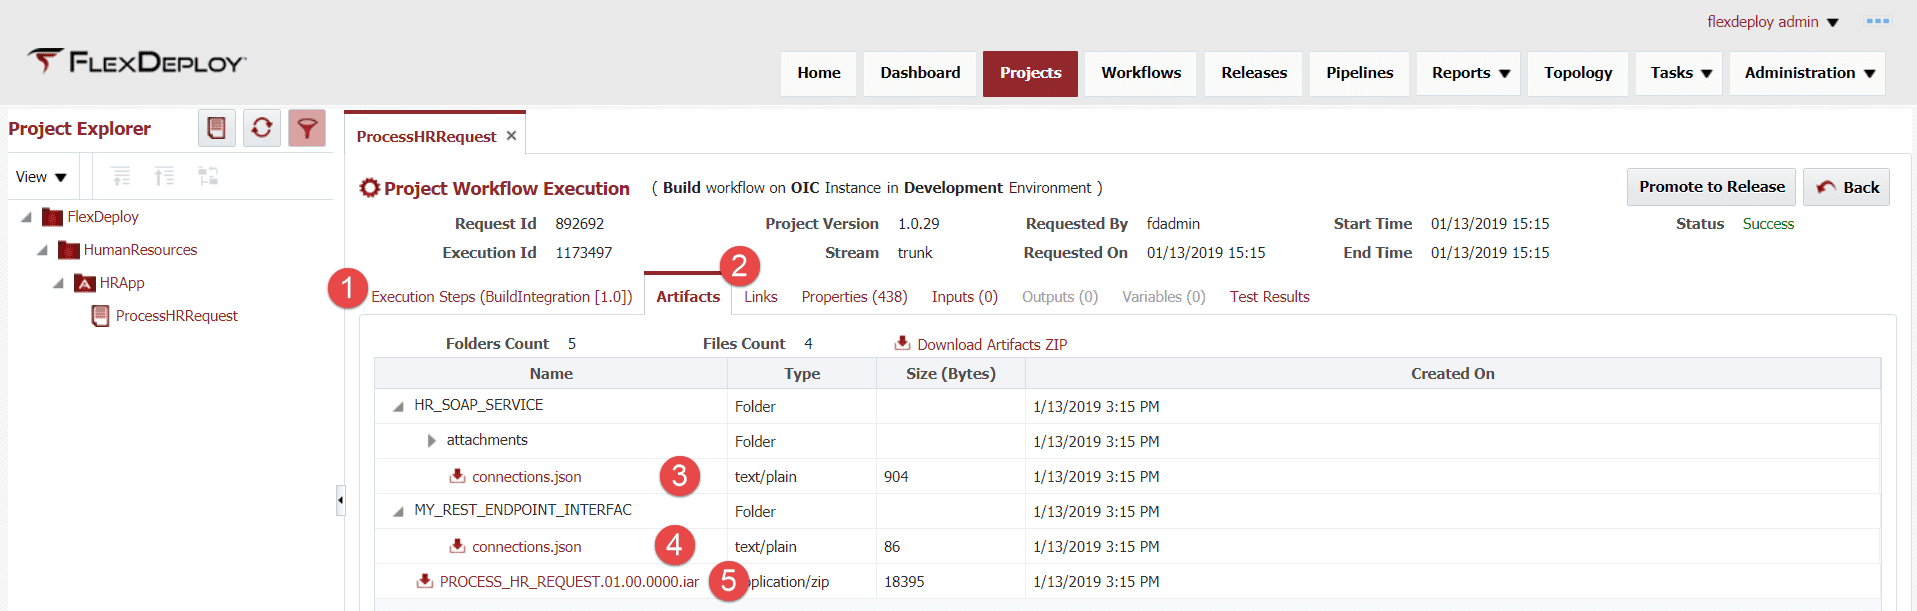
Clicking on the artifact tab will show the artifacts that were created by the build process. Since we had checked the input to manage connections on the exportIntegration operation, you will see the connection files (points 3 and 4) that were associated to this integration. Point 5 shows the integration archive (iar) file that is exported for the integration, it will contain the integration name and the revision number that was exported.
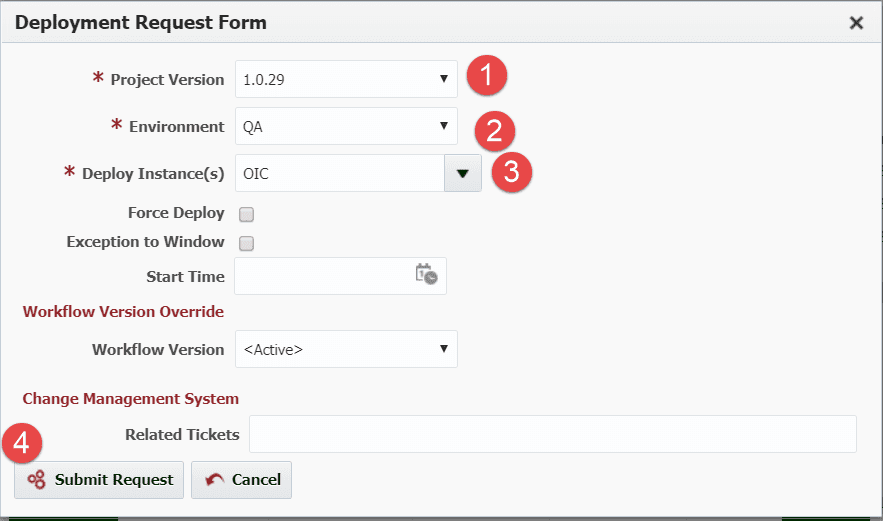
Now that we have a successful build and artifacts created, we can deploy this artifact to the QA environment by clicking the Deploy button on the project. Select the following options:
By using FlexDeploy, organizations establish an automated and repeatable process for building, packaging, and safely deploying code, APIs, meta-data changes, and data migrations from development through test to production environments.
- Project version that you want to deploy, the latest project version is the default project version, so it doesn’t have to be changed.
- The environment that you want to deploy to
- The instance that you want the deployment to use (defaulted from the project)
- Submit Request will execute the deployment to the selected environment
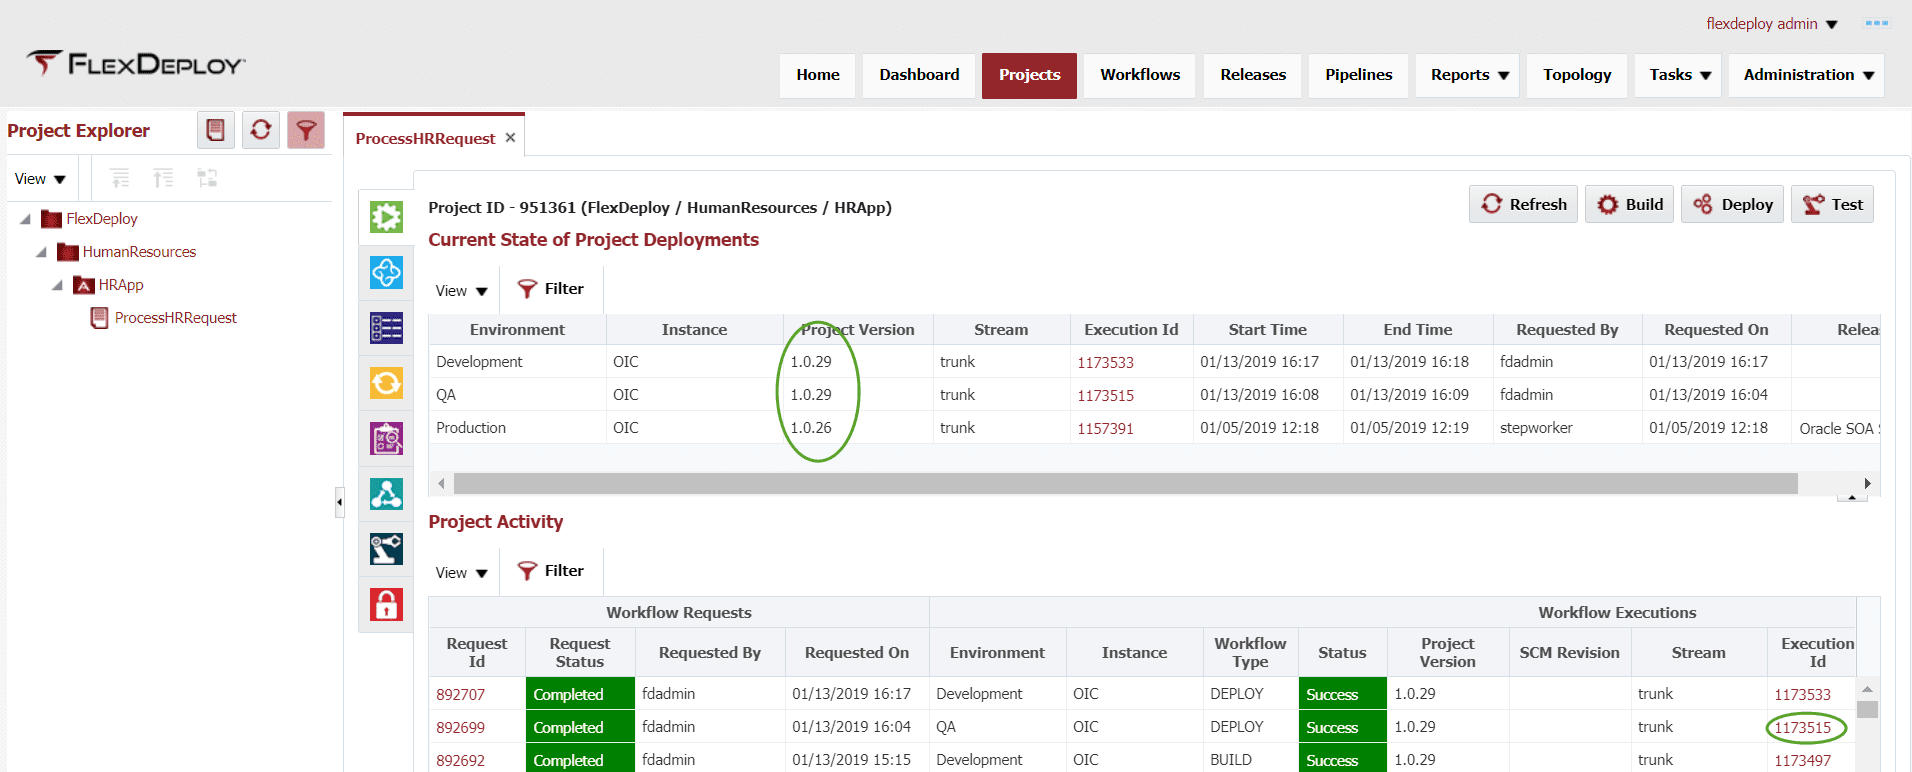
Upon completion of the deploy, an executionId link is available that will again show the workflow execution, artifacts that were deployed, deployment logs and property values at the time of deployment. In addition, the status section of the page shows the project versions that have been deployed to each environment so there is an immediate indication of any discrepancies between environments.
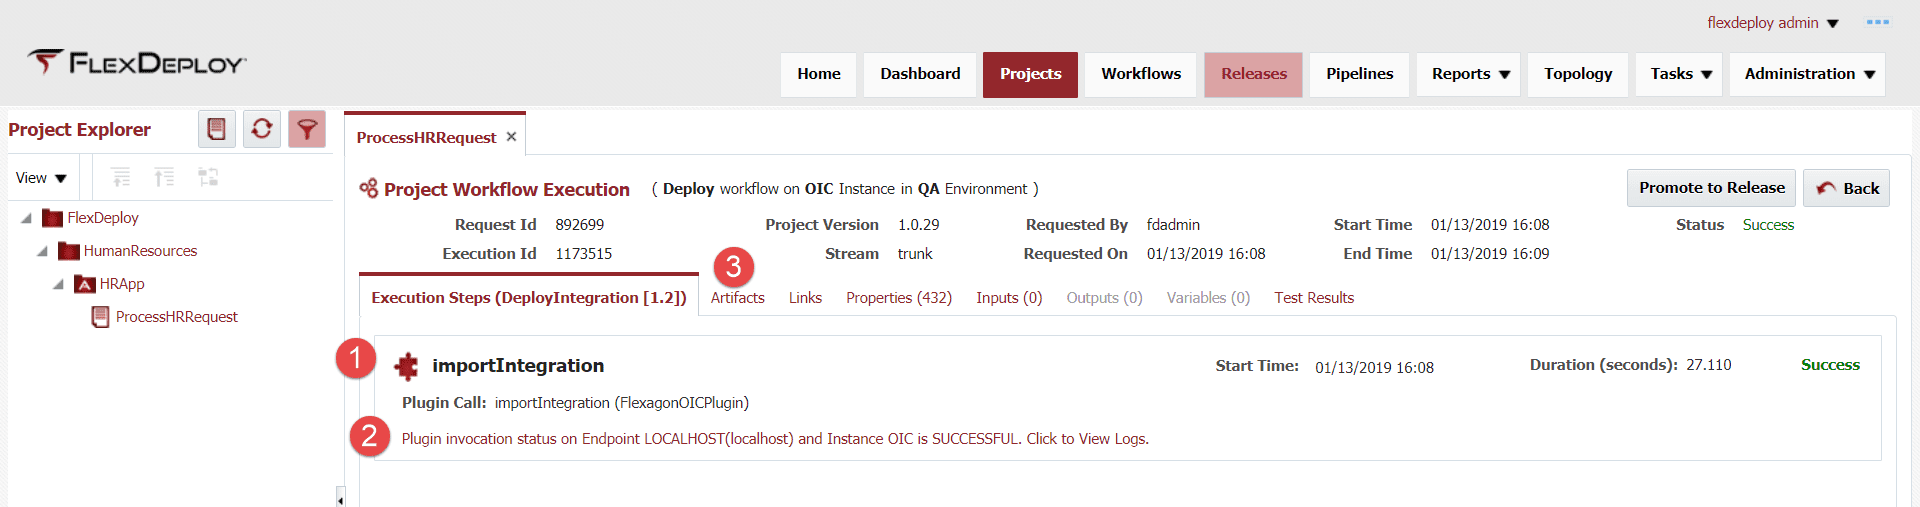
Clicking on the executionId link shows details of the deployment as shown below. The artifacts that were deployed, the same artifacts as created on the build, are available. Also, the workflow execution is shown, and the link under the operation will show the execution logs.
Conclusion
This was the initial blog for the FlexDeploy Loves OIC series and covered a large portion of the configuration that is required for the entire series. Many of these configurations won’t change over time and we will build on the work done. In this blog, we have shown how FlexDeploy can work with an application that doesn’t follow the standard build/deploy scenario and provide the lifecycle management that we desire. In the next blog, we will build on this and cover how to manage connection properties that change per environment.
Previous Post: FlexDeploy Loves OIC: Series Overview
Next Post: FlexDeploy Loves OIC: Manage Connection Property Replacement