
In the previous three episodes of the Sitecore Content Serialization series, we have discussed the introduction to Sitecore Content Serialization, Serialization configuration with Command Line Interface (CLI), and Serialization configuration with Sitecore for Visual Studio (SVS). In this blog, we will continue exploring Sitecore Content Serialization and learn about the complete procedure of item serialization.
The first step is to set up the solution using the Sitecore template. You can follow the steps mentioned in Walkthrough: Using the Getting Started template to set up the project solution. Before installing the template, you have installed the below prerequisites,
- .NET Core 3.1 SDK
- .NET Framework 4.8 SDK
- Visual Studio 2019 & above
- Docker for Windows (Please refer to this blog for Sitecore Containers)
- PowerShell 5.1
Once you installed all the prerequisites, you are ready to download and install the template. To create a project solution based on the getting started template, follow the below steps to install the template and set up the project solution on your local workstation.
1: Open PowerShell with administrator privileges and run the below command,
dotnet new -i Sitecore.DevEx.Templates --NuGet-source https://nuget.sitecore.com/resources/v3/index.json
2: Validate port 443 in IIS; you can check the port using below PS command,
Get-Process -Id (Get-NetTCPConnection -LocalPort 443).OwningProcess
3: Validate port 8983 for SOLR
Get-Process -Id (Get-NetTCPConnection -LocalPort 8983).OwningProcess

4: Open the solution folder in PowerShell and run the below command to create a solution
dotnet new sitecore.aspnet.gettingstarted -n <Solution_Name>
5: Open the \<Solution_Name> and run the init.ps1 to set up the Sitecore container instance. Run the below command,
.\init.ps1 -InitEnv -LicenseXmlPath "<add here the Sitecore license file path>" -AdminPassword "<Sitecore password>"
Step 06: Now it’s time to download the Sitecore docker image and install the containers using up.ps1 script. Just run the up.ps1 script in the PowerShell.
Step 07: After running the up.ps1 script, you can see the three websites configured in the IIS.
- Sitecore identity server – https://id.<Solution_Name>.localhost/
- Sitecore CM instance – https://cm.<Solution_Name>.localhost/
- Rendering Host (UI website) – https://www.<Solution_Name>.localhost/
Module Configurations
As in the last couple of blogs, we have configured the Sitecore Content Serialization tools such as Command Line Interface and Sitecore for Visual Studio. To smooth the serialization process, we need to create different modules to state the list of Sitecore items we want to include in the serialization. As we have learned about the Sitecore Content Serialization tools in the last couple of blogs, configure it locally. So we can create modules from a text editor, or if you are using SVS, you can create modules through Sitecore Module Explorer.
Using Text Editor
Step 01: Open the sitecore.json file in the Visual Studio code. You can find the sitecore.json file in the solution folder you set up on your workstation.
Step 02: Update the file with the below changes, remove line 4 from the below screenshot, and add line 5, “src//.module.json”
{
    "$schema": "./.sitecore/schemas/RootConfigurationFile.schema.json",
    "modules": [
    //"src/items.module.json"
    "src/*/*.module.json"
     ],
     "serialization": {
        "defaultMaxRelativeItemPathLength": 100,
        "defaultModuleRelativeSerializationPath": "items"
     }
}
Step 03: Create a folder under the src and name a folder on your feature with “module” as a suffix. Example – ProductModule.
Step 04: Create a JSON file for your module named ProductModule.module.json and add the namespace property,
{ "namespace": "ProductModule" }
Using Sitecore for Visual Studio
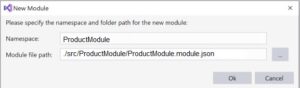
Step 01: Open Sitecore Module Explorer in Visual Studio, right-click on Modules and click on New Module. Set the namespace ProductModule.
Step 02: Select the Module file path – ./src/ProductModule/ProductModule.module.json.
As a developer, the module plays a vital role in serialization, making the process smooth and efficient. After creating a module, we need to configure the item we need to include in the serialization process and configure the rules. In the next episode, we will configure a fit and rules. So stay tuned!
Please comment below if you have any questions, comments, or suggestions.
Happy Learning!