
In the last episode, we configured the includes and rules in sitecore.json. In this episode, we will continue exploring Sitecore Content Serialization and learn multiple options required for serialization along with the item packaging and deployment.
Serialize Items
We have built the modules, including items and rules. Now we need to serialize an object using different features; let’s discuss all the features available using Command Line Interface and Sitecore for Visual Studio.
Serialize an item through CLI
In the previous episode of this blog series, we have configured the Sitecore CLI on your workstation and also discuss the list of commands available for the serialization using CLI. Please visit the blog page to recall all the commands available in Sitecore CLI for Serialization- Setting up Sitecore Content Serialization using CLI (Command Line Interface).
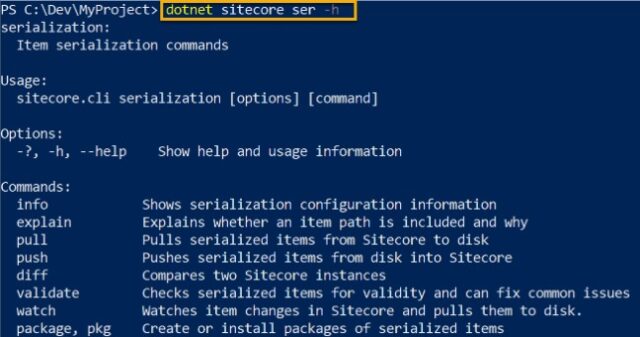
Step 01: Open your project folder in the PowerShell terminal with administrator privilege.
Step 02: Run the below command to see all the list of commands available in Sitecore CLI for serialization.
dotnet sitecore ser -h
Serialize an item through SVS
In the previous episode, we also configured the SVS with the instance; please check out this blog to recall the configuration steps required for SVS setup with your instance – Setting up Sitecore Content Serialization using Sitecore for Visual Studio – GUI (Graphical User Interface).
Step 01: Open Sitecore Module Explorer in Visual Studio
Step 02: When you right-click on the module created in the previous steps then, you can see the list of options that require serialization.
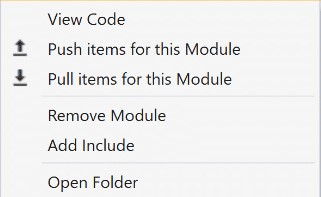
Pull/Push Commands/Features available for serializing an item using Sitecore CLI and SVS

Item Packaging

In the previous steps, we learned about the use of a module to serialize/sync Sitecore items for sharing between the developers for development. But for the production release, we need to create a Sitecore Content Serialization package and configure it in the pipeline for continuous integration. We can create packages from both Sitecore CLI and SVS.
Create a package from Sitecore Command Line Interface
Step 01: Open the project root folder where we have sitecore.json in the PowerShell terminal along with administrator privilege.
Step 02: Run the below command to create a package through Sitecore CLI.
dotnet sitecore ser pkg create -o <name>
Create a package from Sitecore from Visual Studio
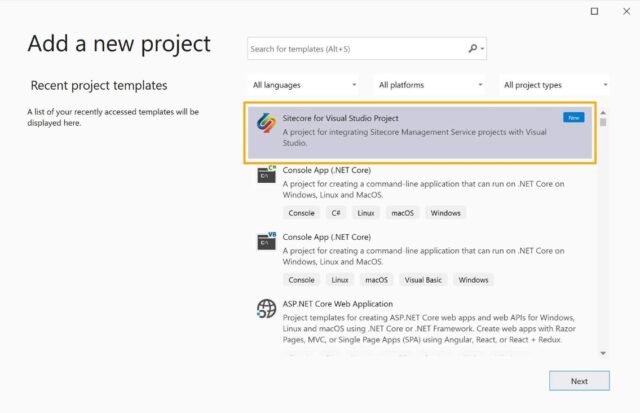
Step 01: Open the project solution in Visual Studio and right click on the solution and add the New Project.
Step 02: In Add a new project window, search Sitecore for Visual Studio Project.
Step 03: Add the name <SolutionName>.build and set the path with /src folder.
Step 04: Hit the Create button and save the solution.
Step 05: Build the solution.
Step 06: Now right-click on a project we created and open its Properties.
Step 07: Open the tab Serialized Item Package and select the checkbox Build Serialized Item Package.
Step 08: In the Package Module section, select the radio button for Include All Modules.
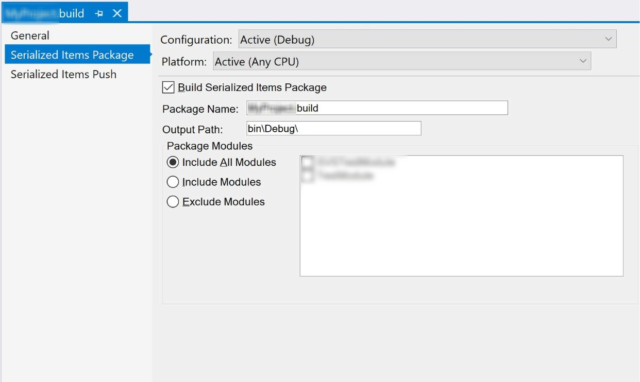
Step 09: Hit the save and build the project to create a package.
Deployments
In the previous steps, we created the Sitecore Content Serialization package, and now we have to configure the lower/production environment.
1. Create a configuration patch for Identity Server
Step 01: Create a patch file named Sitecore.IdentityServer.<SolutionName>.xml for Sitecore Identity Server in docker/build/id folder.
Step 02: Add the below line of code and save the file,
<?xml version="1.0" encoding="utf-8"?>
<Settings>
  <Sitecore>
    <IdentityServer>
      <Clients>
        <MyProjectDeployment>
            <!--
              The ClientId and ClientName are arbitrary, but the ClientId must
              match the value we pass into the client-id argument when using the Sitecore CLI,
              and the client_id value in our claim mapping patch for the CM role.
            -->
            <ClientId>MyProjectDeployment</ClientId>
            <ClientName>MyProjectDeployment</ClientName>
            <AccessTokenType>0</AccessTokenType>
            <AccessTokenLifetimeInSeconds>3600</AccessTokenLifetimeInSeconds>
            <IdentityTokenLifetimeInSeconds>3600</IdentityTokenLifetimeInSeconds>
            <RequireClientSecret>true</RequireClientSecret>
            <AllowOfflineAccess>false</AllowOfflineAccess>
            <AllowedGrantTypes>
                <AllowedGrantType1>client_credentials</AllowedGrantType1>
            </AllowedGrantTypes>
            <ClientSecrets>
                <!-- Configured via environment variable. -->
                <ClientSecret1></ClientSecret1>
            </ClientSecrets>
            <AllowedScopes>
                <!-- this is required even if not a 'user' for Sitecore to like us -->
                <AllowedScope1>sitecore.profile.api</AllowedScope1>
            </AllowedScopes>
        </MyProjectDeployment>
      </Clients>
    </IdentityServer>
  </Sitecore>
</Settings>
2. Update the identity server Dockerfile
Step 01: Open the docker-compose-override.yml file to override/add new environment variables to the id service.
Sitecore_Sitecore__IdentityServer__Clients__<SolutionName>Deployment__ClientSecrets__ClientSecret1: ${MYPROJECT_DEPLOYMENT_SECRET}
Step 02: Save the file.
Step 03: Open Docker Compose .env and append the below line of code to the value of <SolutionName>_DEPLOYMENT_SECRET
<SolutionName>_DEPLOYMENT_SECRET=<Secret_Key>Step
04: Save the file.
3. Adding a new config patch in the Platform web project.
Step 01: In Visual Studio, go to Platform web project. Create a new configuration patch file with the name <SolutionName>Deployment.ClaimMapping.config under the App_Config/Include folder
Step 02: Add the below line of code in that file,
<?xml version="1.0" encoding="utf-8"?>
<configuration xmlns:patch="http://www.sitecore.net/xmlconfig/" xmlns:role="http://www.sitecore.net/xmlconfig/role/" xmlns:set="http://www.sitecore.net/xmlconfig/set/">
  <sitecore role:require="Standalone or ContentManagement">
    <federatedAuthentication>
      <identityProviders>
        <identityProvider id="SitecoreIdentityServer" type="Sitecore.Owin.Authentication.IdentityServer.IdentityServerProvider, Sitecore.Owin.Authentication.IdentityServer" resolve="true">
          <transformations hint="list:AddTransformation">
            <transformation name="grant admin rights for MyProjectDeployment" type="Sitecore.Owin.Authentication.Services.DefaultTransformation, Sitecore.Owin.Authentication">
              <sources hint="raw:AddSource">
                <!-- This needs to match the ClientId in the Identity Server configuration. -->
                <claim name="client_id" value="MyProjectDeployment" />
              </sources>
              <targets hint="raw:AddTarget">
                <claim name="name" value="sitecore\admin" />
                <claim name="http://www.sitecore.net/identity/claims/isAdmin" value="true" />
              </targets>
              <keepSource>true</keepSource>
            </transformation>
          </transformations>
        </identityProvider>
      </identityProviders>
    </federatedAuthentication>
  </sitecore>
</configuration>
Step 03: Save the file.
Step 04: Run the .\up.ps1 or docker-compose build or docker-compose up -d to launch the environment.
Step 05: Final step is to install your item package, which we created in the above steps, with the use of the below command,
dotnet sitecore ser package install -f src\<SolutionName>.build\bin\Debug\<SolutionName>.build.itempackage
For lower/production deployment, we need to create a package to support the CI pipeline and make sure that package should contain all the required items for that deployment.
This is the end of the Sitecore Content Serialization series. Refer to the below links for all the episodes, and feel free to let me know if you have any suggestions and post a comment below if you have any questions.
Sitecore Content Serialization Series:
Episode 01: Introduction
Episode 02: Setup using CLI (Command Line Interface)
Episode 03: Setup using Sitecore for Visual Studio – GUI
Episode 04: Prerequisites and Modules Configuration
Episode 05: Include and Rules Configuration
Episode 06: Serialization Features, Item Packaging, and Deployment
Happy learning!