
A popular JavaScript library, Axios has become a staple in modern web development, especially when handling HTTP requests in React applications. This blog will explore the ins and outs of using Axios with React, providing a complete guide and practical code examples to enhance your understanding.
Getting Started with Axios in React
Installation
Step 1: Creating a React App
Run the given command to build a new React app.
Note: If you already have the react application created, you can skip this step and directly follow the 2nd step.
npx create-react-app my-axios-app
cd my-axios-app
npm start
Step 2: Installing Axios
Now, install Axios into your project by running:
npm install axios
Making GET Requests
Basic GET Request
Let’s initiate our exploration with a fundamental aspect – making a simple GET request. Create a new file named getExample.js within an ‘Axios’ folder in your React project and add the following code:
getExample.js
// Import Axios
import axios from "axios";

// Make a GET request
const fetchData = async () => {
  try {
    const response = await axios.get(
      "https://jsonplaceholder.typicode.com/posts/1"
    );
    console.log("Data fetched:", response.data);
  } catch (error) {
    console.error("Error fetching data:", error);
  }
};

// Export the function for use in other files
export default fetchData;
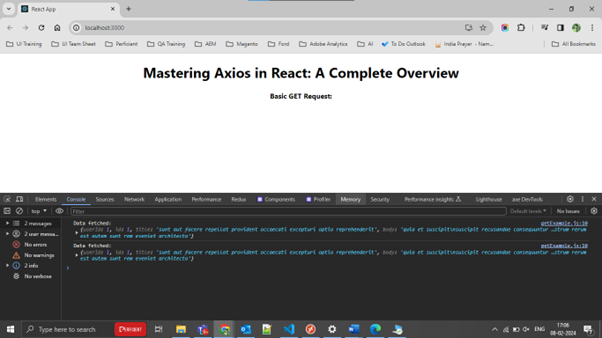
In this getExample.js file, ‘Axios’ is imported to handle HTTP requests. The ‘fetchData’ function, defined as an asynchronous operation, utilizes Axios to request a GET to a specified URL. Upon a successful request, the fetched data is logged to the console. Any errors encountered during the request are caught and logged as well.
Import the ‘fetchData’ function in the App.js component to retrieve data from the API.
App.js
import React, { useEffect } from "react";
import fetchData from "./axios/getExample";

const App = () => {
  useEffect(() => {
    fetchData();
  }, []);

  return (
    <div>
      <h2>Mastering Axios in React: A Complete Overview</h2>
      <p>Basic GET request: </p>
    </div>
  );
};

export default App;
Output
Handling Async/Await
To enhance code readability, we can use the async/await syntax. Create another file named asyncAwaitExample.js within an ‘Axios’ folder in your React project and add the following code:
asyncAwaitExample.js
// Import Axios
import axios from "axios";

// Make an asynchronous request using async/await
const fetchDataAsync = async () => {
  try {
    const response = await axios.get(
      "https://jsonplaceholder.typicode.com/posts/1"
    );
    console.log("Data fetched asynchronously:", response.data);
  } catch (error) {
    console.error("Error fetching data:", error);
  }
};

// Export the function for use in other files
export default fetchDataAsync;
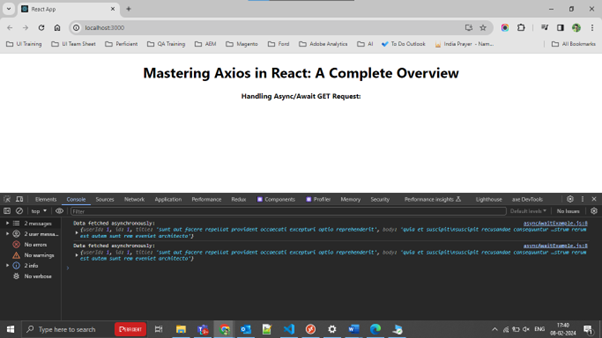
In this asyncAwaitExample.js file, we import Axios to handle HTTP requests. The ‘fetchDataAsync’ function is defined as an asynchronous operation utilizing the async/await syntax. Axios makes a GET request to a specified URL inside a try block. The fetched data is logged to the console after successful completion with a message indicating asynchronous retrieval. Any encountered errors during the request are caught in the catch block and logged to the console.

Import the ‘fetchDataAsync’ function in the App.js component to fetch data asynchronously using async/await.
App.js
import React, { useEffect } from "react";
import fetchDataAsync from "./axios/asyncAwaitExample";

const App = () => {
  useEffect(() => {
    fetchDataAsync();
  }, []);

  return (
    <div>
      <h2>Mastering Axios in React: A Complete Overview</h2>
      <p>Handling Async/Await GET Request: </p>
    </div>
  );
};

export default App;
Output
Making POST Requests
To create a POST request functionality, first, create a new file named postExample.js within an ‘Axios’ folder in your React project and add the following code:
postExample.js
import axios from "axios";

const postData = async (data) => {
  try {
    const response = await axios.post(
      "https://jsonplaceholder.typicode.com/posts",
      data
    );
    console.log("Data posted:", response.data);
  } catch (error) {
    console.error("Error posting data:", error);
  }
};

export default postData;
In this postExample.js file, we define a function ‘postData’ that uses the ‘Axios.post’ method, a function in Axios used to send data to a server over the internet. It requires the server’s address (URL) and the data you want to send. It handles the data-sending process and provides error messages if something goes wrong. This method makes interacting with APIs easy and transmitting data from your React app to a server.
Import the ‘postData’ function in the App.js component to send data via a POST request.
App.js
import React, { useState } from "react";
import postData from "./axios/postExample";
function App() {
  const [data, setData] = useState({ title: "", body: "" });
  const handlePost = (e) => {
    e.preventDefault();
    postData({ ...data, userId: 1 });
  };
  return (
    <div>
      <h1>Mastering Axios in React: A Complete Overview</h1>
      <h4>Making POST Requests: </h4>
      <form onSubmit={handlePost}>
        <label>
          Title:
          <input
            type="text"
            value={data.title}
            onChange={(e) => setData({ ...data, title: e.target.value })}
          />
        </label>
        <br />
        <label>
          Body:
          <textarea
            value={data.body}
            onChange={(e) => setData({ ...data, body: e.target.value })}
          />
        </label>
        <br />
        <input type="submit" />
      </form>
    </div>
  );
}

export default App;
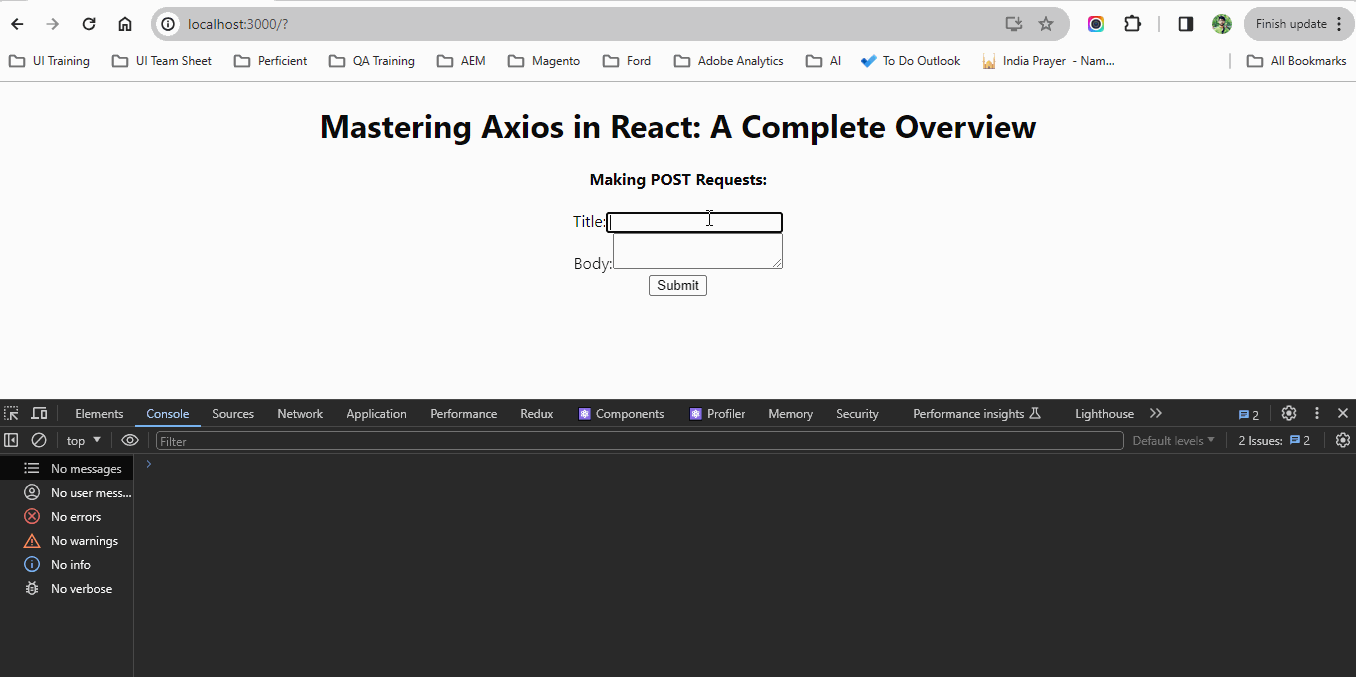
In App.js, the state manages post data using the ‘useState’ hook. When submitting the form, the ‘handlePost’ function prevents the default action and sends the post data using Axios via ‘postData’ from postExample.js. Users can input the post title and body through input fields and a textarea element. This component makes submitting post data straightforward, showcasing how Axios can handle POST requests in React applications.
Output
Advanced Techniques with Axios
Configuring Global Defaults
Axios allows you to set global configuration defaults, making managing headers and base URLs easier. Create a new file named global.js within an ‘Axios’ folder in your React project and add the following code:
global.js
// Import Axios
import axios from "axios";

// Set global configuration defaults
axios.defaults.headers.common["Authorization"] = "Bearer TEST_GLOBAl_DEFAULTS";
axios.defaults.headers.common["Accept"] = "application/json";
axios.defaults.baseURL = "https://jsonplaceholder.typicode.com";
In this global.js file, we set standard headers like authorization, accept headers, and specify a base URL for all requests.
To integrate these global defaults into our React components, we simply import the global.js file into our App.js component:
App.js
import React, { useEffect } from "react";
import axios from "axios";
import "./axios/global";
function App() {
  const fetchData = async () => {
    try {
      const response = await axios.get("/posts/1");
      console.log("Data fetched:", response.data);
    } catch (error) {
      console.error("Error fetching data:", error);
    }
  };
  useEffect(() => {
    fetchData();
  });
  return (
    <div>
      <h1>Mastering Axios in React: A Complete Overview</h1>
      <h4>Configuring Global Defaults: </h4>
    </div>
  );
}

export default App;
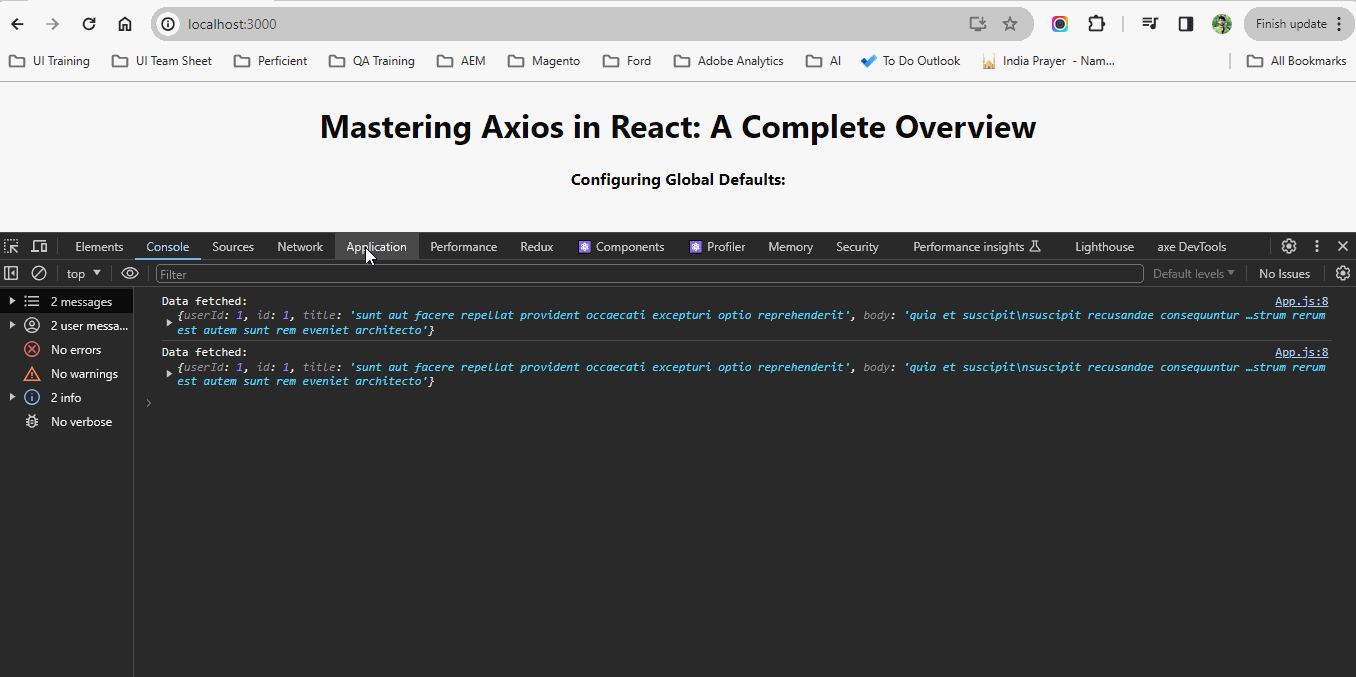
In this App.js file, we import Axios and global.js to set default configurations. We define a ‘fetchData’ function to fetch data from an API endpoint using Axios. The ‘useEffect’ hook ensures ‘fetchData’ is called when the component mounts. If data is fetched successfully, we log it; if an error occurs, we log the error.
Output
Custom Axios Instance
Custom Axios instances allow developers to create specialized instances of Axios with unique configurations tailored to specific needs. This means you can define custom settings, such as base URLs, headers, and interceptors, for different parts of your application without affecting the global Axios configuration. Create a file named customInstance.js and add the following code:
customInstance.js
import axios from "axios";

const customAxios = axios.create({
  baseURL: "https://jsonplaceholder.typicode.com",
  headers: {
    Authorization: "Bearer TEST_CUSTOM_AXIOS",
    Accept: "application/json",
  },
});

export default customAxios;
In the customInstance.js file, we create a custom Axios instance. This instance is created using the ‘Axios.create’ method and sets a base URL and custom headers, including authorization and content type. This allows us to interact with the API in a controlled manner.
Import the custom Axios instance from customInstance.js in the App.js component to make requests with custom configurations.
App.js
import React, { useEffect } from "react";
import customInstance from "./axios/customAxios";
function App() {
  const fetchData = async () => {
    try {
      const response = await customInstance("/posts/2");
      console.log("Data fetched:", response.data);
    } catch (error) {
      console.error("Error fetching data:", error);
    }
  };
  useEffect(() => {
    fetchData();
  });
  return (
    <div>
      <h1>Mastering Axios in React: A Complete Overview</h1>
      <h4>Custom Axios Instance: </h4>
    </div>
  );
}

export default App;
Output

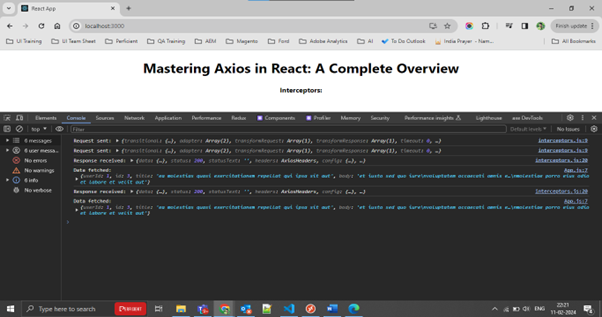
Interceptors
Interceptors play a vital role in intercepting and modifying HTTP requests and responses in Axios. They provide a powerful mechanism to manage the request and response lifecycle, allowing developers to add custom logic, such as logging, error handling, and authentication, before sending requests or after receiving responses. Create a file named interceptors.js and add the following code:
interceptors.js
import axios from "axios";

const createInstance = axios.create({
  baseURL: "https://jsonplaceholder.typicode.com",
});

createInstance.interceptors.request.use(
  (request) => {
    console.log("Request sent:", request);
    return request;
  },
  (error) => {
    console.error("Error in request interceptor:", error);
    return Promise.reject(error);
  }
);

createInstance.interceptors.response.use(
  (response) => {
    console.log("Response received:", response);
    return response;
  },
  (error) => {
    console.error("Error in response interceptor:", error);
    return Promise.reject(error);
  }
);

export default createInstance;
In this interceptors.js file, we have two interceptors: one for handling requests and another for managing responses. These interceptors are created using the Axios.interceptors.request.use and Axios.interceptors.response.use methods, respectively. These methods allow us to intercept HTTP requests and responses made by Axios before they are sent or received by the server, allowing us to add custom logic or modify the data.
Import interceptors.js to set up request and response interceptors for Axios in the App.js component.
App.js
import React, { useEffect } from "react";
import createInstance from "./axios/interceptors";
function App() {
  const fetchData = async () => {
    try {
      const response = await createInstance("/posts/3");
      console.log("Data fetched:", response.data);
    } catch (error) {
      console.error("Error fetching data:", error);
    }
  };
  useEffect(() => {
    fetchData();
  });
  return (
    <div>
      <h1>Mastering Axios in React: A Complete Overview</h1>
      <h4>Interceptors: </h4>
    </div>
  );
}

export default App;
In this App.js file, we have a fetchData function responsible for fetching data from the API endpoint ‘/posts/3’ using our custom Axios instance createInstance and using the ‘useEffect’ hook to ensure that the ‘fetchData’ function is called when the component mounts. This hook runs the ‘fetchData’ function once the element is rendered to the screen.
Output
Conclusion
Congratulations! You’ve successfully set up Axios in a React app, made a basic GET request, and delved into advanced techniques like configuring global defaults, using custom instances, and implementing interceptors. These techniques are essential for real-world applications, offering flexibility, maintainability, and a centralized approach to handling HTTP requests. As you continue your journey, explore additional Axios features and adapt them to meet the specific needs of your projects.