
Sitecore has form elements OOB that meet practically all form requirements. But in some scenarios, we may need to create a custom element to fulfill the requirement like the Cascading Dropdown List.
We had a scenario where we needed to load all Products of selected Categories in dropdown lists. We intended to utilize the Sitecore SXA Filter. However, after selecting Category from the list, it loads the associated Products in the Products dropdown list while removing the other Category item from the Category dropdown list.
As a result, we decided to build a custom cascading dropdown in the Sitecore Form. You can create 2 or more cascading dropdowns as per your need.
There are a few steps and configuration that needs to be followed as below.
Step 1:
Go to core database and under this location (/sitecore/client/Applications/Forms/Components/Layouts/PropertyGridForm/PageSettings/Property Editor Settings), create a new control by copying DropDownList and name it CascadeDropDownList.
 1: Create a new component in the core database.
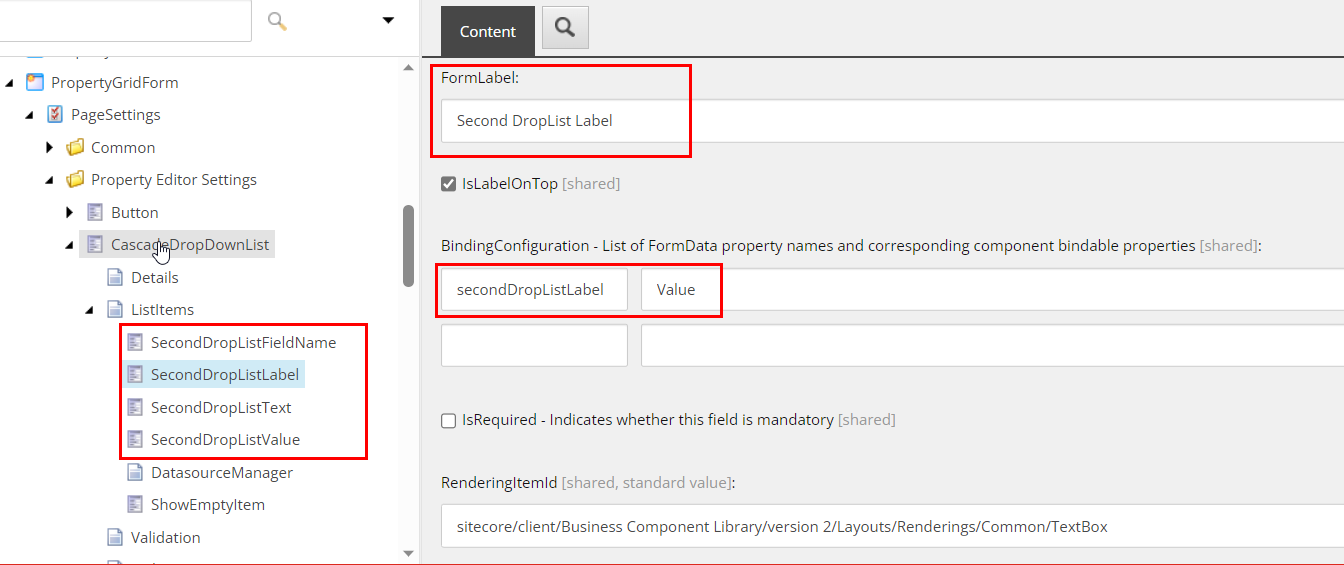
For this new control, you can add element properties as per the requirement which you can use in Form design (refer to fig: 7. Cascade Dropdown and its properties) and code.
To Add text properties, add some text box parameters under ListItems for binding the second drop-down list. Or copy the text box parameter from the location (/sitecore/client/Applications/FormsBuilder/Components/Layouts/PropertyGridForm/PageSettings/Settings/ListBox/ListItems/Rows).
In each text box parameter, you need to fill these field values as per your parameter name.
 2: Add properties for the element.
Make an entry of each parameter under ListItems like this.
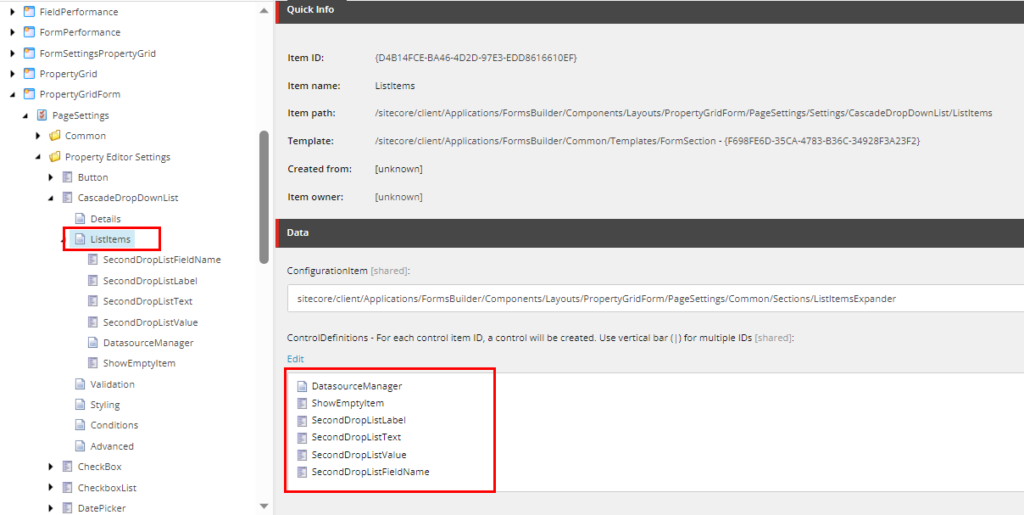
3: Parameter entry in Listitems.
Step 2:

Create a new Model that will be inherited from DropDownListViewModel like this.
using Sitecore.Data.Items;
using Sitecore.Diagnostics;
using Sitecore.ExperienceForms.Mvc.Models.Fields;
using System;

namespace SitecoreCascadingDropDown.Models.FormBuilder
{
    [Serializable]
    public class CustomCascadeDropDownListViewModel : DropDownListViewModel
    {
        public virtual string SecondDropDownSelectedValue { get; set; }
        public string SecondDropListLabel { get; set; }
        public string SecondDropListValue { get; set; }
        public string SecondDropListText { get; set; }

        protected override void InitItemProperties(Item item)
        {
            Assert.ArgumentNotNull(item, "item");
            base.InitItemProperties(item);

            SecondDropListLabel = item?.Fields["SecondDropListLabel"]?.Value;
            SecondDropListValue = item?.Fields["SecondDropListValue"]?.Value;
            SecondDropListText = item?.Fields["SecondDropListText"]?.Value;
        }

        protected override void UpdateItemFields(Item item)
        {
            Assert.ArgumentNotNull(item, "item");
            base.UpdateItemFields(item);

            var label = item.Fields["SecondDropListLabel"];
            if (label != null)
            {
                label.SetValue(SecondDropListLabel, true);
            }

            var value = item.Fields["SecondDropListValue"];
            if (value != null)
            {
                value.SetValue(SecondDropListValue, true);
            }

            var text = item.Fields["SecondDropListText"];
            if (text != null)
            {
                text.SetValue(SecondDropListText, true);
            }
        }
    }
}
Step 3:
Create a view for binding the Model values.
@using Sitecore.ExperienceForms.Mvc.Html
@model SitecoreCascadingDropDown.Models.FormBuilder.CustomCascadeDropDownListViewModel

<div class="universalcascadingselectlist">
    <div class="category-select-list-ddn">
        <label for="@Html.IdFor(m => Model.Value)" class="@Model.LabelCssClass">@Html.DisplayTextFor(t => Model.Title)</label>
        <select id="@Html.IdFor(m => Model.Value)"
                name="@Html.NameFor(m => Model.Value)"
                class="@Model.CssClass cascadingselectlist-category-ddn select-box__selec"
                data-sc-tracking="@Model.IsTrackingEnabled"
                data-sc-field-name="@Model.Name" @Html.GenerateUnobtrusiveValidationAttributes(m => m.Value)>
            @if (Model.ShowEmptyItem)
            {
                <option label=" "></option>
            }@foreach (var item in Model.Items)
            {
                <option value="@item.Value" selected="@item.Selected">@item.Text</option>
            }
        </select>
    </div>
    @Html.ValidationMessageFor(m => Model.Value)

    <div class="products-select-list-ddn">
        <label for="@Html.IdFor(m => Model.SecondDropDownSelectedValue)" class="">
            @Html.DisplayTextFor(t => Model.SecondDropListLabel)
        </label>

        <select id="@Html.IdFor(m => Model.SecondDropDownSelectedValue)"
                name="@Html.NameFor(m => Model.SecondDropDownSelectedValue)"
                class="@Model.CssClass cascadingselectlist-products-ddn select-box__select"
                data-sc-tracking="@Model.IsTrackingEnabled" data-sc-text="@Model.SecondDropListText">
            {
            <option value="@Model.SecondDropListValue">@Model.SecondDropListText</option>
            }
        </select>
    </div>
</div>
Step 4:
Write a JS code to load parent items (Product Category) data on page load, and as per category item selected or change get all the respective child items (Products) data. Or you can say by selecting the first dropdown value we are getting values and filling the second dropdown value.
let UniversalCascadingSelectList = function (selectListComponent) {
    this.selectListComponent = selectListComponent;
    this.parentSelectList = this.selectListComponent.querySelector('.cascadingselectlist-category-ddn');
    this.childSelectList = this.selectListComponent.querySelector('.cascadingselectlist-products-ddn');
    this.textField = this.childSelectList.getAttribute("data-sc-text");
    this.valueField = this.childSelectList.getAttribute("data-sc-value");
};

UniversalCascadingSelectList.prototype.Init = function () {
    var _this = this;

    _this.PopulateChildList();

    this.parentSelectList.addEventListener('change', function () {
        _this.PopulateChildList();
    });
};

UniversalCascadingSelectList.prototype.PopulateChildList = function () {
    var childSelectList = this.childSelectList;

    //get the value from select list 1
    var itemId = this.parentSelectList.value;

    //pass it via the get, as querystring parameter
    $.get("/FormBuilder/CustomCascadingDropdown/SelectItems", { itemId: itemId, textFieldName: this.textField, valueFieldName: this.valueField }, function (data, status) {

        //clear and load SelectList2
        childSelectList.innerHTML = "";

        if (status === "success") {
            $.each(data, function (key, entry) {
                var addedOption = document.createElement("option");
                addedOption.text = entry.Text;
                addedOption.value = entry.Value;
                childSelectList.add(addedOption, 1);
            });
        }
    });
};

window.addEventListener('load', function () {
    let selectLists = document.querySelectorAll('.universalcascadingselectlist');

    if (selectLists) {
        selectLists.forEach(function (selectListComponent) {
            // Construct new FeaturedData
            var selectList = new UniversalCascadingSelectList(selectListComponent);

            // Init functionality on load
            selectList.Init();
        });
    }
});
Step 5:
Add a controller to handle JS call(s) to get the data.
using Sitecore.Data;
using Sitecore.Data.Items;
using System;
using System.Linq;
using System.Web.Mvc;

namespace SitecoreCascadingDropDown.Controllers.FormBuilder
{
    public class CustomCascadingDropdownController : Controller
    {
        public JsonResult SelectItems(string itemId, string textFieldName, string valueFieldName)
        {
            if (string.IsNullOrEmpty(itemId))
                return new JsonResult();

            if (Sitecore.Context.Database == null)
                return new JsonResult();

            var parentItem = Sitecore.Context.Database.GetItem(ID.Parse(itemId));

            if (parentItem == null)
                return new JsonResult();

            var items = parentItem.GetChildren().Select(x => new SelectListItem { Text = GetValueForStandardFields(textFieldName, x) ?? x.Fields[textFieldName].Value, Value = GetValueForStandardFields(valueFieldName, x) ?? x.Fields[valueFieldName].Value });

            return Json(items, JsonRequestBehavior.AllowGet);
        }

        private string GetValueForStandardFields(string fieldName, Item item)
        {
            if (fieldName.Equals("ID", StringComparison.OrdinalIgnoreCase))
                return item.ID.ToString();

            if (fieldName.Equals("Name", StringComparison.OrdinalIgnoreCase))
                return item.Name;

            return null;
        }
    }
}
Step 6:
Create a Field template in location (/sitecore/templates/System/Forms/Fields).
Create a new template by copying the existing DropDownList and name it “Cascading Dropdown list”. Add the below fields for the properties that were created in the core db. Optionally, you can set default values in standard values for these fields.
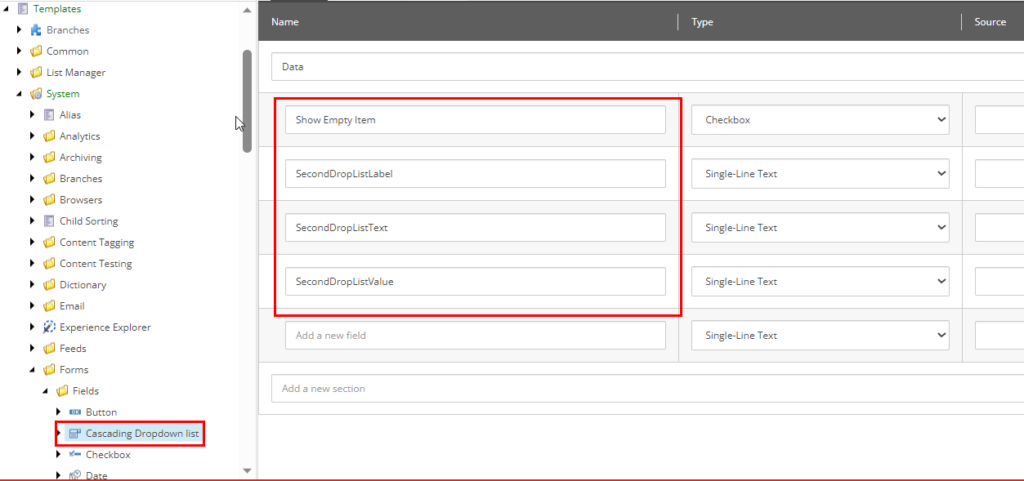
4: Create Field template.
Step 7:
Make an entry in the master database under this location (/sitecore/system/Settings/Forms/Field Types/Lists). Make a copy of the existing Dropdown List, name it Cascade Dropdown List, and fill in the required fields.
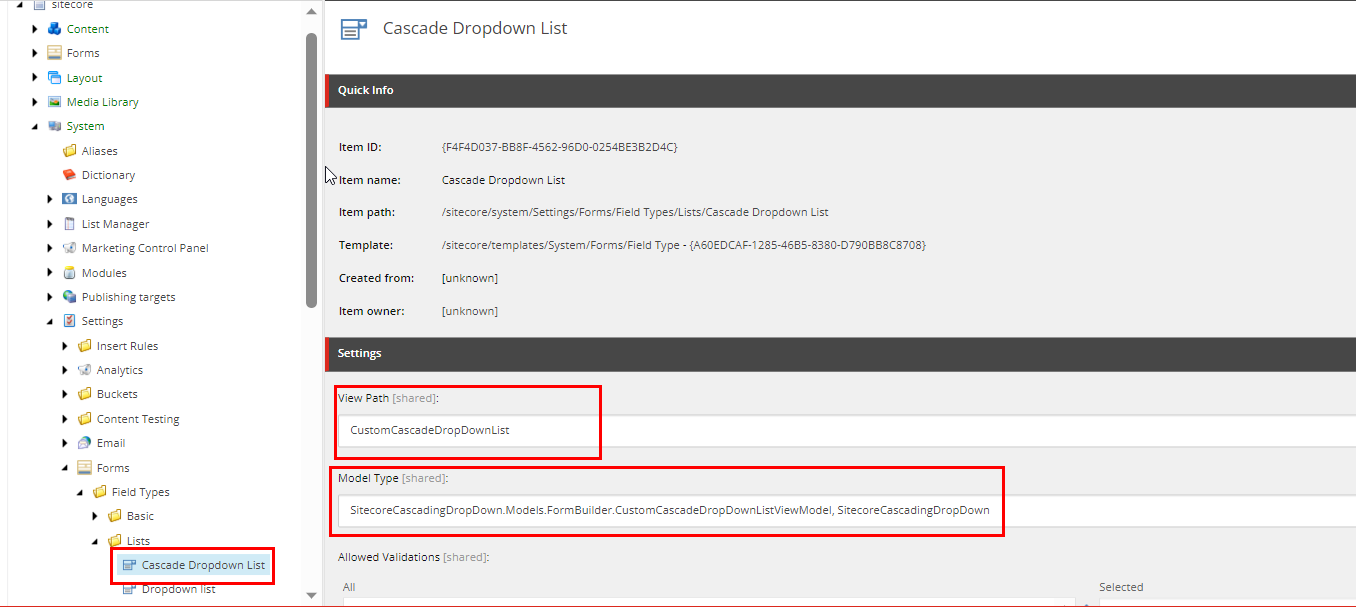
5: Add an item in Master database.
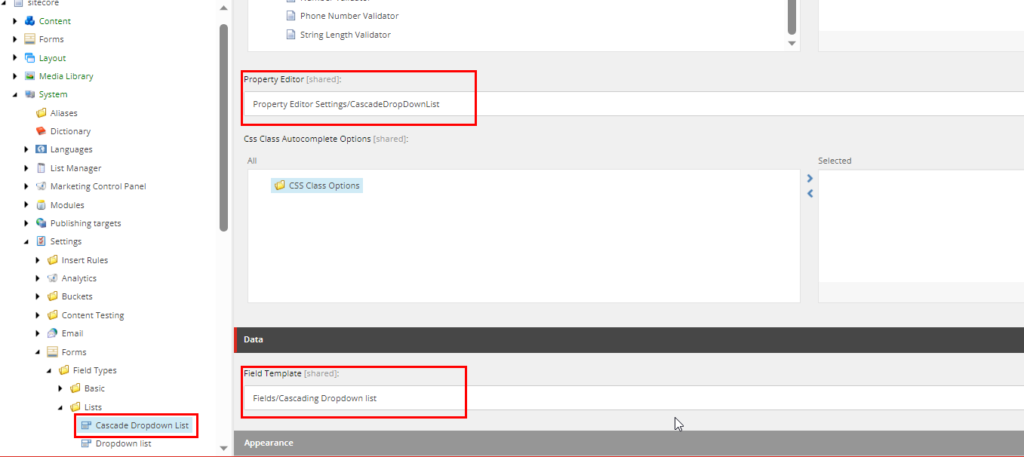
6: Set the highlighted fields with respective data.
After doing all these steps, you will find a custom Cascading dropdown in Form Elements.
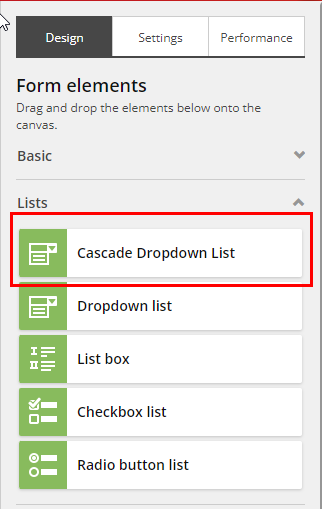
7: Added custom Cascade Dropdown in Form element’s list section.
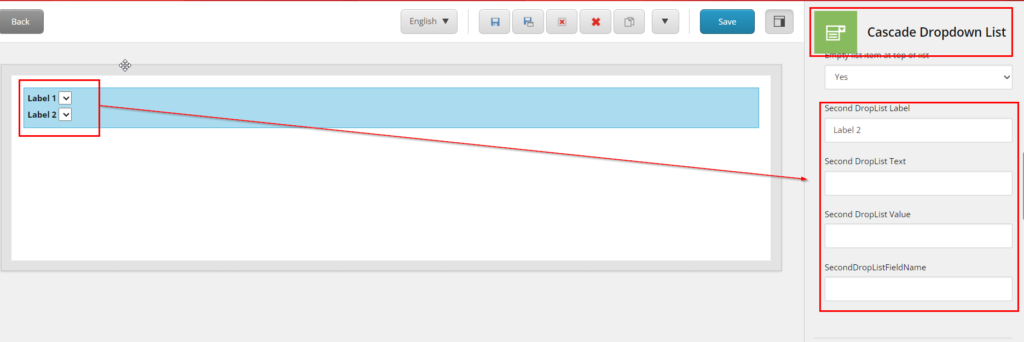
8. Cascade Dropdown and its properties.
Hope this helps you in your custom element creation in Sitecore.
Thanks, and Happy learning.