
Introduction to Spring Boot
What is Spring Boot?
Spring Boot is a powerful convention-over-configuration framework that simplifies the development of Java-based applications. It is built on top of the Spring Framework and provides a set of defaults, reducing the need for custom configurations. Spring Boot is designed to accelerate the development process, making it easier for developers to create production-ready applications with minimal effort.
Key Features and Benefits
- Opinionated Defaults: Spring Boot provides sensible defaults for configuration, reducing the need for developers to make numerous decisions.
- Embedded Servers: It comes with embedded servers like Tomcat, Jetty, or Undertow, eliminating the need for external server setups.
- Microservices-Friendly: Spring Boot facilitates the development of microservices architecture, allowing for the creation of independently deployable and scalable services.
- Auto-Configuration: Spring Boot automatically configures components based on project dependencies, reducing manual setup.
- Production-Ready: With built-in health checks, metrics, and monitoring features, Spring Boot applications are ready for production deployment.
Spring Boot vs. Traditional Spring
While traditional Spring applications require extensive XML configurations and boilerplate code, Spring Boot embraces convention over configuration. It simplifies dependency management, reduces the need for XML, and provides embedded servers by default. Spring Boot promotes a more streamlined and agile development process compared to the more verbose nature of traditional Spring applications.
Setting Up Your Development Environment
Installing Java Development Kit (JDK)
Before getting started with Spring Boot, ensure that you have Java Development Kit (JDK) installed on your machine. You can download the latest version from the official Oracle or OpenJDK website ( https://openjdk.org/) and follow the installation instructions.
Configuring Integrated Development Environment (IDE)
Choose an Integrated Development Environment (IDE) that suits your preferences. Popular choices include IntelliJ IDEA, Eclipse, and Visual Studio Code. Configure your IDE to use the installed JDK, ensuring a smooth development experience.
Initializing a Spring Boot Project
- Using Spring Initializr: Spring Initializr is a web-based tool that helps you bootstrap a new Spring Boot project. Select your project options, such as project type, language, and dependencies, and download the generated project archive.
To manually initialize the project:
Take the reference of this snapshot and follow the below steps for manually initializing the project.
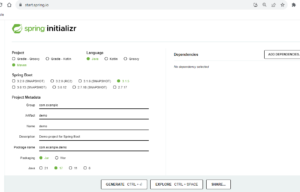
- Navigate to https://start.spring.io. This service pulls in all the dependencies you need for an application and does most of the setup for you.
- Choose either Gradle or Maven and the language you want to use. I have used Java language with Maven.
- Click Dependencies and select Spring Web.
- Click Generate.
- Download the resulting ZIP file, which is an archive of a web application that is configured with your choices.
Understanding the Basics of Spring Boot
The Spring Boot Starter Concept
Spring Boot Starters are a set of convenient dependency descriptors that simplify project configuration. They are designed to handle the boilerplate code associated with specific tasks, such as web development, data access, or testing. Starters make it easy to include common dependencies in your project without manually managing version numbers.
Auto-Configuration in Spring Boot
Auto-Configuration is a key feature of Spring Boot that automatically configures beans based on the project’s classpath. By analyzing the dependencies present, Spring Boot intelligently sets up components, eliminating the need for extensive manual configurations. This feature significantly reduces the development time and effort required for setting up a Spring application.
Application Properties

Spring Boot allows you to configure your application using properties files. These configuration files provide a way to externalize settings, making it easy to change application behavior without modifying code. Understanding how to leverage these configuration options is essential for customizing the behavior of your Spring Boot application.
Building Your First Spring Boot Application
Creating a Simple RESTful Web Service
Let’s create a basic RESTful web service using Spring Boot. Start by defining a simple controller:
Create a simple Java class. Take a reference to the below path for reference.
/SprinBoot-BlogSeries/src/main/java/com/example/HomeController.java
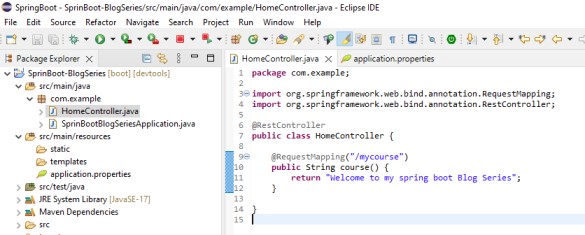
This controller responds to a request at “/mycourse” with a simple return message “Welcome to my Spring Boot Blog Series”.
In the above example, I have used @RequestMapping annotation to map requests to the controller method. It has various attributes to match by URL, HTTP method, request parameters, headers, and media types. You can use it at the class level to express shared mappings or at the method level to narrow down to a specific endpoint mapping.
There are also HTTP method specific shortcut variants of @RequestMapping:
- @GetMapping
- @PostMapping
- @PutMapping
- @DeleteMapping
- @PatchMapping
Running and Testing Your Application
- Ensure Tomcat is Embedded:
- Spring Boot comes with an embedded server (like Tomcat) by default. You don’t need to set up an external server; it’s embedded within your application.
- Build Project:
- Before running, ensure your project is built. In Eclipse, this can be done by right-clicking on the project, then selecting “Run As” > “Maven Build…” and providing the goal as
clean install.
- Before running, ensure your project is built. In Eclipse, this can be done by right-clicking on the project, then selecting “Run As” > “Maven Build…” and providing the goal as
- Start the Server:
- Navigate to your main application class (where your
mainmethod is) or any class with amainmethod. - Right-click on the class and choose “Run As” > “Java Application.”
- Navigate to your main application class (where your
- Access the Endpoint:
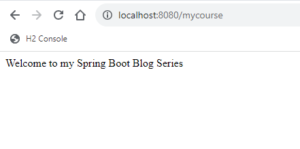
- Once the server is started, open a web browser.
- Navigate to the specified endpoint. For example, if you have a RESTful endpoint at http://localhost:8080/mycourse , enter this URL in the browser.
Remember, the default port for Spring Boot applications is often 8080, but it can be configured differently if needed. Adjust the port in your application.properties if you’ve changed it using server.port.
See the below snapshot for reference.

Project Structure and Configuration Files
Explore the generated project structure, which typically includes folders for controllers, services, and configuration. Examine the application.properties file to understand how configuration properties are set. Understanding the project structure and configuration is crucial for organizing and customizing your Spring Boot application.
Congratulations! You’ve taken the first steps in mastering Spring Boot. In the upcoming parts of this series, we’ll delve deeper into advanced topics, building on the foundational knowledge you’ve gained. Stay tuned for more in-depth explorations of Spring Boot’s powerful features.
Reference:
https://spring.io/guides/gs/spring-boot/
https://www.baeldung.com/spring-boot
Dive into the world of SAP with our guide on managed services, service management, audits, and intelligent asset management. Learn how to optimize your SAP landscape for peak performance and achieve unparalleled efficiency in your operations.
Thank you for your valuable suggestions.