CI/CD | Java | Secure Software Development | Security
How to make your web application more secure by using Static Application Security Testing (PART 1 of 5 in Application Security Testing series) Maarten Plat 30 Jan, 2023


Welcome to part two of the Application Security Testing series. Like I mentioned in the previous blog, during this blog series we are going to look at the different types of Application Security Testing and Software Composition Analysis. If you missed part one, be sure to check it out: Application Security Testing Part one.
This time we will focus on Dynamic Application Security Testing (DAST). First, I will give a brief explanation about DAST. After the explanation the advantages and disadvantages of DAST are listed. We conclude with a demo of an open source DAST tool called OWASP ZAP by using it against our own vulnerable web application.
The vulnerable web application is the same one we used in the first blog of this series. You can download the source code here: vulnapp.
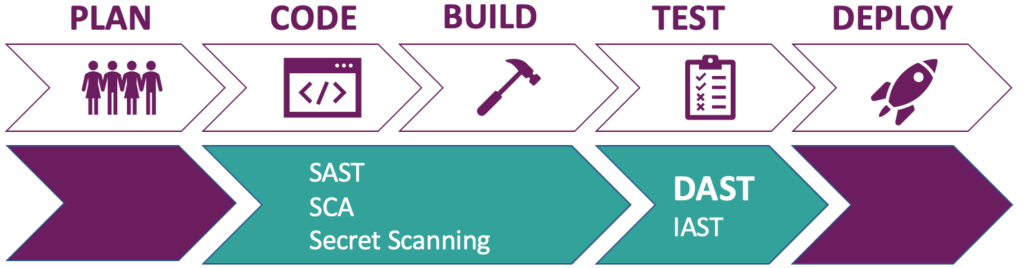
Figure 1: Place of DAST and other application security testing in development phases
Automated DAST will take place during the “Test” phase of the software development phases. However, nothing stops you from downloading ZAP to use it manually in your own local environment.
DAST tests the security of an application by scanning it at runtime. In order to do this, it needs to be provided with information about the targeted web application. Some examples of information are URL’s and login credendentials.
ZAP starts with spidering your web application: based on the URL you provided, ZAP will search for links in pages to get an overview of the URLs of your web application. It will register these and then start the scanning process. A DAST tool scans by sending HTTP Requests with malicious payloads and analyzes the corresponding HTTP Responses to identify potential vulnerabilities. A DAST tool analyzes HTTP Responses because it has no knowledge of the internal workings of the application.
A DAST tool uses policies or rules to specify what kind of attacks should be executed. These attacks will expose a certain type of security vulnerability. Unlike the rules of SAST tools, they are not language specific. However, make sure the DAST tool you want to use, contains policies/rules that define vulnerability types that are important to your context. The security department should be able to help you.
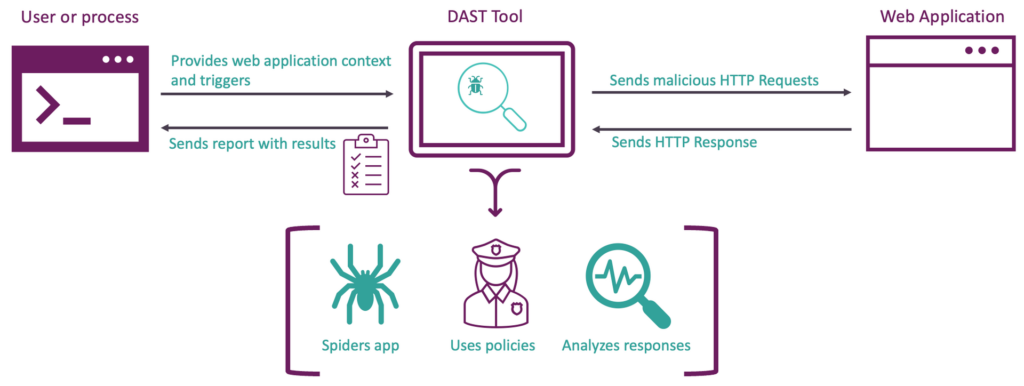
Figure 2: High level overview of DAST
Advantages
Disadvantages
When you look at the above, the disadvantages seem to be in the majority. The disadvantages are listed to make you aware of the fact that you should fine tune the tool and the process around it. They can be overcome by taking measures to counter them. For example, the first disadvantage can be mitigated by using a DAST tool in a separate CI/CD pipeline instead of your main build pipeline and let it run during the night. This way you will have the results the next morning and you don’t have to wait for hours until your build pipeline is finished. If there are any vulnerabilities, you can fix them the next day.
Now it is time to use a DAST tool against our vulnerable web application. We will be using OWASP Zed Attack Proxy (ZAP), an open source tool that can also be used for penetration testing. ZAP can be setup as a man-in-the-middle proxy which means it intercepts HTTP Requests and HTTP Responses that are exchanged between the browser and the web application. We will be using another feature of OWASP ZAP, namely its scanning capabilities. If you want to learn more about the options of OWASP ZAP, check out the website of OWASP ZAP.
For this demo we will be using the docker version of OWASP ZAP. So, it is necessary to have Docker installed on your system. You can download Docker here.
Once docker is installed, you will need to pull the OWASP ZAP docker image. Start a terminal and execute the following command:
docker pull owasp/zap2docker-stable
If you have a Macbook with a M chip, the pulled image will not work because it was built for a different CPU architecture. We will need to build the image ourselves. Download or clone the OWASP ZAP source code here. Start a terminal and ‘cd’ to the folder containing the ZAP source code. Once you are in the ZAP source code root folder, ‘cd’ into the docker folder. Run the following command:
Docker build -t zapm1 -f Dockerfile-stable .
Docker will build the ZAP image and name it zapm1. The preparation of the ZAP Docker image is now done.
Next, we will start the vulnerable application. Use a terminal and ‘cd’ into the downloaded vulnerable application root folder named vulnerable-app. It contains a file called vulnapp-0.0.1-SNAPSHOT.jar. We will use this file to run the web application by using the following command:
java -jar vulnapp-0.0.1-SNAPSHOT.jar
The application will run at http://localhost:8080.
Now it is time to run the active scanner of ZAP against our web application. To do this, we need to provide ZAP with context about our web application. I created a ZAP context file called DAST.context for this purpose. It contains credentials for authentication and the login/logout url. This way we can peform an authenticated scan. Doing an authenitcated scan is important because otherwise ZAP will only scan unauthenticated endpoints and miss potential vulnerabilities. For more information about authentication and ZAP, checkout: ZAP Authentication. You can find the DAST.context file by going to the root folder of the downloaded vulnerable application and navigate to the folder called ZAP. You can have a look at it now, but we will be modifying it shortly.
The ZAP Docker container will not be able to reach the vulnerable web application at http://localhost:8080. It needs your private IP Address to reach the vulnerable web application.
Use the following command on the terminal for Linux or Mac:
ifconfig | grep -E ‘([0-9]{1,3}\.){3}[0-9]{1,3}’
Or for windows:
ipconfig /all
Copy the IPV4 address and open DAST.context with a text editor of your choice. Replace all three instances of <Your PRIVATE IP ADDRESS> with the copied IPV4 address and save the file. For me http://<YOUR PRIVATE IP ADDRESS>:8080 becomes http://192.168.1.148:8080.
With that finished we can run ZAP against our web application. Open a terminal and cd into the folder containing the DAST.context file. Run the following command if you use the M1 image:
docker run -v $(pwd):/zap/wrk/:rw -t zapm1 zap-full-scan.py -t http://<YOUR PRIVATE IP ADDRESS>:8080/login -n DAST.context -U mike -r testreport.html
Run this command if you use the downloaded image:
docker run -v $(pwd):/zap/wrk/:rw -t owasp/zap2docker-stable zap-full-scan.py -t http://<YOUR PRIVATE IP ADDRESS>:8080/login -n DAST.context -U mike -r testreport.html
This command uses a volume (-v) to make files available between the Docker container and its host environment. Next it uses the python script zap-full-scan.py that is embedded in the ZAP Docker image. First the script uses a spider feature to discover new URLs in the web application and then starts scanning the discovered URLs. We target our web application with -t and as before you need to replace <YOUR PRIVATE IP ADDRESS> in the command with your own IP Address. Then we provide the context file with -n and we are using an authenticated scan by providing a user that is contained in the context file with -U. Lastly, we want ZAP to generate a report with findings by using -r.
After ZAP is done the found vulnerabilities are displayed in the terminal screen. ZAP also created a testreport.html in the same folder that you ran the scan. This file gives a nice readable overview of the results. Open the report with a browser and you will see figure 3.
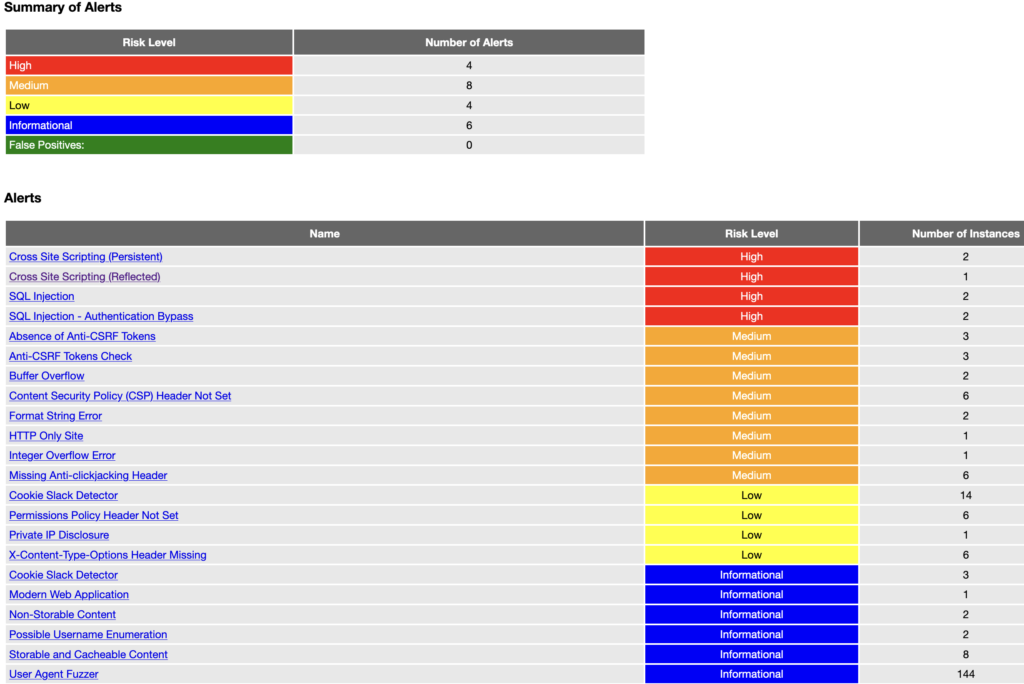
Figure 3: OWASP ZAP scan results of vulnerable application
ZAP found quite a few vulnerabilities ranging from very bad (High) to might be a problem (Informational). For the sake of keeping things short, I will only discuss the high and medium findings and not go into detail about all the vulnerabilities. We will only take a closer look at the Cross Site Scripting vulnerability. For more detail on the other vulnerabilities I will link to relevant resources.
The first type of High finding is Cross Site Scripting. Cross Site Scripting is an injection attack that allows an attacker to compromise the interactions a user has with the vulnerable application. This means that an attacker can potentially read, modify and transmit any sensitive data accessible by the browser of the user. The attack is executed by injecting JavaScript into the vulnerable web application, which is then executed in the browser of the user. ZAP mentions two types of Cross Site Scripting. Persistent and Reflected Cross Site Scritping. Persistent Cross Site Scripting means that the attacker’s JavaScript payload is stored in a persistent storage (for example a database). The vulnerable application uses this persistent storage to build a web page (HTTP Response) which contains the JavaScript payload embeded in HTML (<script></script> is a HTML tag). This means that everytime this page is visited the JavaScript payload is executed. In our case, everybody who visits the http://localhost:8080/posts?postId=1 is attacked.
You can verify this by entering a the JavaScript payload like <script>alert(‘xss’)</script> via the form at http://localhost:8080/posts?postId=1. Everytime you visit the URL, you will get a pop-up with the text “xss” as shown in figure 4. This confirms that our added JavaScript is executed on this page.
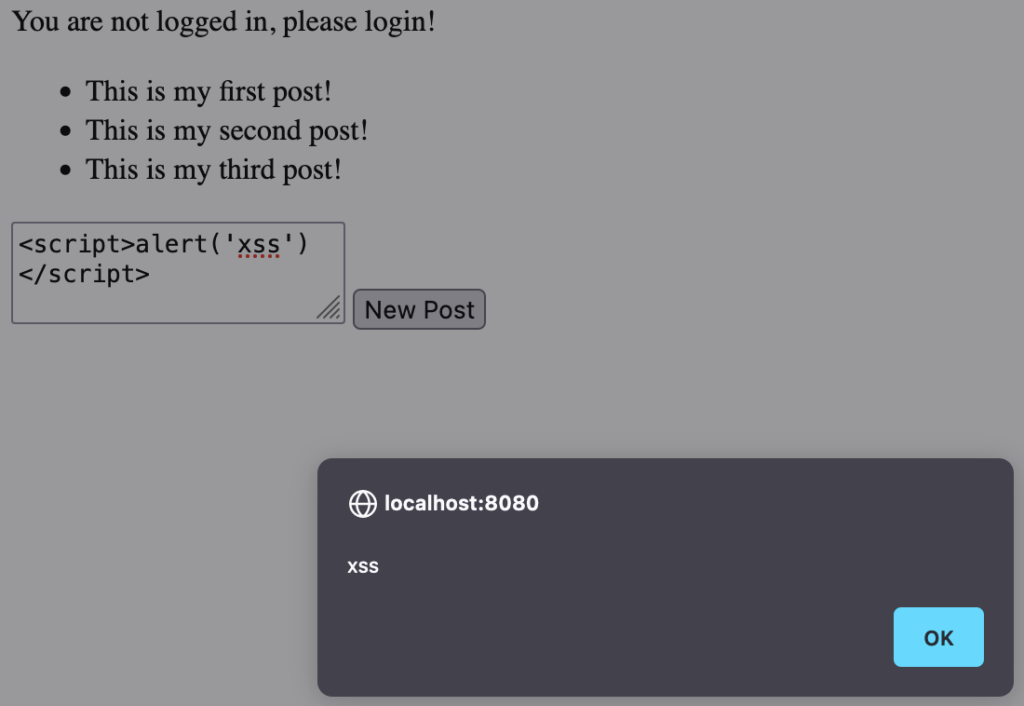
Figure 4: Cross Site Scripting attack via /posts
Reflected Cross Site Scripting means the data (the HTML that contains the embeded JavaScript payload) that is send by a HTTP Request, is added to the HTTP Response of that corresponding HTTP Request in a unsafe manner. No persistent storage is used. You might think that it is only possible to attack your own browser in this way. However it might be possible to attack another user by sending a link with a JavaScript payload. For example by e-mailing someone a payload like https://vulnerableapp.com/post?message=<script>alert(‘xss’)</script>. If the receiver of this link clicks on it, the JavaScript is executed in his or her browser. The Reflected Cross Site Scripting finding in the ZAP results is a false positive. The JavaScript payload is not reflected in the response of the request because the response of the request is a redirect to http://localhost:8080/posts?postId=1. The redirected page does contain the JavaScript payload. ZAP thinks the redirected page is the HTTP Response of the HTTP Request. Which is not the case.
Now it is time to fix the problem. There are two things that we can apply to prevent this problem. First of all you should always validate the input of the user and secondly most modern template engines provide ways to output encode user controlled data. If you want to learn more about input validation checkout this OWASP cheatsheet: Input Validation Cheat Sheet. We will look at output encoding. When we look at the code of the posts.html template in the directory vulnerable-app/src/main/resources/templates/, we see the following code:
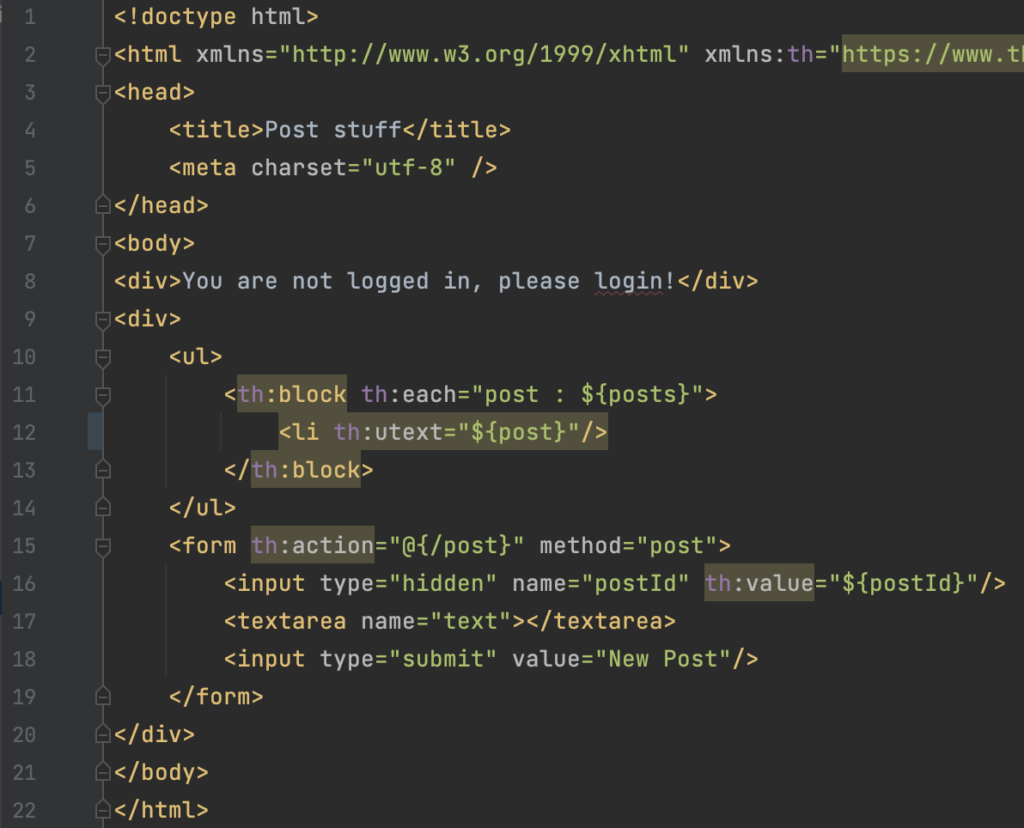
Figure 5: Posts template
The vulnerable application uses a template engine called Thymeleaf. When we visit the documetation at documentation (3.2), the documentation states that Thymeleaf by default output encodes HTML with the ‘th:text’ tag. This makes Cross Site Scripting like we just found with ZAP impossible. However at line 12 in the Posts template (posts.html) the vulnerable application uses ‘th:utext’ to render data. The ‘th:utext’ tag renders raw HTML and since the data that is rendered by this tag is unvalidated user data, the Cross Site Scripting problem arises. In this case the fix is simple. Change the ‘th:utext’ on line 12 to ‘th:text’. Now if we look at the source of the vulnerable webpage via the browser we won’t see the payload ‘<script>alert(‘xss’)</script>’, but ‘<script>alert(‘xss’)</script>. The payload ‘<script>alert(‘xss’)</script>’ is output encoded. This prevents the browser from executing any JavaScript via HTML constructs. Be aware of the fact that it is important to use the right output encoding method for the specific context. For more information about this, checkout the OWASP Cross Site Scripting Prevention Cheat Sheet.
The second type of High finding concern SQL Injection. Apparently, it is possible to compromise the database of the vulnerable web application and use SQL Injection to bypass authentication via the login page. While ZAP lists them as two different SQL Injections, it is one SQL Injection that can be exploited in different ways depending on the payload. This is an additional SQL injection to the one that Semgrep found in the previous blog. For some reason OWASP ZAP did not find the SQL Injection that Semgrep found, the SQL Injection in posts?postId=1. We will go into the details of the “/login” SQL Injection in the third blog.
On the other hand, ZAP found vulnerabilities that Semgrep did not. This makes clear why it is important to use several different types of security testing tools to get the most accurate results. Now we will briefly discuss the medium findings.
The vulnerable web application seems to lack protection against CSRF. This may cause unintended action on the user’s behalf by an attacker. For example, unintended transfer of money to a bank account.
ZAP also thinks our web application contains a buffer overflow, integer overflow and format String Error. These kinds of vulnerabilities can lead to remote code execution, which is really scary. Because it means that arbitrary code can be run on the targeted server and might give an attacker control over the server.
The web application is using an insecure communication channel since it uses HTTP instead of HTTPS. HTTP does not encrypt the communication between the server and client. This can be abused by a man in the middle attack. In such an attack the attacker can read all the data that is communicated between a client and server. The attacker might for example use this to collect credenditals.
The last finding of ZAP we are going to discuss is about HTTP response headers. The responses of the vulnerable application are missing HTTP security headers. The medium findings concern the absence of anti click jacking protection and the Content Security Policy that helps mitigate Cross Site Scripting. The kind of vulnerabilities that these HTTP security headers protect against can for example be misused to deface a web application, spread malware or manipulate the user to do unintended actions.
The next step would be to validate if the vulnerabilities found by ZAP are true vulnerabilities (true positive) or not a vulnerability at all (false positivies). We already know that the Cross Site Scripting and SQL injection vulnerability are true positives. What about the rest? Try to figure out by yourself. If you want to know right away, highlight the text in the spoilers black by selecting it.
<Spoilers>
The finding about CSRF, use of HTTP and missing security headers are all true positives. The buffer overflow, format String Error and Integer overflow findings are problems, but not security vulnerabilities. They cannot be exploited and are false positives. However, they do make us aware of the fact that we do not have input validation and proper error handling in place and this should be fixed.
</Spoilers>
For a comprehensive list of tools, checkout: AppSecMap.
This concludes this blog. In the next blog we will look at Interactive Application Security Testing (IAST) and once again test our vulnerable web application. See you at the next one!
