
In today’s digital world, security is a major concern, and 2-factor authentication (2FA) is one way to increase security. 2FA adds an extra layer of protection to your account by requiring users to provide two forms of authentication to access it. This usually includes something the user knows (such as a password) and something they have (such as a physical device). In this blog post, we will discuss how to implement 2FA in a Spring Boot application using Google Authenticator, a popular app that generates one-time codes.
To implement 2FA in Spring Boot with Google Authenticator, we need to add the following dependencies in your `pom.xml` or `build.gradle` file :
- `google-authenticator`: to generate and validate the TOTP codes.
<dependency>

<groupId>com.warrenstrange</groupId>

<artifactId>googleauth</artifactId>

<version>1.4.0</version>

</dependency>
- `zxing-core`: to generate QR codes.
<dependency>

<groupId>com.google.zxing</groupId>

<artifactId>core</artifactId>

<version>3.3.0</version>

</dependency>

<dependency>

<groupId>com.google.zxing</groupId>

<artifactId>javase</artifactId>

<version>3.3.0</version>

</dependency>
Next, We need to configure Google Authenticator to create the Google Authenticator bean:
import com.warrenstrange.googleauth.GoogleAuthenticator; import lombok.RequiredArgsConstructor;

import org.springframework.context.annotation.Bean; import org.springframework.context.annotation.Configuration;
@Configuration

@RequiredArgsConstructor

public class CustomGoogleAuthenticatorConfig { private final CredentialRepository credentialRepository;

@Bean

public GoogleAuthenticator gAuth() {

GoogleAuthenticator googleAuthenticator = new

GoogleAuthenticator();

googleAuthenticator.setCredentialRepository(credentialReposit ory);

return googleAuthenticator;

}

}
Now, we have to implement ICredentialRepository for persisting keys for users. It contains two methods i.e. saveUserCredentials and getSecretKey. Below is the simple implementation :
import com.warrenstrange.googleauth.ICredentialRepository; import lombok.AllArgsConstructor;

import lombok.Data;

import lombok.NoArgsConstructor;

import org.springframework.stereotype.Component;

import java.util.HashMap;

import java.util.List;

import java.util.Map;

@Component

public class CredentialRepository implements ICredentialRepository {

private final Map<String, UserTOTP> usersKeys = new HashMap<String, UserTOTP>();

@Override

public String getSecretKey(String userName) { return usersKeys.get(userName).getSecretKey(); }

@Override

public void saveUserCredentials(String userName, String secretKey,

int validationCode,

List<Integer>

scratchCodes) {

usersKeys.put(userName, new UserTOTP(userName, secretKey, validationCode, scratchCodes)); }

public UserTOTP getUser(String username) { return usersKeys.get(username);

}

@Data

@NoArgsConstructor

@AllArgsConstructor

class UserTOTP {

private String username;

private String secretKey;

private int validationCode;

private List<Integer> scratchCodes;

}

}
Now, let’s create a controller for generating and verifying code :
import com.fAuth.models.ValidateCodeDto;

import com.fAuth.models.Validation;

import com.google.zxing.BarcodeFormat;

import com.google.zxing.client.j2se.MatrixToImageWriter; import com.google.zxing.common.BitMatrix;

import com.google.zxing.qrcode.QRCodeWriter;

import com.warrenstrange.googleauth.GoogleAuthenticator; import com.warrenstrange.googleauth.GoogleAuthenticatorKey; import

com.warrenstrange.googleauth.GoogleAuthenticatorQRGenerator; import lombok.RequiredArgsConstructor;

import lombok.SneakyThrows;

import lombok.extern.slf4j.Slf4j;

import org.springframework.web.bind.annotation.*;

import javax.servlet.ServletOutputStream;

import javax.servlet.http.HttpServletResponse;

@Slf4j

@RestController

@RequiredArgsConstructor

@RequestMapping("/code")

public class CodeController {

private final GoogleAuthenticator gAuth;

@SneakyThrows

@GetMapping("/generate/{username}")

public void generate(@PathVariable String username, HttpServletResponse response) {

final GoogleAuthenticatorKey key =

gAuth.createCredentials(username);

//I've decided to generate QRCode on backend site QRCodeWriter qrCodeWriter = new QRCodeWriter();

String otpAuthURL =

GoogleAuthenticatorQRGenerator.getOtpAuthTotpURL("my-demo", username, key);

BitMatrix bitMatrix = qrCodeWriter.encode(otpAuthURL, BarcodeFormat.QR_CODE, 200, 200);

//Simple writing to outputstream

ServletOutputStream outputStream =

response.getOutputStream();

MatrixToImageWriter.writeToStream(bitMatrix, "PNG", outputStream);

outputStream.close();

}

@PostMapping("/validate/key")

public Validation validateKey(@RequestBody ValidateCodeDto body) {

return new

Validation(gAuth.authorizeUser(body.getUserName(), body.getCode()));

}

}

Once everything is set up, the user will log in using their username and password as usual. After successful authentication, the user will be prompted to enter a one-time code generated by Google Authenticator. This code will be valid for only a short time (usually 30 seconds) and can only be used once.
Now, let’s try to generate a QR code for Google Authenticator App
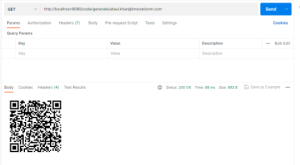
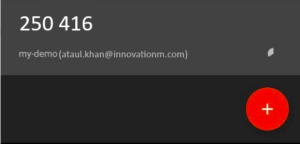
Now, we have to scan this QR code with our GA app to get the code :
Now, let’s validate the code :
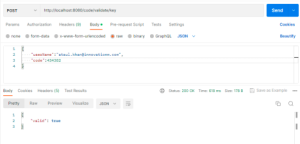
As we can see in the above screenshot, when we provide the code generated by the GA App and the email id, the API is validating the code and returns the response as true.
Good work folks! We’ve implemented 2 Factor Authentication with Google Authenticator, as you can see, it was fairly easy to do.
In summary, 2FA is an important security measure that adds an extra layer of protection to your accounts. Spring Boot with Google Authenticator makes it easy to implement 2FA in your web applications. By adding two dependencies, configuring Spring Security, creating a custom authentication filter, and configuring Google Authenticator, you can secure your application and provide a safer user experience.