

The goal of every software team is to maximize competitive advantage while minimizing the gap between conception, implementation, and deployment to production, without sacrificing application integrity or customer (user) experience. Elite teams meet this goal by integrating continuous integration and continuous delivery (CI/CD) into their development process. With CI/CD, you get speedy deployments protected by your test suite. Nothing is deployed without passing required tests.
In this tutorial, I will show you how to Dockerize a Flask application, deploy it to the Azure Container Registry (ACR), and set up a CircleCI pipeline to automate future updates.
Learning Objectives
In this article you will learn how to do the following:
- Dockerize a Flask application
- Deploy a Docker image to Azure Container Registry (ACR)
- Automatically update the app by pushing to a GitHub repo via CircleCI
To easily focus on the main objectives of this post, a sample application has been created which you will clone and run in your local environment.
Prerequisites
- Familiarity with Docker and Docker Desktop installed on your local machine. You can follow Docker’s tutorial for Windows or macOS
- A GitHub account
- A CircleCI account
- An Azure account with an active subscription
- Python (>3.10) installed on your workstation
- Azure CLI installed on your workstation
Setting up the development environment
To help understand the concepts in this article, a simple Flask application has been created - an exchange rate API that gives naive rates for supported currencies. Use git to clone the sample application to your development environment.
git clone https://github.com/CIRCLECI-GWP/python-circleci-docker.git
Change into the cloned directory:
cd python-circleci-docker
Create a virtual environment for your project using this command:
python3 -m venv .venv
To activate the virtual environment, run this command:
source .venv/bin/activate
To find out more about virtual environments, you can read the official Flask documentation here.
Once your virtual environment is activated, install the project requirements using this command:
pip3 install -r requirements.txt
Testing the code
Tests are an essential component of CI/CD; testing protects the integrity of the application. As you deploy changes quickly using automation, you must make sure that new updates do not have negative effects on the application.
The first step in the CI/CD process is to run the application test suite. If all tests pass, the updates can be built and deployed with the assurance that the system will work as expected. If the tests fail, the deployment process is terminated and the failing code reviewed before trying again.
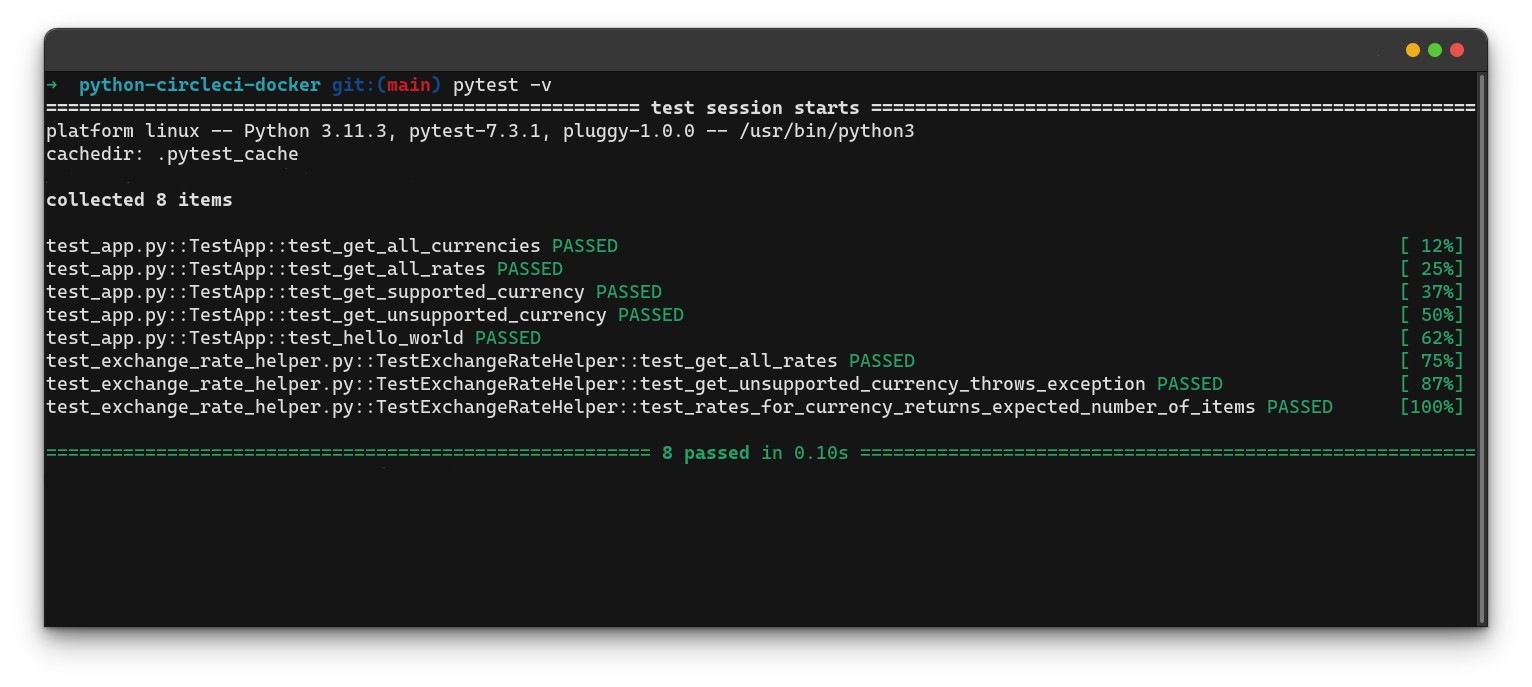
The sample application for this tutorial uses the pytest framework for testing. The tests are in two files:test_app.py and test_exchange_rate_helper.py. These tests ensure that the behaviour of the application is consistent with the posited scenarios in each test. Let’s start with reviewing test_exchange_rate_helper.py.
  import unittest
  import exchange_rate_helper

  class TestExchangeRateHelper(unittest.TestCase):

      def test_get_all_rates(self):
          rates = exchange_rate_helper.getAllExchangeRates()
          expectedNumberOfRates = len(exchange_rate_helper.getSupportedCurrencies())
          actualNumberOfRates = len(rates)
          self.assertEqual(expectedNumberOfRates, actualNumberOfRates)

      def test_get_unsupported_currency_throws_exception(self):
          with self.assertRaises(ValueError):
              rates = exchange_rate_helper.getExchangeRatesForCurrency("YUAN")

      def test_rates_for_currency_returns_expected_number_of_items(self):
          rates = exchange_rate_helper.getExchangeRatesForCurrency("NGN")
          expectedNumberOfRates = len(exchange_rate_helper.getSupportedCurrencies()) - 1
          actualNumberOfRates = len(rates)
          self.assertEqual(expectedNumberOfRates, actualNumberOfRates)
The TestExchangeRateHelper is instantiated from the base class unittest.Test, which is the smallest unit of testing. It checks for a specific response to a particular set of inputs. The unittest framework provides a base class, TestCase, that you will use to create new test cases.
The test_get_all_rates functions tests that the exchange_rate_helper module returns rates for all the supported currencies.
The test_get_unsupported_currency_throws_exception function tests the outcome when an unsupported currency is passed to the exchange_rate_helper module. When this happens, the application should throw an exception. The test verifies this via the assertRaises() function call.
Finally, the test_rates_for_currency_returns_expected_number_of_items function tests ensures that the exchange_rate_helper module returns the expected number of rates when provided with a supported currency.
To be sure everything is in order, you can run the tests written for the project using this command.
pytest -v
Note: When the above command will be run for the first time, it will prompt you to install the python3-pytest package. Type y and press enter to install the package.
You can also run the application using this command:
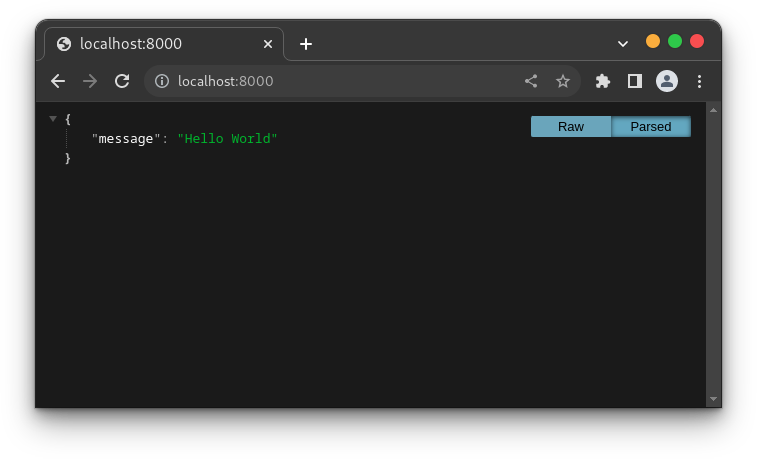
flask run --port=8000
Note: When you run this command for the first time, it will prompt you to install the python3-flask package. Type y and press enter to install the package.
This runs the application on port 8000 on your application. Open http://localhost:8000/ in your browser to review the response from the index endpoint.
The application has these routes:
| Route | Description |
|---|---|
| /rates | Get all the rates for supported currencies |
| /currencies | Get all the supported currencies by the API |
| /rate/ |
Get the rates for a specified supported currency. If the provided currency is not supported, an error response is returned. |
Once you’re sure everything works, stop the application by pressing ctrl + C to stop the server.
Next, deactivate the virtual environment by typing deactivate. If needed, you can always reactivate the virtual environment as described here.
Dockerizing the application
In this tutorial, you will be hosting your container image on Azure Container Registry. To build a container image, you’ll need to first create a Dockerfile.
From the root of the application, create a new file named Dockerfile and ensure that its content matches this:
FROM python:alpine

WORKDIR /app

COPY requirements.txt /app

RUN pip install -r requirements.txt

COPY . /app

CMD ["python3", "app.py"]
This file uses the alpine version of the Python docker image. Next the working directory is set to /app after which the requirements.txt file is copied into the working directory. Pip is used to install the project requirements after which the project files are copied to the working directory. The last line lets Docker know the command to run when the container starts.
Setting up Azure Container Registry (ACR)
In this article, I will show you how to set up the container registry with the CLI. If you’re interested in using your Azure dashboard instead, you can follow the steps in this article.
Authenticating with Azure
To run commands using Azure CLI, you will need to be authenticated. Run this command:
az login
This opens a new window in your browser. Provide your email address and password to complete the authentication process. In your terminal, once the authentication process is completed the subscription details are printed out. Make a special note of the id key. It will be used when creating a service principal.
The output should match this:
[
  {
    "cloudName": "AzureCloud",
    "homeTenantId": "",
    "id": "9e2f3560-1f82-41e2-80b3-0bef44ff9b070",
    "isDefault": true,
    "managedByTenants": [],
    "name": "Visual Studio Enterprise Subscription",
    "state": "Enabled",
    "tenantId": "9e2f3560-1f82-41e2-80b3-0bef44ff9b070",
    "user": {
      "name": "yemiwebby@gmail.com",
      "type": "user"
    }
  }
]
If you haven’t already done so, create a new service principal using this command:
az ad sp create-for-rbac --name <service_principal_name> --scopes /subscriptions/<subscription_id> --role owner
In the command, service_principal_name can be any name you choose, subscription_id is the value of the id key in the terminal output of the successful login. On successful completion, the service principal information will be printed on the terminal. The information displayed includes the appId and password used to log in to the container registry.
The output of the above command should match this:
{
  "appId": "34erer1f6-t74356-475w-b5aa-bf08df45b0c0",
  "displayName": "svc-principle-name",
  "password": "qkt8Q~kbEWHIUHUnnvXNfjCeVAdxrwer4g45hAbg5",
  "tenant": "9e2f3560-1f82-41e2-80b3-0b8fbff9b070"
}
Setting up Container Registry Using Azure CLI
Create a new resource group by running this command:
az group create --name FlaskRG --location eastus
Next, create a new container registry:
az acr create --resource-group FlaskRG --name flaskdockerdemo --sku Basic
NOTE: The registry name must be unique. If you get a message like this: The registry DNS name flaskdockerdemo.azurecr.io is already in use., you will need to choose a different, unique name. You can also use the Registries API to check for available names.
With a registry successfully set up, you can build the Docker image, and push it to the registry.
Building the Docker image
The application contains a Dockerfile which contains instructions with which Docker can build and serve the API. When building the application, specify the registry DNS name:
docker build -t flaskdockerdemo.azurecr.io/flask-rates-api:latest .
Note: Replaceflaskdockerdemo with the name you chose for the registry URL and login server details.
You can run the Docker image locally using this command.
docker run -p 8000:5000 flaskdockerdemo.azurecr.io/flask-rates-api
The application will run on port 8000.
Pushing the Docker image to ACR
Once the build process is complete, you can push the image to the container registry. Before pushing to the registry, you must be authenticated on it. Usethis command:
echo $AZURE_SP_PASSWORD | docker login flaskdockerdemo.azurecr.io -u $AZURE_SP --password-stdin
Replace $AZURE_SP_PASSWORD and $AZURE_SP in the command with the service principal password and appId respectively.
Push to the container registry:
docker push flaskdockerdemo.azurecr.io/flask-rates-api
To confirm if the image has been deployed, you can run:
az acr repository list --name flaskdockerdemo --output table
The output:
Result
-----------------
flask-rates-api
Setting up the CircleCI configuration
Having set up a container registry, you can now set up a CI/CD pipeline. The first step is preparing a config.yml file to give CircleCI step-by-step instructions. At the root of your project, create a new folder named .circleci and in it a file named config.yml. Add this code to the file:
version: 2.1

orbs:
  python: circleci/python@2.1.1
  azure-acr: circleci/azure-acr@0.2.1

jobs:
  pull-and-test:
  description: "Setup Django application and run tests"
  executor: python/default
  steps:
    - checkout
    - python/install-packages:
        pkg-manager: pip
    - run:
        name: "Run tests"
        command: pytest -v

workflows:
  deploy-docker-image:
  jobs:
    - pull-and-test
    - azure-acr/build-and-push-image:
        login-server-name: flaskdockerdemo.azurecr.io
        registry-name: flaskdockerdemo
        repo: flask-rates-api
        requires:
          - pull-and-test
This workflow makes use of two orbs provided by CircleCI. Orbs are shareable packages of CircleCI configuration you can use to simplify your builds. For this pipeline, the Python and Azure ACR orbs are used.
The pull-and-test job is used to pull the latest code and run the test suites. This job uses the Python orb as an executor.
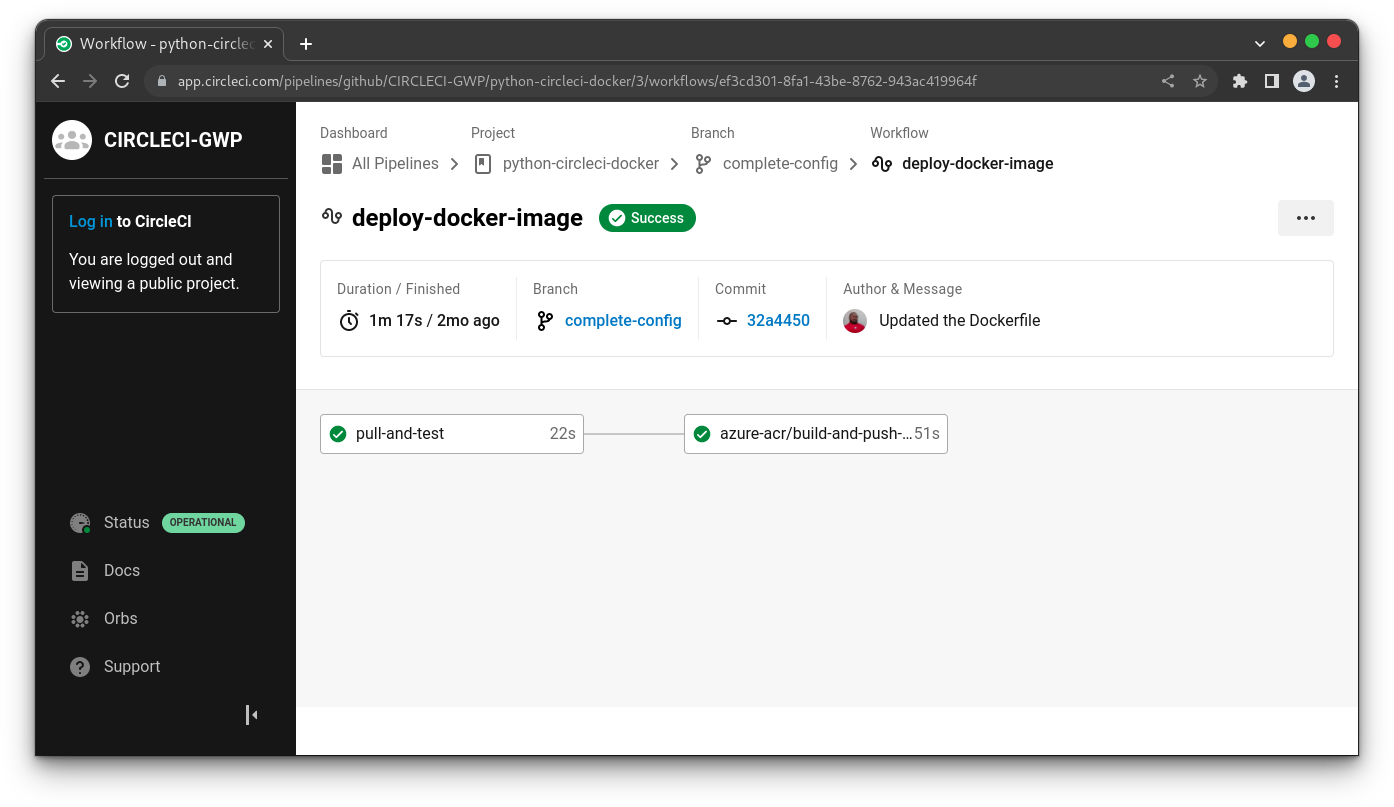
Finally, the deploy-docker-image workflow is used to determine the sequence of job execution. Once the pull-and-test job is completed, the build-and-push-image job provided by the azure-acr orb is executed. This job checks out the latest code from the associated repository, builds an updated image, and pushes it to the container registry. This job requires some additional parameters for the login server, registry name, and repository name. By default, the built images will be tagged latest.
To run this project on your CircleCI account, you will need to migrate your code to a repository on your Github account. Create a new one. When you run the commands, replace REPOSITORY_URL with the URL of the newly created repository.
Run:
git remote set-url origin <REPOSITORY_URL>
git add .
git commit -m "CI/CD Pipeline configuration"
git push origin main
Connecting the project with CircleCI
Next, connect the Github repository to your CircleCI account. Go to your CircleCI dashboard and select the Projects tab on the left panel. Click the Set Up Project button corresponding to the GitHub repository containing the code.
The next step is to select your config.yml file. You can select the Fastest option because you have included the configuration in your repository. Type in the branch name (main in our case) and click Set Up Project.
On the first run, the process will fail because you haven’t set up a user key and added all the environment variables yet.
To configure the environment variables, select the Environment Variables option from the left panel of the Project Settings page. Select Add Environment Variable. Next, type the environment variable and the value you want it to be assigned to.
The environment variables required are as follows:
AZURE_SPis the username for your Azure Service PrincipalAZURE_SP_PASSWORDis the password for your Azure Service PrincipalAZURE_SP_TENANTis the tenant ID for your Azure Service Principal
With these variables in place, you can rerun the workflow. However, instead of starting from the beginning, feel free to restart from where the workflow failed.
Finally, your workflow will complete successfully.
Conclusion
Setting up a CI/CD pipeline has many benefits. By having a reliable test suite, you are assured that your application integrity is not compromised. If tests fail, the deployment process terminates and you are notified. This allows you to rectify any issues and restart the process - without any downtime.
Also, an automated pipeline replaces manual updates, which are highly susceptible to human error. Developers can concentrate on development and implementation.
The entire project - complete with CircleCI configuration and Kubernetes manifest is available on GitHub.
Oluyemi is a tech enthusiast with a background in Telecommunication Engineering. With a keen interest in solving day-to-day problems encountered by users, he ventured into programming and has since directed his problem solving skills at building software for both web and mobile. A full stack software engineer with a passion for sharing knowledge, Oluyemi has published a good number of technical articles and blog posts on several blogs around the world. Being tech savvy, his hobbies include trying out new programming languages and frameworks.