
In the previous part of this blog, we’ve seen what Salesforce Survey is, how to enable it and How to Create a Salesforce Survey form.
If you are not aware of the Survey forms, you can go with this link.
In this part of this blog, we are going to explore the ways through which we can send the created survey forms to customers.
So, without waiting, let’s get started.
How to Send a Salesforce Survey Form?
Here, I’m using the survey form that we created in the previous part of this blog series. Once you are done with everything “Activate” the survey form. Once activated you can’t do any customizations.
After activating, the builder part is converted into “View”, means you can now only view the survey form and are unable to customize. Now, click on “Send”.
There are two ways to send survey invitations to customers to collect their feedback. Those are as follows:
- By generating link or QR code.
- By sending Email.
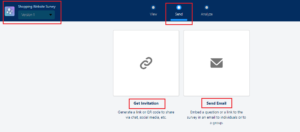
A. Way 1 – By Generating a Link or QR code.
Click on “Get Invitation”. A popup will open having two options: – 1. Participants in your Company. 2. Participants Outside your Company. Let’s learn one by one.
-
Participants in Your Company –
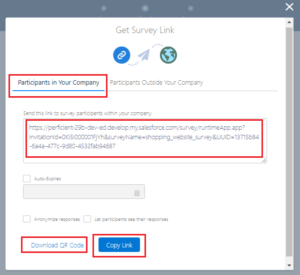
Sending link to participants in your company means sending to the “Authenticated Users” or who has Salesforce Account.
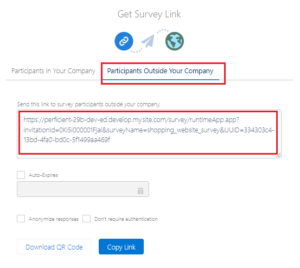
A link is generated which you can copy and share or simply download a QR Code. Also, there are a few options available for Auto-Expire the link, Anonymize responses and visibility of responses for participants. By enabling these checkboxes, you can customize the survey invitation. -
Participants Outside Your Company –
Sending links to participants outside your company means sending them to the “Unauthenticated Users” (no need to authenticate them) or those who do not have a Salesforce Account.
You can share the generated link simply by copying the QR or downloading the QR code.
But, if you do not select any “Community” or “Experience Cloud Site” while enabling Salesforce Survey, then the link will not display as shown below.
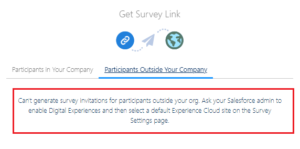 Read the message properly. It is said to enable “Digital Experience” in your org and select a default community site on survey setting page.
-
Create Experience Cloud Site:
If you do not know how to create Experience Cloud site, you can follow this link. Let’s create Experience Cloud Site and choose it as default on Survey Setting Page as follows.
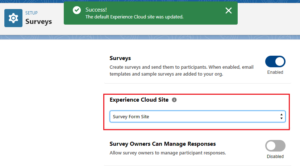

When you select Experience Cloud Site from the survey setting page, a success message will be populated as shown above. We will learn later about “Survey Owner can Manage Responses” in the next part.
After selecting the Experience Cloud Site on Survey setting page, link will be generated in box at “Participants Outside Your Company”.
-
Give Permissions to Guest User Profile:
Since the participants doesn’t have access to Salesforce Account, we call them as “Guest User”. So, the Guest User profile should have required permission such as to read the survey, read the survey invitation and write the survey responses.
To do this, follow the below steps:
1. Go to the builder page of created experienced cloud site.
2. Click on Settings icon and go to the General.
3. Navigate down towards the “Guest User Profile” section.
4. Click on “Survey Form Site Profile”. It will redirect to the Profiles in the org.
5. Click on Edit.
6. Scroll down to Standard Object Permissions. Give permissions as follows.
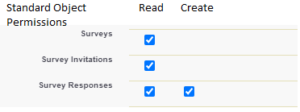
In this way, Guest User can access the survey form and submit the responses as well.
B. By Sending an Email:
Another way to send survey invitation is by using emails. So, let’s follow.
- Click on “Send Email”.
- In Select Content – select ‘survey link’ or you can select any question as well. Click Next.
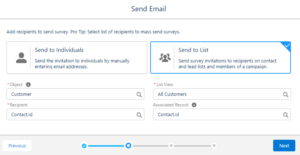
- Here, you need to select how you want to send email, individually or in list. For sending survey form in bulk, “Send to List” is suggested.
- Here, click on “Send to List” and fill the fields as follows. You can select any object according to your requirements.
- Click Next. (Note: Here in my org, contact’s display name is changed to customer, but API name is as usual)
- Here, in recipient (To), All contacts are displaying as we already selected “All Contacts” in list view. You can also customize mail subject and body according to your requirements.
In case of “Send to Individual”, you need to add email addresses of recipient manually. It may be your guest user or other.
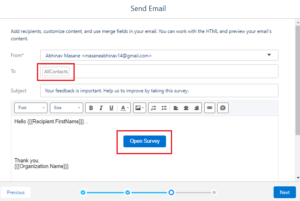
On clicking “Open Survey”, your survey form will be open. - Click Next.
- Review your work or selections and do customization in Invitation Link Settings if required.
- Click “Send”.
In this way, you’ve emailed all the contacts to gather their feedback.
Note: With the help of the “Send to List” Email technique, we can only send emails to internal users only.
With this, we’ve covered the ways to send survey forms to customers and covered functionalities to do that.
In the next part of this blog, we will cover the “Analyze” section of survey forms in which we will learn to analyze the collected feedback and use it to grow our business.
Conclusion:
Collecting feedback from customers, users play a major role in building a business stronger in today’s world and competing and presenting better. Sending survey invitations also requires a great strategy to reach out to customers very easily and quickly. All that we covered in this blog. It helps to smoothen the customer experience and enhance the progress of business.
To be Continued !!