
Recently my colleagues and I were tasked to upgrade a containerized solution from Sitecore 9.3.0 to 10.3.1 which got me excited as it had been a minute since I had performed a Sitecore upgrade. The upgrade steps have evolved significantly over these years and I was very keen to explore and execute them.

We broke down the upgrade into these 3 major stages listed below and I performed the database upgrade steps while my teammates worked on the other 2 stages.
- Upgrade database
- Upgrade VS solution
- Upgrade docker files.
In this 3 part blog series we will be extensively covering stage 1 which involves upgrading the Sitecore databases from 9.3.0 to 10.3.1. In this first part we will do a deep dive into the prerequisites required for the upgrade and steps needed to prepare for it.
Prerequisites for upgrading
- You should know your local host Windows ltsc version and your Sitecore topology. For me ltsc version was 2019 and Sitecore topology was xp0.
- Go to https://dev.sitecore.net/Downloads/Sitecore_Experience_Platform/103/Sitecore_Experience_Platform_103_Update1.aspx and review the “Upgrade Container Deployment Guide”.
- Download and extract the Sitecore Container Deployment package via the “Container Deployment Package” link present on https://dev.sitecore.net/Downloads/Sitecore_Experience_Platform/103/Sitecore_Experience_Platform_103_Update1.aspx to a folder on your local, say C:/sitecoreupgrade.
- Based on your ltsc version and topology, navigate to the corresponding folder and review its content.
- In my case it was C:\sitecoreupgrade\SitecoreContainerDeployment.10.3.1.009452.1448\compose\ltsc2019\upgrade\xp1
- As there was no folder for xp0, we decided to use the xp1 topology folder
- We went with compose folder as we were using docker and not Kubernetes
- Inside the xp1 folder review contents of docker-compose.upgrade.yml to identify what all databases (see lines 7-16 in screenshot below) backups you need from production(prod).
services: mssql-upgrade: image: ${SITECORE_DOCKER_REGISTRY}sitecore-xp1-mssql-upgrade:${SITECORE_VERSION} environment: IS_ALWAYS_ENCRYPTED: ${IS_ALWAYS_ENCRYPTED} PROCESSING_ENGINE_TASKS_DATABASE_USERNAME: ${PROCESSING_ENGINE_TASKS_DATABASE_USERNAME} Sitecore_ConnectionStrings_Core: Data Source=${SQL_SERVER};Initial Catalog=${SQL_DATABASE_PREFIX}.Core;User ID=${SQL_USERNAME};Password=${SQL_PASSWORD} Sitecore_ConnectionStrings_Master: Data Source=${SQL_SERVER};Initial Catalog=${SQL_DATABASE_PREFIX}.Master;User ID=${SQL_USERNAME};Password=${SQL_PASSWORD} Sitecore_ConnectionStrings_Web: Data Source=${SQL_SERVER};Initial Catalog=${SQL_DATABASE_PREFIX}.Web;User ID=${SQL_USERNAME};Password=${SQL_PASSWORD} Sitecore_ConnectionStrings_Experienceforms: Data Source=${SQL_SERVER};Initial Catalog=${SQL_DATABASE_PREFIX}.Experienceforms;User ID=${SQL_USERNAME};Password=${SQL_PASSWORD} Sitecore_ConnectionStrings_Processing_Engine_Tasks: Data Source=${SQL_SERVER};Initial Catalog=${SQL_DATABASE_PREFIX}.Processing.Engine.Tasks;User ID=${SQL_USERNAME};Password=${SQL_PASSWORD} Sitecore_ConnectionStrings_Messaging: Data Source=${SQL_SERVER};Initial Catalog=${SQL_DATABASE_PREFIX}.Messaging;User ID=${SQL_USERNAME};Password=${SQL_PASSWORD} Sitecore_ConnectionStrings_Reporting: Data Source=${SQL_SERVER};Initial Catalog=${SQL_DATABASE_PREFIX}.Reporting;User ID=${SQL_USERNAME};Password=${SQL_PASSWORD} Sitecore_ConnectionStrings_Xdb_Collection_Shard0: Data Source=${SQL_SERVER};Initial Catalog=${SQL_DATABASE_PREFIX}.Xdb.Collection.Shard0;User ID=${SQL_USERNAME};Password=${SQL_PASSWORD} Sitecore_ConnectionStrings_Xdb_Collection_Shard1: Data Source=${SQL_SERVER};Initial Catalog=${SQL_DATABASE_PREFIX}.Xdb.Collection.Shard1;User ID=${SQL_USERNAME};Password=${SQL_PASSWORD} Sitecore_ConnectionStrings_Marketingautomation: Data Source=${SQL_SERVER};Initial Catalog=${SQL_DATABASE_PREFIX}.Marketingautomation;User ID=${SQL_USERNAME};Password=${SQL_PASSWORD} Database_Upgrade_From_Version: ${DATABASE_UPGRADE_FROM_VERSION} Database_Upgrade_To_Version: ${DATABASE_UPGRADE_TO_VERSION} Sitecore_License: ${SITECORE_LICENSE} isolation: ${ISOLATION} - In my case it was C:\sitecoreupgrade\SitecoreContainerDeployment.10.3.1.009452.1448\compose\ltsc2019\upgrade\xp1
- Before taking the prod db backup you can create/verify a login on prod Sitecore that you can use to login to Sitecore on local host to clean up databases and perform post upgrade steps.
Upgrade Preparation Steps
- Take backups of existing 9.3.0 prod databases on Azure.
- These generally have bacpac extensions
- We had saved the bacpac files in a Blob Container
- Download and install “Microsoft Azure Storage Explorer”.
- Open Azure storage explorer and connect to Blob Container via these steps
-
-
- Navigate to “Storage Accounts” node in Azure Explorer and right click
- Select “Connect to Azure Storage”
- Select “Blob container or directory” as the Azure resource
- Select your preferred connection method. As our DevOps team had shared the SAS URL of the Blob Container with me, I used that as the connection method. After connecting to Blob Container, download the bacpac files
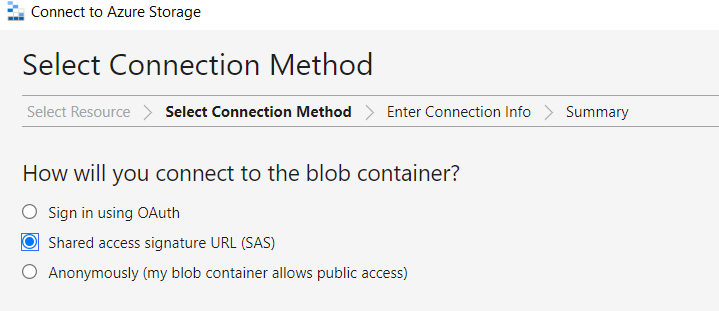
Select SAS as the connection method
-
-
- On your local start all the containers in your 9.3.0 solution.
- Connect to SQL server instance present inside the SQL container using SSMS on your local host. SQL Server name generally has this syntax – “127.0.0.1,port number”. E.g. 127.0.0.1,1433
- Take backups of existing 9.3.0 databases from local via SSMS.
- Enable contained database authentication by running this following command in SSMS.
sp_configure 'contained database authentication', 1;
GO
RECONFIGURE;
GO
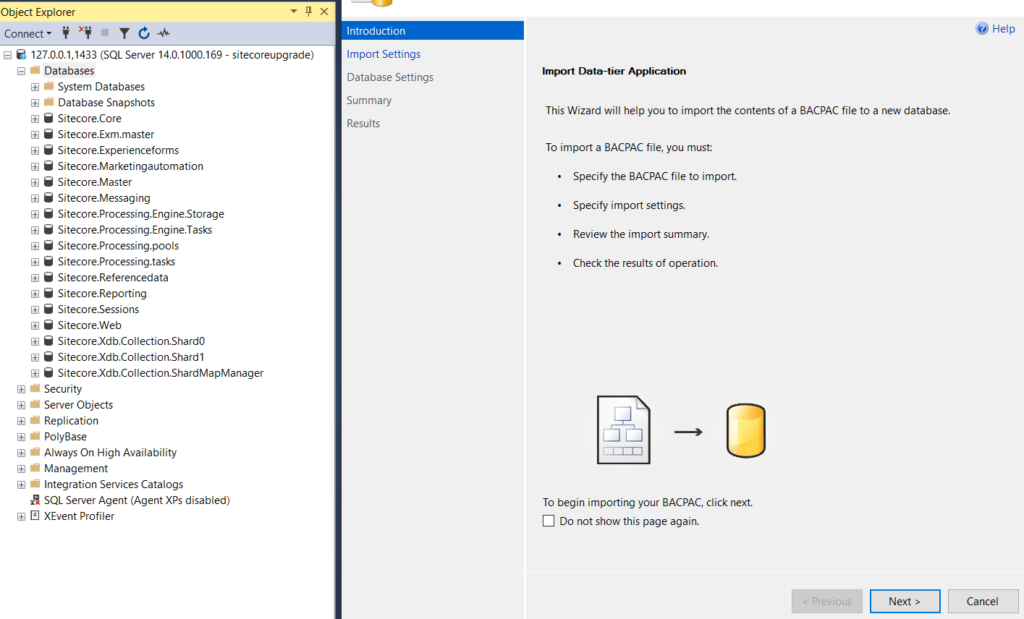
- Import all the bacpac files from prod on local host via “Import Data-tier Application” functionality in SSMS. You may append the text “.Prod” to new database name so that you can differentiate between prod and local version of databases. E.g. “Sitecore.Master.Prod”. See screenshots below for reference.
Import bacpac file in SSMS
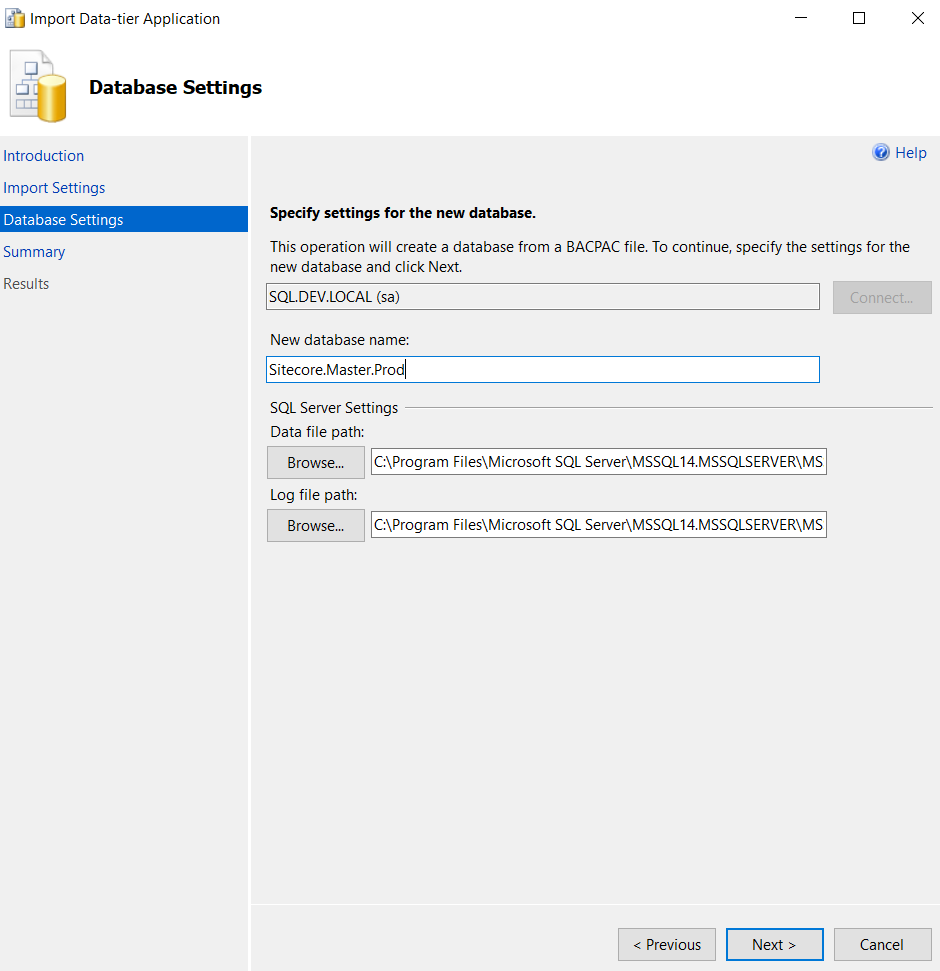
Append the text “.Prod” to new database name
Note:- We observed that our SQL container volume was complaining about disk space at this location “C:\Program Files\Microsoft SQL Server\MSSQL14.MSSQLSERVER\MSSQL\DATA”. So we ended up changing that to “C:\Data” for both Data file path and Log file path. The reason being the path “C:\Program Files\Microsoft SQL Server\MSSQL14.MSSQLSERVER\MSSQL\DATA” was inside the container and had limited space. Hence changing it to “C:\Data” (which maps back to my local host via volume mount as mentioned in steps below) made it use my local host disk space.
- Stop the SQL container via this command “docker stop <sqlcontainername>” E.g. docker stop my_container
- Review the “sql” service section of your solution’s docker-compose file and observe the local host path set under volume. In my case it was data\sql folder(see line #7 in screenshot below) inside the docker folder of the solution.
sql: image: ${REGISTRY}sitecore-xp-sxa-sqldev:${SITECORE_VERSION}-windowsservercore-${WINDOWSSERVERCORE_VERSION} isolation: ${ISOLATION} restart: ${RESTART_POLICY:-unless-stopped} hostname: ${SQL_HOST} volumes: - .\data\sql:C:\Data networks: default: aliases: - ${SQL_HOST} mem_limit: 2GB ports: - "1433:1433" environment: SA_PASSWORD: ${SQL_SA_PASSWORD} ACCEPT_EULA: "Y" SQL_HOSTNAME: ${SQL_HOST} # Allows for access to the database through traefik to support using database locally. # This should not be used in production. # # Since this is not http, but tcp traffic it does does not understand the concept of a "host". # so we must dedicate a port to it in traefik, and direct all traffic to this router: HostSNI(`*`). labels: - "traefik.enable=true" - "traefik.tcp.routers.${COMPOSE_PROJECT_NAME}-sql.entrypoints=sql" - "traefik.tcp.routers.${COMPOSE_PROJECT_NAME}-sql.rule=HostSNI(`*`)" - "traefik.tcp.routers.${COMPOSE_PROJECT_NAME}-sql.service=${COMPOSE_PROJECT_NAME}-sql" ## Service for SQL requests - "traefik.tcp.services.${COMPOSE_PROJECT_NAME}-sql.loadbalancer.server.port=1433" - Go to the folder docker\sql\data in your solution and
- Observe the names of the local 9.3.0 data and log files. Eg Sitecore.Master, Sitecore.Core etc.
- Move all the mdf and ldf files related to the prod databases you imported in the steps above to a different folder say C:\sitecoreupgrade\proddbs
- Rename the files in “C:\sitecoreupgrade\proddbs” folder to match the file names of local 9.3.0 files. E.g Rename “Sitecore.Master.Prod” to “Sitecore.Master”
- Copy the files from “C:\sitecoreupgrade\proddbs” to “docker\sql\data” folder of your solution and replace the existing files
- Restart the sql container via this command ” docker start <sqlcontainername>”. Note:- the Sitecore instance might take a few minutes to come up when you restart SQL container. Till then it might show SQL timeout error.
- Build your VS solution.
- Delete the databases having “.Prod” in their names to free up disk space.(Optional)
- At this point, your local site is using 9.3.0 code base from local and production version of 9.3.0 databases. If you have a production Sitecore login, then you can try to login to your local Sitecore instance using that to verify that you are seeing the production content.
- Connect again to SQL container via SSMS and create a new login say “sitecoreupgrade” and give it “db owner” membership role for all the Sitecore databases.
This covers the prerequisites and preparation steps need to perform the database upgrade.
In part 2 we will go over the steps that need to be performed to do the actual upgrade of databases. Lastly we will take a look at steps that need to be executed after we have upgraded our Sitecore databases and code base to 10.3.1
In part 2 we will go over the steps that need to be performed to do the actual upgrade of databases. Lastly we will take a look at steps that need to be executed after we have upgraded our Sitecore databases and code base to 10.3.1
Nice Article, Very good insights