
In Sitecore, the General Link field type is a versatile field that allows content authors to create links to internal or external resources. The General Link field provides a user-friendly interface for authors to select and configure links. Along with the key features listed below, I wanted to use “Telephone Link” as well, both in the “Content & Experience” editor modes. In this article, we are going to explore how we can use the process of extending the general link for content editor mode in Sitecore 10.2.
Key features of the General Link field type include:
- Internal Link
- Media Link
- External Link
- Anchor
- Javascript
A telephone link is primarily used to show a phone number in a manner that makes it easy for mobile users to call by tapping on it. In the example below, the anchor tag has the “href” attribute, and when the “href” has “tel:” in it, users can simply click to initiate a call to the specified number.
<a class="telephone" title="Call us" href="tel:1234567890">Call us</a>
To implement the “Telephone Link” feature in the “General Link” field type, we need to make changes that ensure it functions correctly in the below listed editor modes in Sitecore.
- Content Editor
- Experience Editor
In order to enable the “Telephone Link” feature in Content Editor mode, we should follow the specified steps below.
1. Navigate to General Link Field Type
Go to the core database and locate the “General Link” field type under the path “/sitecore/system/Field types/Link Types/General Link”.
2. Add Telephone Menu Item
Create a “Telephone” menu item within the “Menu” folder of the General Link. Use the Menu Item template, which is located at the following path to create this “Telephone” menu item.
Menu Item Template Path : "/sitecore/templates/System/Menus/Menu item"
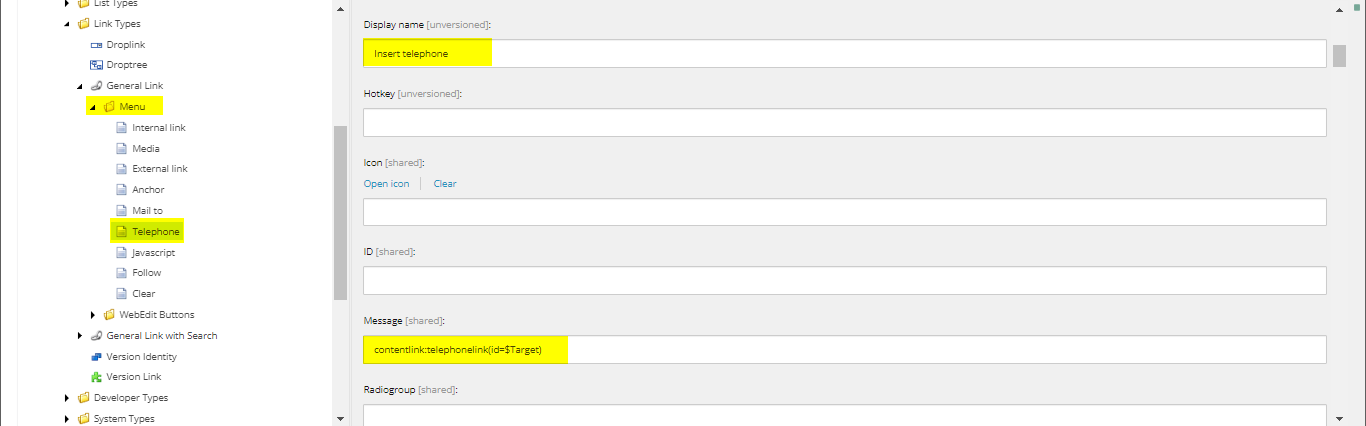
3. Telephone Menu Item – Add Required Configuration
Once the “Telephone” menu item is created, assign the necessary configuration values to the respective fields.
- Display name: Add “Insert telephone” in the display name field.
- Message: Add “contentlink:telephonelink(id=$Target)” in the message field, as it will be used to generate the “Telephone Link” form during rendering.
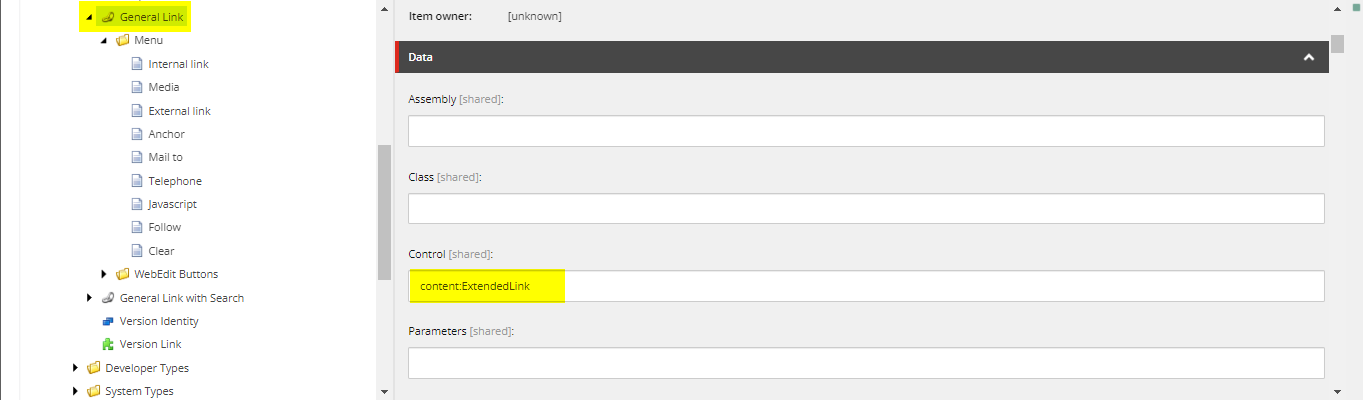
4. Update General Link Control Property
Choose the General Link field type and change the “Control” property to “content:ExtendedLink”.
Note: It was originally set as “content:Link,” and now we’re extending it by incorporating the necessary code for the “Telephone Link.” That’s why we’ll be using the extended keywords.

5. Add ExtendedLink.cs Class
Next, we need to create the “ExtendedLink.cs” class, which will make use of the handle message. The value of the “Message” field mentioned in Step 3, point number two, must match with the switch case statement of the “HandleMessage” method of the “ExtendedLink.cs” class, as shown below.
string name = message.Name;
switch (name)
{
    case "contentlink:telephonelink":
    {
       //This will find the TelephoneLink control and open the dialog box
       var urlString = new UrlString(UIUtil.GetUri("control:TelephoneLink"));
       this.Insert(urlString.ToString(), new NameValueCollection { { "height", "335" } });
       break;
    }
    default:
    {
      return;
    }
}
Click on the GitHub – ExtendedLink.cs link to access the detailed code.
The “ExtendedLink.cs” class is created by inheriting the existing “Link.cs” class file. In Sitecore 10.2, if you extract the “Sitecore.Kernel.dll,” you’ll locate this particular class within the “Sitecore.Shell.Applications.ContentEditor” namespace.
6. Add TelephoneLink.xml Design File
Create a file named “TelephoneLink.xml” by following the steps outlined below.
- Navigate to the “/sitecore/shell/Applications/Dialogs” path in your project solutions, if it exists. Otherwise, create the folder hierarchy.
- Create a folder named “TelephoneLink” within the previously mentioned folder hierarchy.
- Create a file named “TelephoneLink.xml” inside the “TelephoneLink” folder.
- Once you’ve included the “TelephoneLink.xml” file, the file path should be “/sitecore/shell/Applications/Dialogs/TelephoneLink/TelephoneLink.xml”.
- Click on the GitHub – TelephoneLink.xml link to access the detailed HTML structure needed for the “Telephone” dialog box in Content Editor mode.
7. Add TelephoneLinkForm.cs Class
Create the “TelephoneLinkForm.cs” class, which serves as the code behind the “TelephoneLink.xml” design file Access the detailed code logic needed for implementing the “TelephoneLinkForm.cs” class by clicking on the GitHub – TelephoneLinkForm.cs link.
8. Add ExtendedGeneralLinkRender.cs Render Class
To manage the Telephone Link, it’s necessary to create the Render class. To do this, generate the “ExtendedGeneralLinkRender.cs” class. Access the detailed code for this class by clicking on the GitHub – ExtendedGeneralLinkRender.cs link.
9. Add Configuration Patch File
Create a configuration patch file to set up and connect the control source.
<?xml version="1.0"?>
<configuration xmlns:patch="http://www.sitecore.net/xmlconfig/" xmlns:set="http://www.sitecore.net/xmlconfig/set/" xmlns:role="http://www.sitecore.net/xmlconfig/role/">
    <sitecore>
        <controlSources>
            <source mode="on" namespace="Fieldtypes.ExtendedGeneralLink" assembly="Fieldtypes" prefix="content"/>
        </controlSources>
        <pipelines>
            <renderField>
                <processor patch:before="*[@type='Sitecore.Pipelines.RenderField.GetLinkFieldValue, Sitecore.Kernel']" type="Fieldtypes.ExtendedGeneralLink.ExtendedGeneralLinkRender, Fieldtypes" />
            </renderField>
        </pipelines>
    </sitecore>
</configuration>
Once, all the changes have been added, don’t forget to clean and rebuild the solution.
10. Final Output – Content Editor
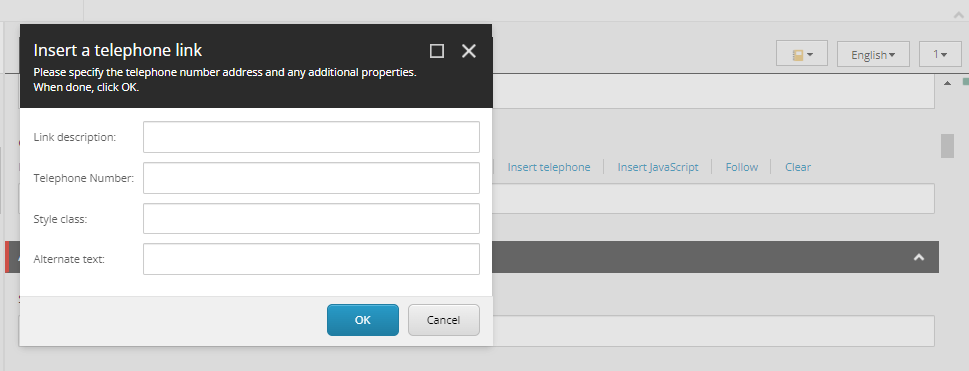
When adding a component that utilizes the “General Link” field type, choose its data source through the content editor mode. Here, you will find the “Insert telephone” link.

Select the “Insert telephone” link, and subsequently, a dialogue box titled “Insert a telephone link” will appear. Through this dialogue box, you can input the “Telephone Number” and its basic details.
Conclusion
Extending the features of the General Link in Sitecore is a valuable customization, providing a more personalized and efficient user experience to meet specific project needs. In this blog, we delved into the process of extending the general link for content editor mode. In the upcoming blog titled “Extending General Link for Experience Editor Mode in Sitecore,” we will explore how to extend the general link specifically for the experience editor mode.
Happy learning!