Analytics Engineering | Data | dbt | Google Cloud Platform
Managing Multiple BigQuery Projects With One dbt Cloud Project Lucas Ortiz 14 Apr, 2023


In a previous Blog post, I discussed how to manage multiple BigQuery projects with one dbt Cloud project. Even though the instructions were focused on BigQuery, the same concept can also be applied for other Cloud providers. For each, however, there are specific details that may make it harder or easier to set up.
In this article, we’ll walk through the steps for setting it up for Databricks, using Multiple Databricks Workspaces with one single dbt Cloud project.
In summary, it will consist of 3 main steps:
Note: If you already have a Databricks Workspace configured, you can skip this section.
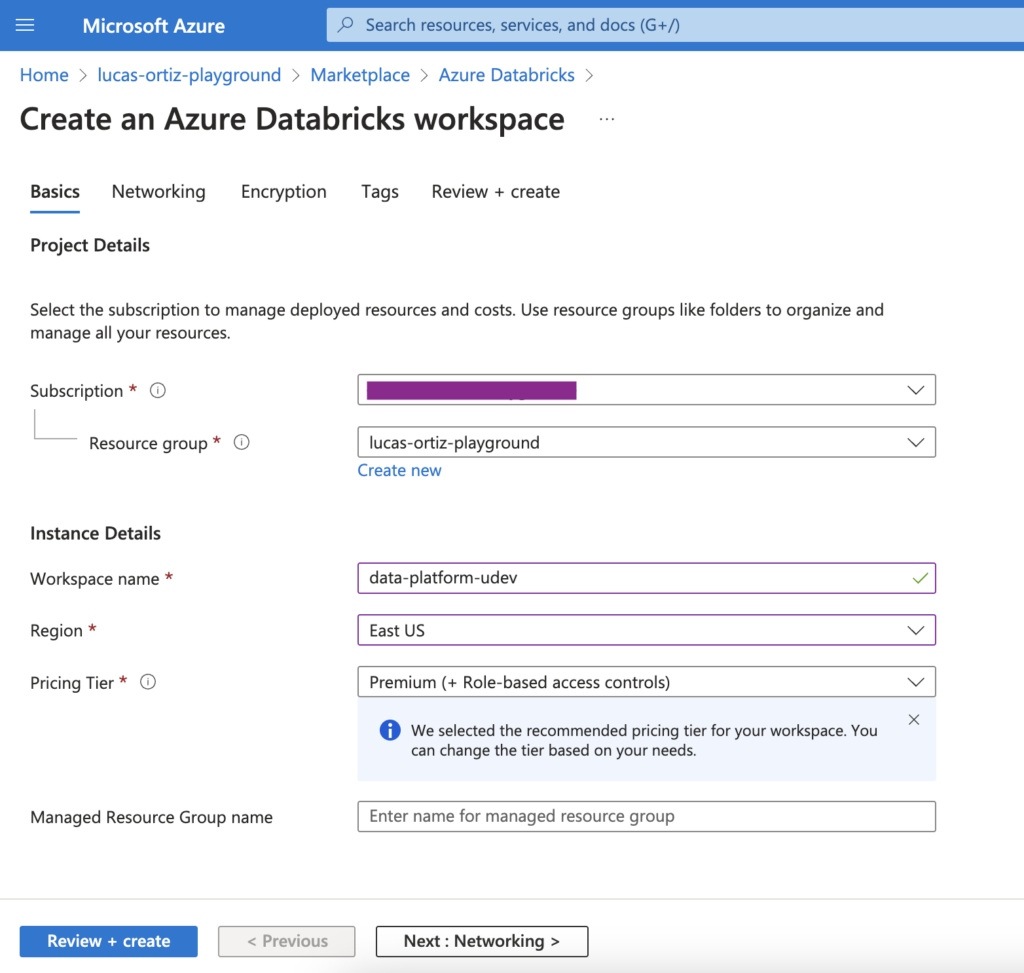
For this project, we will use Azure as our Cloud provider. All the steps would work in a different provider, with some adjustments.
To start with, we must create two Databricks Workspaces. We will call them data-platform-udev and data-platform-uprod.
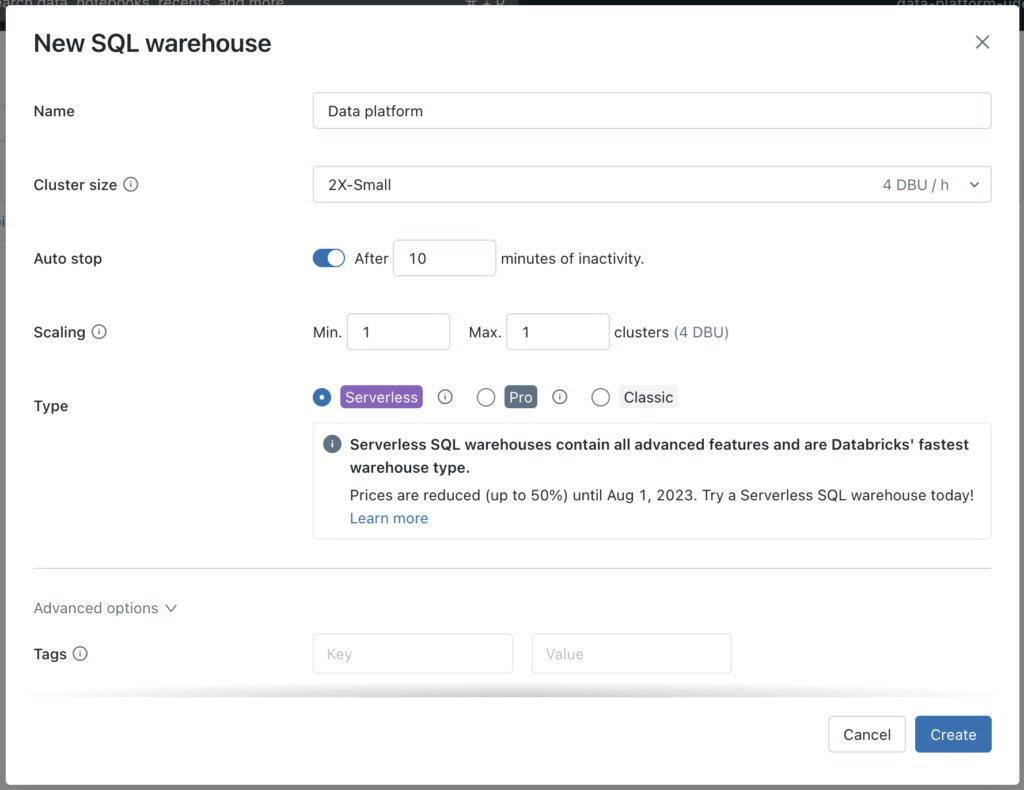
Once both Workspaces are created, we will open both of them. We must then create a SQL Warehouse instance that Databricks will use, for each Workspace.
First, click on SQL Warehouses on the left bar, then Create SQL warehouse button.

This will open a new window. Here you can select the appropriate options, based on your use case. I’ll keep the sizes as small as possible, since it is only for demo purposes.
Now that we have our Databricks Workspace and SQL Warehouse instance configured, it is time to start dealing with authentication.
We want to avoid Access Tokens that are associated with a specific user as much as possible, this way things won’t break if someone leaves the company, or something else happens with the account. To make it possible, we will use Service Principals in the Databricks Workspace.
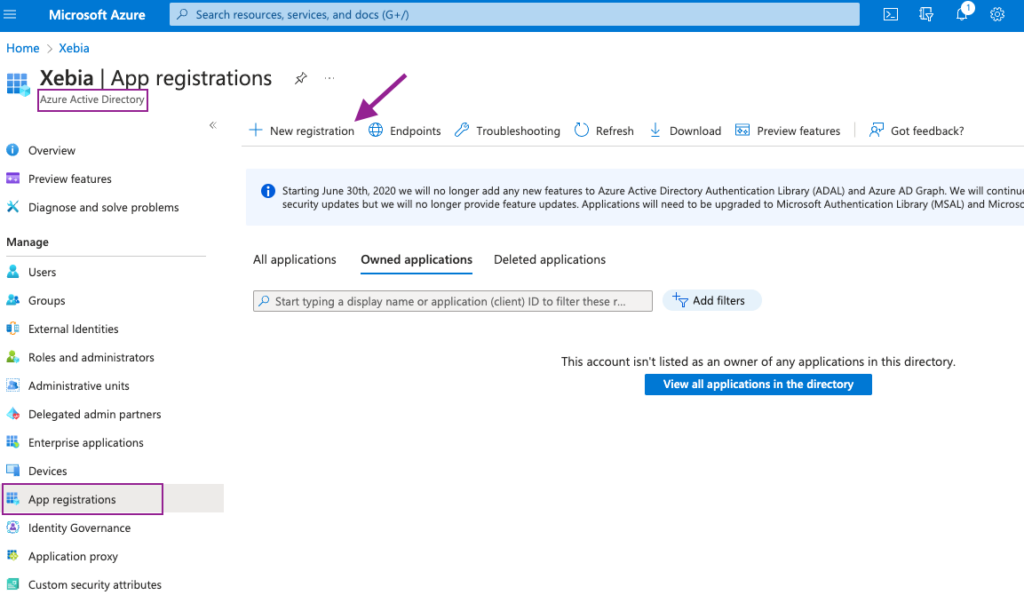
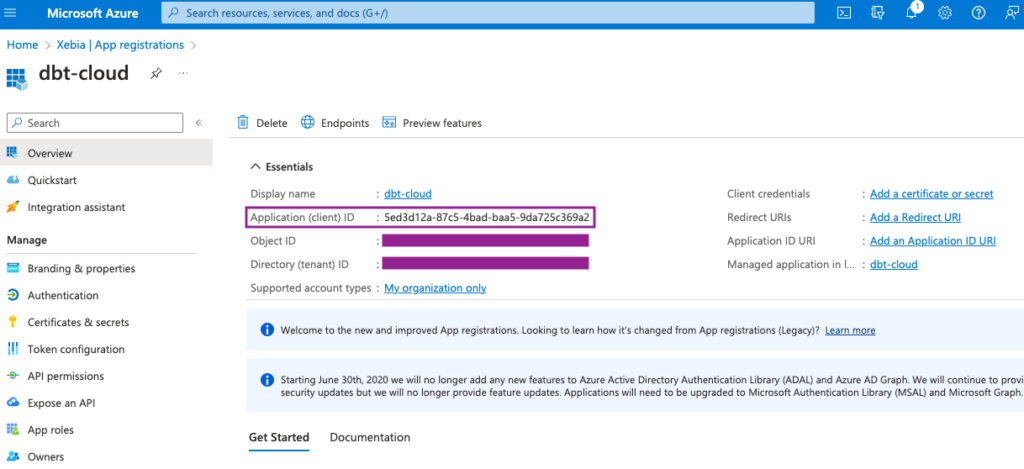
To set it up, the first step is to navigate to the Azure Active Directory in Azure Portal and select App registrations from the left bar. We will create a New registration, by clicking the button.
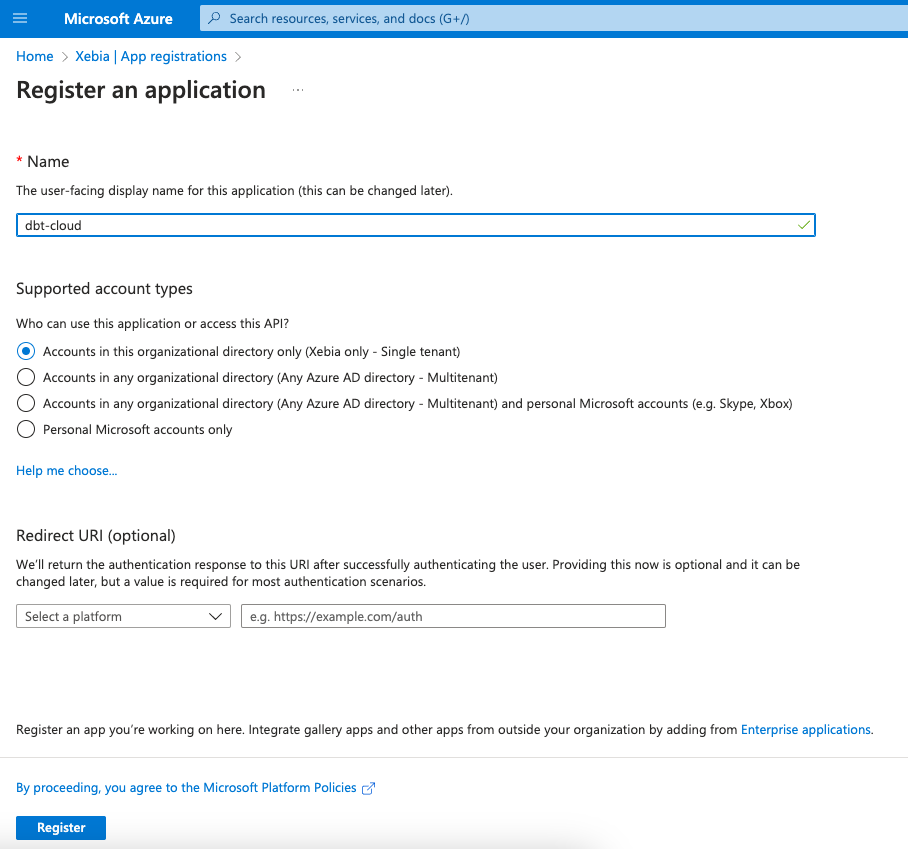
We will name our Application as dbt-cloud, so we know its purpose of use.
Once it is created, we will be redirected to the new App page. From this page, we will need the Application ID later on, so we will save its value (or keep the tab opened).
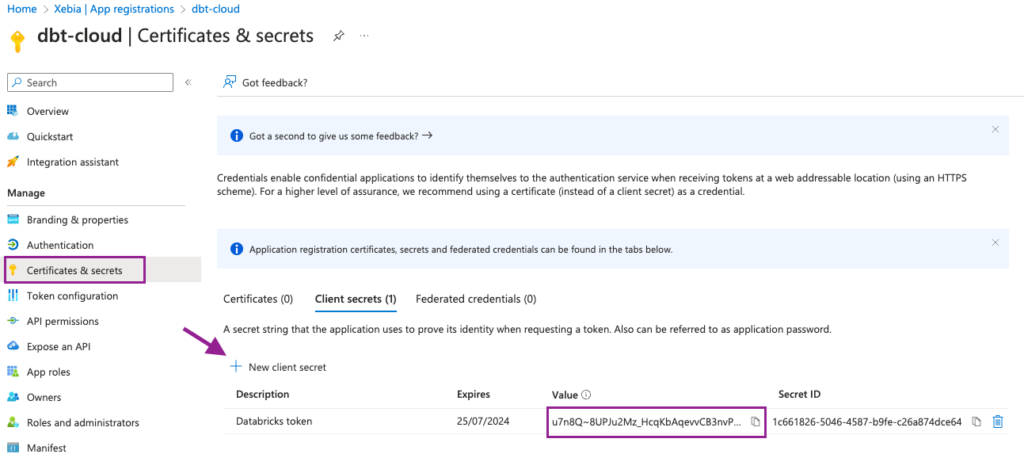
The last step for the Application setup is to create a Client Secret. It will be used later on to generate our Databricks Token to connect with dbt.
To do so, we will navigate to the Certificates & secrets page and click on New client secret. Add a suitable description and expiration time.
From the new Client secret, we will copy the Value field and save it for a later step. Attention: the Value will be shown to you only once, make sure you save it, otherwise you will have to create a new Client secret.
Now all we have left to do is to add the Service principal to both our Databricks Workspaces, this way we will be able to use them to generate the token to connect to dbt.
In the Databricks workspace, navigate to Admin Settings > Service principals.
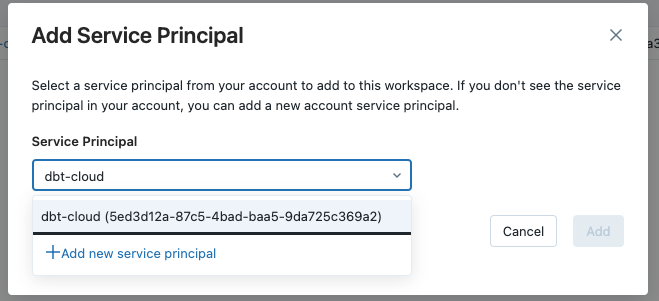
We will click on Add service principal, to add our recently created App to the Workspace.

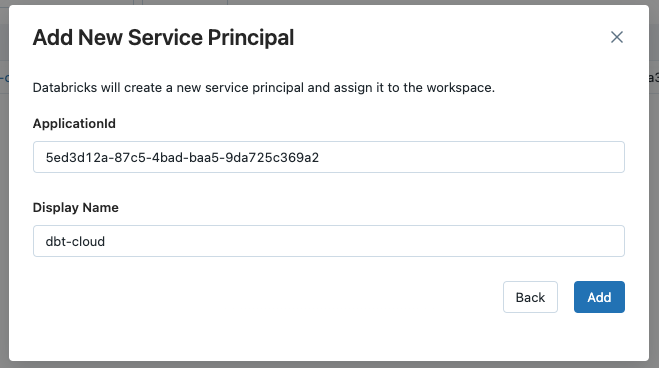
A new window will open. We will use the Application Id we copied in a previous step. If you can’t find the Service Principal in the dropdown list, select the Add new service principal option and insert the ApplicationId and a suitable Display name.
Now that we have added our Service Principal to the Workspace, we just have to set the correct permissions – to use Tokens and to modify the Data Catalog.
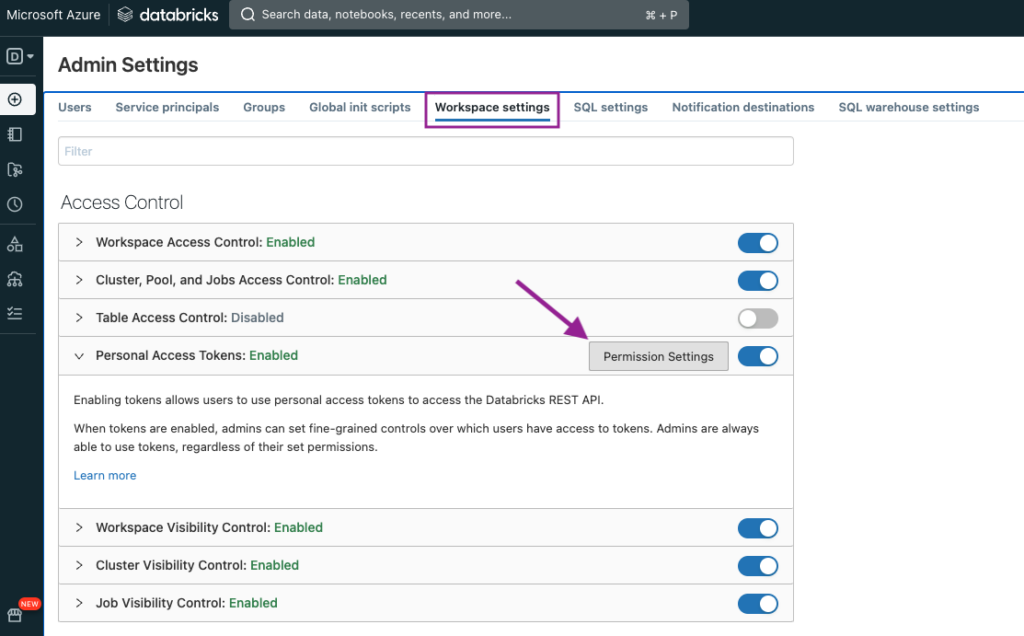
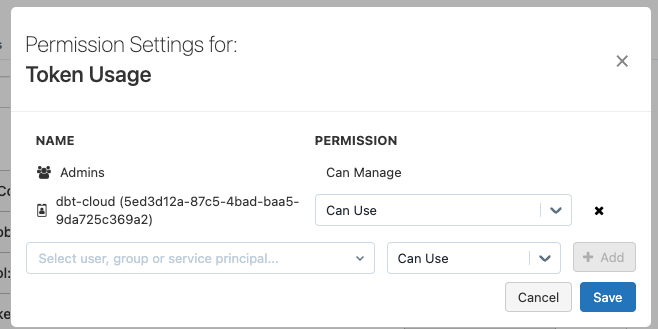
By default, Service Principals are not allowed to use tokens. To change this, we will navigate to Workspace settings > Personal Access Tokens > Permission Settings.
A new window will open, where we can search for our Service Principal and add the permission Can Use.
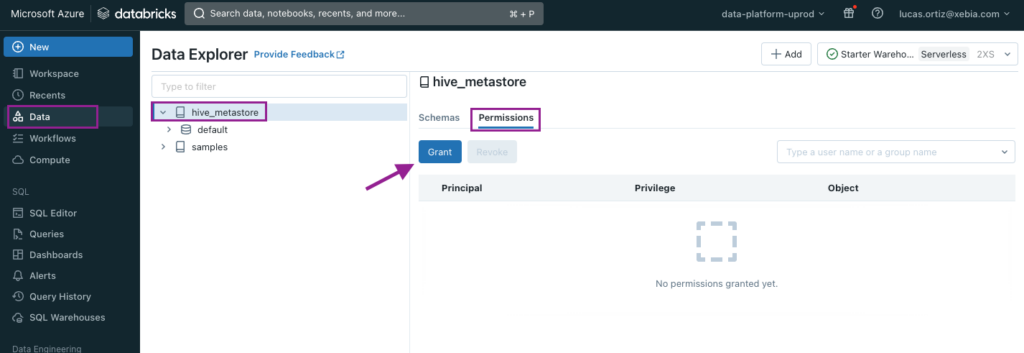
Finally, we will give the Service Principal access to the catalog, so it can create and modify schemas and tables.
We will first navigate to the Data page, select the appropriate catalog (default is hive_metastore), select the Permissions tab and click on Grant.
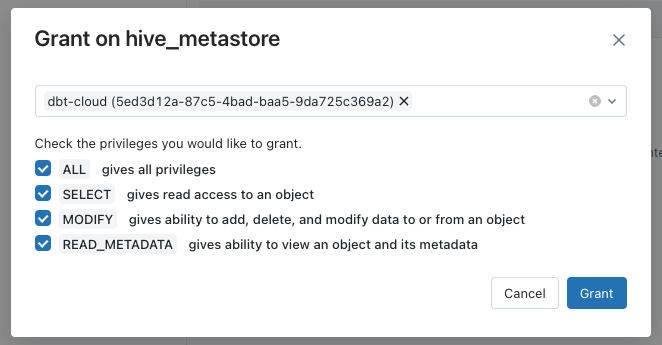
On the windows that will open, we will select the Service Principal name and give access to all privileges.
Make sure you follow the last Databricks steps on both Workspaces – udev and uprod.
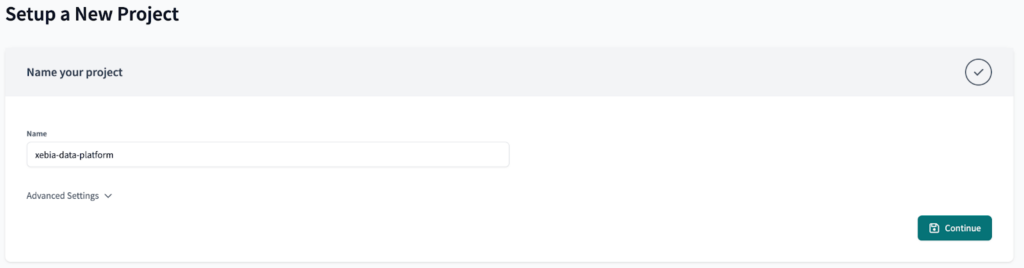
From the dbt Cloud side, let’s begin by creating our new project.
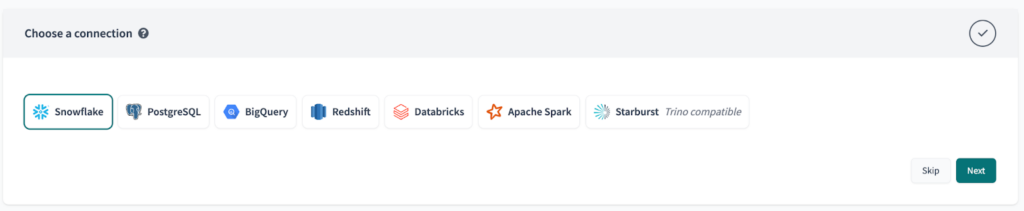
At first, we won’t set the connection to Databricks, since we would have to update it later on to use a Environment Variable, generating rework. Just click the Skip button for now.
Once you do it, the next step (Configure your environment) will be automatically skipped.
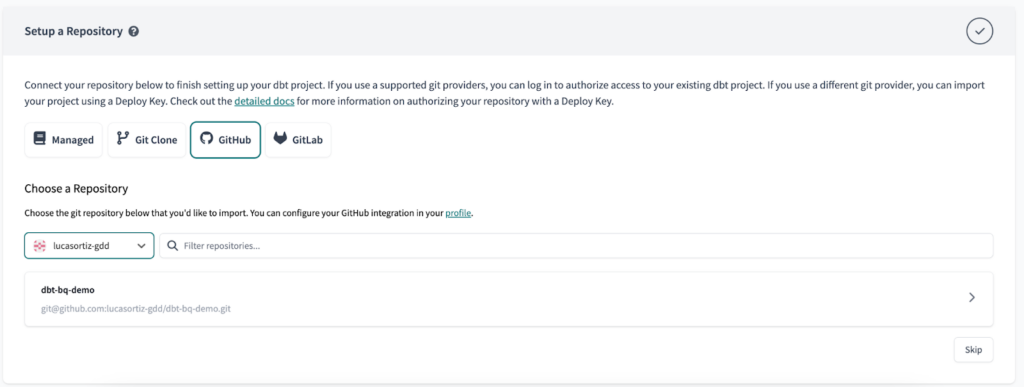
Finally, set up your repository with your preferred git platform.
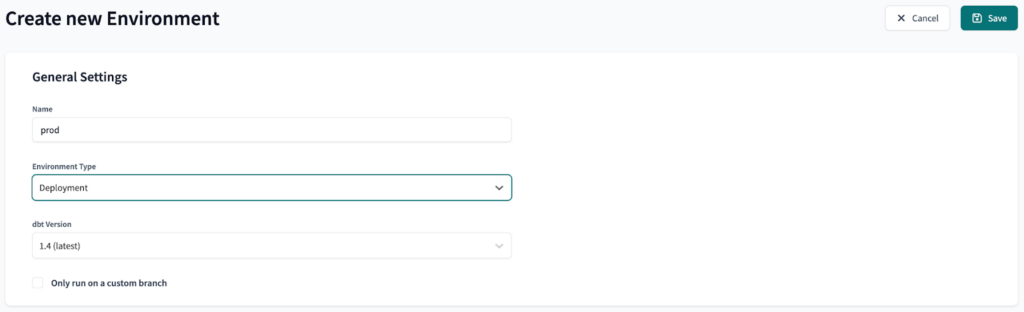
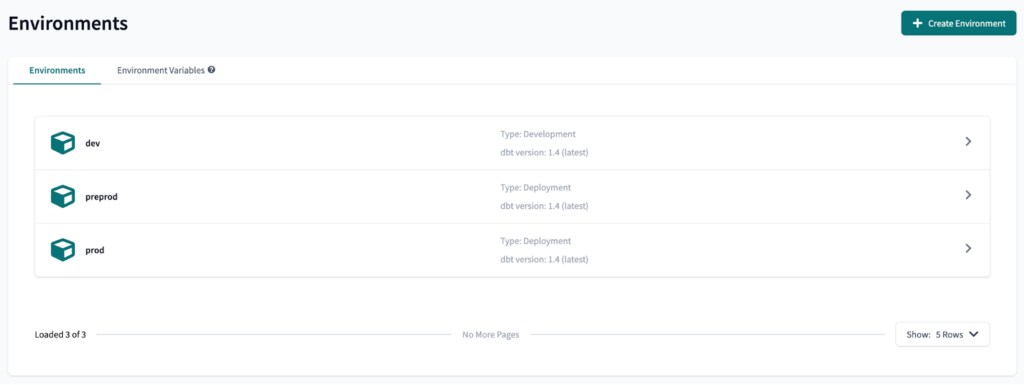
Next, we will create three environments: dev, preprod and prod. Dev is a development environment, while preprod and prod are deployment environments.
The final result should look like this:
The next step is to create two Environment Variables. This will allow us to use the data-platform-udev Databricks Workspace in the preprod dbt Cloud environment, and the data-platform-uprod Databricks Workspace in the prod dbt Cloud environment.
To create an Environment Variable is pretty straight-forward: on the Environments page, select Environment Variables and click on Add Variable. We will name the variables DBT_DATABRICKS_HOST and DBT_DATABRICKS_HTTP_PATH.
To find the values of the variables, we have to navigate to the Databricks Workspace, then open the SQL Warehouse we created in the previous steps. Under Connection details, we will find both values. We won’t use the whole value, only the highlighted piece.
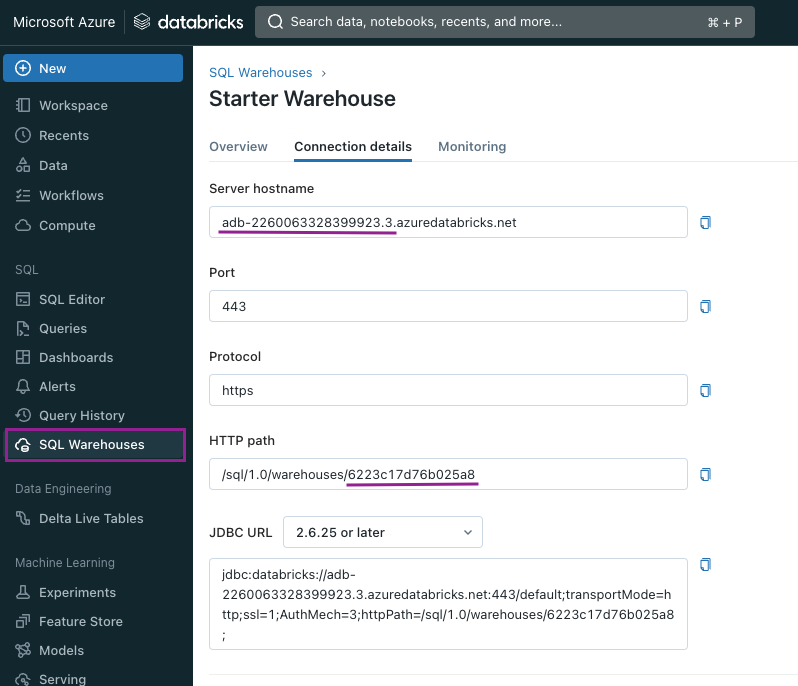
For example:
DBT_DATABRICKS_HOST = adb-2260063328399923.3
DBT_DATABRICKS_HTTP_PATH = 6223c17d76b025a8
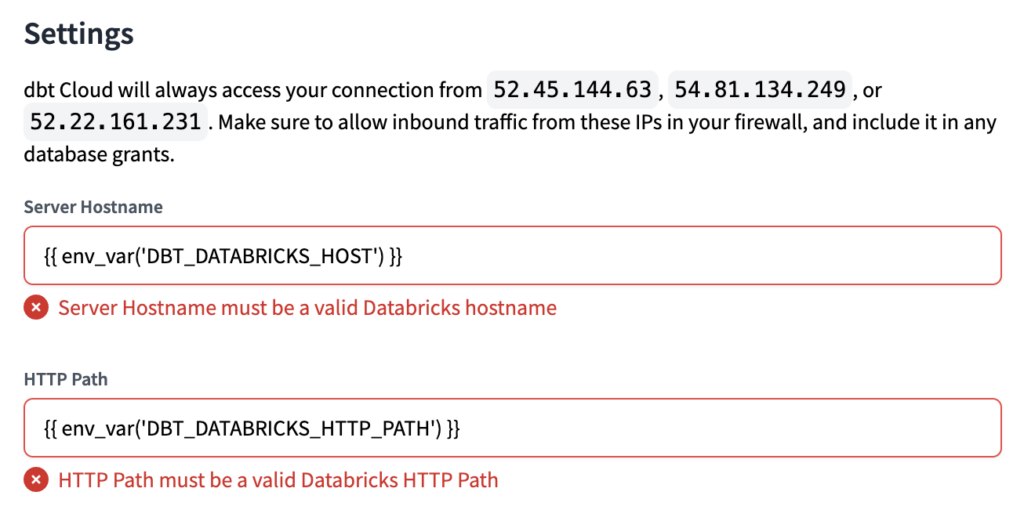
We have to do it this way, using only part of the Server hostname and HTTP Path values, because dbt Cloud has a syntax validation when setting up the connection. If we set the variable as the whole value, and try using only the variable when setting the connection, we will get an error.
You can see an example of the error you would get in the image below. If it is not clear yet, don’t worry, once we set the correct values (in the next steps), it will be clearer.
The final result should look like this:
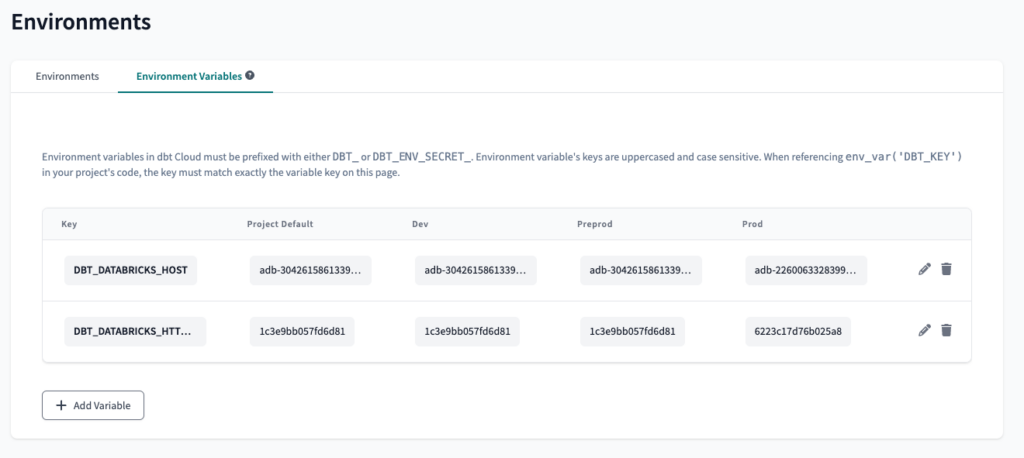
Since we only have two Databricks Workspaces, we will use the same values for dev and preprod, however, it is possible to implement the same logic with three or more Workspaces.
Once the variables are set, we can set up the connection with Databricks, using the newly-created variables to switch between Workspaces depending on the environment in use.
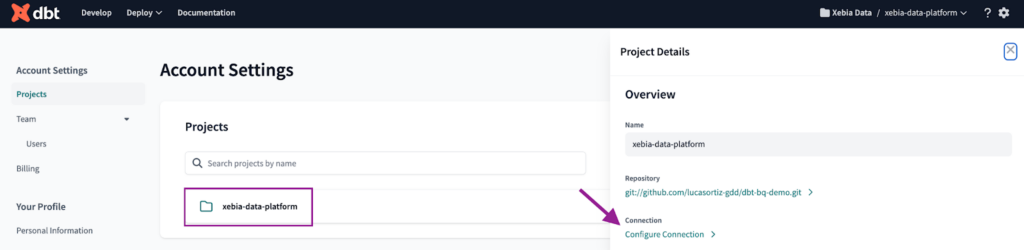
To set the connection with Databricks, first we must navigate to the Account Settings. There, we can find all our projects. We will click on the project we just created and then on Configure Connection.
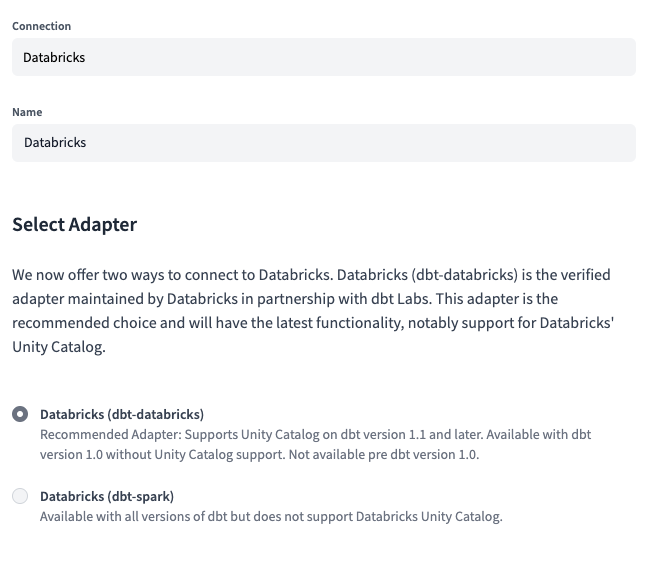
The next step is to set the Connection type to Databricks and select dbt-databricks as the Adapter.
Finally, we will set Server Hostname and HTTP Path values as follows:
Server Hostname = {{ env_var('DBT_DATABRICKS_HOST') }}.azuredatabricks.net
HTTP Path = /sql/1.0/warehouses/{{ env_var('DBT_DATABRICKS_HTTP_PATH') }}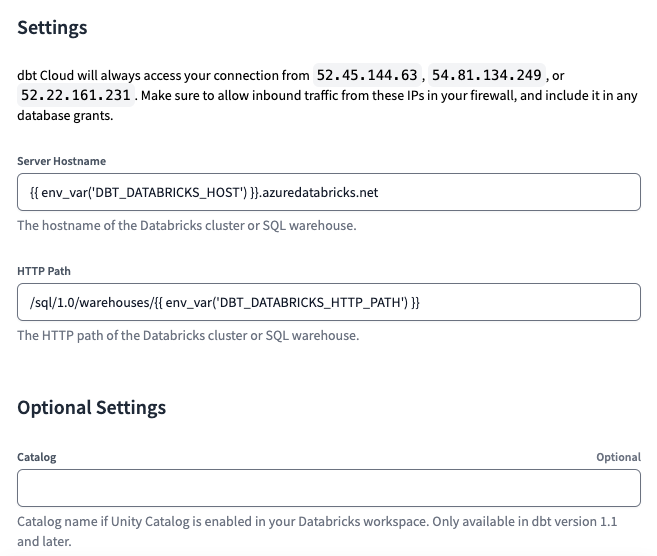
Note: If you are using Unity Catalog, it is also possible to set its value as a variable. To configure this, you must create a third variable in the previous step and set the corresponding values for each environment.
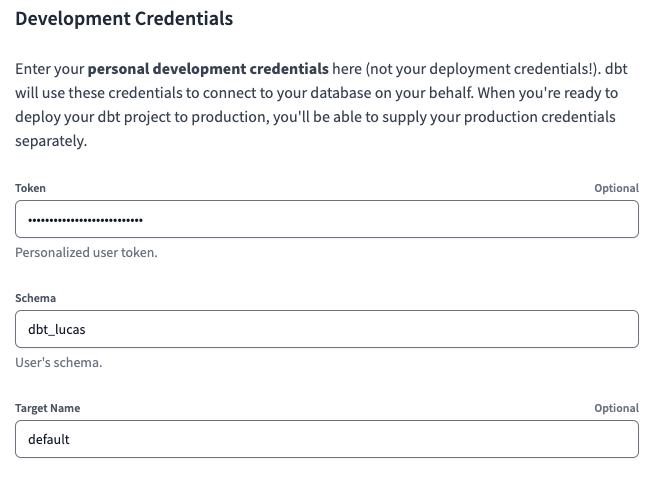
As an additional step, we will set up the Development Credentials. To do so, navigate to the Credentials page and select the project. We will have to set a Token and Schema. For the Schema, just choose a value unique to you – dbt_lucas, in my case.
For the Token, it is a Personal Access Token (PAT), unique to each user. We can generate one directly in the Databricks Workspace (udev), by selecting User Settings > Access Tokens > Generate new token
As of now, we have the correct Server Hostname and HTTP Path for each environment, using Environment Variables. We also set our Development Credentials, allowing each developer to have their own environment to develop. The only missing piece is the authentication for the Deployment environments.
To set it up, first we will navigate to the Environments page in dbt Cloud, select preprod and click on Edit. Scrolling down to the end of the page, we will find the Deployment Credentials section. There, we can set a Token and Schema. For the last, we will use dbt.
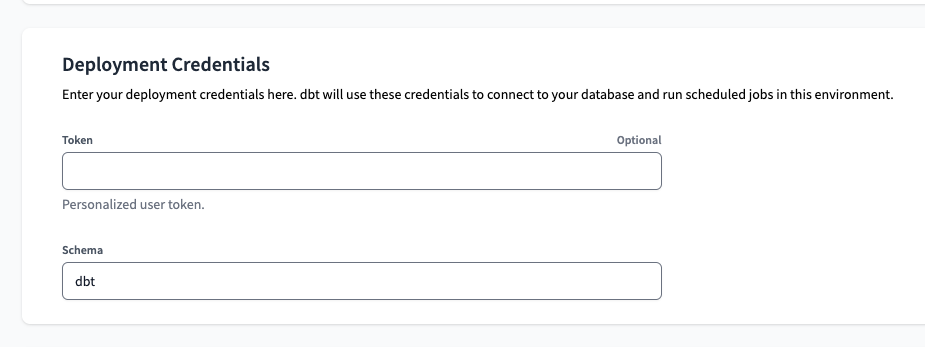
To get the Token is a bit more tricky. Even though the interface says Personalized user token, we want to avoid Personal Tokens that are associated with a specific user as much as possible – that’s the whole point why we set a Service Principal in the first steps of this post. Lucky for us that we already considered this from the very beginning, so now it will be much easier.
Unfortunately, Databricks doesn’t have any way to generate a token for a Service Principal straight from the UI. The only option left for us is to use Azure’s and Databricks’ APIs to generate the token. We will use a Python script, so make sure you have it installed and can run Python scripts.
To run this script properly, we will need the Tenant ID (you can find it in your Azure Portal), the Application ID, Client Secret Value and Databricks URL. Replace the values accordingly and run the script.
The token will be printed in your console, if everything was set properly.
# This script creates a Service Principal token for Databricks, with the duration of 1 year.
# First, it uses the Azure API to create a bearer token based on a Client secret from a Azure
# Active Directory App. This token has a maximum lifetime of 1 day. To make it live longer, we
# then use this token to create a token in Databricks, with a lifetime of 1 year.

import requests
import json

# Variables
tenant_id = '<span style="font-weight: 400">9e9c4a1a-0a3d-4d4e-8f2e-7f4f6d5e6d7c</span>'
application_id = '<span style="font-weight: 400">3c5b6a9b-1a2b-4c3d-5e6f-7g8h9i0j1k2l</span>'
client_secret_value = '<span style="font-weight: 400">qQt8Q~FQEptp1kv5-RUJNagwumzSPLfriPigqa41</span>'
databricks_url= 'https://adb-123456789.0.azuredatabricks.net'

# Create an Azure Active Directory token. To do so, we use the Azure API, with the Tenant Id,
# Application Id and Client secret value. The last two can be obtained by creating an App under Azure
# Active Directory.
def get_aad_token(tenant_id, application_id, client_secret_value):
    url = f'https://login.microsoftonline.com/{tenant_id}/oauth2/v2.0/token'
    payload = f'client_id={application_id}&client_secret={client_secret_value}&grant_type=client_credentials&scope=2ff814a6-3304-4ab8-85cb-cd0e6f879c1d/.default'

    response = requests.post(url, data=payload)
    aad_token = json.loads(response.text)['access_token']
    return aad_token

# Create a Databricks token. We use the Databricks API, with our Databricks URL and the AAD
# token obtained from the get_aad_token() function.
def create_databricks_token(databricks_url, aad_token):
    expiration_years = 1
    url = f'{databricks_url}/api/2.0/token/create'
    payload = json.dumps({
        'lifetime_seconds': 60 * 60 * 24 * 365 * expiration_years,
        'comment': 'blog post'
    })
    headers = {
        'Content-Type': 'application/json',
        'Authorization': f'Bearer {aad_token}'
    }

    response = requests.post(url, headers=headers, data=payload)
    response_json = json.loads(response.text)
    token_value = response_json['token_value']
    return token_value

# Call the functions
aad_token = get_aad_token(tenant_id, application_id, client_secret_value)
token_value = create_databricks_token(databricks_url, aad_token)

# Print the token
print(token_value)
The token will be something like dapi0fafa34d3b9g012962d34e7ba5dd62c44-3. Once you have it, just set this value as the Token in your Deployment Credentials value.
Repeat the same steps in this section for the Prod environment, and don’t forget to replace the databricks_url in the Python script and re-run it. The token is different for each Environment.
From now on, your dbt project should already be working with two different Databricks Workspaces. All that is left to do is set your deployment pipeline for each individual environment.
You can follow the steps on how to set up your deployment pipeline in this article (CI/CD in dbt Cloud with GitHub Actions: Automating multiple environments deployment).
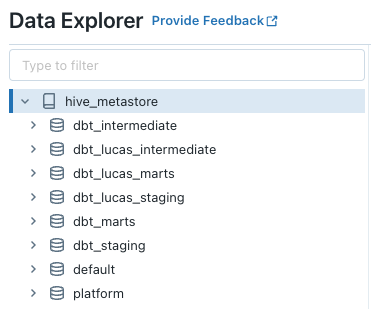
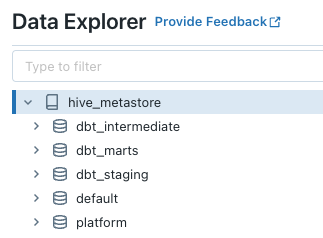
After building the models for each environment, and also in the Develop IDE, you should have two Workspaces that look like the images below:
Databricks is a great tool that offers a unified analytics platform that combines data engineering, data science, and business analytics. It provides a collaborative environment for teams to work together, accelerating the development and deployment of data-driven solutions. With its powerful processing capabilities and scalability, Databricks enables organizations to extract valuable insights from their data faster and more efficiently.
By implementing this setup, with Multiple Databricks Workspaces and one dbt Cloud Project, you can achieve greater maintainability, scalability, and security for your data platform, making it ready for the growth of the data team.