Hear from a Partner: The Power of Ivanti Cloud Dispatcher
By Donny van der Linde, Workspace Consultant at NEXXT
Our Ivanti partner, NEXXT, participated in the Ivanti Automation beta program. They wrote about their experience to help their customers understand the new features Ivanti is working and prepare for future releases.
The below is an excerpt of the NEXXT blog (translated from Dutch):
The Covid-19 pandemic has had a significant impact on the way we work. The office has shifted to a remote, work-from-home workplace, a scenario Ivanti refers to as the Everywhere Workplace™. This means that the ability to use new technologies, applications and devices to stay in touch with colleagues is increasingly important for organizations, as is ensuring they remain in control.
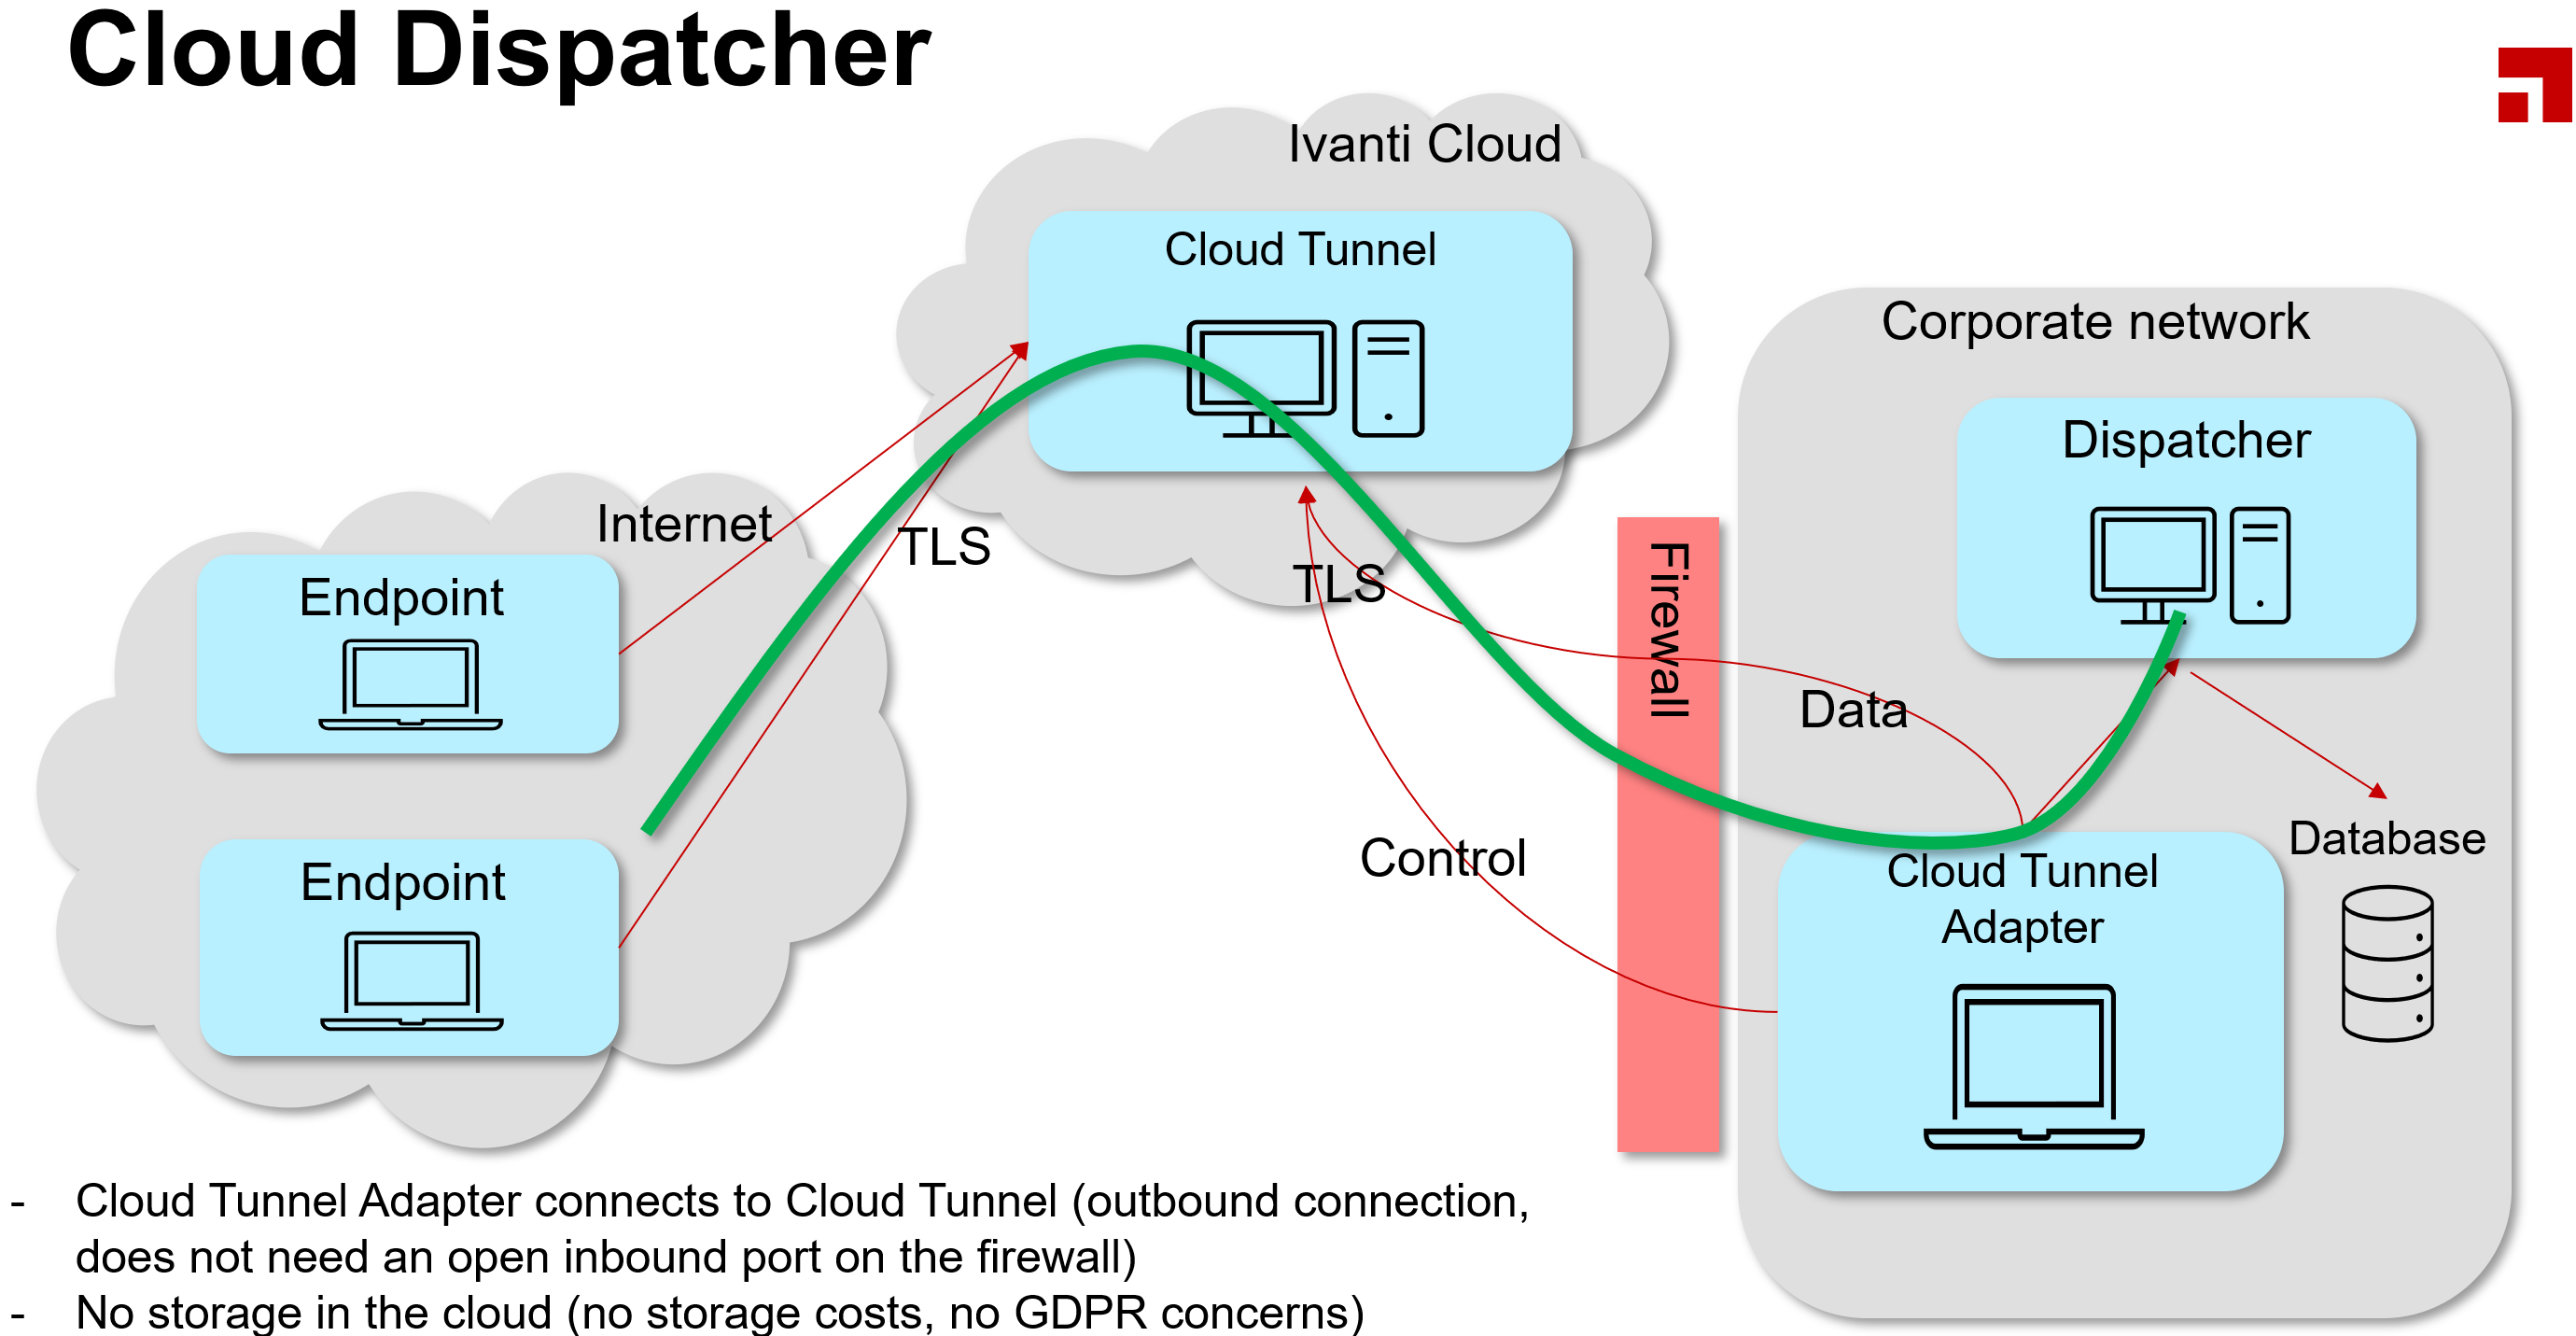
Ivanti Automation enables full control over the maintenance of the configurations and adjustments on all managed workstations within organizations. The Ivanti Cloud Dispatcher is a new component of Ivanti Automation which can connect Ivanti Automation Agents to on-premises Dispatchers through an Ivanti cloud back-end. It makes it much easier to connect devices your employees use while working from home to the on-premises Dispatcher backend.
What is Ivanti Automation?
Ivanti Automation streamlines the management of complex hybrid IT environments by automating infrastructure, cloud and workplace processes. In addition to the Identity Management portfolio, Ivanti Automation now also integrates with the entire Ivanti IT product portfolio for operational security, unified endpoint management, IT asset management, service management and third-party technologies.
With Ivanti Automation, organizations can:
- Automate routine configurations, provisioning and upgrades with over 300 built-in automation tasks.
- Significantly reduce the time it takes to fulfill requests and resolve incidents by eliminating the need to wait for human availability and decide to take necessary actions.
- Simplify management of complex hybrid environments by quickly creating powerful, sequential runbooks.
- Mitigate risk and improve security through predictable and audit-friendly processes that enforce policies and help prevent human error.
Current situation
In the current situation, endpoints get information directly from an on-premises Dispatcher. Endpoints and Dispatcher server(s) are both located in your corporate network. For example, when an employee with a laptop moves outside the corporate network, new information from Ivanti Automation cannot be retrieved; there is no connection with an on-premises Dispatcher. In this configuration, endpoints outside the corporate network are not updated with new information, which limits your organization's capabilities that you would have internally.
NEXXT Level
An Ivanti Cloud Tunnel Adapter runs on-premises in the company network and connects to an existing on-premises Dispatcher server(s) as well as to Ivanti Cloud. In Ivanti Cloud, a dedicated Cloud Dispatcher Tunnel is available and the Ivanti Automation processes running on the endpoints connect to this Cloud Dispatcher Tunnel. When the endpoint is connected to the internet, the endpoint will retrieve information and new configurations as usual in an on-premises environment.
Components required to use Ivanti Cloud Dispatcher
To properly test the Beta version, we used our demo environment and the product builds delivered by Ivanti through their Beta program. In this demo environment I need the following Ivanti Automation components:
• Ivanti Automation Database
• Ivanti Automation Console
• Ivanti Automation Dispatcher
• Ivanti Automation Cloud Tunnel Adapter
• Ivanti Automation Agent (remote endpoint > virtual machine in Azure)
The following parts have been made available by Ivanti:
• Ivanti Cloud Dispatcher Tunnel (Ivanti Cloud, including credentials and keys)
The Ivanti Cloud Tunnel Adapter can be installed on the same server as your Dispatcher or on a separate server, as long as the computer where the Ivanti Cloud Tunnel Adapter is installed can connect to both the Internet and the Dispatcher.
Test it.
Step 1:
The Ivanti Automation Demo environment, which was on version 2021.4, had to be upgraded to version 2022.1 using an upgrade pack which is made available for us through the Beta program. After the upgrade of the basic components (Database, Console, and Dispatcher) in the on-premises environment, the Cloud Dispatcher must be turned on.
Step 2:
Enabling the Cloud Dispatcher option which became available after the upgrade. Within the console, go to Setup > Cloud Dispatcher > Settings tab and enable the option. A dedicated tenant will automatically be created IF a trial or official Cloud Dispatcher license is available for your company.
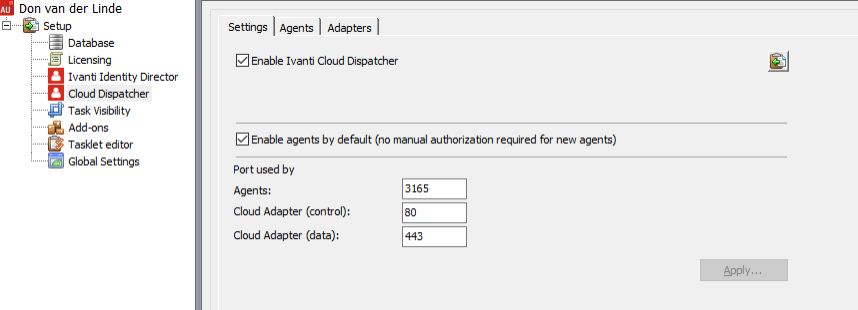
When configuring the Cloud Dispatcher, the default ports can be adjusted as desired. Explanation of the different ports:
- Agents: This is the port used by agents to connect to the Cloud Relay
- Cloud Adapter (control): This is the port used by the Cloud Adapter for the outbound connection to the Cloud Dispatcher backend, for control purposes.
- Cloud Adapter (data): This is the port used by the Cloud Adapter for the outbound connection to the Cloud Dispatcher backend, for transferring data between Agent and Dispatcher.
|
Note: the ports are inbound ports for the Ivanti Cloud Dispatcher, meaning they are outbound ports that should be allowed by your Firewall configuration. |
Step 3:
Installing Ivanti Cloud Tunnel Adapter, which can be downloaded from the Ivanti Automation Console. Within the console, go to Setup > Cloud Dispatcher > Adapters tab, and the option “Download Ivanti Cloud Tunnel Adapter” will be available at the bottom of the screen. When clicked, the Windows Installer package (.MSI) will be downloaded. The installation parameters required for connecting to the Ivanti Cloud can be copied to the clipboard by clicking on the clipboard icon. See the example where the button is highlighted in red.

The Ivanti Cloud Tunnel Adapter was installed on a separate server to create a clear separation.
Windows command line installation:

The installation of the Ivanti Cloud Tunnel Adapter is completed in seconds and will be connected to Ivanti Cloud. A new service has been added to Windows Services.

At the moment of testing, the Beta version of Ivanti Cloud does not (yet) have a GUI where connection to Ivanti Cloud can be checked. To see if Ivanti Cloud Tunnel Adapter is connected to the Ivanti cloud, the log files can be consulted in:
C:\ProgramData\Ivanti\Ivanti Cloud Tunnel Adapter
Every day a new file is created there, in the format “log<yyyymmdd>.txt” (example: “log20210323.txt”).

In the above logging, we see that the Ivanti Cloud Dispatcher has successfully connected to Ivanti Cloud (an Azure Container provided by Ivanti) and the on-premises Dispatcher. The listening ports that Ivanti Cloud Dispatcher uses in the demo environment are 443, 80, and 3165 (all using TLS).
Step 4:
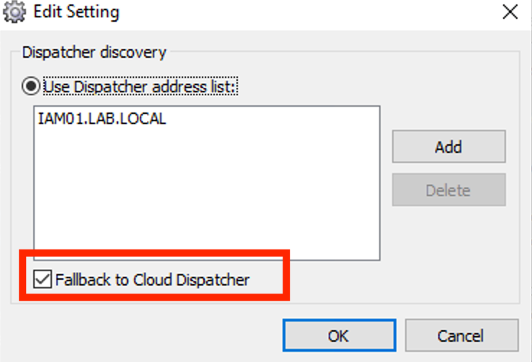
Installation of the Ivanti Automation Agent. First, a fallback will have to be set here in the console for the agents, to allow the Agent to use a connection to Cloud Dispatcher when a direct connection to a Dispatcher fails.
Within the Ivanti Automation console, go to Setup > Global Settings and select Dispatcher Discovery, turn on the option “Fallback to Cloud Dispatcher”.
Create a Pre-Config Windows Installer package for the Ivanti Automation Agents. Within the console, go to Administration > Components and right-click on the x64 or x86 agent, then select “Save component as”.

Use this package to install the Ivanti Automation Agent on an endpoint. I have created a virtual machine within Azure and installed the agent on this.
The agent is visible in the 'Agents' overview under Topology.
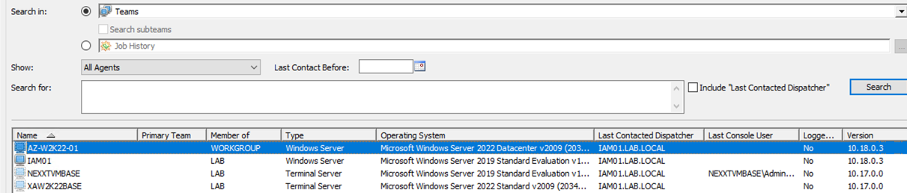
To see that an agent is connected to a Cloud Dispatcher, this can be found by going to Setup > Cloud Dispatcher and then Agents within the console.

Step 5:
The ultimate test is the installation of an application using a module 7-Zip as an example.
|
Note: To limit the data transfer from the corporate network to the Everywhere Workplace™ endpoints, you might want to consider delivering resources via web content (resource type = located at URL) |
From the Ivanti Automation console, we schedule the task to the agent on the virtual machine running in Azure.
In the Jobs overview, we see that it has been installed successfully.

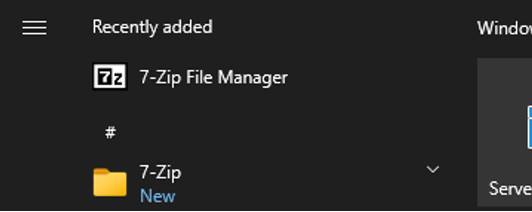
Checking the agent now shows 7-Zip in the Start menu.
Conclusion
As an organization, you have control over remote endpoints such as laptops with Ivanti Cloud Dispatcher. Because the Ivanti Cloud Dispatcher uses outgoing connections, no incoming Firewall rules need to be set. Also, Ivanti Cloud does not store any data and has no storage costs, so you as an organization have nothing to do with GDPR considerations.
It is a very simple installation with clear documentation to get the Ivanti Cloud Dispatcher up and running.
Be sure to also see the possibilities offered by this development of Ivanti within Cloud Computing platforms, where a lot is done with Automation as a Code. But what if your organization does not yet have this expertise? Due to the flat learning curve, Ivanti Automation can be a very interesting solution!