
The explosion of talent available for remote work (and the widespread acceptance of remote first employment) allows for global collaboration on an unprecedented scale. This expansion does not come without risks - especially in the software industry. Multiple developers working on the same codebase face the risk of introducing breaking changes and disrupting the application. Teams need to follow best practices so that everyone is always on the same page. Failure to do so can result in unexpected downtime and loss. Continuous integration (CI) is one of those best practices that high-performing development teams have adopted. CI is the repeatable process of integrating changes from multiple contributors to create a single software project.
In this article, I will use CircleCI to show how you can apply continuous integration to a LoopBack project. LoopBack is a highly extensible Node.js and TypeScript framework for building APIs and microservices.
This tutorial is the first in a series about establishing a CI/CD practice for your LoopBack applications. The next tutorial shows you how to automate LoopBack deployments.
For this project we will build an API for a quiz application. The API will have endpoints to handle these operations:
- Get all questions
- Get the total number of questions in the database
- Get a question with a specified ID
For added effect, the API will vehemently reject requests to delete a question.
Prerequisites
- Before you install LoopBack, make sure to download and install Node.js version 8.9.x or higher. Node.js a JavaScript runtime.
- Install the LoopBack 4 CLI if you have not done so.
Getting started
The LoopBack 4 CLI is a command-line interface that can scaffold a project or extension. The CLI provides the fastest way to get started with a LoopBack 4 project that adheres to best practices.
npm install -g @loopback/cli
Create a new project using this command:
lb4 app
? Project name: quiz-ci-app-api
? Project description: A simple API for a quiz application
? Project root directory: quiz-ci-app-api
? Application class name: QuizCiAppApiApplication
? Select features to enable in the project Enable eslint, Enable prettier, Enable mocha, Enable loopbackBuild, Enable vscode, Enable docker, Enable repositories, Enable
services
? Yarn is available. Do you prefer to use it by default? No
Note: If LoopBack crashes and fails to create the app, make sure you’re on an LTS version of Node. Some later versions of Node have compatibility issues.
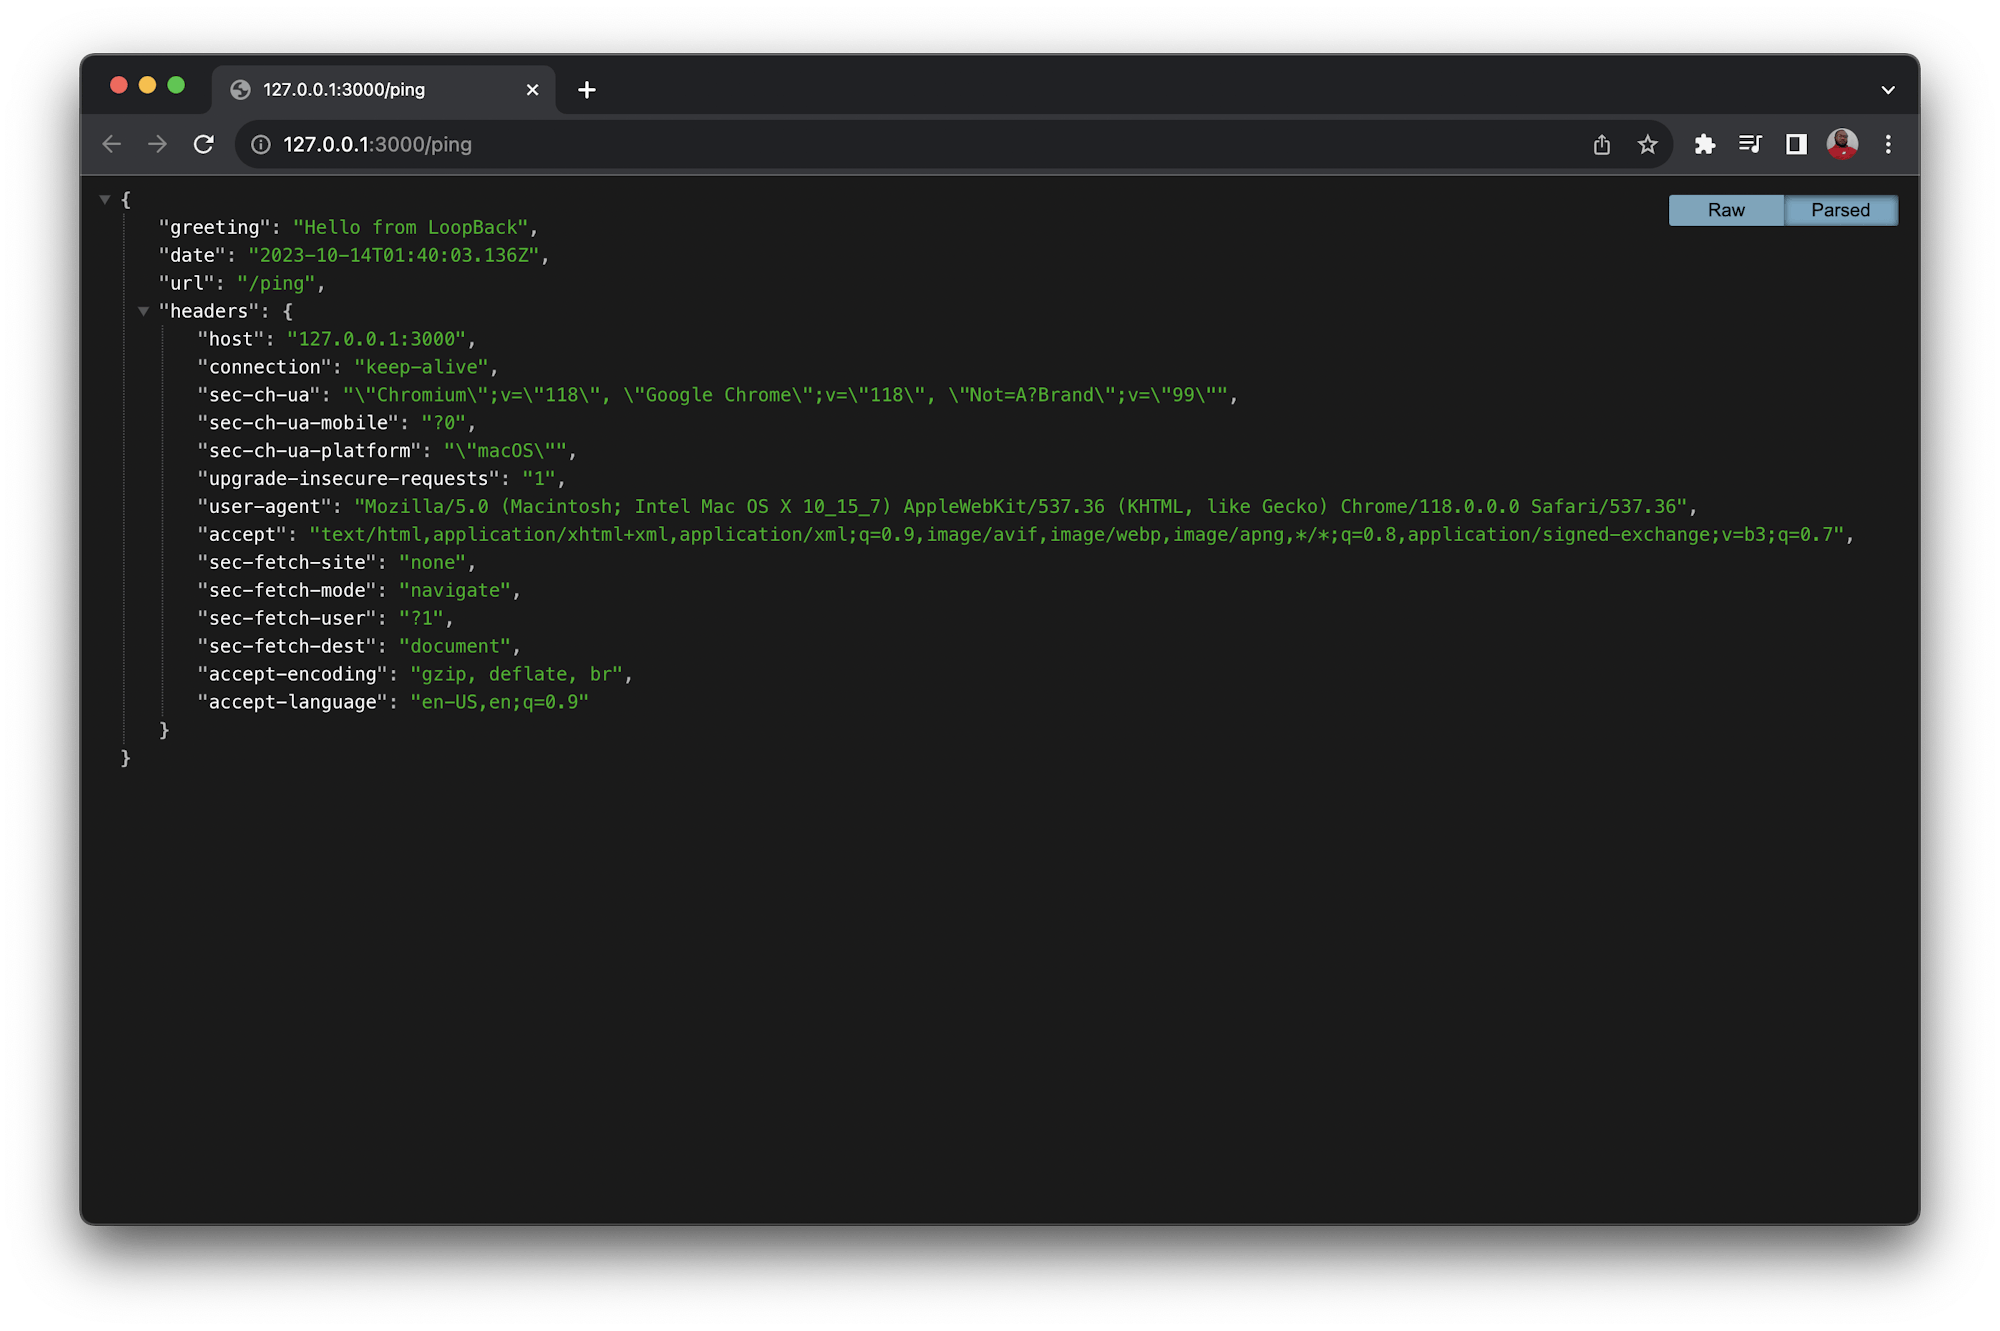
The project comes with a “ping” route to test the project. Try it out by running the project. Navigate into the newly created quiz-ci-app-api directory and start it by running:
cd quiz-ci-app-api

npm start
In a browser, visit http://127.0.0.1:3000/ping
Configuring CircleCI
Next, add the pipeline configuration for CircleCI. At the root of your project, create a folder named .circleci and within it, create a file named config.yml. In the newly created file, add this configuration:
version: "2.1"
orbs:
  node: circleci/node@5.1.0
jobs:
  build-and-test:
    docker:
      - image: "cimg/base:stable"
    steps:
      - checkout
      - node/install
      - run:
          command: npm install
          name: Install dependencies
      - run:
          command: npm run test
          name: Run tests
workflows:
  test_my_app:
    jobs:
      - build-and-test
This configuration pulls in the Node.js orb: circleci/node. Among other things, this allows you to install packages with caching enabled by default.
Also specified is a job named build-and-test which does this:
- Checks out the latest code
- Installs node
- Installs the packages declared in
package.json - Runs the tests in the projects
Finally, the config specifies a workflow that runs the build-and-test job.
Next, set up a repository on GitHub and link the project to CircleCI. See this post for help pushing your project to GitHub.
Log into your CircleCI account. If you signed up with your GitHub account, all your repositories will be displayed on your project’s dashboard.
Next to your quiz-ci-app-api project, click Set Up Project.
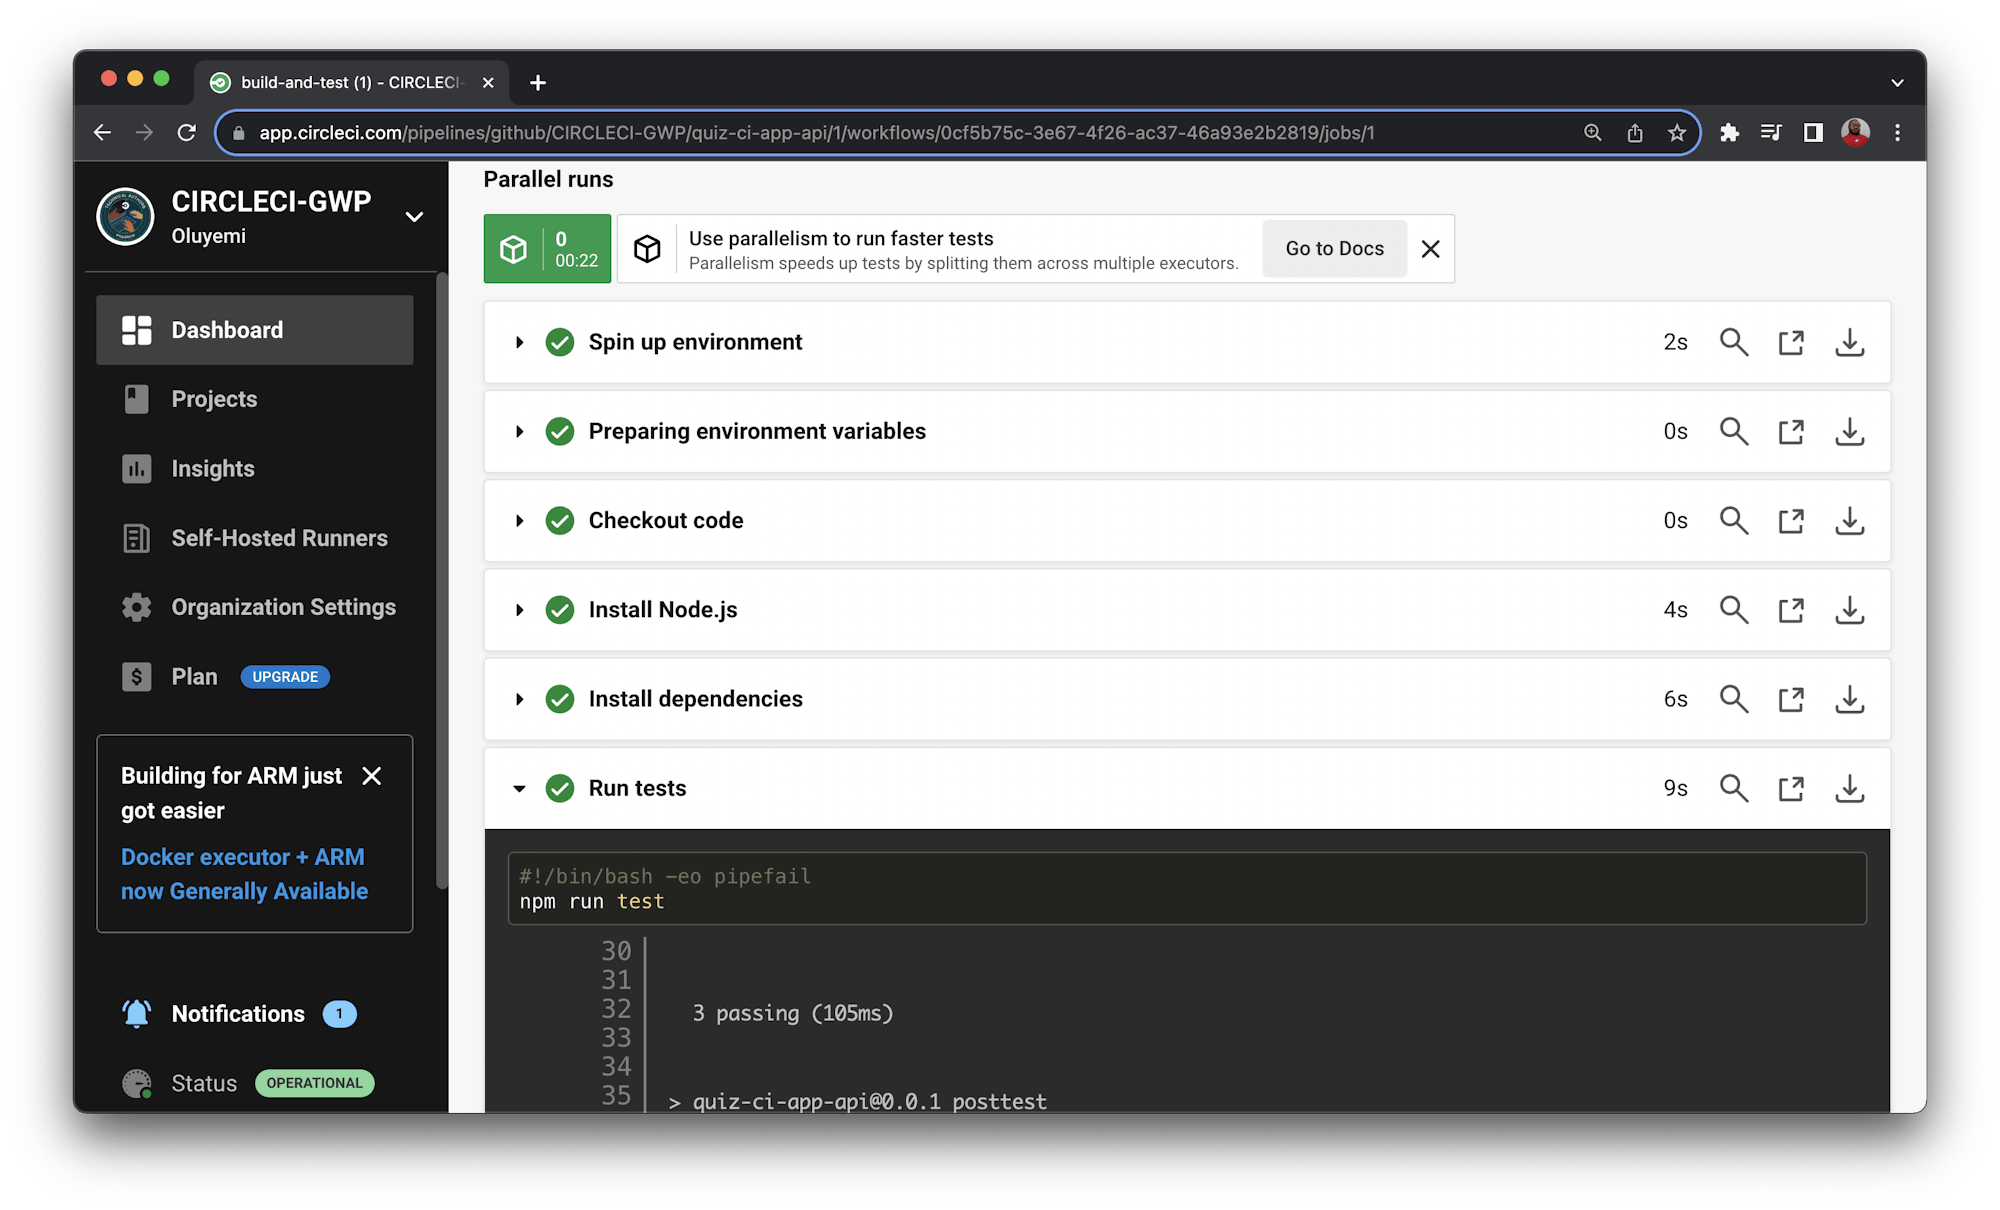
CircleCI will detect the config.yml file within the project. Click Use Existing Config and then Start Building. Your first workflow will run successfully!
Now that you have a pipeline in place, you can add the questions features of the API.
Building the question model
For this tutorial, a question will have fields for these attributes:
- Difficulty
- Question
- Correct answer
A unique primary key is assigned by default when the question is created.
You can use the lb4 model command and answer the prompts to generate the model. Press Enter with an empty property name to generate the model. Follow these steps:
lb4 model question
? Please select the model base class Entity (A persisted model with an ID)
? Allow additional (free-form) properties? No
Model Question will be created in src/models/question.model.ts

Let's add a property to Question
Enter an empty property name when done

? Enter the property name: id
? Property type: number
? Is id the ID property? Yes
? Is id generated automatically? Yes

Let's add another property to Question
Enter an empty property name when done

? Enter the property name: difficulty
? Property type: string
? Is it required?: Yes

Let's add another property to Question
Enter an empty property name when done

? Enter the property name: question
? Property type: string
? Is it required?: Yes

Let's add another property to Question
Enter an empty property name when done

? Enter the property name: answer
? Property type: string
? Is it required?: Yes

Let's add another property to Question
Enter an empty property name when done

? Enter the property name:
A new model will be created at src/models/question.model.ts.
Building a datasource
Next, create a datasource to hold the questions for the API. For this tutorial, use an in-memory database. Create a datasource using this command:
lb4 datasource
Respond to the prompts as shown:
? Datasource name: db
? Select the connector for db:  In-memory db (supported by StrongLoop)
? window.localStorage key to use for persistence (browser only):
? Full path to file for persistence (server only): ./data/db.json
Next, create a folder named data in the root directory of the project. In the data directory, create a file named db.json and add this to it:
{
  "ids": {
    "Question": 9
  },
  "models": {
    "Question": {
      "1": "{\"difficulty\":\"medium\",\"question\":\"The HTML5 standard was published in 2014.\",\"answer\":\"True\",\"id\":1}",
      "2": "{\"difficulty\":\"medium\",\"question\":\"Which computer hardware device provides an interface for all other connected devices to communicate?\",\"answer\":\"Motherboard\",\"id\":2}",
      "3": "{\"difficulty\":\"medium\",\"question\":\"On which day did the World Wide Web go online?\",\"answer\":\"December 20, 1990\",\"id\":3}",
      "4": "{\"difficulty\":\"medium\",\"question\":\"Android versions are named in alphabetical order.\",\"answer\":\"True\",\"id\":4}",
      "5": "{\"difficulty\":\"medium\",\"question\":\"What was the first Android version specifically optimized for tablets?\",\"answer\":\"Honeycomb\",\"id\":5}",
      "6": "{\"difficulty\":\"medium\",\"question\":\"Which programming language shares its name with an island in Indonesia?\",\"answer\":\"Java\",\"id\":6}",
      "7": "{\"difficulty\":\"medium\",\"question\":\"What does RAID stand for?\",\"answer\":\"Redundant Array of Independent Disks\",\"id\":7}",
      "8": "{\"difficulty\":\"medium\",\"question\":\"Which of the following computer components can be built using only NAND gates?\",\"answer\":\"ALU\",\"id\":8}"
    }
  }
}
The ids key of the JSON file lets the database know the next ID to assign a new question. In the models section, we provide the data for each model. Also specified is the Question model and the base questions in your database.
Create a repository
For this tutorial, you will use the repository to provide a layer of abstraction between the database and the question model. Create a new repository using this command:
lb4 repository
Respond to the prompts as shown:
? Select the datasource DbDatasource
? Select the model(s) you want to generate a repository for Question
The newly created class (located in src/repositories/question.repository.ts) has the connections needed to perform CRUD operations for your model.
Create a controller
Create a new controller using this command:
lb4 controller
Respond to the CLI prompts as shown:
? Controller class name: question
Controller Question will be created in src/controllers/question.controller.ts

? What kind of controller would you like to generate? REST Controller with CRUD functions
? What is the name of the model to use with this CRUD repository? Question
? What is the name of your CRUD repository? QuestionRepository
? What is the name of ID property? id
? What is the type of your ID? number
? Is the id omitted when creating a new instance? Yes
? What is the base HTTP path name of the CRUD operations? /questions
The CLI creates a controller capable of handling all CRUD operations. However, at this time, you need only a subset of those operations. Open the questions controller located at src/controllers/question.controller.ts and edit it to match this code:
import {
  Count,
  CountSchema,
  Filter,
  FilterExcludingWhere,
  repository,
  Where,
} from "@loopback/repository";
import { del, get, getModelSchemaRef, HttpErrors, param, response } from "@loopback/rest";
import { Question } from "../models";
import { QuestionRepository } from "../repositories";

export class QuestionController {
  constructor(
    @repository(QuestionRepository)
    public questionRepository: QuestionRepository
  ) {}

  @get("/questions/count")
  @response(200, {
    description: "Question model count",
    content: { "application/json": { schema: CountSchema } },
  })
  async count(@param.where(Question) where?: Where<Question>): Promise<Count> {
    return this.questionRepository.count(where);
  }

  @get("/questions")
  @response(200, {
    description: "Array of Question model instances",
    content: {
      "application/json": {
        schema: {
          type: "array",
          items: getModelSchemaRef(Question, { includeRelations: true }),
        },
      },
    },
  })
  async find(@param.filter(Question) filter?: Filter<Question>): Promise<Question[]> {
    return this.questionRepository.find(filter);
  }

  @get("/questions/{id}")
  @response(200, {
    description: "Question model instance",
    content: {
      "application/json": {
        schema: getModelSchemaRef(Question, { includeRelations: true }),
      },
    },
  })
  async findById(
    @param.path.number("id") id: number,
    @param.filter(Question, { exclude: "where" })
    filter?: FilterExcludingWhere<Question>
  ): Promise<Question> {
    return this.questionRepository.findById(id, filter);
  }

  @del("/questions/{id}")
  @response(403, {
    description: "Question DELETE not permitted",
  })
  async deleteById(@param.path.number("id") id: number): Promise<void> {
    throw new HttpErrors.Forbidden("Question DELETE not permitted");
  }
}
Adding tests for the endpoints
The last step is to add an acceptance test suite to ensure that your question controller works as expected. In the src/__**tests__**/acceptance folder, create a new file called question.controller.acceptance.ts and add this code to it:
import { Client, expect } from "@loopback/testlab";
import { QuizApplication } from "../..";
import { setupApplication } from "./test-helper";

describe("QuestionController", () => {
  let app: QuizApplication;
  let client: Client;

  before("setupApplication", async () => {
    ({ app, client } = await setupApplication());
  });

  after(async () => {
    await app.stop();
  });

  it("successfully makes GET request to /questions", async () => {
    const res = await client.get("/questions").expect(200);
    expect(res.body).to.be.an.Array();
    expect(res.body).to.have.length(8);
  });

  it("successfully makes GET request to /questions/count", async () => {
    const res = await client.get("/questions/count").expect(200);
    expect(res.body).to.be.an.Object();
    expect(res.body.count).to.equal(8);
  });

  it("successfully makes GET request to /questions/{id}", async () => {
    const res = await client.get("/questions/2").expect(200);
    expect(res.body).containEql({ id: 2, difficulty: "medium", answer: "Motherboard" });
  });

  it("makes DELETE request to /questions which fails", async () => {
    await client.delete("/questions/5").expect(403);
  });
});
Before you run the tests, take a minute to do some housekeeping. Lint your code and fix any issues using this command:
npm run lint:fix
Commit your code and run the tests locally to be sure everything is in order. Use this command:
npm test
Push the latest changes to your GitHub repository. This triggers the CircleCI build-and-test job which runs successfully just as it did earlier. Great work!
Conclusion
In this article, we looked at how to build an API using LoopBack. We also set up a CircleCI pipeline to manage continuous integration for the project. By automating the testing process, you remove the risk of human error wreaking unexpected havoc in the production environment. It also adds an additional level of quality control and assurance to the software being maintained. Give continuous integration a try and make code base bottlenecks a thing of the past for your team.
The entire codebase for this tutorial is available on GitHub .
Oluyemi is a tech enthusiast with a background in Telecommunication Engineering. With a keen interest in solving day-to-day problems encountered by users, he ventured into programming and has since directed his problem solving skills at building software for both web and mobile. A full stack software engineer with a passion for sharing knowledge, Oluyemi has published a good number of technical articles and blog posts on several blogs around the world. Being tech savvy, his hobbies include trying out new programming languages and frameworks.