
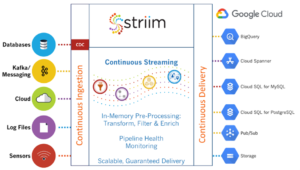
Businesses prefer the cloud over traditional On-Prem for their business apps for various reasons such as high availability, cost savings, enhanced security, etc. One challenge that needs to be addressed in planning for data migration is the need for continuous data ingestion in cloud storage. One of the most reliable ETL tools to address this need is Striim which can be used to move data from an existing data center to the Google Cloud Platform. Striim is a flexible platform that enables real-time ETL and ELT from a wide range of sources, including on-prem, cloud databases, IoT, messaging systems, network protocols, files, and more.
MySQL is the world’s most popular open-source relational database. Cloud SQL for MySQL is a service provided by the Google Cloud Platform and supports all major versions of MySQL, including MySQL Workbench, mysqldump, phpMyAdmin, dbForge Studio, Toad Edge for MySQL, and MySQL CLI. These tools are integrated into Cloud SDK. With this service, we are going to create source data for a use case. Google Cloud Spanner is a distributed relational database service provided by Google Cloud Platform. It supports global transactions, multi-site replication, and failover. Cloud spanner is used to store more than 30TB of data than Cloud SQL.
In this tutorial, you will learn how to load data and change a data capture pipeline to cloud spanner from Cloud SQL for MySQL using Strim, a Google Cloud’s Data Migration Partner.
How to Migrate the Database
1. Set up MySQL
- To set up the MySQL database, execute the below commands in the cloud shell. For that, you need to activate it. To activate cloud shell, click on Active Cloud Shell at the top of the Google Cloud console.
| 1. CSQL_NAME=striim-sql-src | 2. CSQL_USER_NAME=striim-user |
| 3. CSQL_USER_PWD=striim-usr-password | 4. CSQL_ROOT_PWD=striim-root-password |
- Once the above commands are executed to create a new user, you need to connect MySQL using that user. Use the command below in the cloud shell to execute.
- gcloud sql connect $CSQL_NAME –user=$CSQL_USER_NAME
- Once connected, use the command below to create a database and load data in it:
-
- USE striimdemo;
- SELECT 1 FROM DUAL;
- USE striimdemo;
- CREATE TABLE ORDERS (ORDER_ID Integer, ORDER_DATE VARCHAR(50), ORDER_MODE VARCHAR(8), CUSTOMER_ID Integer, ORDER_STATUS Integer, ORDER_TOTAL Float, SALES_REP_ID Integer, PROMOTION_ID Integer, PRIMARY KEY (ORDER_ID));
- INSERT INTO ORDERS (ORDER_ID, ORDER_DATE, ORDER_MODE, CUSTOMER_ID, ORDER_STATUS, ORDER_TOTAL, SALES_REP_ID, PROMOTION_ID) VALUES (1001, 1568927976017, ‘In-Store’, 1001, 9, 34672.59, 331, 9404);
- INSERT INTO ORDERS (ORDER_ID, ORDER_DATE, ORDER_MODE, CUSTOMER_ID, ORDER_STATUS, ORDER_TOTAL, SALES_REP_ID, PROMOTION_ID) VALUES (1002, 1568928036017, ‘In-Store’, 1002, 1, 28133.14, 619, 2689);
- INSERT INTO ORDERS (ORDER_ID, ORDER_DATE, ORDER_MODE, CUSTOMER_ID, ORDER_STATUS, ORDER_TOTAL, SALES_REP_ID, PROMOTION_ID) VALUES (1003, 1568928096017, ‘CompanyB’, 1003, 1, 37367.95, 160, 30888);
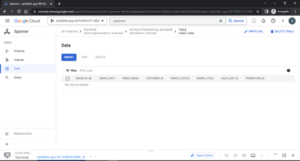
- Next, you will want to verify that the Cloud Spanner instance has been set up with a database and table defined. Search for the spanner on the navigation page and check instancestriim-spanner-demo and database. In this database, you will see an orders table that will have no data in it.
2. Set up the Striim Software
Follow the steps below to set an instance on a striim server through the Google Cloud Marketplace.
- Once you open the above link, click on the launch button, and then fill in the configuration option for the striim server. Change the zone to the same as the cloud SQL instance zone. Leave the other settings on default and click on deploy. Take note of the instance name and instance zone.
- Execute the command below to replace the instance name and zone.
- STRIIMVM_NAME = striim-1-vm
- STRIIMVM_ZONE = us-east1-c
- Now try to communicate the striim server with cloud SQL by executing the command below to add the striim server’s IP address to it.
- gcloud sql instances patch $CSQL_NAME –authorized-networks=$(gcloud compute instances describe $STRIIMVM_NAME –format=’get(networkInterfaces[0].accessConfigs[0].natIP)’ –zone=$STRIIMVM_ZONE)
- In the deployment manager, click the visit the site button and configure the striim installation. Then use admin as the user and provide the password. This will take you to the administrator page, where you can connect to MySQL.

3. Set up Connector/J
In this task, you will try to connect to the cloud SQL instance to striim using the connector/J.
- In the development manager page of the striim instance, click the SSH button, which will automatically open the SSH into the virtual machine. Using the below command, download the connector/J into the VM and unpack it.
- sudo curl -LO https://dev.mysql.com/get/Downloads/Connector-J/mysql-connector-java-8.0.29.tar.gz
- sudo tar -xvzf mysql-connector-java-8.0.29.tar.gz
- Copy the file in the striim library path and make it executable by changing ownership of it.
- sudo cp mysql-connector-java-8.0.29/mysql-connector-java-8.0.29.jar /opt/striim/lib
- sudo chmod +x /opt/striim/lib/mysql-connector-java-8.0.29.jar
- sudo chown striim
- Run the following command to create the user directory and give the user permission to access it.
| 1. export user_id=`whoami` | 2. sudo mkdir /home/$user_id |
| 3. sudo chown -R $user_id /home/$user_id | 4. sudo chmod -R u+rX /home/$user_id |
- Now you will start the striim server to recognize the new library.
| 1. sudo systemctl stop striim-node | 2. sudo systemctl stop striim-dbms |
| 3. sudo systemctl start striim-dbms | 4. sudo systemctl start striim-node |
4. Create a cloud spanner access key

Striim will require an access key to connect to the cloud spanner to perform the required action.
- Run the command below in the cloud shell to create a service account for striim to connect to the cloud spanner.
- gcloud iam service-accounts create striim-spanner –display-name striim-spanner
- export sa_striim_spanner=$(gcloud iam service-accounts list –filter=”displayName:striim-spanner” –format=’value(email)’)
- export PROJECT=$(gcloud info –format=’value(config.project)’)
- gcloud projects add-iam-policy-binding $PROJECT –role roles/spanner.databaseUser –member serviceAccount:$sa_striim_spanner
- gcloud iam service-accounts keys create ~/striim-spanner-key.json –iam-account $sa_striim_spanner
- This will create a key in your home path, now, you will need to move this key to striim VM.
- gcloud compute scp ~/striim-spanner-key.json $STRIIMVM_NAME:~ –zone=$STRIIMVM_ZONE
You are now ready to create a Striim Application.
5. Create Realtime Database migration
In real-time database migration, a database moves from the source to the target destination while continuous capture of changes is also being run.
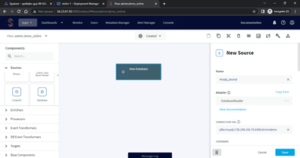
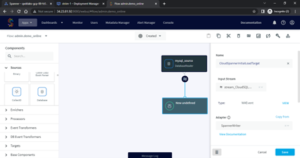
- In Striim Web UI, click on create an App from scratch and give the name of the application. You will be greeted by the Flow Designer page. To do a one-time bulk initial load of data, use Database Reader and enter all your connection properties on the right new source.
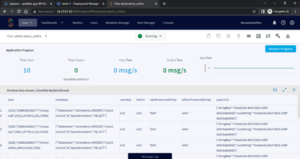
- Deploy the app and click on the eye icon near the database reader component to preview your data as it flows through the striim pipeline and starts the app.
You have successfully connected the source database through the striim.
- Next, you will add the target object cloud spanner by clicking the + button under the database reader component. Enter the connection properties, then deploy and start the application.
- As the cloud spanner is configured as the target, you should get the replicated data in it. Run the query and see the result for the sum of orders as 43148952
You have successfully set up your striim environment and pipeline to perform the batch load,
6.Create a continuous data pipeline from cloud SQL for MySQL to Cloud Spanner
With the one-time bulk load, you will set up a continuous replication pipeline for change data capture.
- Create an app from scratch. Instead of the Database Reader source, choose the MySQL CDC source and enter your connection properties. Now deploy and start the application.
- Next, add data in the source by executing the following commands in the cloud shell.
- Connect your MySQL instance with the command below in cloudshell
- gcloud sql connect striim-sql-src –user=striim-user
- Add more data to the table with the command below
- USE striimdemo;
- INSERT INTO ORDERS (ORDER_ID, ORDER_DATE, ORDER_MODE, CUSTOMER_ID, ORDER_STATUS, ORDER_TOTAL, SALES_REP_ID, PROMOTION_ID) VALUES (1011, 1568928576017, ‘In-Store’, 1011, 9, 13879.56, 320, 88252);
- INSERT INTO ORDERS (ORDER_ID, ORDER_DATE, ORDER_MODE, CUSTOMER_ID, ORDER_STATUS, ORDER_TOTAL, SALES_REP_ID, PROMOTION_ID) VALUES (1012, 1568928636017, ‘CompanyA’, 1012, 1, 19729.99, 76, 95203);
- INSERT INTO ORDERS (ORDER_ID, ORDER_DATE, ORDER_MODE, CUSTOMER_ID, ORDER_STATUS, ORDER_TOTAL, SALES_REP_ID, PROMOTION_ID) VALUES (1013, 1568928696017, ‘In-Store’, 1013, 5, 7286.68, 164, 45162);
In the Striim console, you should see the data flow
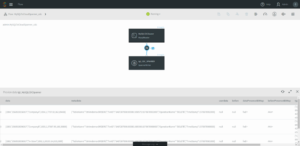
In the Cloud console, you should see the total order sum changed to 629398.4900000001 as new data was added due to the CDC pipeline.
Congratulations! You have successfully set up a streaming pipeline from Cloud SQL for MySQL to Cloud Spanner using Striim, Google Cloud’s Data Migration Partner.