Using Kubernetes to manage containerized applications has its fair share of challenges. One of those challenges is managing complexity. Using namespaces can help minimize that complexity.
Yet, one common misconception is that using multiple namespaces in a single Kubernetes cluster can reduce its performance. Another one is that Kubernetes namespaces tend to reduce Kubernetes cost visibility. There’s more to it than that.
In this post, we’ll share:
Table Of Contents
- What Is A Kubernetes Namespace?
- What Are Kubernetes Namespaces Used For?
- What Are The Types Of Kubernetes Namespaces?
- How To Use Kubernetes Namespaces
- Pod Vs. Cluster Vs. Namespace: What Are The Differences Between Them?
- Using Multiple Kubernetes Namespaces – Should You Do It?
- Can Adding Multiple Namespaces Reduce Your Visibility Into Kubernetes Costs?
Let’s start from the beginning.
What Is A Kubernetes Namespace?
Namespaces in Kubernetes refers to a logical grouping of resources in a Kubernetes cluster. It provides a means to separate different sets of resources, such as services, applications, and pods, allowing them to be managed separately.
In essence, namespaces act like multiple virtual clusters within a single physical Kubernetes cluster. This helps subdivide the physical cluster among different customers, projects, teams, and other elements.

What Are Kubernetes Namespaces Used For?
Namespaces are ways Kubernetes organizes, filters, and manages independent groups of objects within its clusters. Kubernetes clusters require that each workload object be placed within a specific namespace.
Note that although a namespace isolates its components from those in other namespaces, they can still communicate (namespace cross-communication).
Namespaces provide scope for Kubernetes object Names. Names within a namespace must be unique, but you can use the same name in different namespaces.
For example, if you apply namespaces to separate your application life cycle environments (development vs. staging vs. production). Each environment will have copies of the same objects with the same names.
Also note that namespace-based scoping only applies to namespaced objects, such as Deployments and Services, and not to cluster-wide objects such as StorageClass, PersistentVolumes, or Nodes.
Kubernetes namespaces also provide a way to control access to resources. This ensures that only authorized users can access specific resources. You can take advantage of this capability with Kubernetes Role-Based Access Control (RBAC).
There’s more.
Kubernetes namespaces offer the following benefits:
- Logically group resources together
- Help control access to resources
- Isolate resources from each other
- Manage multiple clusters
Some limitations of using Kubernetes namespaces include:
- Adding multiple namespaces may add complexity to a Kubernetes cluster
- Namespaces may impact performance although many are the times when namespaces improve performance since the Kubernetes API gets to work with a smaller set of objects
- Requiring extra management, which can be increasingly challenging
- You may have difficulty troubleshooting them
To better understand these benefits and limitations, let’s take a closer look.
What Are The Types Of Kubernetes Namespaces?
When you first create a Kubernetes cluster, it will have three namespaces by default:
1. Kube-public
This is the namespace that any user can read with or without authentication. Kubernetes uses the kube-public namespace to expose any cluster information required for booting up components, and so Kubernetes itself often manages the namespace.
2. Kube-system
This is the namespace that Kubernetes itself uses to manage its own components. The kube-system namespace tends to have fairly permissive policies, so it is not recommended to add normal workloads to it.
3. Default
This is the namespace where you create your applications and services.
The default namespace is also where any cluster object you add without assigning a specific namespace goes. It serves as the main target for any new user-added resources until you set up custom namespaces.
Oh, one more thing. You cannot delete the default namespace.
How To Use Kubernetes Namespaces
Ultimately, you can always explore your available namespaces with the following command:
Kubectl get namespaces
Yet, that’s not the only thing you can do here. Here’s how to take advantage of namespaces in Kubernetes.
How to create a namespace in Kubernetes with kubectl
There are two ways to create Kubernetes namespaces.
First, create a Kubernetes namespace using a single command:
kubectl create namespace <namespace-name>
For example, to create a namespace named “my-namespace“:
kubectl create namespace my-namespace
Alternatively, create a YAML file and apply it as you would any other Kubernetes resource. For example, to create a namespace named “test”:
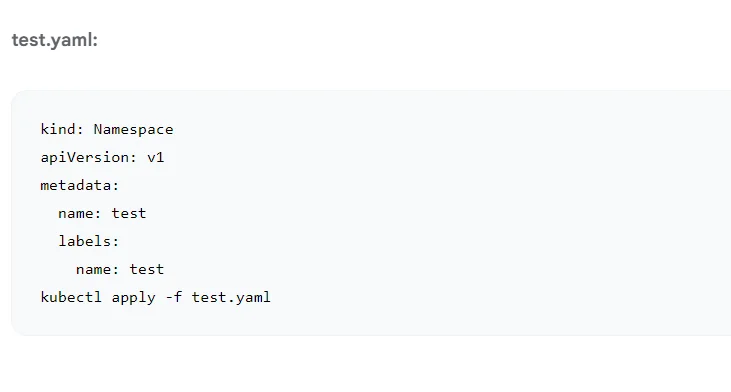
Once you have created a namespace, you can use it to organize your Kubernetes resources. For example, you can create pods, services, and deployments in a specific namespace.
To view all of the namespaces in your cluster, you can use the following command:
kubectl get namespaces
You’ll see the three original namespaces, as well as the one you just created.
To delete a namespace, you can use the following command:
kubectl delete namespace <namespace-name>
For example, to delete the namespace named “my-namespace”:
kubectl delete namespace my-namespace
Please note that deleting a namespace will also delete all of the resources that are currently in that namespace.
How to create resources in a namespace
You need to specify which namespace you want to create the resource in. Otherwise, the resource, such as a pod, will deploy in the currently active namespace (or the default namespace).
There are two ways to create a resource in a specific namespace:
1. Apply the single command
kubectl apply -f pod.yaml –namespace=mynamespace
This command enables you to use the -namespace flag while creating that resource.
Note that kubectl fails to find the resource whenever you attempt to operate a Kubernetes resource in a different namespace. Using the –namespace flag enables you to interact with resources in other namespaces.
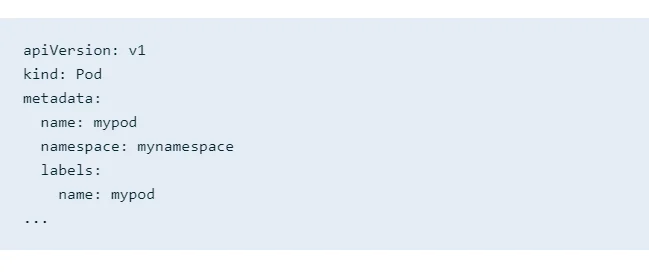
2. Create it with a YAML file
Be sure to specify a namespace within the resource’s YAML specification. Otherwise, the process will fail. Here’s how:
How to view resources in Kubernetes namespaces
Say you want to find a pod in a namespace. You’ll need to use the “namespace” flag. Otherwise, you won’t find it because all commands run against your currently active Namespace. This is how to do it instead:
$ kubectl get pods –namespace=test
NAME READY STATUS RESTARTS AGE
mypod 1/1 Running 0 10s
This can get tedious pretty fast. So, here’s what you need to do if you work on a team with a separate Namespace for everything, and you don’t want to use the “namespace” flag every time you run a command.
How to manage active namespaces
Use the Kubens command to view all your namespaces. The tool highlights your active namespace, which is where any command you run would apply. To switch your active namespace to the one you want, specify it by running the command:
kubens “your preferred namespace”
Now, when you run your “view resource” command, you’ll be able to find it where you created it.
How to cross namespace communication
Say your app needs to connect to a Kubernetes service. In that case, use the built-in DNS service discovery. Simply point your app at the name of the Service.
But what if you have a service with the same name across multiple namespaces? In that case, use the DNS address in its expanded form. The common pattern looks like this:
<Service Aame>.<Namespace Name>.svc.cluster.local
But if you need to access a service (say production) in a different namespace (such as test), simply use the service name and the name of the namespace, as you can see here:
production.test
Here is something else you’ll want to note in relation to Kubernetes namespaces.
Pod Vs. Cluster Vs. Namespace: What Are the Differences Between Them?
In Kubernetes, pods are the smallest deployable units. One or more containers run in a pod instead of directly on virtual machines.
A pod runs in a physical machine known as a node. The node provides the power to run pods, such as CPU and memory. A group of logically connected nodes is referred to as a cluster.
The Kubernetes cluster usually comprises one master node and several worker nodes. The cluster distributes workload among these workers, scaling as needed to handle requirements.
You can quickly learn all about pods vs. nodes vs. clusters here.
A namespace is a way to organize independent components inside a Kubernetes cluster to prevent mix-ups.
What is the difference between a Kubernetes label, annotation, and namespace?
Namespaces are different from Kubernetes labels and annotations in several ways.
Kubernetes annotations are a type of metadata that is not meant to identify a Kubernetes object. Annotations are key-value maps. You attach annotations to Kubernetes objects such as ReplicaSets and Pods.
Kubernetes labels are key-value pairs that contain metadata for identifying objects.
Check out this post for more details about the differences between Kubernetes labels and annotations.
Using Multiple Kubernetes Namespaces – Should You Do It?
Here’s the thing.
Whenever you create a resource without specifying where it should run, it will automatically deploy in the default namespace or the active one.
As your workload increases over time, you may overburden the Kubernetes API with all the disorganized workload in one place. It also becomes easier for one team to accidentally overwrite or disrupt another team’s service.
Creating multiple namespaces can make your services easier to manage. In practice, the benefits of this will differ from use case to use case. Picture these:
Small teams
You can isolate developers, users, and workloads using multiple namespaces. The earliest you can start using multiple namespaces, the better your chances of laying a solid foundation for organized K8s clusters as you grow.
Rapid growth teams
Here, you can use namespaces to segment dev, test, and production environments if you use a single cluster for all three. For example, your developers and testers can make changes to their own namespaces without affecting production code.
Large companies and enterprise
Namespaces are especially useful for controlling access permissions (RBAC), boosting performance, and controlling resource consumption.
Can Adding Multiple Namespaces Reduce Your Visibility Into Kubernetes Costs?
When you use CloudZero for Kubernetes Cost Analysis, it won’t be a problem. Here’s why.

With CloudZero, you are able to map your Kubernetes cost telemetry in the context of your business. You’ll receive immediately actionable insights, including cost per namespace, per pod, per node, per cluster, per service, and per environment.

In addition, CloudZero lets you view Kubernetes costs on a per-unit basis, including cost per hour, per customer, per project, per feature, and more. You can drill down into any of these CloudZero costs Dimensions to reveal the details that could make all the difference:

Even better, CloudZero is your single pane of glass for all your cloud spend. CloudZero gives you the ability to view your AWS, Azure, and GCP costs alongside Kubernetes and data cloud costs such as those from Databricks, Snowflake, and Datadog.
Ultimately, CloudZero’s real-time cost anomaly alerts you to unforeseen costs before they become costly problems. You will receive context-rich alerts through Slack, email, or text messages to ensure your team gets to the root of the problem quickly.
Companies like Remitly, MalwareBytes, and Drift (saved $2.4 million) already use CloudZero. DemandBase just cut its cloud spend by 35% and justified $175 million in financing. You can, too.
 for a chance to test CloudZero for yourself.


The Cloud Cost Playbook
The step-by-step guide to cost maturity