
SXA Clone Rendering is a powerful feature in Sitecore Experience Accelerator that enables users to duplicate and customize existing renderings with ease. This feature can help improve productivity and streamline the web development process by allowing developers to reuse and modify existing components rather than building them from scratch. In this context, we will explore the benefits and steps involved in using the SXA Clone Rendering feature.
With the cloning component, you can utilize existing parameters, existing datasource templates, and existing views. We have the facility to use exact copies as well.
Before deep down into SXA cloning this article is for Beginners with Detail explanation and I highly recommended to refer official Sitecore doc for Copy and customize a rendering
Steps to follow
As SXA updates that override standard SXA toolbox section. To avoid this scenario, I would recommend creating a separate toolbox for customize components.
We can do this by creating a new module in SXA.
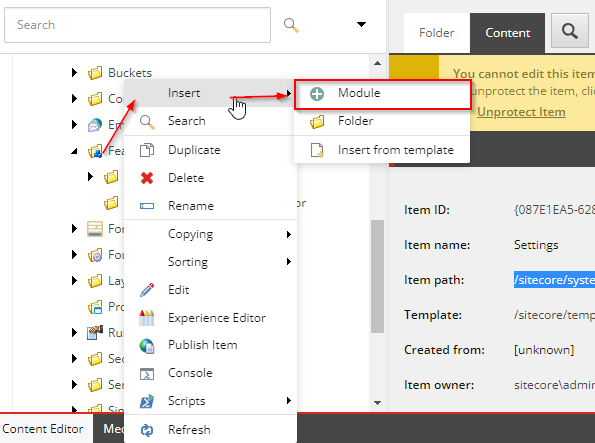
Add an SXA Module
- Go to /sitecore/system/Settings
- Create a new folder either in Feature or in Foundation
- In the menu popup, select Insert and then Module
- In Create New module dialog box, fill up the fields
Module name: Enter the module name, and the system will use this name as the folder name that relates to the modules.
Add to module group: Select the module for which module belongs to
System areas: Create container folders for the system areas listed below
Module scaffolding actions: To install the new module with SXA scaffolding
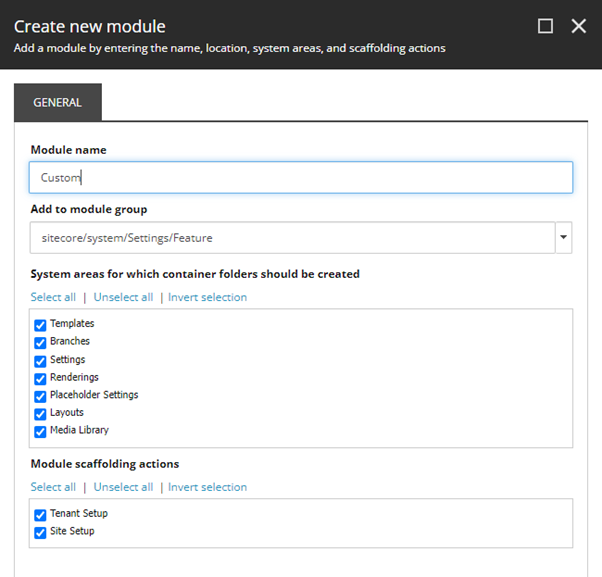
- Click Proceed
The script runs and creates modules in each location mentioned in the systems areas
Note: It is recommended to install a new module on the Site. Select Site -> Scripts -> install Site Module, then select a new module and install it.
Clone rendering

In this article, we are going to create an “Extended Promo” from the Promo component
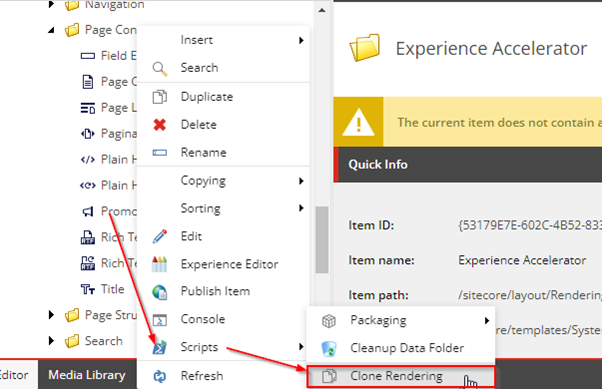
- Locate the rendering of the component, ideally, it resides under “/sitecore/layout/Renderings/Feature/Experience Accelerator” and go to the appropriate group
- Right-click on the component’s rendering and clone rendering under scripts
- The Create Derivative rendering popup opens, be sure to give your component some meaningful name. Select an appropriate module and add rendering CSS class
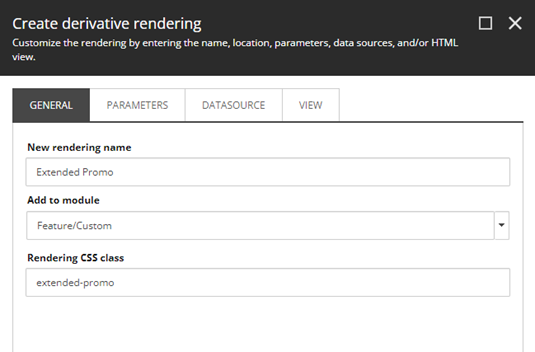
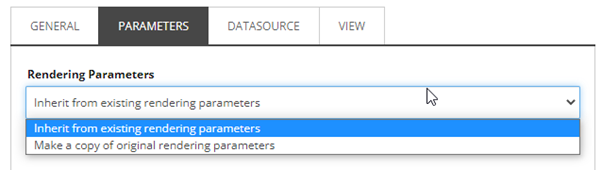
- Select Rendering parameters from drop-down options, selecting Inherit from existing rendering parameters
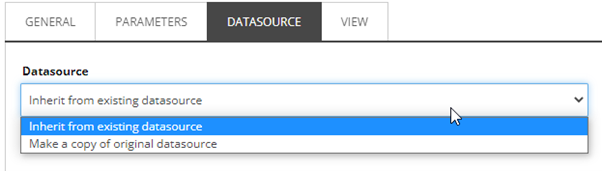
- Select rendering datasources from drop-down options, selecting Inherit from existing datasource
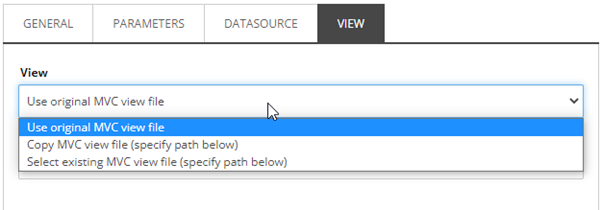
- Select HTML view from the options, and you’ll get the view file from the path mentioned, selecting use original MVC view file
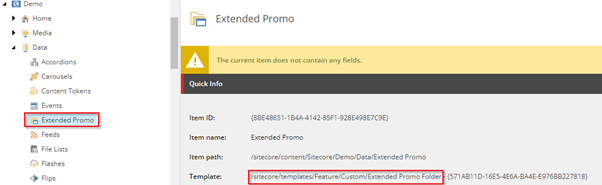
After the component is created from cloning, go to the template and update fields as needed
Note:
If you created SXA cloning mistakenly in the wrong module or faced any issues just remove that step-by-step from the below path and try again
-
- /sitecore/templates/Feature/<module name>/ —> remove all entries related to clone rendering
- /sitecore/templates/Branches/Feature/<module name>/Available <module name> Renderings/$name –> Remove clone rendering entry from Renderings field
- /sitecore/system/Settings/Feature/<module name>/<module name> Site Setup/Rendering Variants/<rendering name>
- Remove available rendering entries if have any
- /sitecore/layout/Renderings/Feature/<module name>/<rendering name>
Add rendering into Toolbox
As we created cloned component, now we would add that component to the toolbox
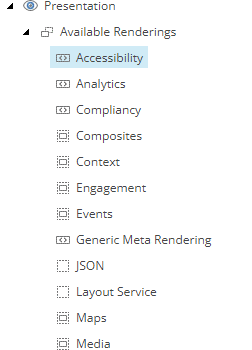
- Navigate to the Presentation folder of the site and go to Available Renderings
- Insert new available renderings by clicking insert –> Available rendering
- Enter the section name that you want to add and click OK
- Once you click on a section, in the Data section, click on edit for the Rendering field
- From select item popup, click the relevant rendering, and double click so that it moves to the list of selected items and hit OK
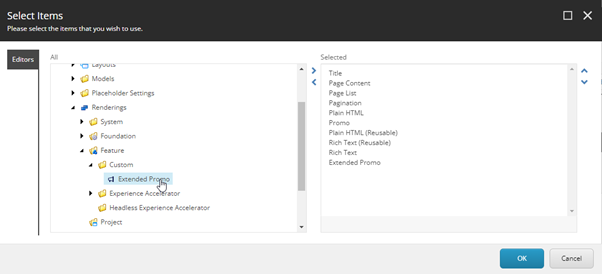
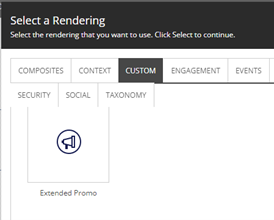
Now we can see new rendering is available in Toolbox
Add the Data folder and Rendering variant Folder
Create a Folder under Site/data with the same name used for the component from the component’s folder template, it would be useful for the creation of global datasources
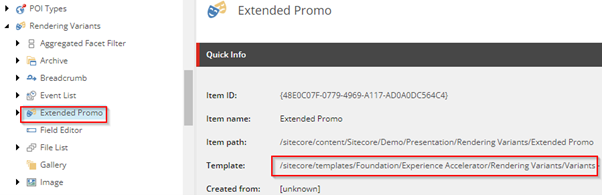
Create a rendering variant from the Variants template with the same name used for the component, With the help of this we can create different rendering variants for component
Troubleshooting
The view file does not exist
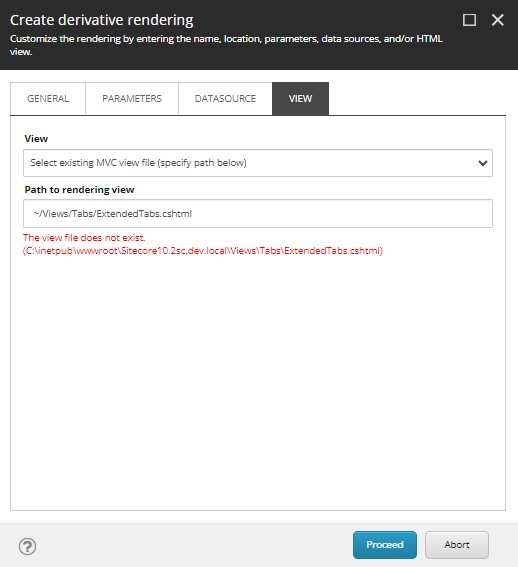
To resolve this issue, add a cshtml file with proper formatting as given in the existing cshtml under the path mentioned in the View Path field and try to clone again.
I hope you found this helpful!! Check out our Sitecore blog for more helpful tips and tricks.