
In our previous blog post, “Coveo Headless Library Integration with OPENUI5 Framework: Development Environment Setup – Phase I,” we started the integration between Coveo Headless and OpenUi5.
Coveo Headless is a search and relevance platform, and OpenUI5 is a dynamic UI framework for web application development. Phase I establishes the foundation for what we’re about to explore in this Phase II edition, so if you haven’t had a chance to read it, we highly recommend doing so.
In Phase I, we set up our development environment, ensuring that all the prerequisites were met to integrate Coveo Headless with OpenUI5. We covered everything from cloning the sample OpenUI5 repository to configuring shims for compatibility. Now that our development environment is ready, it’s time to build the search interface using OpenUI5 controls and Coveo Headless controller instances.
Initializing the Search Engine using CoveoHeadless:
To get things rolling, we need to initialize the Coveo search engine using the buildSearchEngine instance from the Headless library inside the Oninit function inside App.controller.js file. This is where we define the necessary configurations.
For demonstration purposes, we will use a sample configuration:
// Initialize the Coveo search engine
this.searchEngine = CoveoHeadless.buildSearchEngine({
    configuration: {...CoveoHeadless.getSampleSearchEngineConfiguration()}
});
For detailed insight into how to customize and add your configuration parameters, refer to the documentation.
After building the search engine, you can verify if it was successfully initialized by using console.log(this.searchEngine) in same file. Check the browser’s console to see if the search engine object is displayed without any errors.
#image
Creating a UI5 Component with Coveo Headless:
Whenever you’re constructing a new UI5 component that incorporates Coveo Headless capabilities, the following steps must be followed:
- Create a controller instance.
- Create a fragment and include the necessary UI5 control.
- Bind the value to the UI5 control.
- Perform necessary actions.
Building a Search Box Component:
Let’s walk through a practical example of creating a search box component using OpenUI5 with Coveo Headless functionality. In this example, you’ll gain insight into the process of building a search box that allows users to input search queries and receive relevant search results.
Step 1: Create a Controller Instance
In your OpenUI5 controller, start by creating a controller instance that will manage the behaviour of your search box component.
sap.ui.define([
    "sap/ui/core/mvc/Controller",
    "coveo/headless"
], function(Controller, CoveoHeadless) {
    "use strict";

    return Controller.extend("your.namespace.ControllerName", {
        onInit: function() {
            // Create a search box controller instance
            this.buildSearchBox();
        },

        buildSearchBox: function() {
            const searchBoxOptions = {
                enableQuerySyntax: true,
                numberOfSuggestions: 5,
                id: "main-searchBox",
                clearFilters: false
            };
            this.searchBox = CoveoHeadless.buildSearchBox(this.searchEngine, {
                options: searchBoxOptions
            });
        },

        // Other methods and event handlers...
    });
});
Step 2: Create a UI5 Fragment
Next, create a fragment that includes the UI5 controls for your search box component’s interface. We’ll use the SearchFieldcontrol to allow users to input search queries.
<!-- SearchBox.fragment.xml -->
<core:FragmentDefinition xmlns="sap.m" xmlns:core="sap.ui.core">
    <SearchField
        id="searchField"
        width="100%"
        placeholder="Search for..."
        enableSuggestions="true"
        search=".onSearch"
    ></SearchField>
</core:FragmentDefinition>
Step 3: Bind UI5 Control Values
While not needed for the SearchField control, you might need to bind values to other UI5 controls in your fragment to ensure synchronization with the controller.
Step 4: Implement Search Functionality
Implement the onSearch function in your controller. This function will be triggered when users interact with the search field. It will update the search box text using updateText method and trigger the search query using this.searchBox.submit().
onSearch: function(oEvent) {
    var sSearchQuery = oEvent.getParameter("query");
    if (sSearchQuery && sSearchQuery.length > 0) {
        this.searchBox.updateText(sSearchQuery);
        this.searchBox.submit();
    }
}
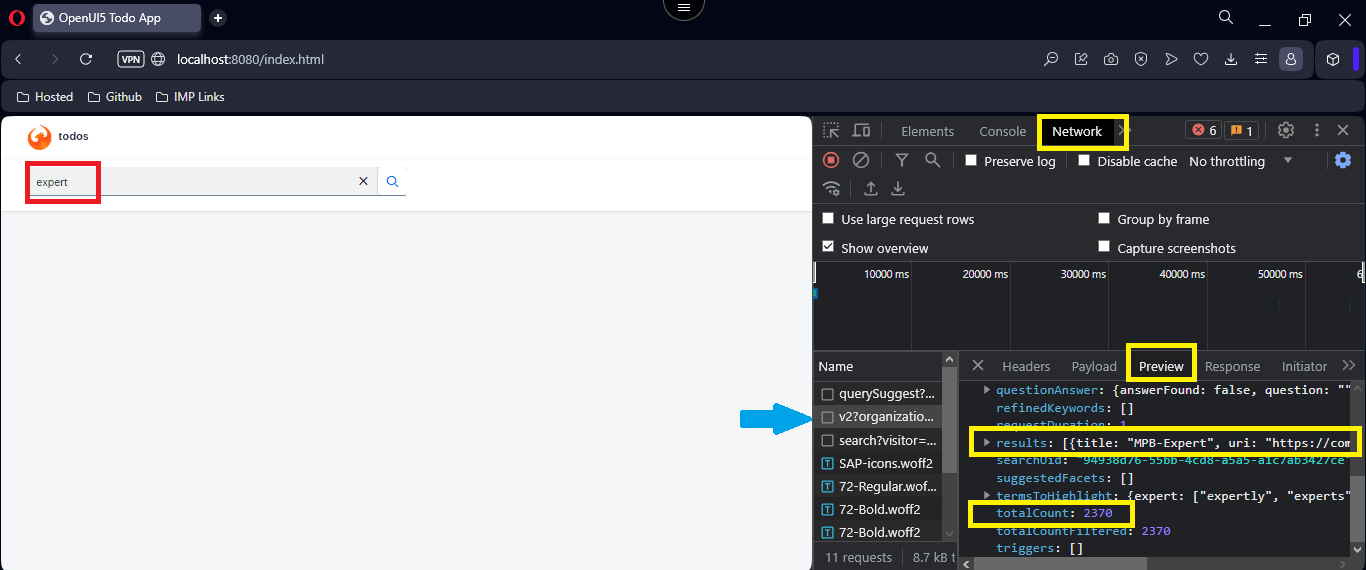
Verifying Network Calls after Successful Search Box Integration
After integrating the search box component using OpenUI5 and Coveo Headless, it’s important to ensure that the search functionality is working as expected. One way to verify this is by checking the network calls made between your application and the Coveo search engine.
Here’s how you can do it:
- Input a search query in the search box.
- Press Enter or trigger the search action.
- When you initiate a search, check the “Network” tab in your developer tools.
- You will see network calls between your application and the Coveo search engine.
- These calls include the search query and the corresponding responses.
- Responses may include search results, suggestions, and other related data.

By Analyzing the Network Calls, you Can:
- Confirm that the search query is being sent to the Coveo search engine.
- Review the response to ensure that relevant search results or suggestions are being received.
Keep in mind that the specific URLs and details of the network calls will depend on your Coveo Headless configuration and the API endpoints you’re using.
You can ensure that your search box component successfully communicates with the Coveo search engine and receives the desired search results or suggestions through network call verification. This step is crucial to confirming the successful integration of the search functionality into your OpenUI5 application.
The complete code can be found in the repository that’s attached below.
Conclusion:
We’ve gone into more detail in this Phase II of our blog series about how to integrate Coveo Headless with the OpenUI5 framework to create a powerful search interface for your web applications. From setting up the Coveo search engine to creating a search box component, we have covered all the necessary processes. These steps will help you add advanced search capabilities to your OpenUI5 applications. Stay tuned for more insights in our ongoing series!
To be Continued…