
Introduction
xConnect is the service layer that sits in between the xDB and any trusted client that wants to read, write, or search experience data using the xConnect Client API. Communication must happen over HTTPS and the client must have the appropriate certificate thumbprint.
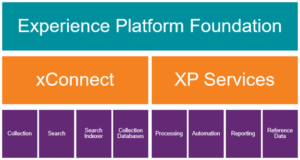 xConnect consists of the following components:
- Collection service
- Search service
- Search Indexer
- Collection databases
Along with xConnect are a variety of XP services which together with xConnect make up what we call the Experience Platform.
These include:
- Processing
- Marketing Automation
- Reporting
- Reference Data
Each role comes with its own set of Rules, nuances and gotchas.
Goal of the exercise is to set up all XP xConnect Roles on an Azure PaaS environment. I am using self-signed certificate for token authentication between xConnect Roles for this exercise. This is a pre-production environment which is locked down inside a private network with no public access but needs to mirror production environment. xConnect apps are usually set up inside a private network as no public access is required and they can communicate with each other internally as long as they are set up inside the same private network. Even if you are planning to use trusted certificate for token authentication for xConnect apps, the below process will remain the same if you don’t want to run into the dreaded “The HTTP response was not successful: Forbidden” error. The xConnect Roles were set up initially with Azure Search using WDP templates and Solr Cloud set up is also part of this exercise.
Roadblocks

The HTTP response was not successful: Forbidden
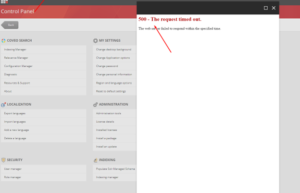
Indexing Manager: 500 – The request timed out.
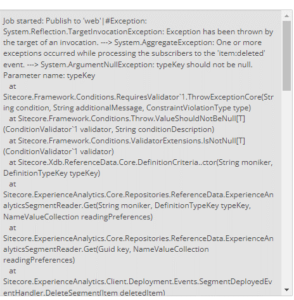
Error on publish: Ensure definition type did not complete successfully.
Gameplan
Start with the basics: Connection String, Connection String, Connection String
There are 3 formats of those that you must validate. Key Vaults are the recommended area to store Connection Strings as they serve as the only source of truth. Now, the 3 formats:
Connection strings for Core, Master, Web, Reporting are database connection strings and require to be in this format: <add name=”core” connectionString=”Data Source=<your-datasource>;Initial Catalog=<your-initial-catalog>;User ID=<your-user-id>;Password=<your-password>” />
xconnect.collection, xdb.marketingautomation.operations.client etc are URLs to the app services. Eg, <add name=”sitecore.reporting.client” connectionString=”<https://sitecore-reporting-client-url>” />
xdb.marketingautomation.operations.client.certificate, xdb.marketingautomation.reporting.client.certificate etc., have references to the client certificate thumbprint. Eg, <add name=”sitecore.reporting.client.certificate” connectionString=”StoreName=My;StoreLocation=LocalMachine;FindType=FindByThumbprint;FindValue=<your-self-signed-certificate-thumbprint>” />
For each Connection string, confirm that the database names and passwords are correct, the users are set up with “Read”, “Write and “Execute” permissions and the same User is added for Shard0, Shard1 and ShardMapManager.
Call out the Certificate:
Each XConnect app service requires this parameter: WEBSITE_LOAD_CERTIFICATES to be tied to the self-signed certificate attached to the “Bring Your Own Certificate” section. You can check if the certificate is loaded correctly by using this command dir cert:\CurrentUser\My in the PowerShell window using KUDU tool. Also verify that the certificate intent is set correctly. For any certificate used by Sitecore XConnect apps the intent needs to include “Client Authentication”
Command to check certificate intent:
$cert = Get-ChildItem -Path Cert:\CurrentUser\My | Where-Object {$_.Thumbprint -match “<YOUR_SELF_SIGNED_CERTIFICATE_THUMBPRINT>”} foreach($key in $cert.Extensions){if(‘EnhancedKeyUsages’ -in $key.psobject.Properties.Name){ $key.EnhancedKeyUsages.FriendlyName }}
Get those Web jobs:
XConnect is shipped with 3 jobs: Processing, Marketing Operations, and Index Worker. To get each of these jobs to start running, the first course of action is to set “incoming client certificates” to Require for the app service.
Next check that the validateCertificateThumbprint is set to the correct Client Certificate Thumbprint with AllowInvalidClientCertificate set appropriately. To get all the jobs to start running, all XConnect Roles should be up and running successfully. This is because they interact with each other through connection strings.
Last but not the least, integrating SolrCloud:
With app services being set up with Azure Search, we had to manually switch them to use Solr Cloud. This involved comparing files that are included in the WDP package for Azure and Solr and disabling/enabling them.
For example, for the Cortex Processing app, I enabled these files.
- Xdb.Collection.IndexReader.SOLR.xml
- Xdb.Collection.Search.IndexTruncation.xml
- Xdb.Collection.Search.Services.xml
- Xdb.Collection.WebClient.SOLR.xml
- EmailCampaign.Messaging.SqlServer.xml
- Xdb.Collection.IndexerSettings.xml
- Xdb.Collection.Indexing.IndexTruncation.xml
- Xdb.Collection.IndexWriter.SOLR.xml
Conclusion
xConnect is the service layer that sits in between the xDB Collection database and xDB index, and any trusted client or device that wants to read, write, or search contact and interaction data. No other system has direct access to the xDB Collection database or the xDB index. Making sure that each Role that is included in the service layer is up and running correctly is primary to harnessing the maximum benefit from this powerful tool.