Mobile Development | Software Development
Welcome to the Swift Playground 
Jeroen Leenarts 04 Sep, 2014


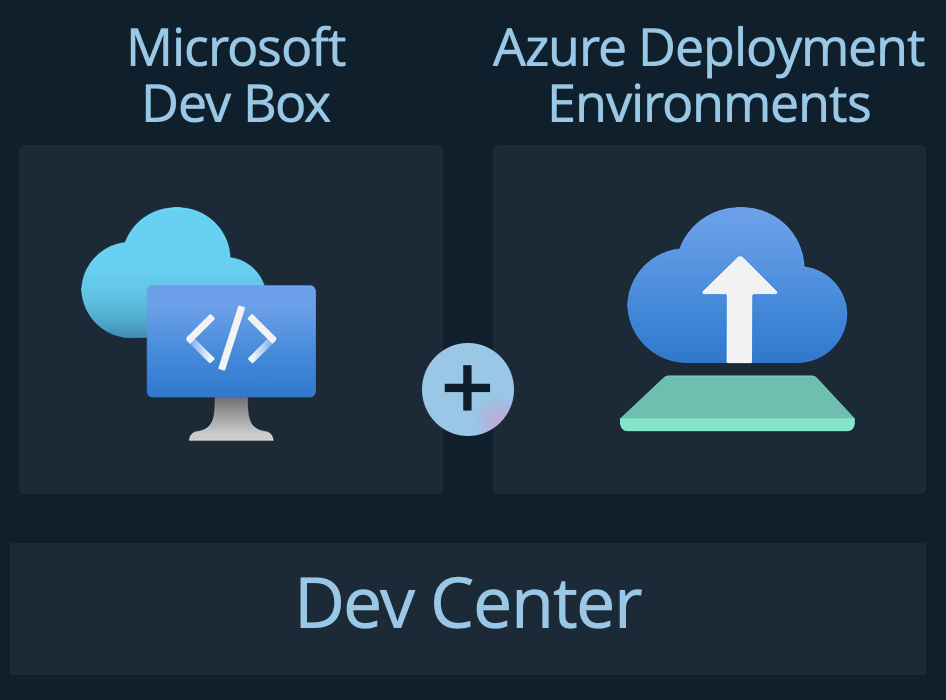
In March this year, Microsoft made another offering in Azure generally available: Azure Deployment Environments. Azure Deployment Environments lets development teams quickly and easily spin up app infrastructure. This infrastructure is defined in project-based templates that establish consistency and best practices while maximizing security. The infrastructure can be written by, for example, the platform team. A development team can then, on-demand, create secure environments through a self-service experience that accelerates all stages of the software development lifecycle. Azure Deployment Environments are part of Azure Dev Center, which also houses the Azure Dev Boxes.
If you want to get your hands dirty right away, then use this great tutorial on Microsoft Learn. Want to know a bit more about the service before using it? Read on! Before we dive into more detail on Azure Deployment Environments, let’s first look at the problems it tries to solve.
Modern cloud-native applications leverage a lot of different services in the cloud. Managing this infrastructure can be a challenge as it quickly becomes complex. To create secure and compliant environments, one must know a lot about scale, identity, networking, and costs. Quite often, developers are not experts in these areas and, maybe more important, they don’t want to be. They want to write the logic that brings value to the business, not build the infrastructure. That means that the required knowledge to build the infrastructure is unavailable in each DevOps team.
Missing required knowledge is one of the reasons organizations tend to have a central team in control of their cloud. Resources are requested through a central IT team. Due to paramount security and compliance concerns, enterprises commonly withhold direct developer access to public cloud platforms like Azure. Many organizations deal with sensitive data, such as personal information or proprietary business data, which necessitates stringent security measures. Allowing developers unmediated access to public cloud services could inadvertently expose critical data or result in non-compliance with industry regulations. This approach prioritizes safeguarding sensitive information and maintaining adherence to established security standards.
The dynamic and scalable nature of public cloud services brings the challenge of cost management to the forefront. Enterprises adopt a centralized model for cloud resource allocation to mitigate potential financial risks. Public cloud platforms operate on a pay-as-you-go basis, making it imperative to control resource provisioning. Enterprises tend to think a central team is better equipped to monitor, track, and optimize resource usage, effectively preventing unforeseen costs resulting from unmanaged or unnecessary resources. They believe this approach contributes to a more predictable and controlled financial landscape.
Another reason for this central approach is that centralized control over public cloud resource provisioning leads to better-optimized resource allocation and utilization. Without this bird’s-eye view, developers might independently create redundant or underutilized resources, leading to inefficiencies and wasted capacity. A central team can assess the organization’s overall resource needs, ensure alignment with business objectives, and allocate resources to maximize efficiency and minimize redundancy. This conserves resources and promotes more effective use of cloud infrastructure.
A fundamental challenge in large enterprises is maintaining consistency and collaboration across diverse projects and development teams. A central team-managed approach fosters standardization and collaboration by establishing uniform practices, templates, and configurations for cloud resources. This ensures that all projects adhere to established best practices and configurations, reducing the risk of security vulnerabilities or operational discrepancies arising from misconfigurations. This approach can streamline development efforts, facilitate cross-team collaboration, and contribute to higher-quality outcomes.
While this central approach to managing the cloud environment might seem reasonable at first, as it seems to safeguard critical aspects of enterprise operations, it also introduces challenges. Challenges that Azure Deployment Environment tries to help you solve. One of the most noticeable disadvantages is the potential for slower resource allocation and flexibility. This model forces developers to wait for the central team to allocate the necessary cloud resources, introducing delays in project timelines and inhibiting the agility and responsiveness required in today’s fast-paced development landscape. When a central team serves as the gatekeeper for all resource provisioning, there’s a risk of becoming a bottleneck during peak demand periods. Miscommunications or a lack of nuanced understanding between developers and the central team can lead to mismatches in resource allocations, resulting in projects being allocated insufficient or surplus resources.
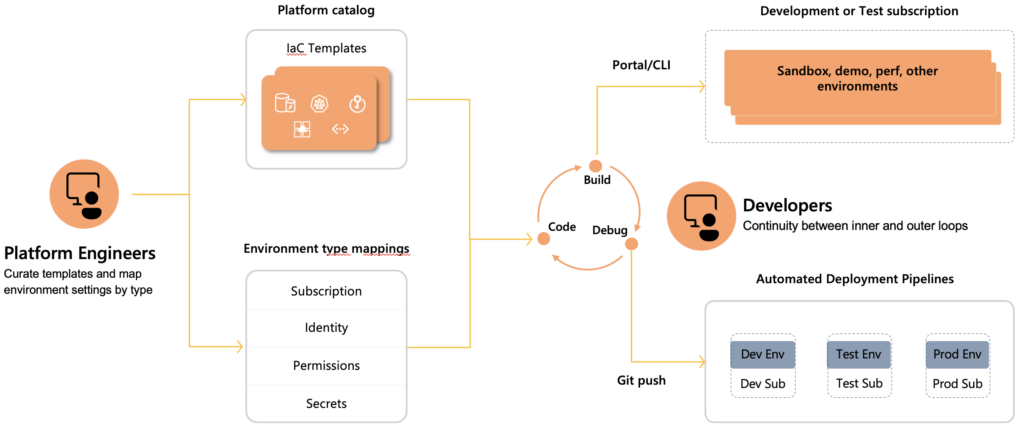
Striking a balance between central control and developer empowerment remains pivotal for effectively managing public cloud resources within enterprise environments. Azure Deployment Environments is a new service that addresses these challenges by providing developers with a self-service, on-demand environment provisioning experience. A developer portal, the Azure CLI, or CI/CD pipelines can be used to create, delete or redeploy environments. This allows developers to have their environments ready when they need them. In the future, new functionality will be added to the product to set an expiry date on an environment. An environment is then automatically deleted when it expires to prevent the environment from burning money while no longer being used. Another future option that will be added will allow us to automatically scale down the environment during, for example, the weekend. These features will help take control over costs.
Azure Deployment Environments can also reduce the often redundant work a central platform team does. It allows them to configure built-in governance and have centralized control over the environments. The platform engineer would start by creating a Dev Center and a project. A single project typically represents a single development team. Platform engineers can then define the different types of environments a specific project can use. For a specific environment type, they can control who can create that type of environment. For example, a development team can be allowed to create only a development or test type of environment. A quality engineer might be allowed to create the test environments. Finally, a CI/CD pipeline can be configured to create a staging and production environment.
Environments are defined in templates using infrastructure as code practices. This allows for centralized control over resource allocation and management by, for example, a platform team. A Git repository can be attached as a catalog to the service. The service will automatically scan through that repository, identify these infrastructure as code templates, and make them available for developers. While doing so, they will be asked to provide some basic information about the environment. They won’t be asked about, for example, the subscription, resource group, or any other Azure governance-related aspect of the environment. That information was already configured by the platform engineer in Azure Deployment Environments, making deploying the environments easier. It also means that any policies applied to the subscriptions or a higher management group will automatically be enforced in any new environment. This helps to keep all environments compliant. Platform engineers can also configure the identities that will be used to create the environment. Whenever a developer selects to create an environment, the service uses managed identities to perform deployment on behalf of the user. This is more secure and isolated because these managed identities are specific for this environment type and for this development team. A platform engineer can also configure what set of permissions should be assigned to the developers when it is created. Being able to set permissions this granular fits nicely in a zero-trust architecture. Finally, tags can automatically be applied to all the resources that the developers are creating. In that way, you can continue to use other tools that you might be using to, for example, track and manage the costs of the resources in Azure.
We have now seen how Azure Deployment Environment tries to help both the developers and the platform engineers. Now that we know more about the product and how it can help both roles in their work, let’s see it in action!
As the introduction mentions, Azure Deployment Environments are part of Azure Dev Center. This service also houses the Azure Dev Boxes. Azure Dev Boxes are pre-configured development environments that developers can use to start developing applications quickly. In this article, we won’t go into detail on Azure Dev Boxes, but you can read more about them here.
After creating a Dev Center, you need to configure four items to get started with Deployment Environments: – A Project – Environment Types – A Template Catalog – An identity
Projects allow you to manage environments and Dev Boxes on a team level. Creating a project is very straightforward. The basic configuration requires a name and the resource group where you want it deployed.
Environment types help define the environments that development teams can create. These are later referenced from within a project, and you can then provide unique deployment settings for each type. Examples here could be development, test, and production. Creating an environment type on the Dev Center level only requires a name and allows you to add default tags. These tags are added to all resources created in an environment of this type. We will see shortly what we can do with these environment types within a project.
The next thing that needs to be configured is the identity. This identity is used to deploy the environments and needs to have the proper permissions to do so. The identity can be a managed identity or a service principal. We will later see that a more granular approach is possible where you can configure different identities for different projects and different environment types.
When provisioning an environment, it is created using a template definition. A template definition is a set of Terraform (in preview) or ARM files that define the infrastructure to be deployed. A template catalog is a collection of these template definitions. A template catalog can be created on the Dev Center level and referenced from within a project. This gives you a central place to manage all your template definitions. The following image shows you how to create a new template catalog.
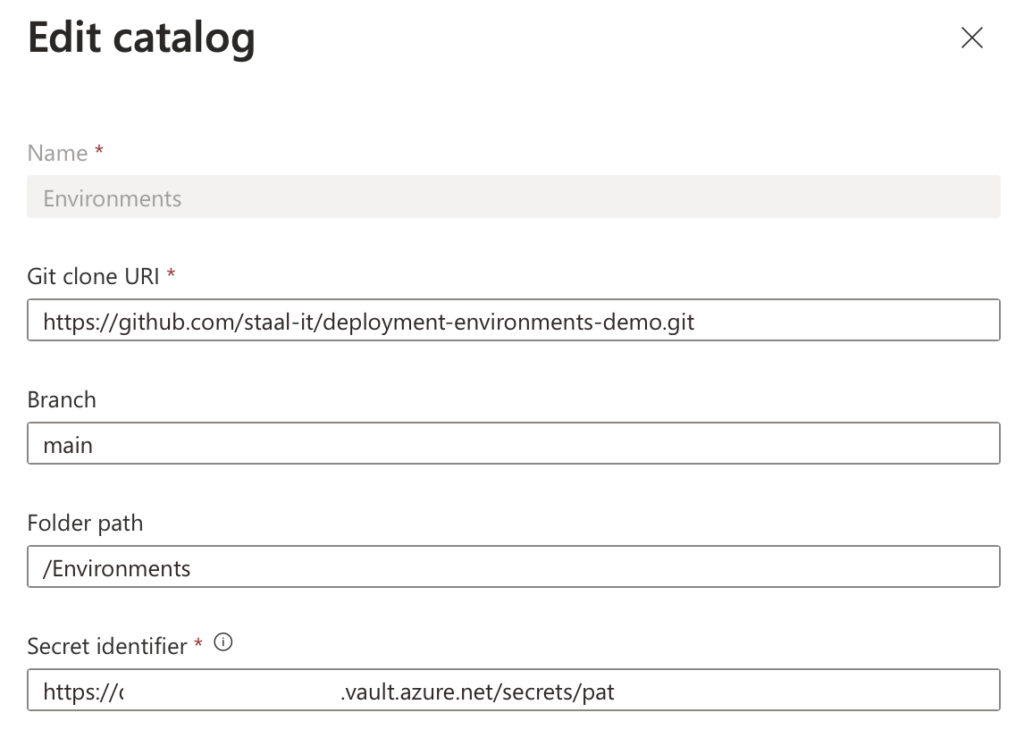
A template catalog is a reference to a GIT repository that contains the templates. As you can see in the image, you can specify the URI, the branch, and the path within the repo that holds your definitions. A PAT is used to access the GIT repository and must be stored in a Key Vault. The identity configured in the dev center needs access to that Key Vault. We will see how to create a template definition in a bit.
Now that we have configured the Dev Center, we can start configuring the new project we just created.
Remember we talked about environment types earlier? We can now use those environment types to configure the project. The following image shows the creation of a new environment type within the project.
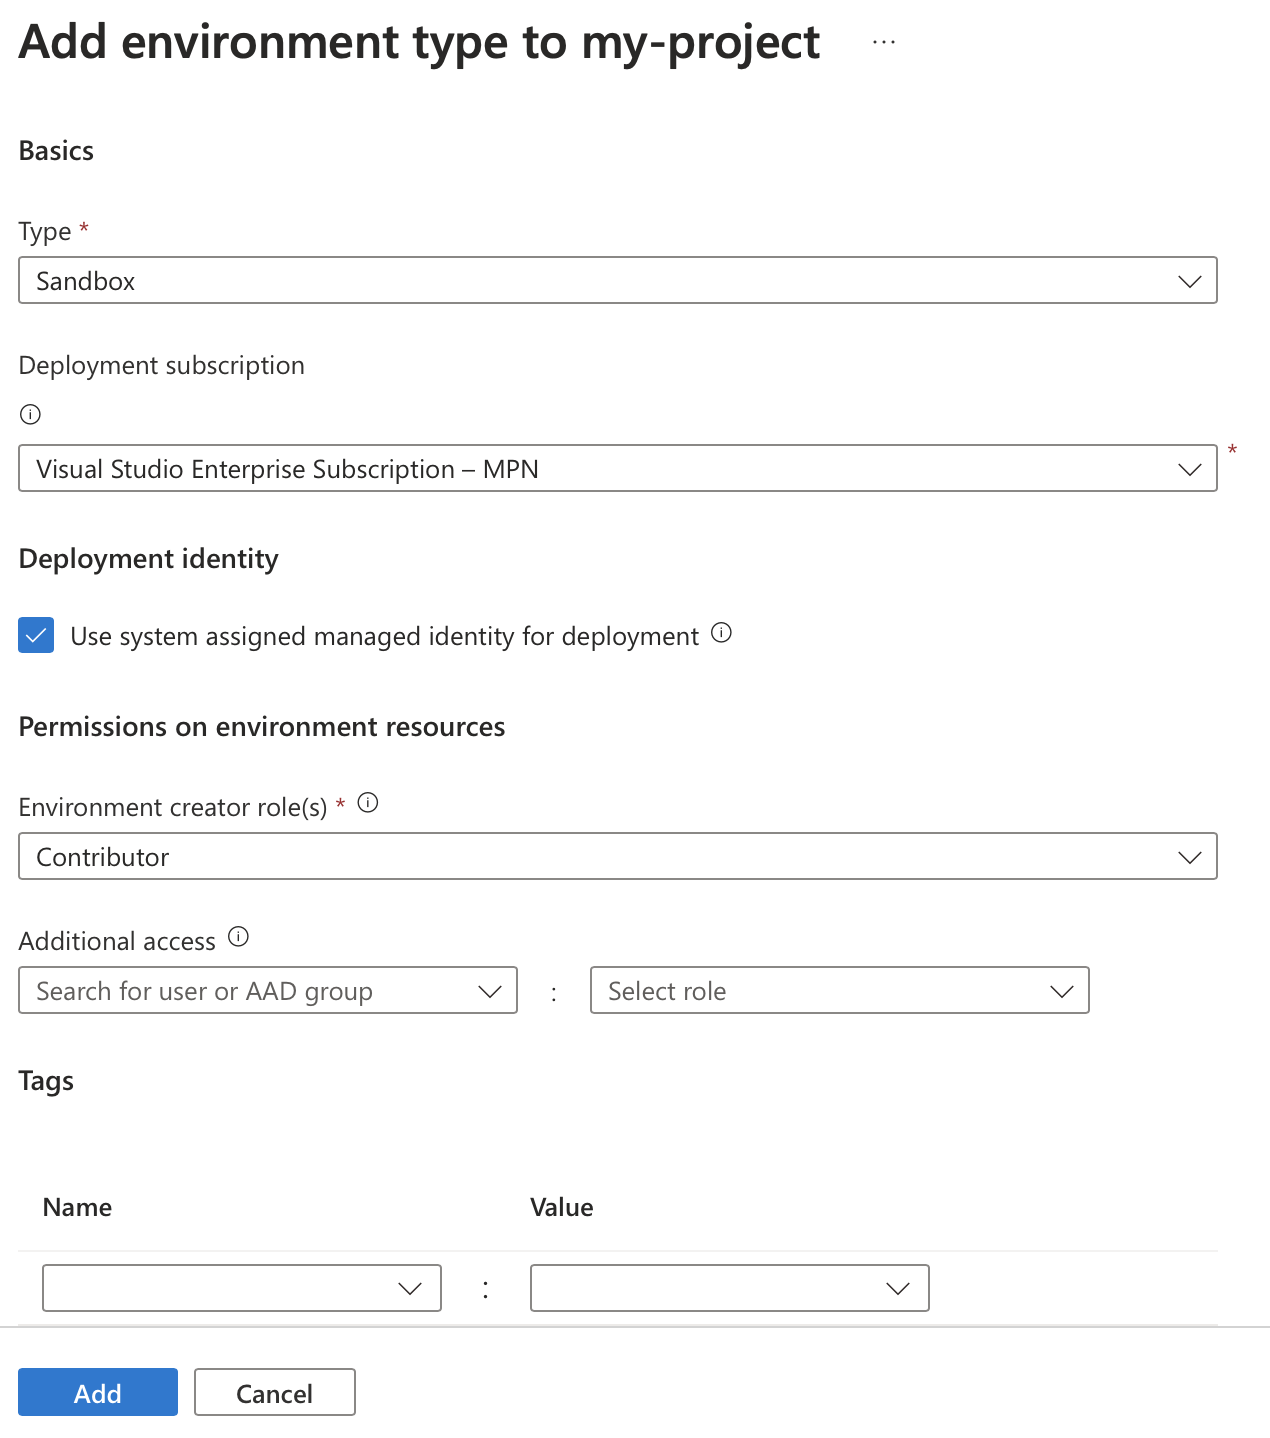
In the type field, we can select any types created on the Dev Center level that weren’t used yet. Next, we can choose the subscription used to deploy the environment. I’m using only one subscription in multiple environment types in the sample. In a real-world scenario, having a separate subscription for test and production workloads per team would be advised.
Next, we can configure a few options around identities and permissions. First, we can select the identity used to deploy environments of this type. This allows you to have different identities for different environment types and ensures we never have a single identity with access to all environments. Then we can configure the permissions assigned to new environments of this type to whoever creates it. When you create an environment using the Azure CLI, the permissions are assigned to you. If you create the environment in a CI/CD pipeline, the identity that executes the pipeline will receive the permissions. Below that option, you get to specify additional users or groups that need specific permissions on the newly created environment. You could, for example, assign read permissions to a team when they do not already have those permissions on the subscription level.
The following image shows the permissions set when creating a new environment with the settings shown in the image above.
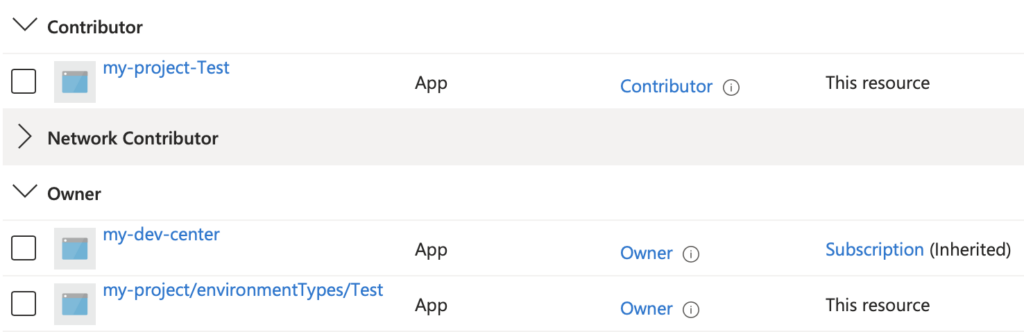
We can see that ‘my-project-Test’, my GitHub Actions user for this environment type, was assigned the Contributor role. The ‘my-project/environmentTypes/Test’ identity, the system-assigned managed identity for this specific environment type, gets the Owner permissions.
The last configuration you want to do on a project is to configure who can use it. Who created the project will automatically be an administrator and have the ‘DevCenter Project Admin’ role assigned. Next to that, you can assign the ‘Deployment Environments User’ role to the team that belongs to this project. They will then be able to create and use the environments that belong to this project.
Now that we’ve configured the dev center and the project, it is time to create a template definition that we can deploy!
The following image shows the ‘Environments’ folder used when configuring the catalog in the dev center. The folder structure is important as it determines which template definitions are available when creating a new environment. Each folder here represents a single template.
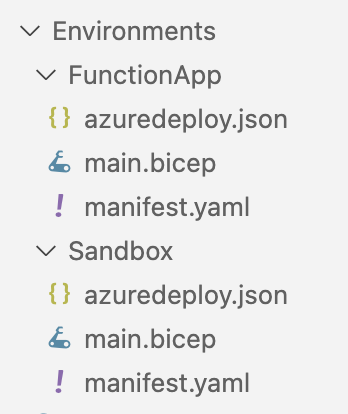
Each template definition needs to have a manifest.yaml. This manifest.yaml file contains the metadata for the template definition. This information will be used to, for example, populate the UI, as we will see later on when creating an environment. Here’s the manifest.yaml for the ‘FunctionApp’ template definition.
<span id="cb1-1"><a href="#cb1-1" aria-hidden="true"></a><span class="fu">name</span><span class="kw">:</span><span class="at"> FunctionApp</span></span>
<span id="cb1-2"><a href="#cb1-2" aria-hidden="true"></a><span class="fu">version</span><span class="kw">:</span><span class="at"> </span><span class="fl">1.0.0</span></span>
<span id="cb1-3"><a href="#cb1-3" aria-hidden="true"></a><span class="fu">summary</span><span class="kw">:</span><span class="at"> Azure Function App Environment</span></span>
<span id="cb1-4"><a href="#cb1-4" aria-hidden="true"></a><span class="fu">description</span><span class="kw">:</span><span class="at"> Deploys an Azure Function App, Storage Account, and Application Insights</span></span>
<span id="cb1-5"><a href="#cb1-5" aria-hidden="true"></a><span class="fu">runner</span><span class="kw">:</span><span class="at"> ARM</span></span>
<span id="cb1-6"><a href="#cb1-6" aria-hidden="true"></a><span class="fu">templatePath</span><span class="kw">:</span><span class="at"> azuredeploy.json</span></span>
<span id="cb1-7"><a href="#cb1-7" aria-hidden="true"></a></span>
<span id="cb1-8"><a href="#cb1-8" aria-hidden="true"></a><span class="fu">parameters</span><span class="kw">:</span></span>
<span id="cb1-9"><a href="#cb1-9" aria-hidden="true"></a><span class="at">  </span><span class="kw">-</span><span class="at"> </span><span class="fu">id</span><span class="kw">:</span><span class="at"> name</span></span>
<span id="cb1-10"><a href="#cb1-10" aria-hidden="true"></a><span class="at">    </span><span class="fu">name</span><span class="kw">:</span><span class="at"> Name</span></span>
<span id="cb1-11"><a href="#cb1-11" aria-hidden="true"></a><span class="at">    </span><span class="fu">description</span><span class="kw">:</span><span class="at"> </span><span class="st">'Name of the Function App.'</span></span>
<span id="cb1-12"><a href="#cb1-12" aria-hidden="true"></a><span class="at">    </span><span class="fu">type</span><span class="kw">:</span><span class="at"> string</span></span>
<span id="cb1-13"><a href="#cb1-13" aria-hidden="true"></a><span class="at">    </span><span class="fu">required</span><span class="kw">:</span><span class="at"> </span><span class="ch">true</span></span>
<span id="cb1-14"><a href="#cb1-14" aria-hidden="true"></a></span>
<span id="cb1-15"><a href="#cb1-15" aria-hidden="true"></a><span class="at">  </span><span class="kw">-</span><span class="at"> </span><span class="fu">id</span><span class="kw">:</span><span class="at"> supportsHttpsTrafficOnly</span></span>
<span id="cb1-16"><a href="#cb1-16" aria-hidden="true"></a><span class="at">    </span><span class="fu">name</span><span class="kw">:</span><span class="at"> </span><span class="st">'Supports Https Traffic Only'</span></span>
<span id="cb1-17"><a href="#cb1-17" aria-hidden="true"></a><span class="at">    </span><span class="fu">description</span><span class="kw">:</span><span class="at"> </span><span class="st">'Allows HTTPS traffic only to Storage Account and Functions App if set to true.'</span></span>
<span id="cb1-18"><a href="#cb1-18" aria-hidden="true"></a><span class="at">    </span><span class="fu">type</span><span class="kw">:</span><span class="at"> boolean</span></span>
<span id="cb1-19"><a href="#cb1-19" aria-hidden="true"></a></span>
<span id="cb1-20"><a href="#cb1-20" aria-hidden="true"></a><span class="at">  </span><span class="kw">-</span><span class="at"> </span><span class="fu">id</span><span class="kw">:</span><span class="at"> runtime</span></span>
<span id="cb1-21"><a href="#cb1-21" aria-hidden="true"></a><span class="at">    </span><span class="fu">name</span><span class="kw">:</span><span class="at"> Runtime</span></span>
<span id="cb1-22"><a href="#cb1-22" aria-hidden="true"></a><span class="at">    </span><span class="fu">description</span><span class="kw">:</span><span class="at"> </span><span class="st">'The language worker runtime to load in the function app.'</span></span>
<span id="cb1-23"><a href="#cb1-23" aria-hidden="true"></a><span class="at">    </span><span class="fu">type</span><span class="kw">:</span><span class="at"> string</span></span>
<span id="cb1-24"><a href="#cb1-24" aria-hidden="true"></a><span class="at">    </span><span class="fu">allowed</span><span class="kw">:</span></span>
<span id="cb1-25"><a href="#cb1-25" aria-hidden="true"></a><span class="at">      </span><span class="kw">-</span><span class="at"> node</span></span>
<span id="cb1-26"><a href="#cb1-26" aria-hidden="true"></a><span class="at">      </span><span class="kw">-</span><span class="at"> dotnet</span></span>
<span id="cb1-27"><a href="#cb1-27" aria-hidden="true"></a><span class="at">      </span><span class="kw">-</span><span class="at"> java</span></span>
<span id="cb1-28"><a href="#cb1-28" aria-hidden="true"></a><span class="at">    </span><span class="fu">default</span><span class="kw">:</span><span class="at"> dotnet</span></span>
This file first contains standard fields like a name, version, and description. The runner specifies whether your templates are written using ARM or Terraform. The use of Terraform is, at the time of writing this article, still in preview, but you can sign up to use it. In this example, an ARM template is used hence the runner: ARM. The templatePath points to the ARM template used to deploy the environment. Bicep is not supported but, since it’s the successor of ARM templates, is preferred over using an ARM template. Luckily you can use Bicep and transpile that into an ARM template, as is done in this example. The ‘main.bicep’ contains all the required resources for the Function App to work and can then be converted into ‘azuredeploy.json’ using the following command:
<span id="cb2-1"><a href="#cb2-1" aria-hidden="true"></a><span class="ex">az</span> bicep build <span class="at">--file</span> main.bicep <span class="at">--outfile</span> azuredeploy.json</span>The parameters section defines the parameters that are required to deploy the template. These parameters are used to populate the form when creating a new environment.
With that in place, we can now create a new environment!
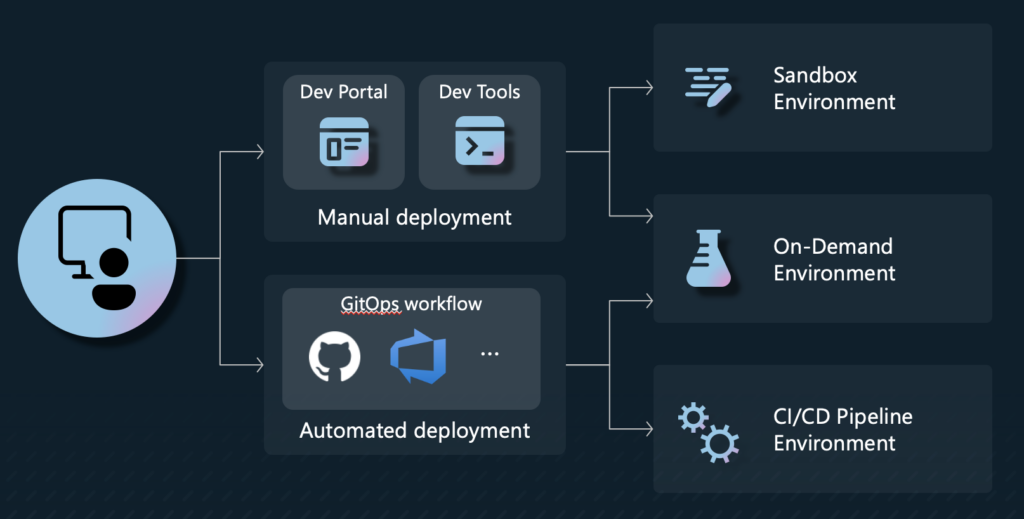
There are multiple ways a developer could use Deployment Environments. The first of them is manually deploying a new environment. That is done using the Dev Portal or a dev tool like the Azure CLI. Using your CI/CD pipeline to deploy a new environment is the other way.
Let’s start with having a look at the Dev Portal. The Dev Portal is a web-based portal that can be used to manage Azure Deployment Environments. It is found at https://devportal.microsoft.com. It provides an overview of all the currently deployed environments and allows a developer to deploy a new one. The exact steps to create a new environment depend on whether you also have access to Dev Boxes. If you don’t, you will see a blue button on the top-left corner saying ‘New Environment’. If you have access to Dev Boxes, that button will be a drop-down, and one of the two options will say ‘New Environment’. Clicking that ‘New Environment’-button will show you the following form:
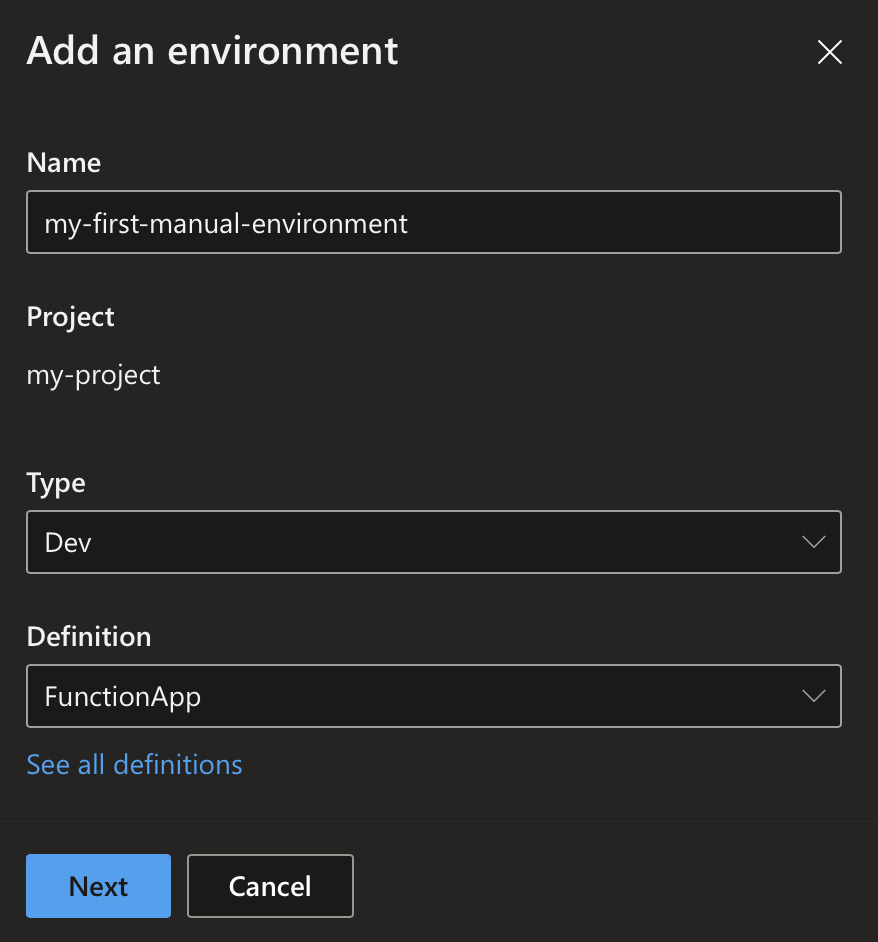
Here, one must enter a name for the new environment, select the environment type like ‘Dev’, and select the template definition. We will later talk about how these template definitions are created. After clicking next, a few additional parameters required on this specific template definition must be inserted. 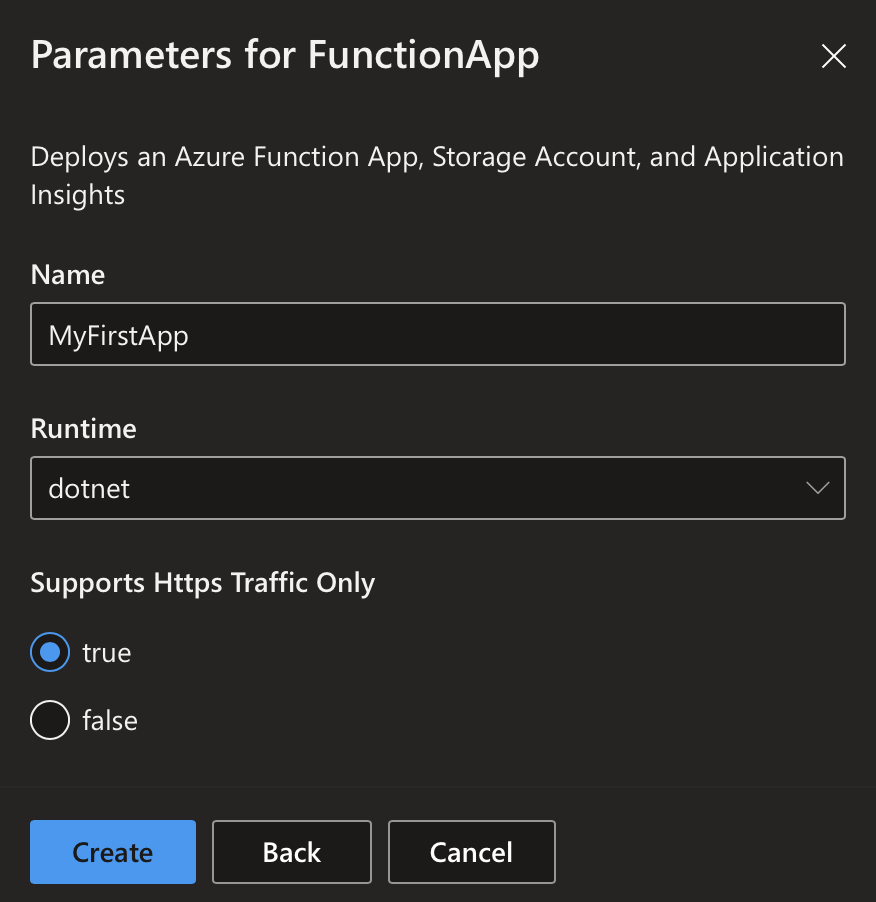 Once the form is submitted, the environment is deployed. This can take a few minutes. Once the environment is deployed, it will appear in the environment list.
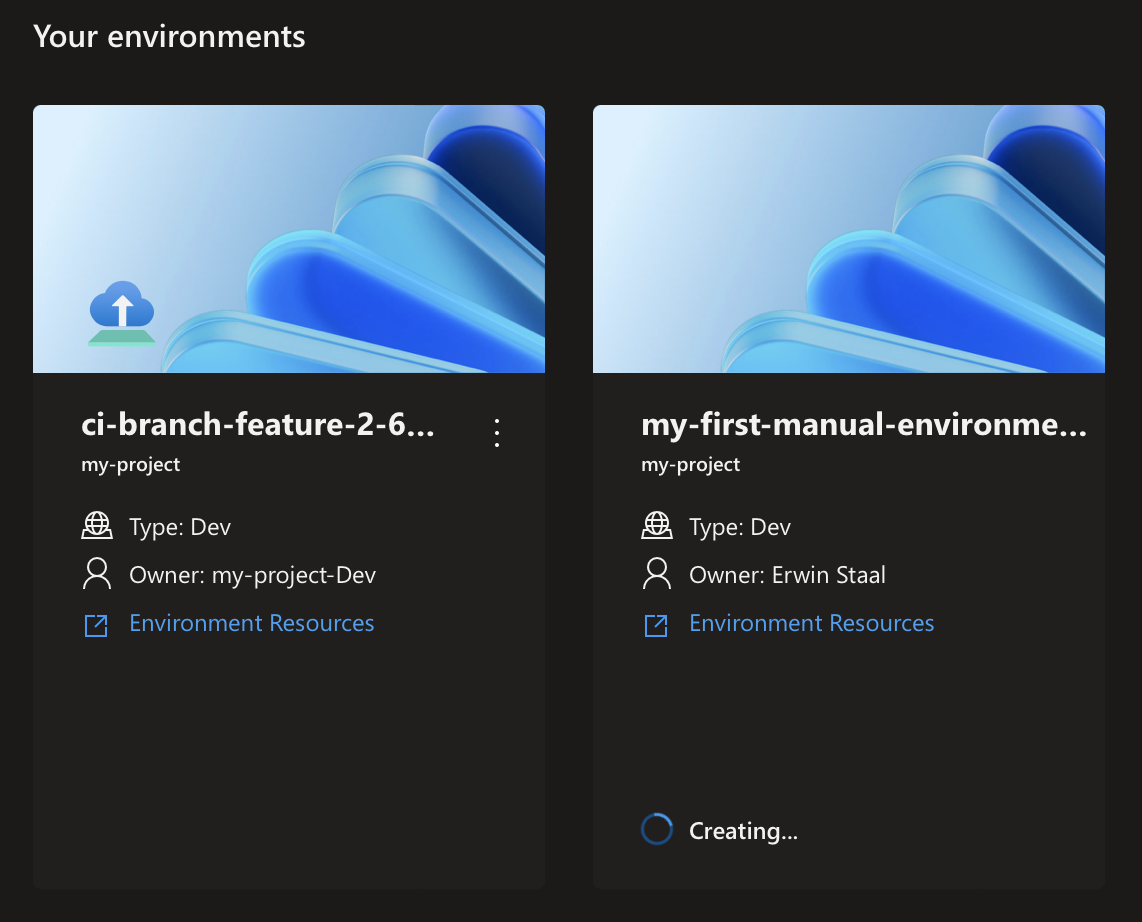
That same environment can also be created using the Azure CLI. The Azure CLI command is az devcenter dev environment create. The following command creates a new environment called ‘my-dev-environment’ using the template definition ‘my-template-definition’. One also needs to specify in which project and dev center the environment should be created. The catalog name is the name of the catalog that contains the template definition.
<span id="cb3-1"><a href="#cb3-1" aria-hidden="true"></a><span class="ex">az</span> devcenter dev environment create <span class="dt">\</span></span>
<span id="cb3-2"><a href="#cb3-2" aria-hidden="true"></a>              <span class="at">--name</span> <span class="st">'my-dev-environment'</span> <span class="at">--environment-type</span> <span class="st">'Dev'</span> <span class="dt">\</span></span>
<span id="cb3-3"><a href="#cb3-3" aria-hidden="true"></a>              <span class="at">--dev-center</span> <span class="va">${</span><span class="er">{ vars.AZURE_DEVCENTER </span><span class="va">}</span>} <span class="at">--project</span> <span class="va">${</span><span class="er">{ vars.AZURE_PROJECT </span><span class="va">}</span>} <span class="dt">\</span></span>
<span id="cb3-4"><a href="#cb3-4" aria-hidden="true"></a> <span class="at">--catalog-name</span> <span class="va">${</span><span class="er">{ vars.AZURE_CATALOG </span><span class="va">}</span>} <span class="at">--environment-definition-name</span> <span class="st">'my-template-definition'</span></span>Another interesting use of the Azure Deployment Environments is to use it in your CI/CD pipeline. This allows you to create a new environment for every branch or pull request that is being created. For you, as the one who created the branch or PR, it allows you to test your pull request in a real, completely isolated environment. Those who need to review your PR or test it can do so without having to deploy anything themselves.
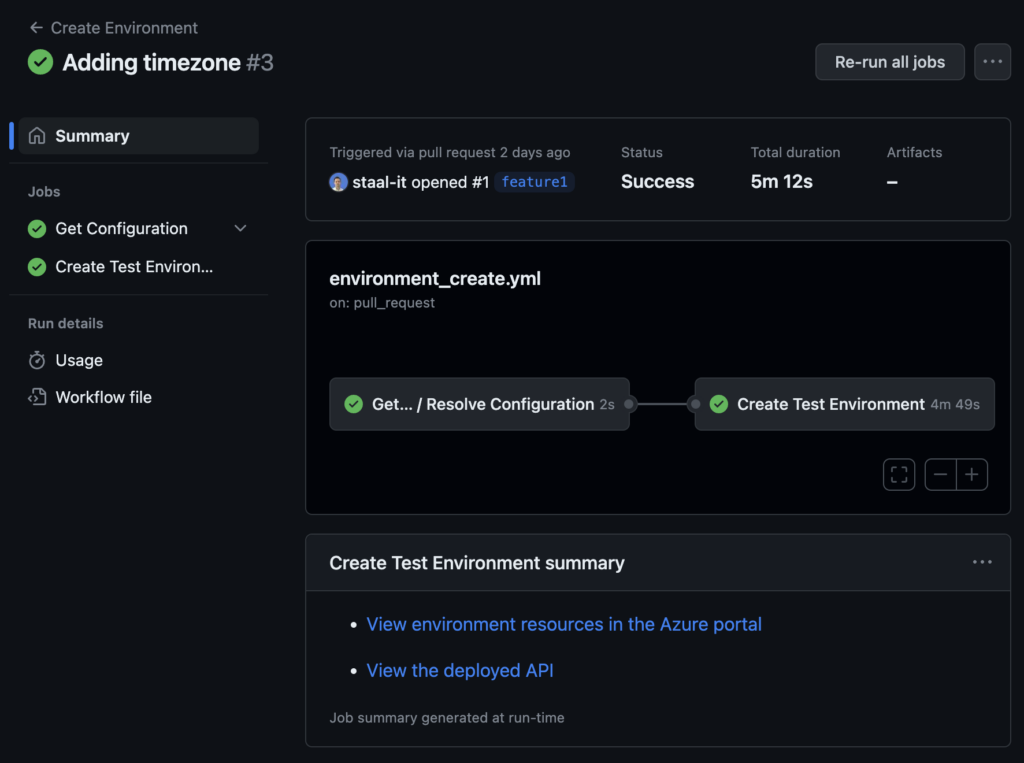
In the image above, we see that a link to the deployed environment in Azure and a link to the deployed API on the Azure Function are shown in the summary of a GitHub Action. That same information can also be added as a comment to the PR, as shown below.
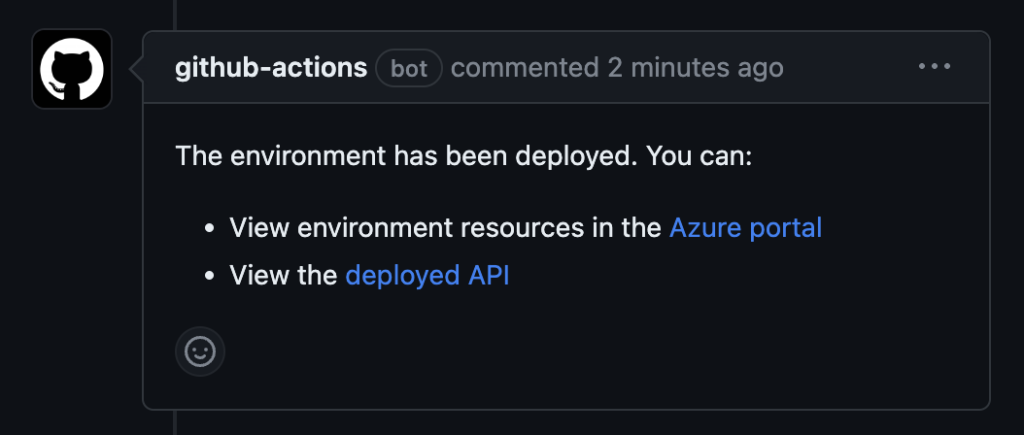
This allows the reviewer to test the API and see if the changes work as expected.
In short, these are the steps in the GitHub Action: – Build a .NET Core API (a very simple API that has a single endpoint that returns timezone information) – Log in to Azure using the Azure CLI – Create the environment using the Azure CLI – Deploy the API to the environment using the Azure CLI – Add a comment to the PR with the link to the deployed API and environment
These sample GitHub Actions can be found in a repository shared by Microsoft, as used in the tutorial mentioned in the introduction. My slightly modified version can be found here.
Microsoft lists one of the benefits of this new tool: platform teams can manage the infrastructure by authoring the template definitions. Teams can then use the self-service capabilities of the tools to use them. From a compliance and governance standpoint, this should bring benefits as this central team can enforce, for example, security policies. But as we mentioned before, such a central approach often leads to a single team being the bottleneck for others. What happened to ‘You build it, you run it’?
I love working in DevOps teams that are end-to-end responsible for their product. For me, that includes infrastructure provisioning as well. I’ve learned that there is no one-size fits all in our industry. Companies and teams are sometimes simply not ready for that way of working. Teams might not be cross-functional enough and have someone with enough knowledge to manage infrastructure. On other occasions, I see cloud implementations that are not mature enough to open up to development teams and ensure compliance and security. For those companies, this tool brings many benefits as it at least brings a lot of self-service options out of the box. More mature teams can leverage the template definitions stored in source control and can easily be shared. That way, collaboration through inner sourcing can be promoted. Teams can start making small template changes and create a pull request. A platform team member can still be the code owner and must approve the change. Since a Dev Center can use multiple catalogs, mature teams can use their own GIT repository and link it. The use of the product and its way of working can, therefore, grow with the maturity of the engineers and the company.