
Cloud | Google Cloud Platform
How to minimize accidental cloud cost on Google Cloud Platform 
Mark van Holsteijn 30 Apr, 2021


When working with Cloud, especially when coming from an on-premises situation, it can become daunting to see how to start and what fits best for your company. There is a wide range of network topologies possible, so this might be seen as a barrier to decide how this can be accomplished. In my field of work, I come across many companies and with that multiple configurations. The common denominator is that all companies had to start somewhere, coming from on-premises or starting fresh, and all started small. This triggered the idea to document a number of network topologies, starting with the most simple of the simple, working our way to more complex setups. Depending on the complexity and relationship of topologies, each blog will contain 1 or 2 topologies.
These series of blogs are targeted for readers in any size of company. This series is typically useful for cloud architects and cloud engineers, who seek some validation on possible topologies. The first one might even be applicable to home or very small business users. It’s expected that the reader does have some knowledge about basic cloud concepts, such as VPC and firewall rules, or have the ability to find the documentation for this when needed.
The examples will be presented as Google Cloud Platform (GCP) resources, but can in most cases be inferred to other public cloud vendors. You should look up the appropriate documentation for this, before starting.
For the first blog in this series we will focus on two topologies:
For the first topology we will be looking at the most simple form possible:
A single virtual machine that is directly accessible from the internet
In this case we will focus on the purpose of the machine as serving a simple web server. 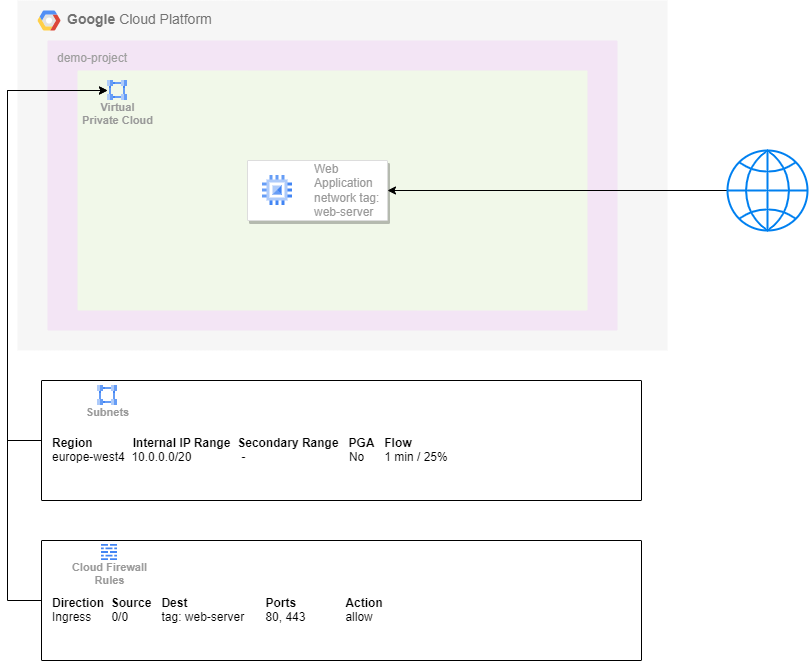
In this example you can see the GCP resource Virtual Private Cloud (VPC), which is the typical network resource that connects all resources. This network has a subnet configured as well as a simple firewall rule targeted for the network tag “web-server”.
Good practice expects that you will not use the default network configuration, but rather that you configure the expected subnets yourself. In this example you will see that there is just one subnet configured in one region, with a limited range of addressable IP addresses. Private Google Access (PGA) is not necessary for this set up, so we disable it. We do want to get information about the interactions (to identify misbehavior for example), so we will allow for flow logs to be collected but with a low sample rate and just at 25% of the traffic.
Default firewall settings (at least with GCP) are configured such that ingress traffic is blocked and egress traffic is allowed, through implied firewall rules. When running a simple web server we do want to allow ingress traffic to the HTTP and HTTPS ports. The traffic may come from any IP address but is only allowed to go to instances with the network tag web-server configured.
Within the network there is a virtual machine called “Web Application”. This virtual machine will run a web-server (Apache, NginX or any other) that listens to ports 80 and 443. Best practice dictates that traffic coming in to port 80 will trigger an automatic redirect to port 443 (HTTPS). You might want to consider using Container Optimized OS (COS) as the boot image, so that you can use a preconfigured container image as source for your web server. This can make scaling up in the future also easier.
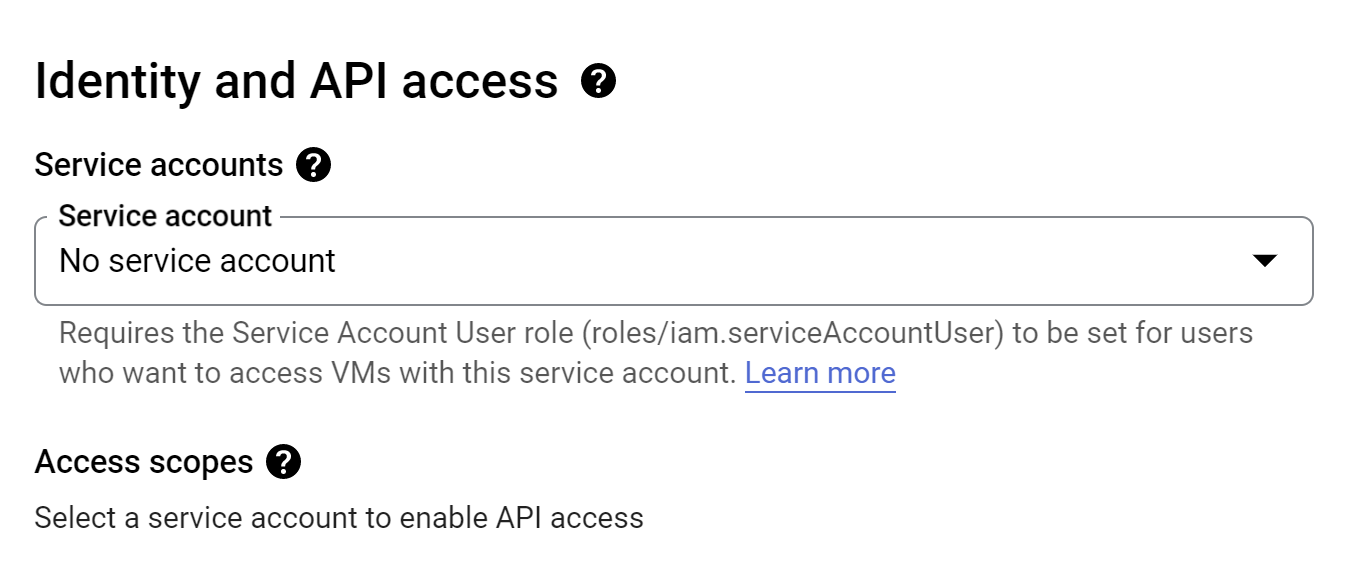
Since we also don’t need any access to other services from this machine, we will remove the service account that is attached by default. This is in accordance with the Principle of Least Privilege. The way Google configures the VMs results in two remaining abilities: read/write access to Cloud Logging and read access to Cloud Storage.
Because your machine will need to be accessible from the public internet, it requires an external IP-address assigned. The default setting when configuring a VM is an ephemeral external IP-address, but you should consider making this static. That way you can re-use it, in case you need to restart the VM for one reason or another. It also allows you to configure a fixed DNS entry with your domain registration service.
Depending on your requirements, the costs can be relatively low. Most public cloud vendors offer a sort of free tier, in which you can run some resources without pay. If you are able to use this, then the costs will most likely only affect the traffic from your machine to the end-user, the cost for the static IP-address and the cost for storage for the logging entries. When using a larger VM, this may incur more costs. You could also consider using Spot VMS, to get a larger machine at reduced costs, but comes with less reliability about the availability of your resources.
Because this is the most simple setup, finding and debugging issues can become very easy. It will allow you to run your service at very low cost.
With this simple architecture it will come with some done sides. Here are a few important ones that you should be aware of.
For the next topology we will be looking at an extension of the previous simple set up, configuring a load balancer backed by a Managed Instance Group (MIG).
An external HTTPS Global Load Balancer backed by a Managed Instance Group
The load balancer provides a number of capabilities, from which we will now only use the ability to scale the number of backend instances while being the single point of entry. The use case is still to serve a simple web server.
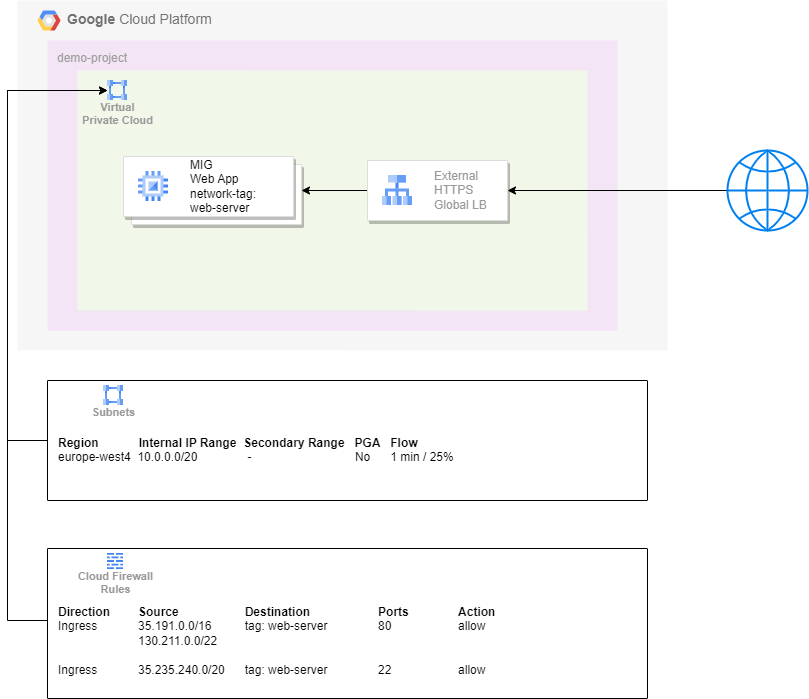
This example will use the same network as from the previous example.
The subnet is the same as in the previous example.
As can be seen in this topology, the firewall rules are different. The load balancer will act as the endpoint for the traffic coming from the public internet and needs to be configured such that it will offload the correct ports. From there the traffic will be forwarded and will always come from a fixed range of IP-addresses. This means that the firewall rule can be configured such that only traffic from these IP-ranges should be allowed into your network.
Additionally, because the VM’s no longer have an external IP-address, it’s no longer possible to directly access these machines when needed. To allow for secure access by identities with sufficient privileges, we configure a firewall rule that allows for access through Identity Aware Proxy (IAP).
Because we’re using a load balancer, we can configure a Managed Instance Group to process our traffic. This MIG will act as the backend service for our load balancer. We can now also configure the load balancer to scale our MIG up and down, based on some chosen metrics that best suit your needs. The configuration of the machine(s) will remain similar to the most simple set up.
Note
If a MIG is not a feasible option, you can still use a single VM or an [unmanaged instance group](https://cloud.google.com/compute/docs/instance-groups). This can however not be easily changed when requirements in the future change. With an unmanaged instance group you will loose the ability for autoscaling, but configuration and changes on individual machines can become easier.
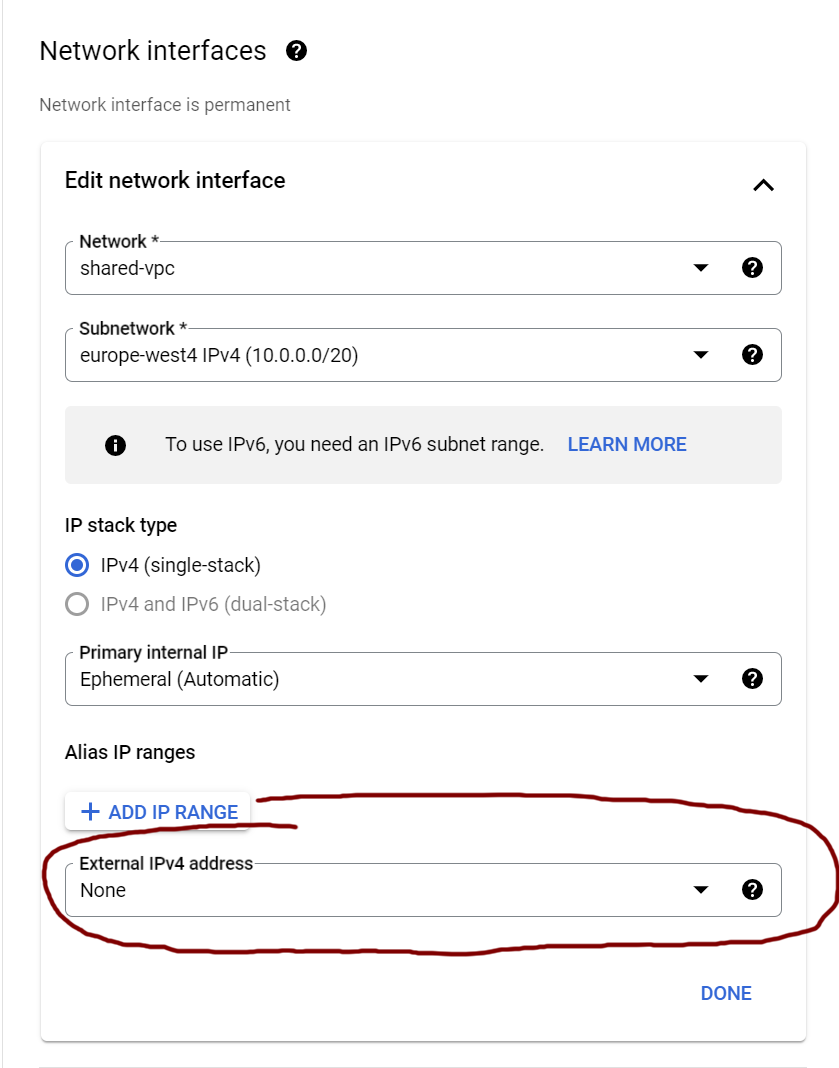
Now that we use a load balancer as a public facing resource, we no longer need our backend service to have an external IP-address. This can reduce the attack service of our VM significantly, because it will no longer be directly accessible from the public internet. Be aware that you will have to explicitly disable the external IP address, because the default settings will use this.
With the load balancer set up, you will now have to attach the external IP-address to this service, instead of to the VM(s) directly. For reasons described in the next chapter, we will be doing this separately before we configure the load balancer. This way we can already configure our DNS-server to point to this address, before we actually configure the load balancer itself.
When you have your service configured with a MIG, you can now create and connect a load balancer. Because this topology describes a web server, we will be using an HTTPS Global External Load Balancer. The load balancer will be the entry point of your service and SSL certificates need to be provisioned.
When adding certificates, you have two options. You either provide your self-managed certificates, or you let Google manage these for you. The latter option is free of charge and uses either the Google root CA or Let’s Encrypt. These certificates will only be provisioned when you have configured your DNS service to point to the IP-address linked to the load balancer. This is why it is important that you’ve reserved the IP-address before. Unless you have strict security requirements through company policies when it comes to secret values and certificates, this will probably be the best choice for you.
Note
There is a bit of a chicken-egg problem when the certificates need to be provisioned. This will come with limited downtime in regards to the verification of your certificates when your service is being visited.
If you are interested in the security around Google Cloud Load Balancing, you might want to also read my earlier blog called “Can we trust Google Cloud Load Balancing?”.
With this added complexity, you will gain a number of benefits. The details will become more apparent with following blogs, when we dive into more complex topologies. Utilizing managed services will however come with an increase of costs.
Even though a MIG is not required as the backend for the load balancer (you can still get away with just one instance), having an instance group you get the benefit of autoscaling when traffic increases. This will make your service more robust.
Usage of a load balancer comes with some costs. Note that the 5 forwarding rules mentioned in the pricing table are shared between one or more load balancers and you should consider placing a http-to-https redirect rule.
As mentioned throughout this second topology, using a load balancer, there are a couple of clear benefits.
The adoption of this topology will come with a couple of drawbacks
This blog is the first in an upcoming series. It will address network topologies in increasing complexity. In this first edition we’ve covered the most simple form of topology, while still adhering to basic security principles, and a slightly more complex variant using a Load Balancer.
The first topology will cost least of the provided options, but will come with some drawbacks in the form of reliability. The second option is already more robust, can be added with additional (security) features and can provide more reliability. This will however come with an increase in cost.
Photo by Shubham Dhage on Unsplash
