AWS | Cloud | Infrastructure
The Evolution of Cloud Networking 
Steyn Huizinga 23 Oct, 2020


Welcome to Building Resilient Public Networking on AWS—our comprehensive blog series on advanced networking strategies tailored for regional evacuation, failover, and robust disaster recovery. Here’s a summary of this engaging journey:
Moreover, we’ve prepared a GitHub repository to complement this blog series. It provides Infrastructure as Code (IaC) using AWS Cloud Development Kit (CDK) and CloudFormation, allowing you to deploy and manage the necessary infrastructure effortlessly.
In this second post in our Building Resilient Public Networking on AWS series, designed for readers with intermediate knowledge, we’ll embark on a guided journey to deploy a secure public endpoint fortified with HTTPS. While there are more automated methods for this process, our goal is to make it understandable and accessible for readers who want to delve into the intricacies.
To set up the necessary infrastructure in the Cloud, we’ll employ Infrastructure as Code (IaC) using AWS CDK with TypeScript along with CloudFormation. You can find the corresponding code for this blog post here.
If you’re new to AWS CDK, I recommend reading "Getting started with the AWS CDK" to understand its basics.
We approach the deployment and configuration of our infrastructure in different phases, utilizing different CDK stacks and incorporating some manual steps for resources outside of AWS. Here’s a concise overview of each phase:
Manual Step
First CDK Stage- Foundational Infrastructure
Manual Step
Second CDK Stage- Web Container Deployment
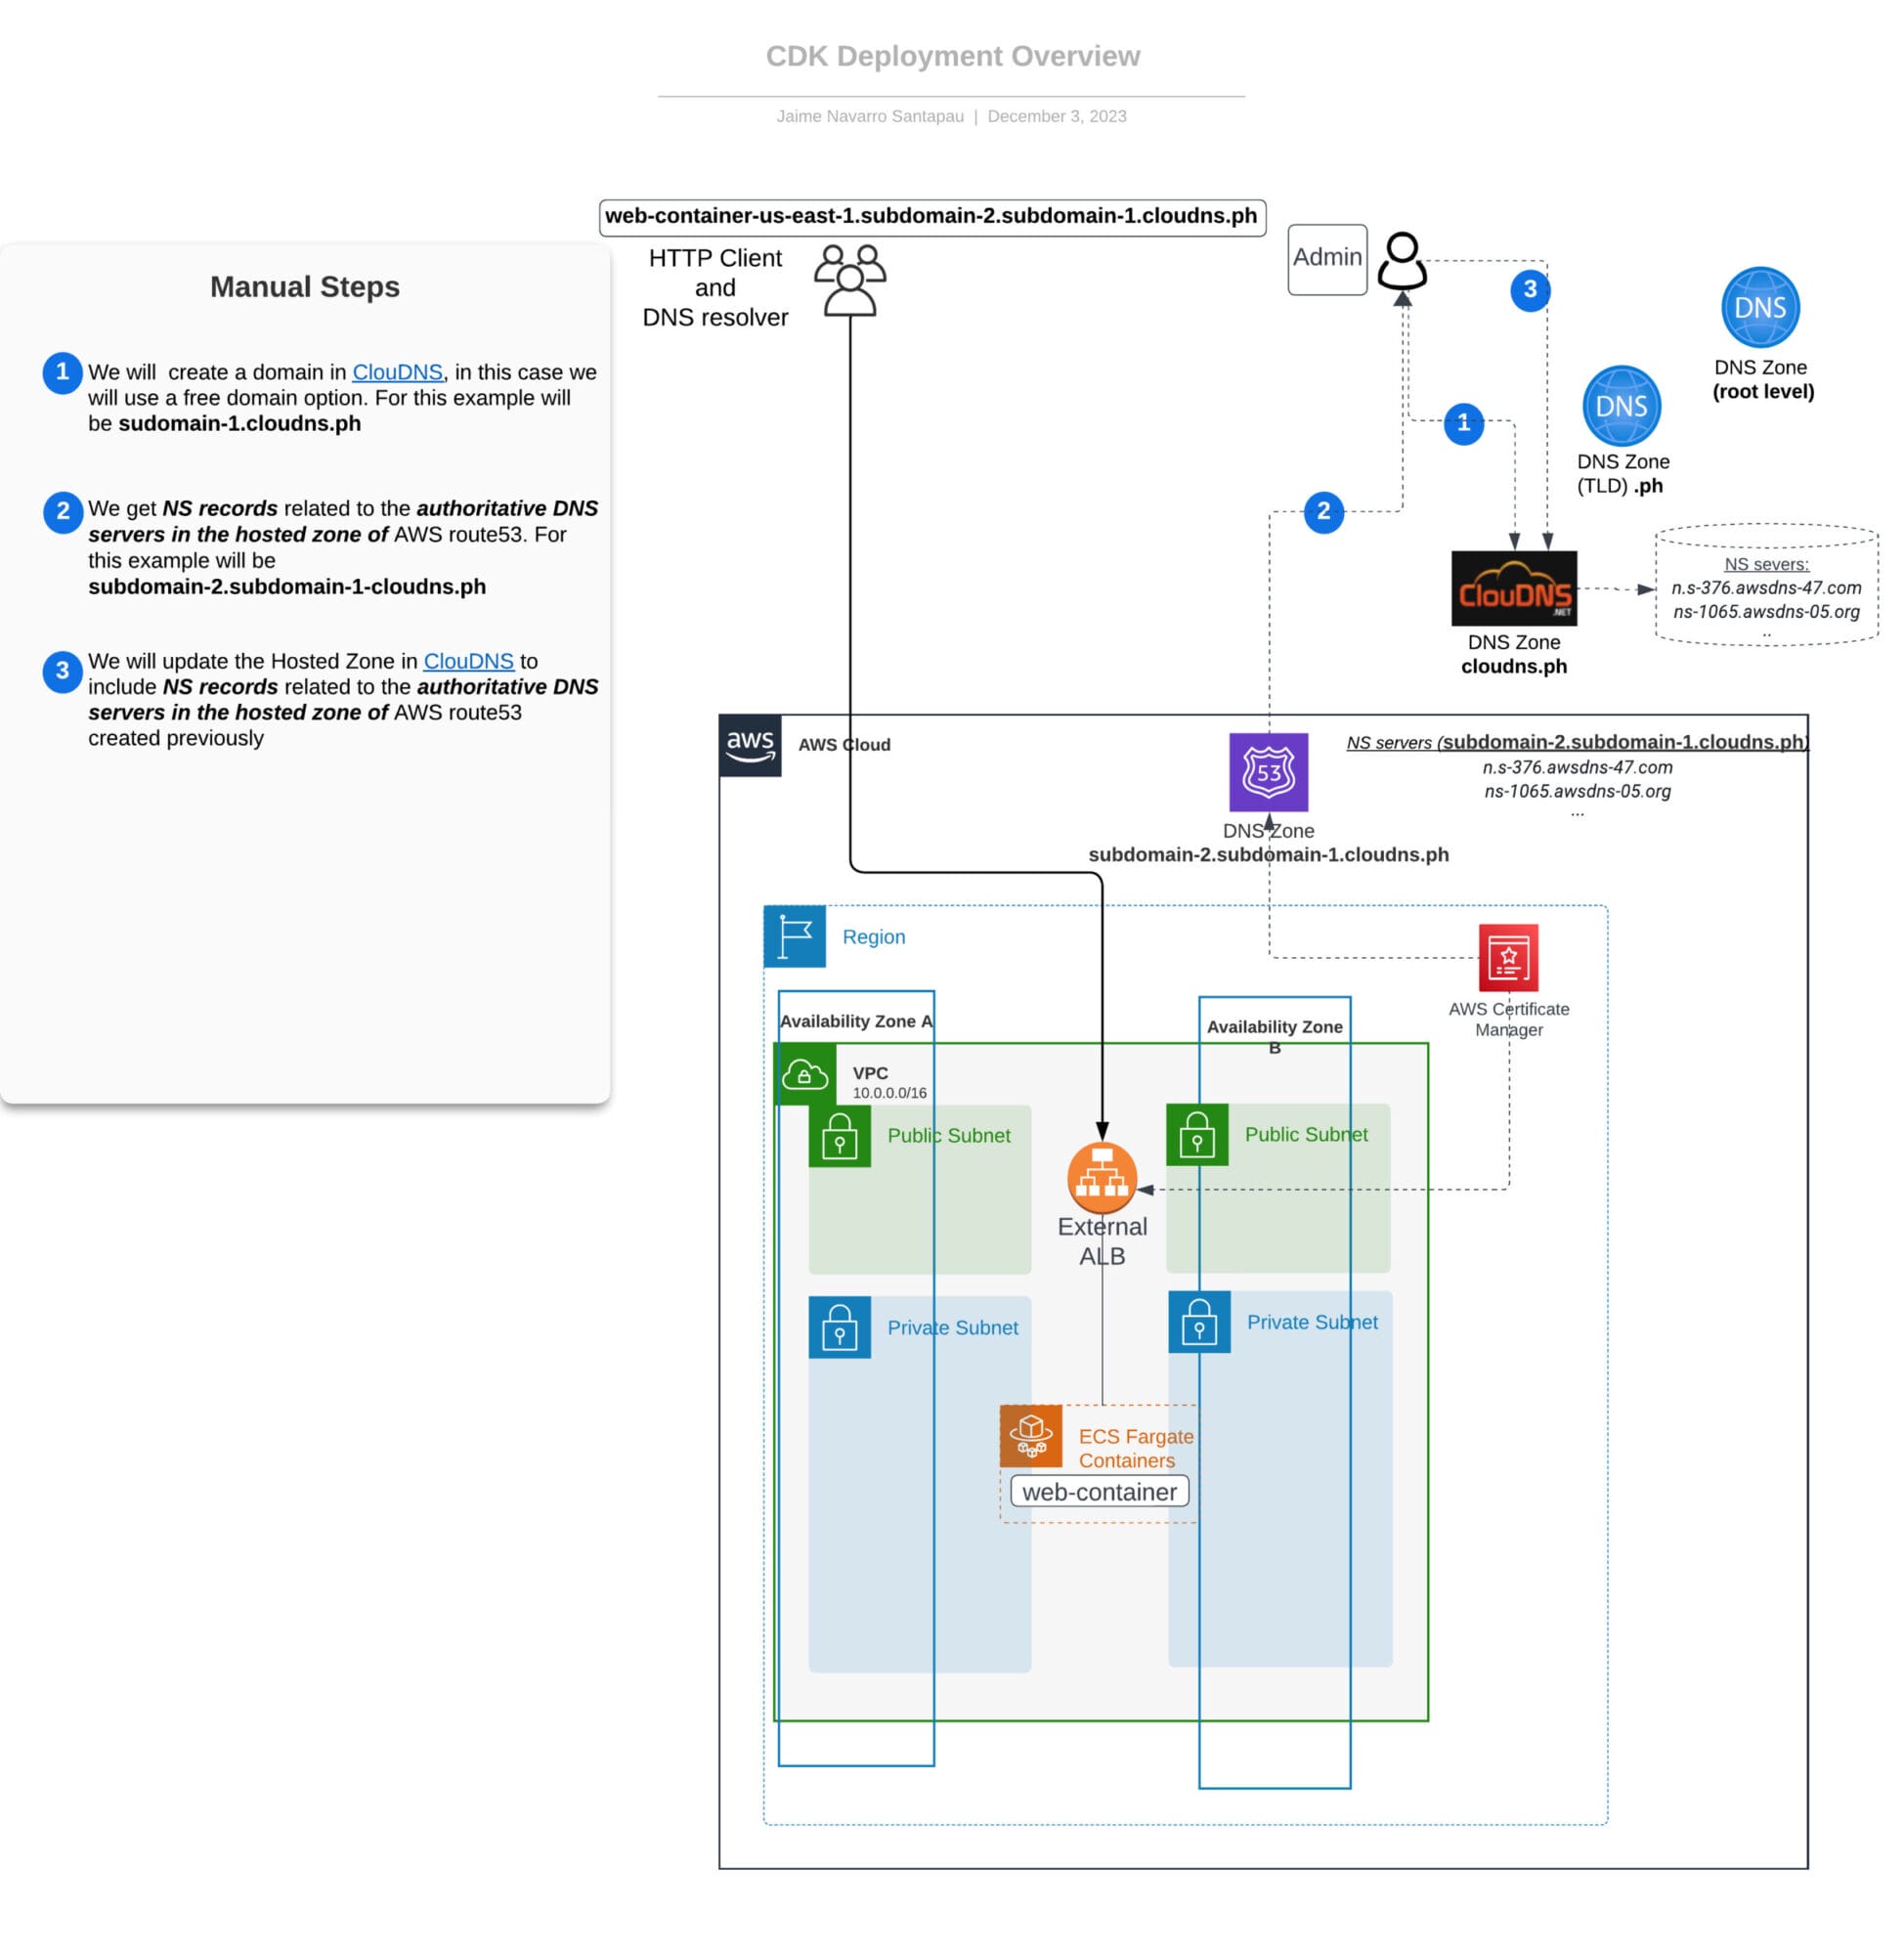
The accompanying diagram illustrates the architecture of our deployed infrastructure, showcasing the relationships between key components. While the CDK stacks deploy infrastructure inside AWS Cloud, for external components like the DNS provider (ClouDNS), we will need to execute manual steps, highlighted in the following diagram.
Now that we have a clear understanding of the role played by each component and AWS product in our infrastructure, let’s streamline the deployment process using powerful automation tools provided by AWS — specifically, AWS CDK and AWS CloudFormation. By leveraging these tools, you can automate the creation and management of your secure public endpoint, ensuring consistency and scalability across your infrastructure.
In this section, we’ll guide you through a step-by-step execution of the actions required to deploy and configure the infrastructure illustrated in the previous image. Our aim is to provide clarity by explaining each step in detail. It’s important to note that, for the sake of clarity, we’ll be performing these actions manually. However, in a real-world scenario, this process should be automated.
To comprehensively understand the automation process and introduce improvements for real-world scenarios, we’ll delve into necessary changes in the "Enhancements and Automation" section later in this blog post. Let’s begin by executing and explaining each step in the deployment process.
To begin the deployment process, you’ll need to install the appropriate tools on the machine where you intend to run these steps. Follow the instructions below based on your operating system:
Before proceeding, let’s ensure that your AWS credentials are correctly configured and functioning as expected. Follow the steps below to confirm:
| aws configure list-profiles |
| export AWS_DEFAULT_PROFILE=xxxxxxxxxx |
| export AWS_DEFAULT_REGION=us-east-1 |
| aws configure list aws sts get-caller-identity |
In this step, you’ll need to choose a unique name for your free domain. As an example, we’ll use "subdomain-1.cloudns.ph" but it’s crucial to select a different public domain name that is available for your use.
Now that our GitHub repository is configured with a free public DNS domain name, let’s build and prepare it for deployment.
| cd infrastructure/blog_post_2 |
| npm install -dd |
| npm run build -dd |
This step involves setting up the necessary AWS resources and configurations to deploy your CDK Stacks using CloudFormation.
| npx cdk bootstrap –region us-east-1 |
| npx cdk context –clear npx cdk synth –debug -vv |
Execute the following command to deploy the basic infrastructure requirements in the us-east-1 region:
| npx cdk deploy stage-1/* –require-approval never |
The basic infrastructure includes:
After executing this command, you can also review the status of your CDK deployment in CloudFormation from the AWS console.
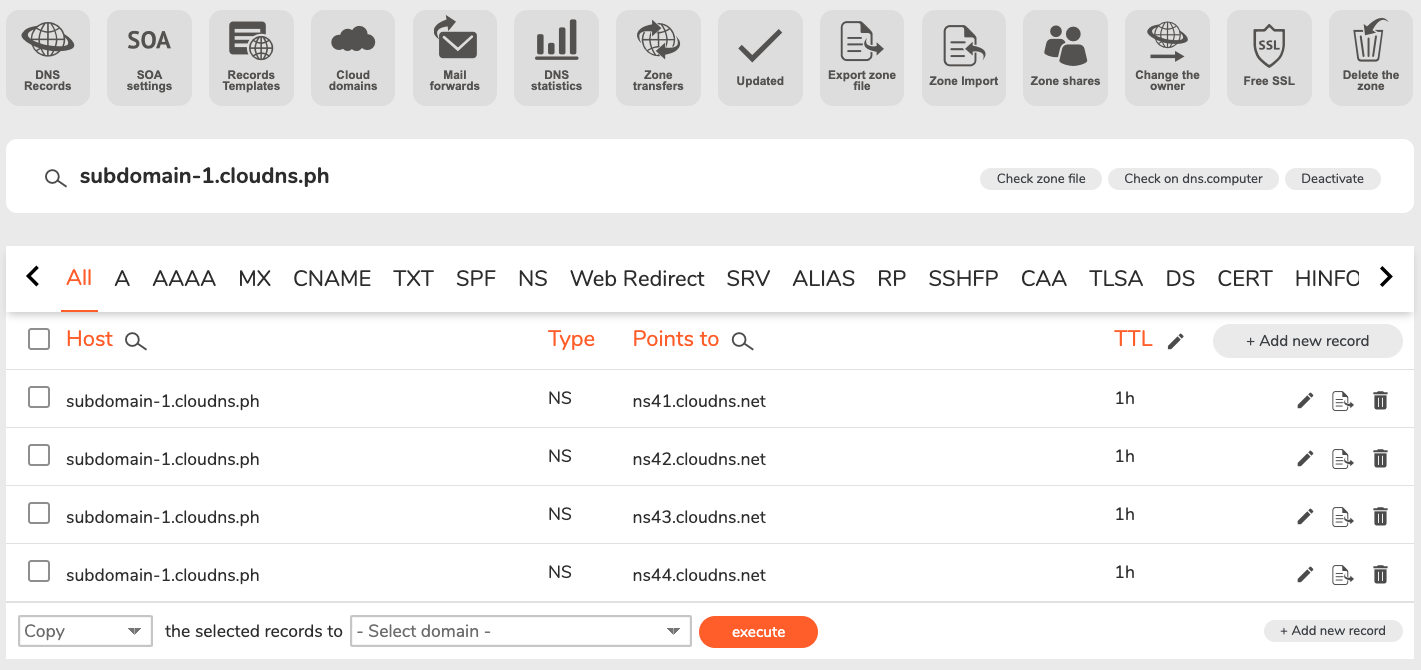
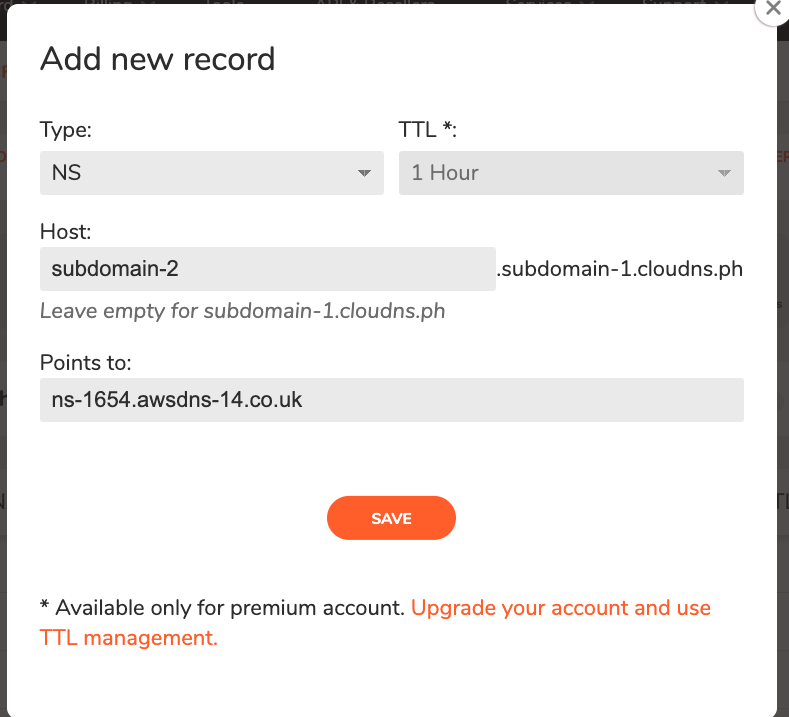
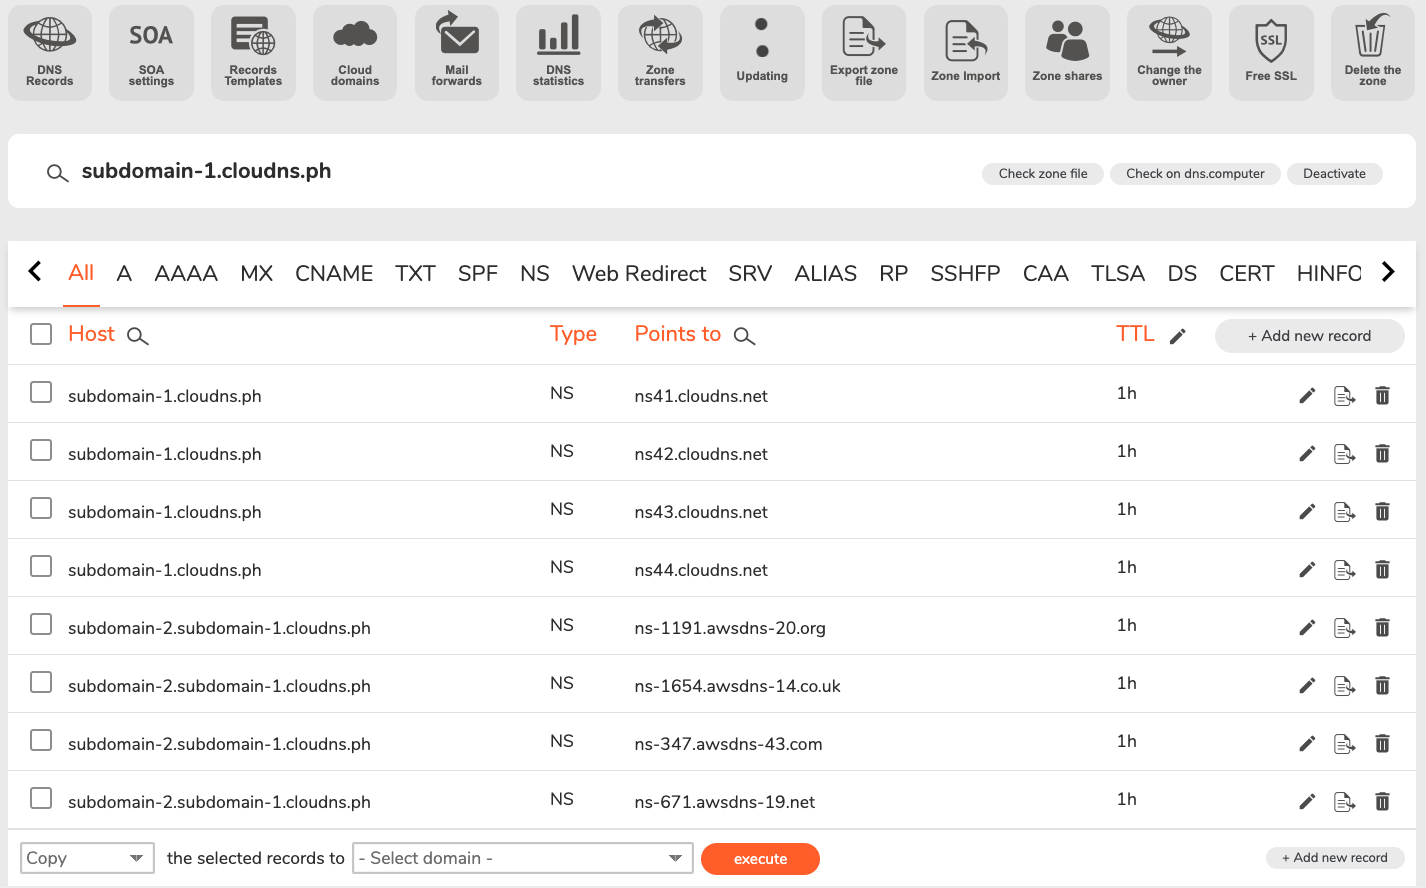
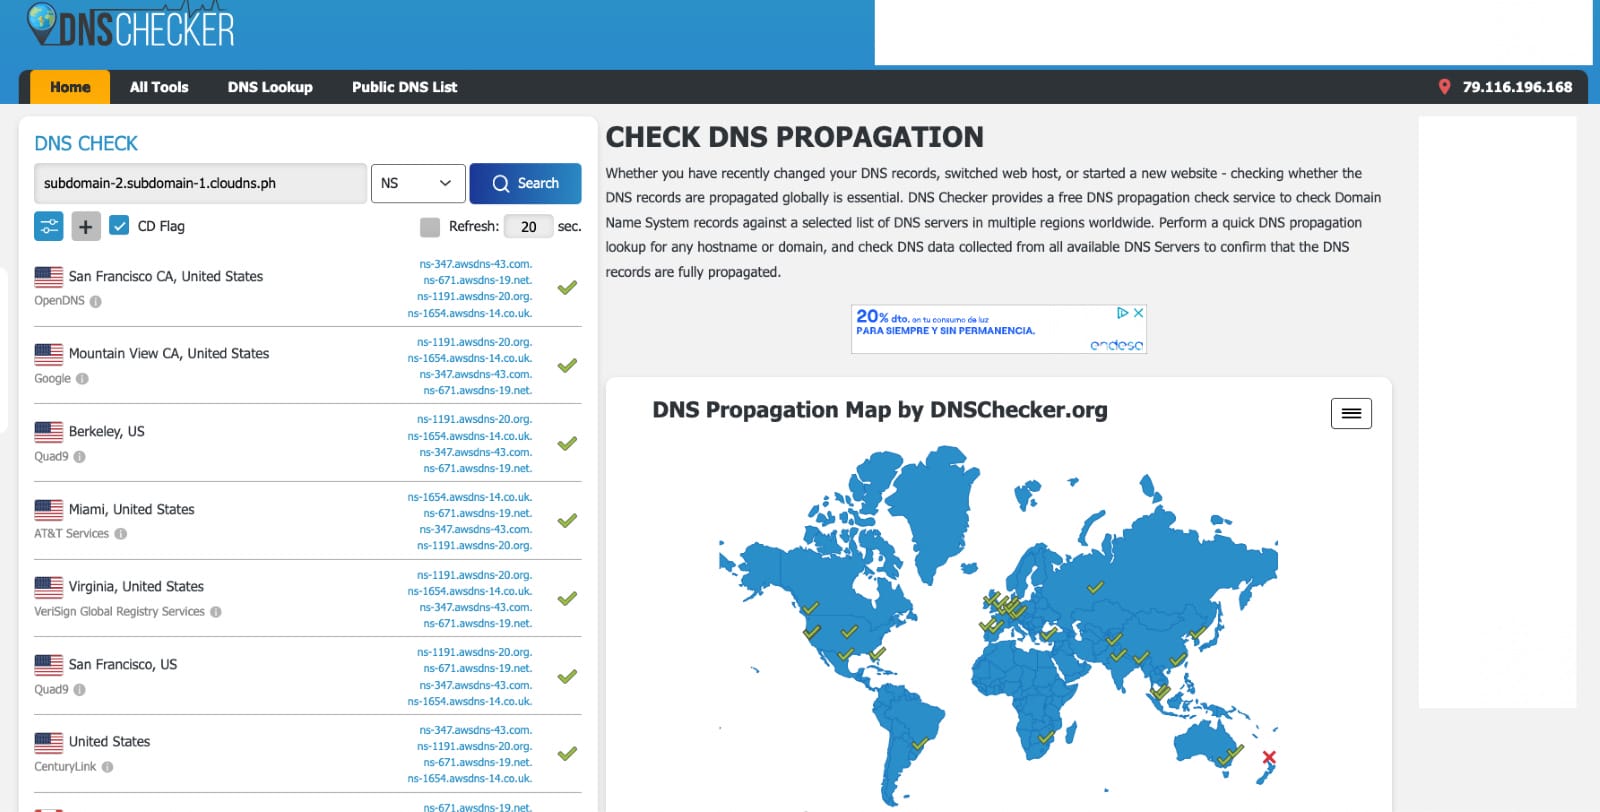
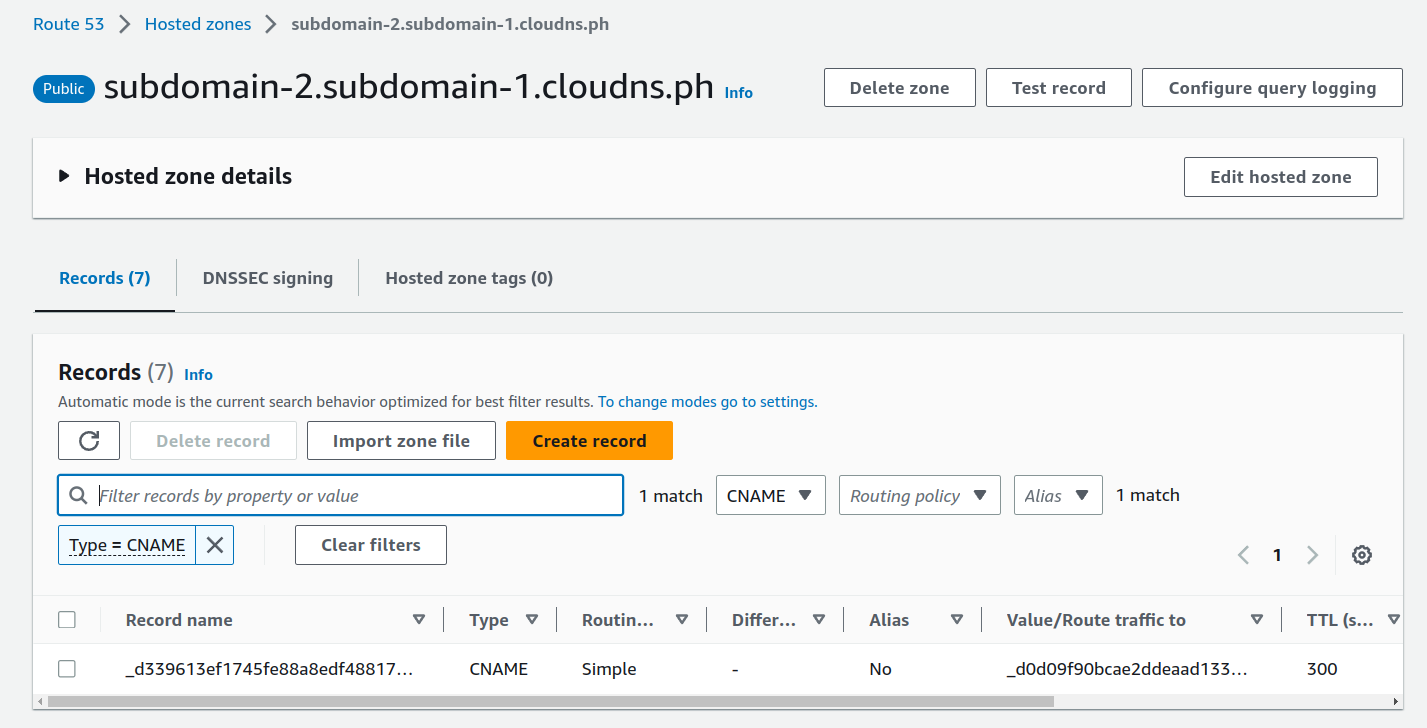
Go to the AWS Route 53 dashboard from the hosted zone created in the previous step. We will get the DNS records with type NameSever (NS).
| ns-123.awsdns-00.com. ns-123.awsdns-00.co.uk. ns-123.awsdns-00.org. ns-123.awsdns-00.net. |
After creating the basic infrastructure in Step 5, it’s essential to review and update in our CDK project the current status of the infrastructure in AWS before deploying the following CDK Stack. Execute the following commands:
| npx cdk context –clear –debug -vv npx cdk synth –debug -vv |
After executing these commands, the file cdk.context.json will be updated. This file contains all the infrastructure dependencies the subsequent CDK stack needs to be deployed in your AWS account.
In this step, we will deploy the remaining infrastructure in the us-east-1 region.
| npx cdk deploy stage-2/* –require-approval never |
This command initiates the deployment of the following components:
After executing this command, you can also review the status of your CDK deployment in CloudFormation from the AWS console.
Once you have finished all the validations, you can clean up all the infrastructure, following these steps to remove the deployed resources.
| npx cdk destroy stage-2/* stage-1/* |
Following this sequence ensures a smooth and complete removal of all resources.
Now that all the necessary infrastructure is in place on your AWS account, it’s time to explore and confirm how the infrastructure behaves. Here are some useful tools for quick verification.
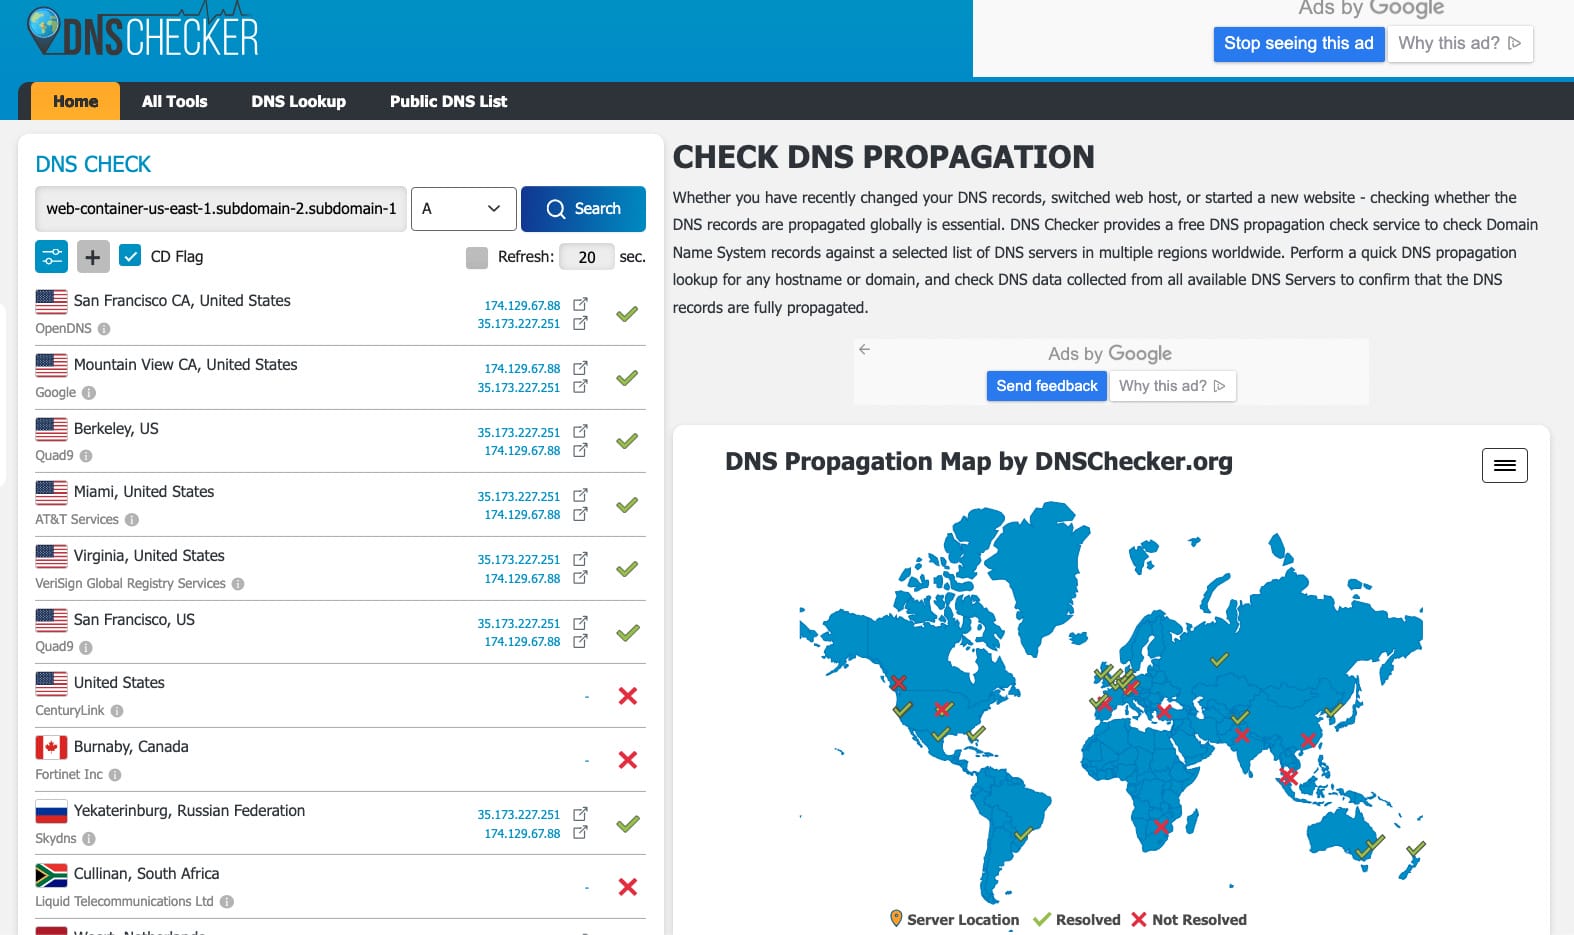
DNS Checker is an online tool to validate DNS propagation across the internet. Remember to update the given domain with the one you have picked. (e.g., "subdomain-2.subdomain-1.cloudns.ph".)
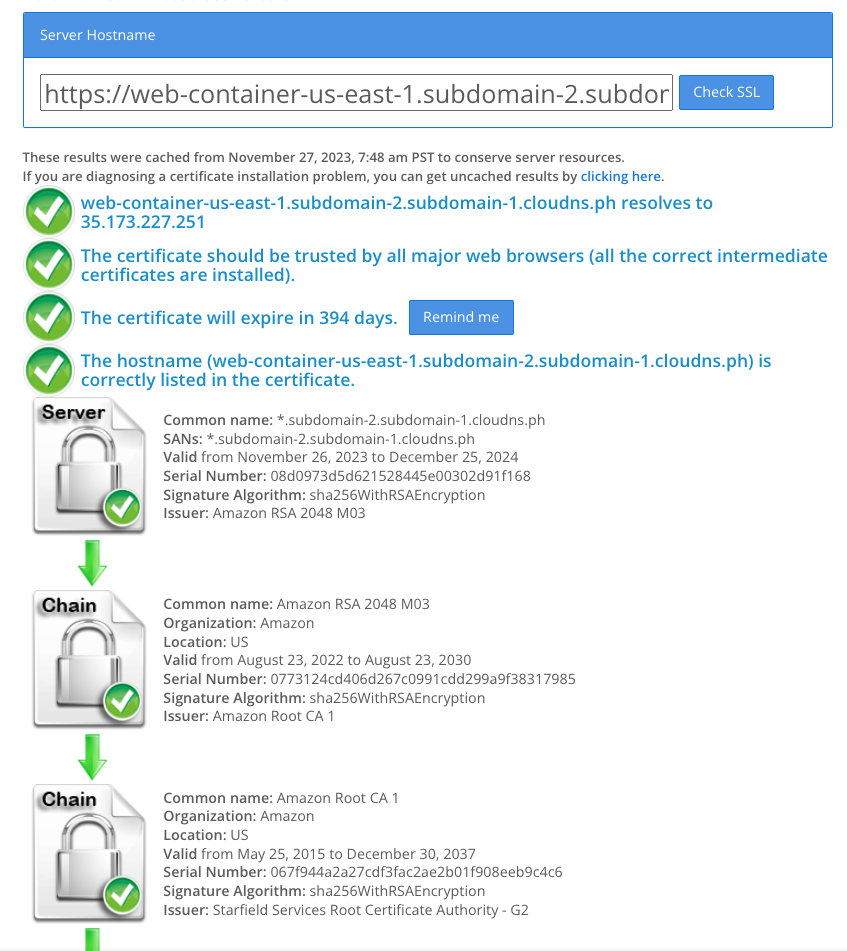
SSL Shopper is an online tool to validate SSL/TLS certificates. Remember to update the given domain with the one you have picked. (e.g., "subdomain-2.subdomain-1.cloudns.ph".)
cURL command-line tool can help us quickly confirm accessibility of your web server and review the HTTP protocols available (h2,http/1.1) to reach the public ALB and if the SSL connections work properly for the created domain.
| curl -v https://web-container-us-east-1.subdomain-2.subdomain-1.cloudns.ph * Trying 35.173.227.251:443… * Connected to web-container-us-east-1.subdomain-2.subdomain-1.cloudns.ph (35.173.227.251) port 443 (#0) * ALPN: offers h2,http/1.1 * (304) (OUT), TLS handshake, Client hello (1): * CAfile: /etc/ssl/cert.pem * CApath: none * (304) (IN), TLS handshake, Server hello (2): * TLSv1.2 (IN), TLS handshake, Certificate (11): * TLSv1.2 (IN), TLS handshake, Server key exchange (12): * TLSv1.2 (IN), TLS handshake, Server finished (14): * TLSv1.2 (OUT), TLS handshake, Client key exchange (16): * TLSv1.2 (OUT), TLS change cipher, Change cipher spec (1): * TLSv1.2 (OUT), TLS handshake, Finished (20): * TLSv1.2 (IN), TLS change cipher, Change cipher spec (1): * TLSv1.2 (IN), TLS handshake, Finished (20): * SSL connection using TLSv1.2 / ECDHE-RSA-AES128-GCM-SHA256 * ALPN: server accepted h2 * Server certificate: * subject: CN=*.subdomain-2.subdomain-1.cloudns.ph * start date: Nov 27 00:00:00 2023 GMT * expire date: Dec 25 23:59:59 2024 GMT * subjectAltName: host “web-container-us-east-1.subdomain-2.subdomain-1.cloudns.ph” matched cert’s “*.subdomain-2.subdomain-1.cloudns.ph” * issuer: C=US; O=Amazon; CN=Amazon RSA 2048 M03 * SSL certificate verify ok. * using HTTP/2 * h2 [:method: GET] * h2 [:scheme: https] * h2 [:authority: web-container-us-east-1.subdomain-2.subdomain-1.cloudns.ph] * h2 [:path: /] * h2 [user-agent: curl/8.1.2] * h2 [accept: */*] * Using Stream ID: 1 (easy handle 0x7fe9ef812c00) > GET / HTTP/2 > Host: web-container-us-east-1.subdomain-2.subdomain-1.cloudns.ph > User-Agent: curl/8.1.2 > Accept: */* > < HTTP/2 200 < date: Mon, 27 Nov 2023 15:51:13 GMT < content-type: application/json; charset=utf-8 < content-length: 456 < x-powered-by: Express < etag: W/”1c8-5fXMveo7D3ZfVWsGIbMvSTgSbVQ” < * Connection #0 to host web-container-us-east-1.subdomain-2.subdomain-1.cloudns.ph left intact {“MessageResponse”: “Region: us-east-1. HTTP Response code: 200. Delay response: 0 seconds.”, “SocketRequest”: “::ffff:10.0.2.105:41334”, “HeadersRequest” :{ “x-forwarded-for”: “79.116.196.168”, “x-forwarded-proto”: “https”, “x-forwarded-port”: “443”, “host”: “web-container-us-east-1.subdomain-2.subdomain-1.cloudns.ph”, “x-amzn-trace-id”: “Root=1-6564baf1-477d00c537a7da013a062f76”, “user-agent”: “curl/8.1.2”, “accept”: “*/*”}, “HeadersResponse” :{ “x-powered-by”: “Express”}} |
As we reflect on the deployment process outlined in this blog post, there are opportunities to refine and automate various aspects, contributing to a more seamless and efficient workflow.
Consider adopting a modular approach to deployment by separating the foundational infrastructure (VPC, Fargate Cluster, Route53 DNS Public Zone) from the web container-related resources. Create distinct AWS CDK apps (or even different GitHub repositories) for these components, allowing for independent updates and modifications. This modular structure promotes flexibility and better aligns with continuous integration and continuous deployment (CI/CD) practices.
Streamline the DNS registration process by utilizing AWS Route 53 as the DNS registrar. Instead of manually configuring NS records with external providers, automate the acquisition and management of DNS names directly within the same Cloud provider. Doing so eliminates the need for manual steps, enhancing the overall automation of the infrastructure setup.
Integrate your deployment process with a CI/CD pipeline to automate testing, building, and deploying infrastructure changes. Leverage tools like GitHub Actions or other CI/CD services to ensure a consistent and reliable deployment pipeline. This integration automates the deployment steps and facilitates collaboration and version control.
Review and adopt Infrastructure as Code (IaC) best practices to enhance code maintainability and scalability. Consider versioning your IaC code, implementing code reviews, and documenting changes. This ensures that your infrastructure evolves systematically, aligning with industry standards and making it easier for multiple team members to contribute.
This section offers a quick comparative overview of key AWS services and their counterparts in Azure and Google Cloud Platform (GCP). If you’re considering similar deployments in different cloud providers, this comparison could serve as a starting point for the reader.
| AWS | Azure | GCP | |
| IaC (Infrastructure as Code) | AWS CDK | Pulumi, Terraform CDK | Pulumi, Terraform CDK |
| Networking | Amazon VPC | Azure Virtual Network | Google Virtual Private Cloud (VPC) |
| Container Service | ECS with Fargate | Azure Container Instances (ACI) | Google Kubernetes Engine (GKE) |
| Application Load Balancer | Application Load Balancer (ALB) | Azure Load Balancer | Google Cloud Load Balancing |
| DNS (Domain Name System) | Amazon Route 53 | Azure DNS | Google Cloud DNS |
| Certificate Manager | AWS Certificate Manager (ACM) | Azure Key Vault | Google Cloud Certificate Manager |
Congratulations! You’ve successfully navigated the intricacies of creating a secure public endpoint on AWS using ACM and Route53, mastering the management of a DNS hosted zone with AWS Route 53 and its seamless integration with third-party DNS hosting providers like ClouDNS.
As you’ve reached this milestone, our journey is far from over. With the ability to deploy a web server in one region, we’re now gearing up for a significant enhancement – deploying across multiple regions. This advancement paves the way for our exploration of solutions for region evacuation.
In the upcoming articles, we’re set to delve into key topics such as regional evacuation, failover, and disaster recovery, leveraging diverse approaches and utilizing various AWS products. Here is a quick spoiler:
We’ll also review pros and cons of the previous approaches, and we will finish our blog post series explaining why the previous approaches can completely fail if we don’t address one of the most common HTTP client behaviors (TCP persistent connections).
Stay tuned for a deeper dive into building resilient and highly available applications in the cloud.
