
Agile Architecture
Performance on Amazon AWS 
Michiel Sens 14 Oct, 2012


Today’s server hardware is powerful enough to execute most compute tasks. With common compute resources most (serial) computing challenges can be solved. However, some tasks are very complex and require a different approach. Think of cases that require improved speed and efficiency, ability to handle large datasets and flexibility etc. For this HPC will bring massive parallel computing, cluster and workload managers and high-performance components to the table.
Modern HPC consists of the following components:
In the next chapters this will be translated to AWS resources.
Technically you could design and build your own HPC cluster on AWS, it will work but you will spend time on plumbing and undifferentiated heavy lifting. The real value of cloud is to use higher-level abstraction services. AWS has two services to support your HPC workload.
AWS Batch is a fully managed service that simplifies the running of batch computing workloads across AWS services. It provides a powerful and scalable platform for executing large-scale batch jobs with minimal setup and management overhead. With AWS Batch, there’s no need to install or manage batch computing software, so you can focus your time on analyzing results and solving problems.
AWS Batch consists of the following components:
A job is a unit of work that will be executed as a containerized application on AWS Fargate or Amazon EC2 in your compute environment. Jobs can be artefacts such as Docker container images, shell scripts or regular Linux executables.
AWS Batch job definitions specify how jobs are to be run. Each job references a job definition. The definition includes configuration such as CPU, memory, orchestration type, multi-node parallel execution, execution timeouts, priorities, retry conditions, target nodes, storage volumes, (EKS) container configuration, secrets etc. Last but not least, configure IAM roles and policies. Many of the parameters can be overwritten at runtime.
Initially jobs will be submitted to a job queue. Each AWS account can host multiple queues, which for example can be used to configure high-priority and low-priority queues, each with its own characteristics. Jobs will reside in the queue until they can be scheduled to run in the compute environment.
Compute environments are associated with a job queue (one or more environments per queue and/or one or more queues per environment). Each environment can have different specifications/configuration. Preferably managed compute environments are used. With this AWS Batch will manage capacity and instance types. It can also manage EC2 On-Demand Instances and EC2 Spot Instances on your behalf, selects the right AMI as it uses GPU optimized AMIs for instance types with GPU acceleration. It is also possible to use your own ECS cluster by configuring unmanaged compute environments.
Scheduling policies can be used to configure how jobs in the queue are allocated and how resources are shared between jobs/users.
AWS ParallelCluster is an open-source cluster management tool that simplifies the creation and management of high-performance computing (HPC) clusters. It allows users to set up clusters with a few simple steps, automating the process of provisioning and configuring the necessary resources.
Existing HPC might be familiar with Slurm, a highly configurable open-source workload manager. Slurm is used to manage and submit batch jobs to the cluster. It uses CLI commands like sbatch (submit jobs), salloc (obtain a job allocation) and srun (run a parallel job on cluster). Slurm also manages the compute resources for your cluster. The exact configuration is described in the cluster configuration.
AWS ParallelCluster UI is a web-based user interface to manage clusters. It’s built on serverless services (API Gateway / Lambda) and provides the same functionality as the CLI tool pcluster.
Although most common AWS services can be used in a HPC system, AWS has a few complementary purpose
Lustre is an open-source parallel distributed file system, designed for large-scale cluster computing. It uses different layers: Management Servers, Metadata Servers, Object Storage Servers and Object Storage Targets. By decoupling tasks and providing a set of servers (up to hundred hosts) the architecture can provide a terabyte-per-second scale consumed by thousands of hosts. It provides more scale than traditional network filesystems. Lustre is POSIX-compliant. AWS provides Lustre as a managed service (Amazon FSx for Lustre). Setting up a new cluster and maintaining it requires minimal effort. Data is protected with AWS KMS, encryption in transit, IAM and daily backups to S3 and has AWS Backup Support. Lustre supports Linux clients only.
Elastic Fabric Adapter (EFA) is a type of network interface for Amazon EC2 instances. It uses OS-bypass capabilities and enhances the performance of inter-instance communication that is critical for scaling HPC and machine learning applications. It is optimized to work on the existing AWS network infrastructure and it can scale depending on application requirements. With an EFA, HPC applications use MPI or NCCL to interface with the Libfabric API. The Libfabric API bypasses the operating system kernel and communicates directly with the EFA device to put packets on the network. This reduces overhead and enables the HPC application to run more efficiently. EFA is not a replacement for normal interfaces as it has limitations, for example, it cannot be used to send to outside the subnet.
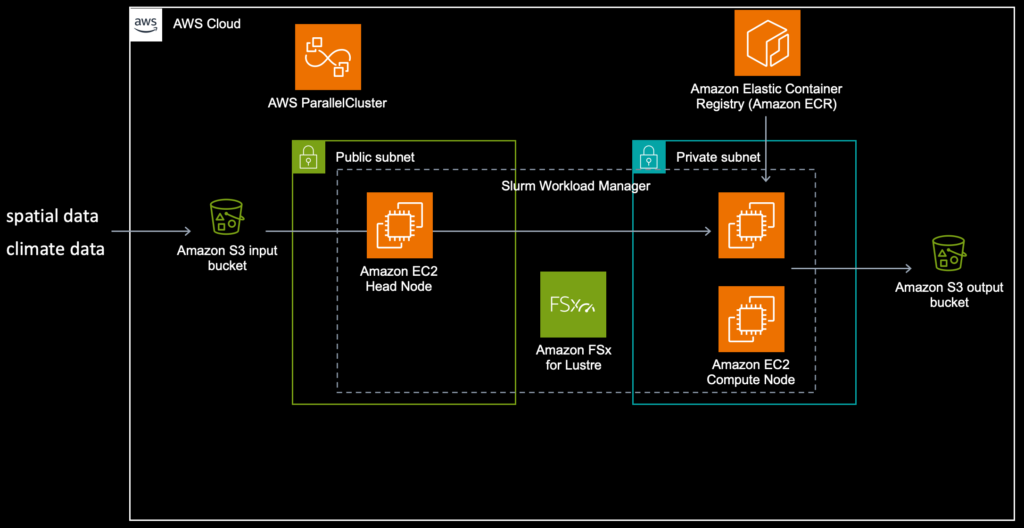
For this blog post we’ll be using AWS ParallelCluster to manage the workload. See solution diagram below for a high-level overview.
Like most other systems that are designed to run on AWS you first need to have some basics in place. Both AWS Batch and AWS ParallelCluster rely on EC2 and networking. This requires a VPC with public and private subnets, access to the Internet (routes/NAT gateway). Important to note is that AWS ParallelCluster requires the VPC options DNS Resolution = yes and DNS Hostnames = yes to be enabled.
It is recommended to run the commands below in a virtualenv. You can run the commands on your local machine or on EC2 in AWS. Before you start make sure you have configured your VPC configuration and your SSH key pair. The pcluster configure command will guide you through a number of questions, such as the VPC subnet id for your head node, maximum size of your cluster, instance types etc. It is self-explanatory of you are aware of the AWS basics. For more information about installing the tools, click here.
$ pip install -U aws-parallelcluster setuptools-rust
$ export AWS_PROFILE=myprofile
$ pcluster configure --config cluster-config.yaml
This will generate a configuration file:
Region: eu-west-1
Image:
    Os: alinux2
HeadNode:
    InstanceType: t2.micro
    Networking:
    SubnetId: subnet-08c245b78a82c3924
    Ssh:
    KeyName: steyn-mbp
Scheduling:
    Scheduler: slurm
    SlurmQueues:
    - Name: queue1
    ComputeResources:
    - Name: t2micro
        Instances:
        - InstanceType: t2.micro
        MinCount: 0
        MaxCount: 10
    Networking:
        SubnetIds:
        - subnet-0b864625631add41e
        - subnet-0053337e5ceeea8f3
        - subnet-035761b17a12851ac
The configuration above is a description of your AWS ParallelCluster and input for your new cluster. For production workloads you need to consider configuring theSharedStoragesection.
Now create the cluster
$ export AWS_PROFILE=myprofile
$ pcluster create-cluster --cluster-name steyn  --cluster-configuration cluster-config.yaml
With the commandlist-clustersyou can view the progress:
$ export AWS_PROFILE=myprofile
$ pcluster list-clusters
{
  "clusters": [
    {
      "clusterName": "steyn",
      "cloudformationStackStatus": "CREATE_IN_PROGRESS",
      "cloudformationStackArn": "arn:aws:cloudformation:eu-west-1:123456789012:stack/steyn/173732e0-16b1-11ee-a432-0ab77f79d7f7",
      "region": "eu-west-1",
      "version": "3.6.0",
      "clusterStatus": "CREATE_IN_PROGRESS",
      "scheduler": {
        "type": "slurm"
      }
    }
  ]
}
Now wait for the clusterStatus to change to CREATE_COMPLETED. This might take a while. Once completed verify that you can signin to your head node:
$ export AWS_PROFILE=myprofile
$ pcluster ssh --cluster-name steyn
[ec2-user@ip-10-0-0-149 ~]$ sinfo
PARTITION AVAIL  TIMELIMIT  NODES  STATE NODELIST
queue1*      up   infinite     10  idle~ queue1-dy-t2micro-[1-10]
Your cluster is now up & running and waiting for jobs to be submitted to the queue. In your EC2 console you now see one active node, the head node.
Let’s start with a simple job to verify that everything is working. Create a simple script named hellojob.sh.
$ cat > hellojob.sh
#!/bin/bash
sleep 30
echo "Hello World from $(hostname)"
Now submit this script to the queue:
$ sbatch hellojob.sh
$ sinfo
Now AWS ParallelCluster will create a compute node for this job. It might take a moment before the compute node is pulling jobs from the queue.
You can view the queue by running squeue:
$ squeue
             JOBID PARTITION     NAME     USER ST   TIME  NODES NODELIST(REASON)
                 1    queue1 hellojob ec2-user  R   0:08      1 queue1-dy-t2micro-2
This job, with jobid 1, is in running state for 0:08 seconds. The column ST is showing the state. When completed it will write the output to the current working directory in a file named after the job id: slurm-1.out.
There are multiple strategies to schedule parallel jobs, the most convenient way is to use job arrays in sbatch. In the next example we will schedule 64 jobs in one array.
$ sbatch --array=0-64 hellojob.sh
$ squeue
             JOBID PARTITION     NAME     USER ST       TIME  NODES NODELIST(REASON)
        20_[40-64]    queue1 hellojob ec2-user PD       0:00      1 (Resources)
             20_30    queue1 hellojob ec2-user  R       0:03      1 queue1-dy-t2micro-1
             20_31    queue1 hellojob ec2-user  R       0:03      1 queue1-dy-t2micro-7
             20_32    queue1 hellojob ec2-user  R       0:03      1 queue1-dy-t2micro-2
             20_33    queue1 hellojob ec2-user  R       0:03      1 queue1-dy-t2micro-8
             20_34    queue1 hellojob ec2-user  R       0:03      1 queue1-dy-t2micro-6
             20_35    queue1 hellojob ec2-user  R       0:03      1 queue1-dy-t2micro-9
             20_36    queue1 hellojob ec2-user  R       0:03      1 queue1-dy-t2micro-3
             20_37    queue1 hellojob ec2-user  R       0:03      1 queue1-dy-t2micro-4
             20_38    queue1 hellojob ec2-user  R       0:03      1 queue1-dy-t2micro-5
             20_39    queue1 hellojob ec2-user  R       0:03      1 queue1-dy-t2micro-10
The results will be written again to your local working directory, but with a different name. The jobid will now be appended by the array index.
ls  | tail
slurm-20_5.out
slurm-20_60.out
slurm-20_61.out
slurm-20_62.out
slurm-20_63.out
slurm-20_64.out
slurm-20_6.out
slurm-20_7.out
slurm-20_8.out
slurm-20_9.outCompute nodes will be terminated by default after 10 minutes of idle time. Watch the EC2 console to check the status. After 10 minutes only the head node should be running.
Now terminate the cluster. These commands have to be executed from your pcluster enviroment.
$ export AWS_PROFILE=myprofile
$ pcluster delete-cluster --cluster-name steyn
$ pcluster list-clusters
{
  "clusters": [
    {
      "clusterName": "steyn",
      "cloudformationStackStatus": "DELETE_IN_PROGRESS",
      "cloudformationStackArn": "arn:aws:cloudformation:eu-west-1:123456789012:stack/steyn/173732e0-16b1-11ee-a432-0ab77f79d7f7",
      "region": "eu-west-1",
      "version": "3.6.0",
      "clusterStatus": "DELETE_IN_PROGRESS",
      "scheduler": {
        "type": "slurm"
      }
    }
  ]
}
Repeat the last command until the status changes. The output will be something like
$ export AWS_PROFILE=myprofile
$ pcluster list-clusters
{
  "clusters": []
}For more convenient access to the cluster, jobs and queues it is recommended to install AWS ParallelCluster UI. This is a serverless web UI that mirrors the pcluster functionality.
The Well-Architected Framework is a strong foundation when designing and building systems on AWS. This framework provides guidance and the possibility for self-assessment. There is a dedicated lens (focus) for HPC workloads, see here.
<span></span>
