

This is the second tutorial in a two-part series. You can also learn how to automate AWS Lambda function deployments to AWS CDK. AWS Cloud Development Kit (AWS CDK) is an open-source framework that allows you to use the programming language you choose to define and deploy your cloud resources. AWS CDK is an infrastructure-as-code (IAC) solution similar to Terraform that lets you use the expressive power of object-oriented programming languages to define your cloud resources. The AWS CDK framework provides libraries in most popular programming languages for all the major AWS services. You can use the AWS CDK framework to easily define a cloud application stack for your entire system. It eliminates context switching and helps accelerate the development process. Developers save time because they don’t need to learn a new programming language or a new tool to benefit from AWS CDK.
In this article, you will learn how AWS CDK can be used to deploy REST APIs with AWS Lambda-based authorizers. We will see how API Gateway constructs can be used to customize the behavior of the API by adding authorizers, usage plans, throttling, rate limiting, etc.
Prerequisites
For this tutorial, you will need to set up NodeJS on your machine since you will be using it to define our AWS CDK application and the AWS Lambda handlers. In addition to it, you will need to install AWS CLI and AWS CDK CLI on your system to configure AWS credentials and to manually build your CDK application respectively. Also, you need to create an AWS account for deploying the application and a CircleCI account for automating the deployments. Refer to this list to set up everything required for this tutorial
- Create a CircleCI account
- Install NodeJS and NPM
- Install AWS CLI
- Configure AWS credentials
- Install AWS CDK CLI
- Create an AWS account
Creating a new AWS CDK project
First, create a new directory for your CDK project and go to it. Run:
mkdir aws-cdk-api-auth-lambda-circle-ci
cd aws-cdk-api-auth-lambda-circle-ci
Next, using the CDK CLI, run the cdk init command to create a new CDK project using Typescript. You will need the AWS CDK CLI installed on your machine before you can execute the command. Follow the links in the prerequisites section of this tutorial for instructions.
cdk init app --language typescript
Executing this command creates a new CDK project with a single stack and a single application.
Note: AWS CDK supports all major programming languages including Typescript, Python, Java, and C#. If you choose to use a different programming language, you can still follow the steps in this tutorial but the syntax would change based on the programming language that you choose.
Adding a NodeJS Lambda function
In this section, you will use NodeJS to define an AWS Lambda function that can be used for proxy integration with AWS API Gateway. API Gateway’s AWS Lambda proxy integration provides a simple and powerful mechanism to build the business logic of an API. The proxy integration allows the clients to call a single AWS Lambda function in the backend whenever a REST API is called through API Gateway.
You will use an AWS Lambda function very similar to the one defined in this tutorial. Just change the request and response objects for your AWS Lambda proxy integration.
Create a lambda directory at the root of the CDK project. Inside the lambda folder, create another folder named processJob. Create a package.json file in the processJob directory for defining the dependencies. Open the package.json file, and add this content:
{
  "name": "circle-ci-upload-csv-lambda-function",
  "version": "0.1.0",
  "dependencies": {
    "csv-stringify": "^6.0.5",
    "fs": "0.0.1-security",
    "uuid": "^8.3.2"
  }
}
This script defines the name of the project and adds a few dependencies that will be used by the Lambda handler.
Go to the processJob folder from the terminal and install the NPM packages:
cd lambda/processJob
npm install
Next, create an index.js file in the processJob. I used the entire code snippet from linked tutorial and modified the request and response objects.
"use strict";

const AWS = require('aws-sdk');
const { v4: uuidv4 } = require('uuid');
var fs = require('fs');
const { stringify } = require('csv-stringify/sync');
AWS.config.update({ region: 'us-west-2' });

var ddb = new AWS.DynamoDB();
const s3 = new AWS.S3();

const TABLE_NAME = process.env.TABLE_NAME;
const BUCKET_NAME = process.env.BUCKET_NAME;

exports.handler = async function (event) {
  try {
    const uploadedObjectKey = generateDataAndUploadToS3();
    const eventBody = JSON.parse(event["body"]);
    const jobId = eventBody["jobId"];
    console.log("event", jobId);
    var params = {
      TableName: TABLE_NAME,
      Item: {
        jobId: { S: jobId },
        reportFileName: { S: uploadedObjectKey },
      },
    };

    // Call DynamoDB to add the item to the table
    await ddb.putItem(params).promise();

    return {
      statusCode: 200,
      headers: { "Content-Type": "application/json" },
      body: JSON.stringify({
        status: "success",
        jobId: jobId,
        objectKey: uploadedObjectKey,
      }),
    };
  } catch (error) {
    throw Error(`Error in backend: ${error}`);
  }
};

const generateDataAndUploadToS3 = () => {
  var filePath = "/tmp/test_user_data.csv";
  const objectKey = `${uuidv4()}.csv`;
  writeCsvToFileAndUpload(filePath, objectKey);
  return objectKey;
};

const uploadFile = (fileName, objectKey) => {
  // Read content from the file
  const fileContent = fs.readFileSync(fileName);

  // Setting up S3 upload parameters
  const params = {
    Bucket: BUCKET_NAME,
    Key: objectKey,
    Body: fileContent,
  };

  // Uploading files to the bucket
  s3.upload(params, function (err, data) {
    if (err) {
      throw err;
    }
    console.log(`File uploaded successfully. ${data.Location}`);
  });
  return objectKey;
};

function writeCsvToFileAndUpload(filePath, objectKey) {
    var data = getCsvData();
    var output = stringify(data);

    fs.writeFileSync(filePath, output);
    // we will add the uploadFile method later
    uploadFile(filePath, objectKey);
}

function getCsvData() {
    return [
      ['1', '2', '3', '4'],
      ['a', 'b', 'c', 'd']
    ];
}
You may be wondering why the request and response object needs to be modified. When the Lambda function is called through API Gateway the request object consists of JSON that includes the request body, HTTP method type, REST API resource path, query parameters, headers, request context, and more:
{
  "body": "{\"jobId\": \"1\"}",
  "path": "/path/to/resource",
  "httpMethod": "POST",
  "isBase64Encoded": false,
  "queryStringParameters": {
    ...
  },
  "headers": {
    ...
  },
  "requestContext": {
    ...
  }
}
The JSON request payload is stringified and set under the body parameter. To extract the payload in your Lambda you need to modify the code like this:
const eventBody = JSON.parse(event["body"]);
const jobId = eventBody["jobId"];
Because the Lambda response would be used as-is by the API Gateway, you need to format the response to a JSON REST API response that includes the status code, status, headers, and response body. Therefore, you stringify and add the actual response under the body parameter of the JSON object as shown here:
{
    "statusCode": 200,
    'headers': {'Content-Type': 'application/json'},
    "body": JSON.stringify({
      "status": "success",
      "jobId": jobId,
      "objectKey": uploadedObjectKey
    })
}
Adding a Lambda authorizer
Now, define another AWS Lambda function that will serve as a custom authorizer. Whenever a client calls the REST API, API Gateway will invoke this Lambda function, passing the Authorization header value to it. The Lambda handler will validate the token sent in the Authorization header and will return an IAM policy statement if the token has adequate permissions. If the token is not authorized to call the REST API, the Lambda handler will return an error response.
Create a lambda/authorizer directory at the root of the CDK project. Inside the authorizer directory add an a package.json file for defining the dependencies. In the package.json define the name of the project and add a few dependencies that will be used by the Lambda handler:
{
  "name": "circle-ci-auth-lambda-function",
  "version": "0.1.0",
  "dependencies": {}
}
Next, create an index.js file in the authorizer directory for the authorizer Lambda handler. Add an empty Lambda handler to it:
exports.handler =  function(event, context, callback) {

};
Before you implement the Lambda handler, you need to define a method that generates the IAM policy statement granting the execute-api:Invoke permission to the REST API that invoked the authorization Lambda.
var generatePolicy = function(principalId, effect, resource) {
    var authResponse = {};

    authResponse.principalId = principalId;
    if (effect && resource) {
        var policyDocument = {};
        policyDocument.Version = '2012-10-17';
        policyDocument.Statement = [];
        var statementOne = {};
        statementOne.Action = 'execute-api:Invoke';
        statementOne.Effect = effect;
        statementOne.Resource = resource;
        policyDocument.Statement[0] = statementOne;
        authResponse.policyDocument = policyDocument;
    }

    return authResponse;
}
Now that you have the generatePolicy function defined you can implement the Lambda handler. The Lambda handler will extract the authorization token from the event parameter and then validate the token. For a valid token, it will call the generatePolicy method to return the appropriate IAM policy.
exports.handler = function (event, context, callback) {
  var token = event.authorizationToken;
  switch (token) {
    case "allow":
      callback(null, generatePolicy("user", "Allow", event.methodArn));
      break;
    case "deny":
      callback(null, generatePolicy("user", "Deny", event.methodArn));
      break;
    case "unauthorized":
      callback("Unauthorized"); // Return a 401 Unauthorized response
      break;
    default:
      callback("Error: Invalid token"); // Return a 500 Invalid token response
  }
};
Now that you have defined your Lambda for the processing job as well as the Lambda for authorization, you can define CDK constructs for the application.
Defining CDK Constructs for the application
AWS CDK Constructs encapsulate the configuration detail and gluing logic for multiple AWS services. CDK provides libraries in most major programming languages.
Replace the contents of lib/aws-cdk-api-auth-lambda-circle-ci-stack.ts file with code that defines the constructs for AWS S3 bucket, AWS Lambda function, and AWS DynamoDB. Use this snippet:
import * as cdk from 'aws-cdk-lib';
import * as s3 from 'aws-cdk-lib/aws-s3';
import * as dynamodb from 'aws-cdk-lib/aws-dynamodb';
import * as lambda from 'aws-cdk-lib/aws-lambda';
import { Construct } from 'constructs';

export class AwsCdkApiAuthLambdaCircleCiStack extends cdk.Stack {
  constructor(scope: Construct, id: string, props?: cdk.StackProps) {
    super(scope, id, props);

    // we will add all the constructs here
    // replace bucket name with a unique name
    const circleCiGwpBucket = new s3.Bucket(this, "CircleCIGwpAuthExampleBucket", {
      bucketName: "<YOUR_BUCKET_NAME>",
    });

    const circleCiGwpTable = new dynamodb.Table(this, "CircleCIGwpAuthExampleTable", {
      tableName: "CircleCIGwpAuthExampleTable",
      partitionKey: { name: "jobId", type: dynamodb.AttributeType.STRING },
    });

    const circleCiGwpLambda = new lambda.Function(
      this,
      "CircleCiGwpProcessJobLambda",
      {
        runtime: lambda.Runtime.NODEJS_14_X,
        handler: "index.handler",
        timeout: cdk.Duration.seconds(30),
        code: lambda.Code.fromAsset("lambda/processJob/"),
        environment: {
          TABLE_NAME: circleCiGwpTable.tableName,
          BUCKET_NAME: circleCiGwpBucket.bucketName
        },
      }
    );

    circleCiGwpBucket.grantPut(circleCiGwpLambda);
    circleCiGwpTable.grantReadWriteData(circleCiGwpLambda);
  }
}
These constructs are the same as those defined in this series’ earlier post, so I won’t go into details about how creating them. These are basic CDK constructs that create a new S3 bucket, a new DynamoDB table, and a Lambda function using the lambda handler defined in the lambda/processJob directory. After defining the constructs, you can grant appropriate IAM permissions to the Lambda function.
Note: AWS S3 bucket names are unique across all AWS accounts so you will need to provide a unique name for your bucket. TABLE_NAME and BUCKET_NAME are passed as environment variables and they would be available for use in the AWS Lambda handler.
Before working on more constructs, here’s what you need to define in the stack:
- A CDK construct to define the authorization Lambda
- An API Gateway
TokenAuthorizerconstruct that uses the authorization Lambda as its handler. - An API Gateway
RestApiconstruct for our service - An API Gateway
LambdaIntegrationconstruct that uses the process job Lambda as its handler.
After you define the Lambda integration construct, you can use it to add a method to your API resource that sets the token authorizer as the authorization handler.
Defining an authorization Lambda
Add a CDK construct to create an AWS Lambda function for custom authorization. Similar to the Lambda function that you defined earlier, the authorization Lambda will also use the NodeJS runtime and will use the code that was defined in the lambda/authorizer directory.
constructor(scope: Construct, id: string, props?: cdk.StackProps) {
  // add this snippet below the existing code
  const circleCiAuthLambda = new lambda.Function(
    this,
    "CircleCiAuthLambda",
    {
      runtime: lambda.Runtime.NODEJS_20_X,
      handler: "index.handler",
      timeout: cdk.Duration.seconds(30),
      code: lambda.Code.fromAsset("lambda/authorizer/"),
    }
  );
}
Defining a token authorizer
To define an API Gateway token authorizer, add a CDK construct for the TokenAuthorizer. The token authorizer uses the authorization Lambda function that you defined earlier.
import * as cdk from 'aws-cdk-lib';
import * as s3 from 'aws-cdk-lib/aws-s3';
import * as dynamodb from 'aws-cdk-lib/aws-dynamodb';
import * as lambda from 'aws-cdk-lib/aws-lambda';
import * as apigateway from 'aws-cdk-lib/aws-apigateway';
import { Construct } from 'constructs';

constructor(scope: Construct, id: string, props?: StackProps) {
  // add this snippet below the existing code
  const circleCiAuthorizer = new apigateway.TokenAuthorizer(this, 'CircleCIGWPAuthorizer', {
    handler: circleCiAuthLambda
  });
}
Defining the REST API service
Define an API Gateway REST API service, providing a name and description for it. You will use this RestApi service to add resources to it.
constructor(scope: Construct, id: string, props?: cdk.StackProps) {
  // add this snippet below the existing code
  const circleCiGwpApi = new apigateway.RestApi(this, "CircleCIGWPAPI", {
    restApiName: "Circle CI GWP API",
    description: "Sample API for Circle CI GWP"
  });
}
You can now add resources to the circleCiGwpApi service. Resources are the actual endpoints that you are creating, excluding the base URL.
constructor(scope: Construct, id: string, props?: cdk.StackProps) {
  // add this snippet below the existing code
  const jobResource = circleCiGwpApi.root.addResource("jobs");
}
Adding a Lambda integration
A Lambda integration integrates an AWS Lambda function to an API Gateway method. You will use the process job Lambda function defined earlier as the handler for the Lambda integration.
constructor(scope: Construct, id: string, props?: cdk.StackProps) {
  // add this snippet below the existing code
  const processJobIntegration = new apigateway.LambdaIntegration(
    circleCiGwpLambda
  );
}
Adding an API Gateway method with Lambda authorizer
Add a POST method to the jobResource and use the authorization Lambda as the auth handler.
constructor(scope: Construct, id: string, props?: cdk.StackProps) {
  // add this snippet below the existing code
  jobResource.addMethod("POST", processJobIntegration, {
    authorizer: circleCiAuthorizer,
    authorizationType: apigateway.AuthorizationType.CUSTOM,
  });
}
Customizing API usage plan
In this section, you will customize the behavior and experience of the REST APIs by defining usage plans, throttling settings, and rate-limiting. The plan uses API keys to identify API clients and who can access the associated API stages for each key.
Here’s what each of these terms means.
- A usage plan specifies who can access the deployed APIs. The usage plan can optionally be set at the method level. API keys are associated with a usage plan and are used to identify the API client who can access the API for each key.
- API keys are string values that can be used to grant access to your API.
- Throttling limits determine the threshold at which the request throttling should begin. It can be set at the API or method level.
Now that you understand the terminology, you can define a usage plan for your API.
constructor(scope: Construct, id: string, props?: cdk.StackProps) {
  // add this snippet below the existing code
  const circleCiUsagePlan = circleCiGwpApi.addUsagePlan('CircleCiUsagePlan', {
    name: 'CircleCiEasyPlan',
    throttle: {
      rateLimit: 100,
      burstLimit: 2
    }
  });
}
This code defines the throttling limits along with the usage plan. The rateLimit refers to the API’s average requests per second over an extended period. The burstLimit refers to the maximum API request rate limit over a time ranging from one to a few seconds. Setting throttling limits is optional and you could choose not to enforce any such limits for your API.
Usage plans require an API key to be associated with it to identify the clients. Add an API key:
constructor(scope: Construct, id: string, props?: cdk.StackProps) {
  // add this snippet below the existing code
  const circleCiApiKey = circleCiGwpApi.addApiKey('CircleCiApiKey');
  circleCiUsagePlan.addApiKey(circleCiApiKey);
}
CircleCiApiKey doesn’t have any association with the CircleCI dashboard. You can use any other name for the API key you require.
Deploying the CDK stack
Now that you have defined the CDK constructs in your stack, you can deploy the application to an AWS account. You will deploy the application manually before automating the deployment using CircleCI. Make sure that you have the AWS CDK CLI installed on your system. You will need to install the AWS CLI and configure access credentials. Follow the links in the prerequisites section if you need help.
Run these commands to bootstrap the application and deploy it:
cdk bootstrap
cdk deploy
When you execute the cdk deploy command, it prompts you to confirm the IAM role/policy changes that would be applied to your account. The terminal will display the base URL of the REST API service that you deployed. Grab this URL and keep it handy; you will use it to test the API in the next section of the tutorial.
Testing the deployed API
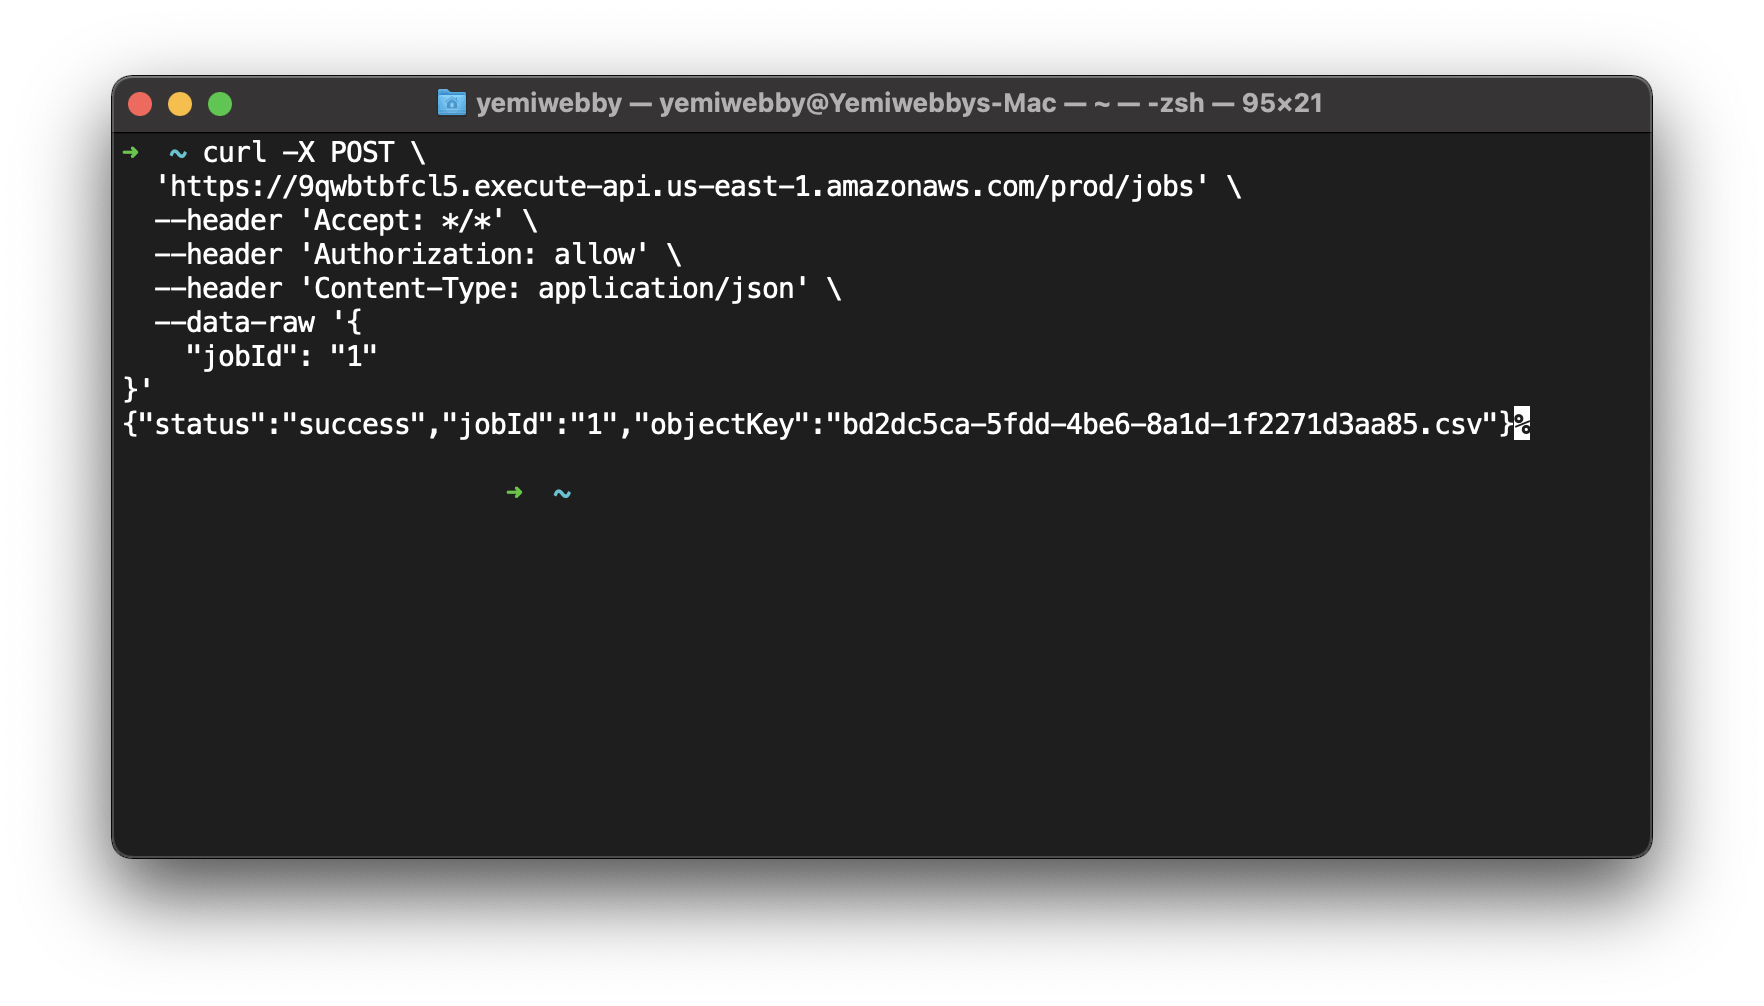
Now that the application has been deployed to your AWS account, test the API by calling the API endpoint using curl. Replace the base URL that you obtained in the previous section in the curl request.
curl -X POST \
  '<base_URL>/jobs' \
  --header 'Accept: */*' \
  --header 'Authorization: allow' \
  --header 'Content-Type: application/json' \
  --data-raw '{
    "jobId": "1"
}'
The Authorization: allow header has been defined to act as the token that will be validated by the authorization Lambda.
On executing the curl request, you should receive a success response.
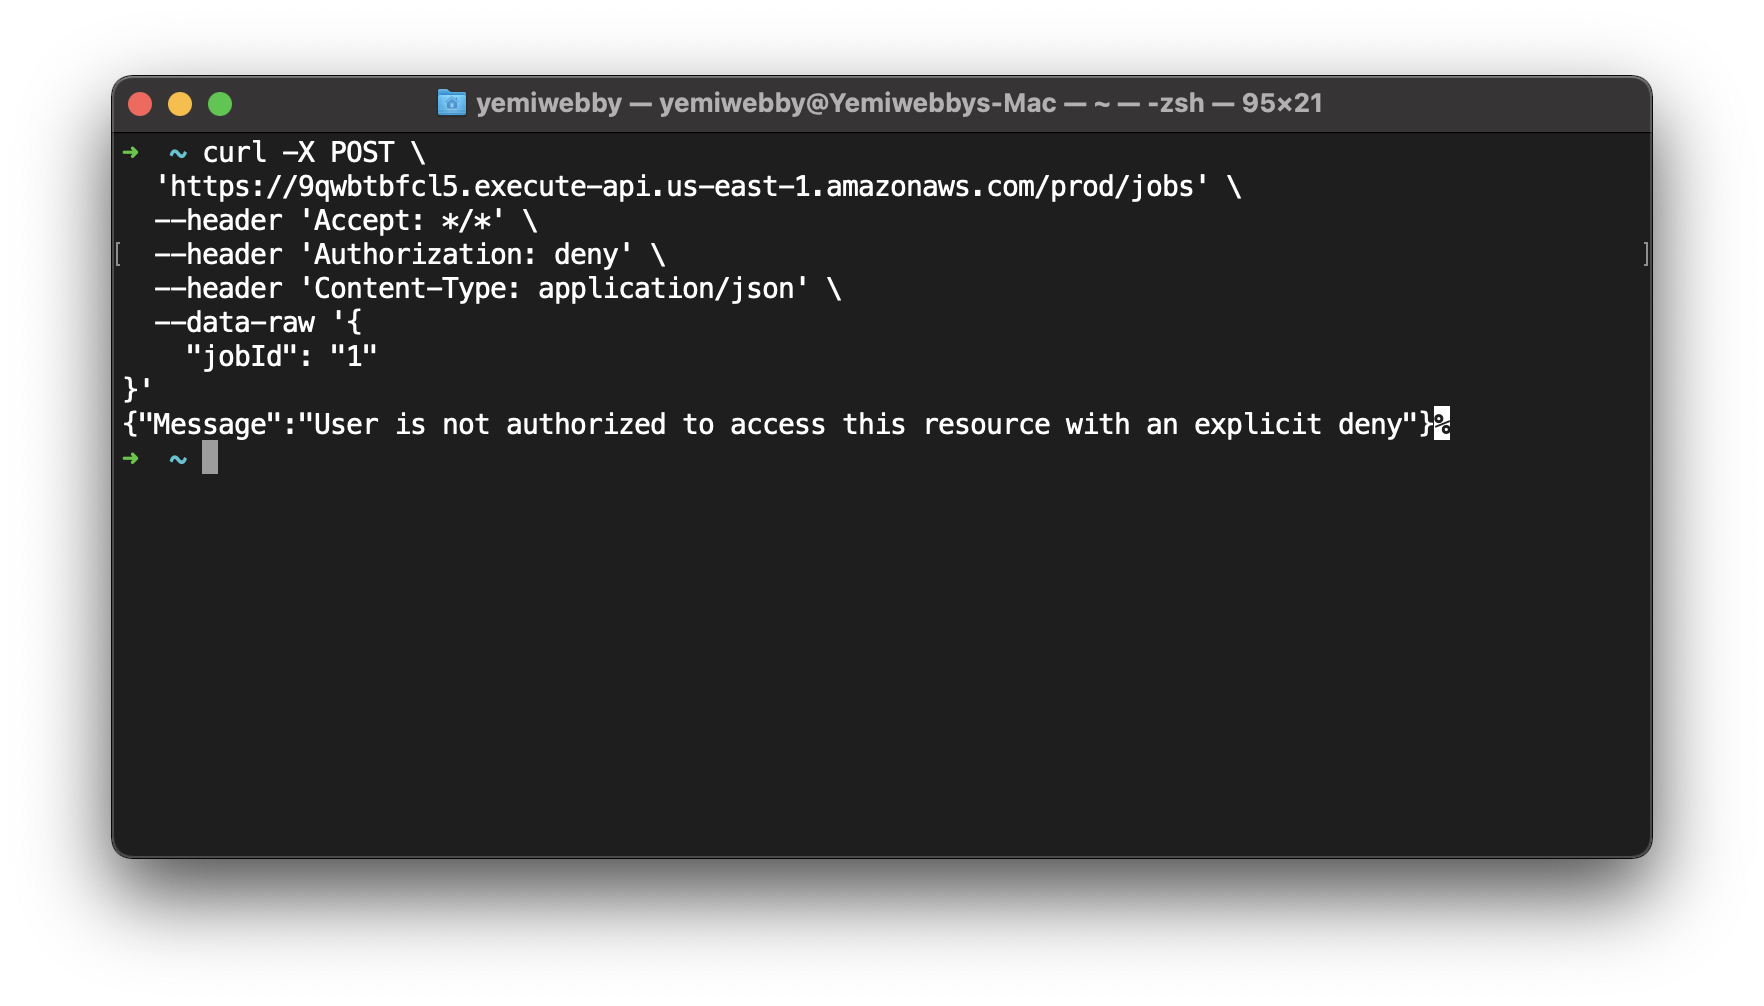
Instead of passing the allow value in the Authorization header, try passing deny or some other value to make sure that the API returns a success response only when it receives a valid token.
curl -X POST \
  '<baseURL>/jobs' \
  --header 'Accept: */*' \
  --header 'Authorization: deny' \
  --header 'Content-Type: application/json' \
  --data-raw '{
    "jobId": "1"
}'
As expected, the API returns an authorized response since the token is not valid.
Automating application deployment using CircleCI
Now that we were able to deploy the CDK application manually using the command line, let us automate the workflow so that the infrastructure changes could be packaged and deployed automatically every time you push code to the main branch. We essentially need to do the following to automate the deployments:
- Update .gitignore
- Update NPM scripts
- Add configuration script
- Create a CircleCI project
- Set up environment variables
Update .gitignore
The code generated by the cdk init command contains a .gitignore file that ignores all .js files by default. Replace the contents of .gitignore with this:
!jest.config.js
*.d.ts
node_modules

# CDK asset staging directory
.cdk.staging
cdk.out
Update NPM scripts
Your CircleCI deployment configuration uses NPM scripts for executing the deploy and diff commands. Add these scripts to the root level package.json file:
// update the aws-cdk-api-auth-lambda-circle-ci/package.json file with the following scripts
{
  ...
  "scripts": {
    ...
    // add the ci_diff and ci_deploy scripts
    "ci_diff": "cdk diff -c env=${ENV:-stg} 2>&1 | sed -r 's/\\x1B\\[([0-9]{1,2}(;[0-9]{1,2})?)?[mGK]//g' || true",
    "ci_deploy": "cdk deploy -c env=${ENV:-stg} --require-approval never"
  },
  ...
}
Adding configuration script
Add a .circleci/config.yml script in the root of the project containing the configuration file for the CI pipeline. Add this code snippet to the config.yml:
version: 2.1

orbs:
  aws-cli: circleci/aws-cli@2.0.6
executors:
  default:
    docker:
      - image: "cimg/node:14.18.2"
    environment:
      AWS_REGION: "us-west-2"
jobs:
  build:
    executor: "default"
    steps:
      - aws-cli/setup:
          aws-access-key-id: AWS_ACCESS_KEY
          aws-secret-access-key: AWS_ACCESS_SECRET
          aws-region: AWS_REGION_NAME
      - checkout
      - run:
          name: 'Install Authorizer lambda packages'
          command: |
            cd lambda/processJob && npm install
      - run:
          name: 'Install Process Job lambda packages'
          command: |
            cd lambda/processJob && npm install
      - run:
          name: "build"
          command: |
            npm install
            npm run build
      - run:
          name: "cdk_diff"
          command: |
            if [ -n "$CIRCLE_PULL_REQUEST" ]; then
              export ENV=stg
              if [ "${CIRCLE_BRANCH}" == "develop" ]; then
                export ENV=prd
              fi
              pr_number=${CIRCLE_PULL_REQUEST##*/}
              block='```'
              diff=$(echo -e "cdk diff (env=${ENV})\n${block}\n$(npm run --silent ci_diff)\n${block}")
              data=$(jq -n --arg body "$diff" '{ body: $body }') # escape
              curl -X POST -H 'Content-Type:application/json' \
                -H 'Accept: application/vnd.github.v3+json' \
                -H "Authorization: token ${GITHUB_TOKEN}" \
                -d "$data" \
                "https://api.github.com/repos/${CIRCLE_PROJECT_USERNAME}/${CIRCLE_PROJECT_REPONAME}/issues/${pr_number}/comments"
            fi
      - run:
          name: "cdk_deploy"
          command: |
            if [ "${CIRCLE_BRANCH}" == "main" ]; then
              ENV=prd npm run ci_deploy
            elif [ "${CIRCLE_BRANCH}" == "develop" ]; then
              ENV=stg npm run ci_deploy
            fi
The CI script utilizes CircleCI’s aws-cli orb for setting AWS configuration (the access key and secret).
The cdk_deploy command checks the branch and accordingly deploys on the prd or stg environment. Note that the cdk_deploy command executes the ci_deploy script defined in the package.json file.
Your pipeline configuration will take care of building, packaging, and deploying the CDK stack to the specified AWS account.
Commit the changes and push your project to GitHub.
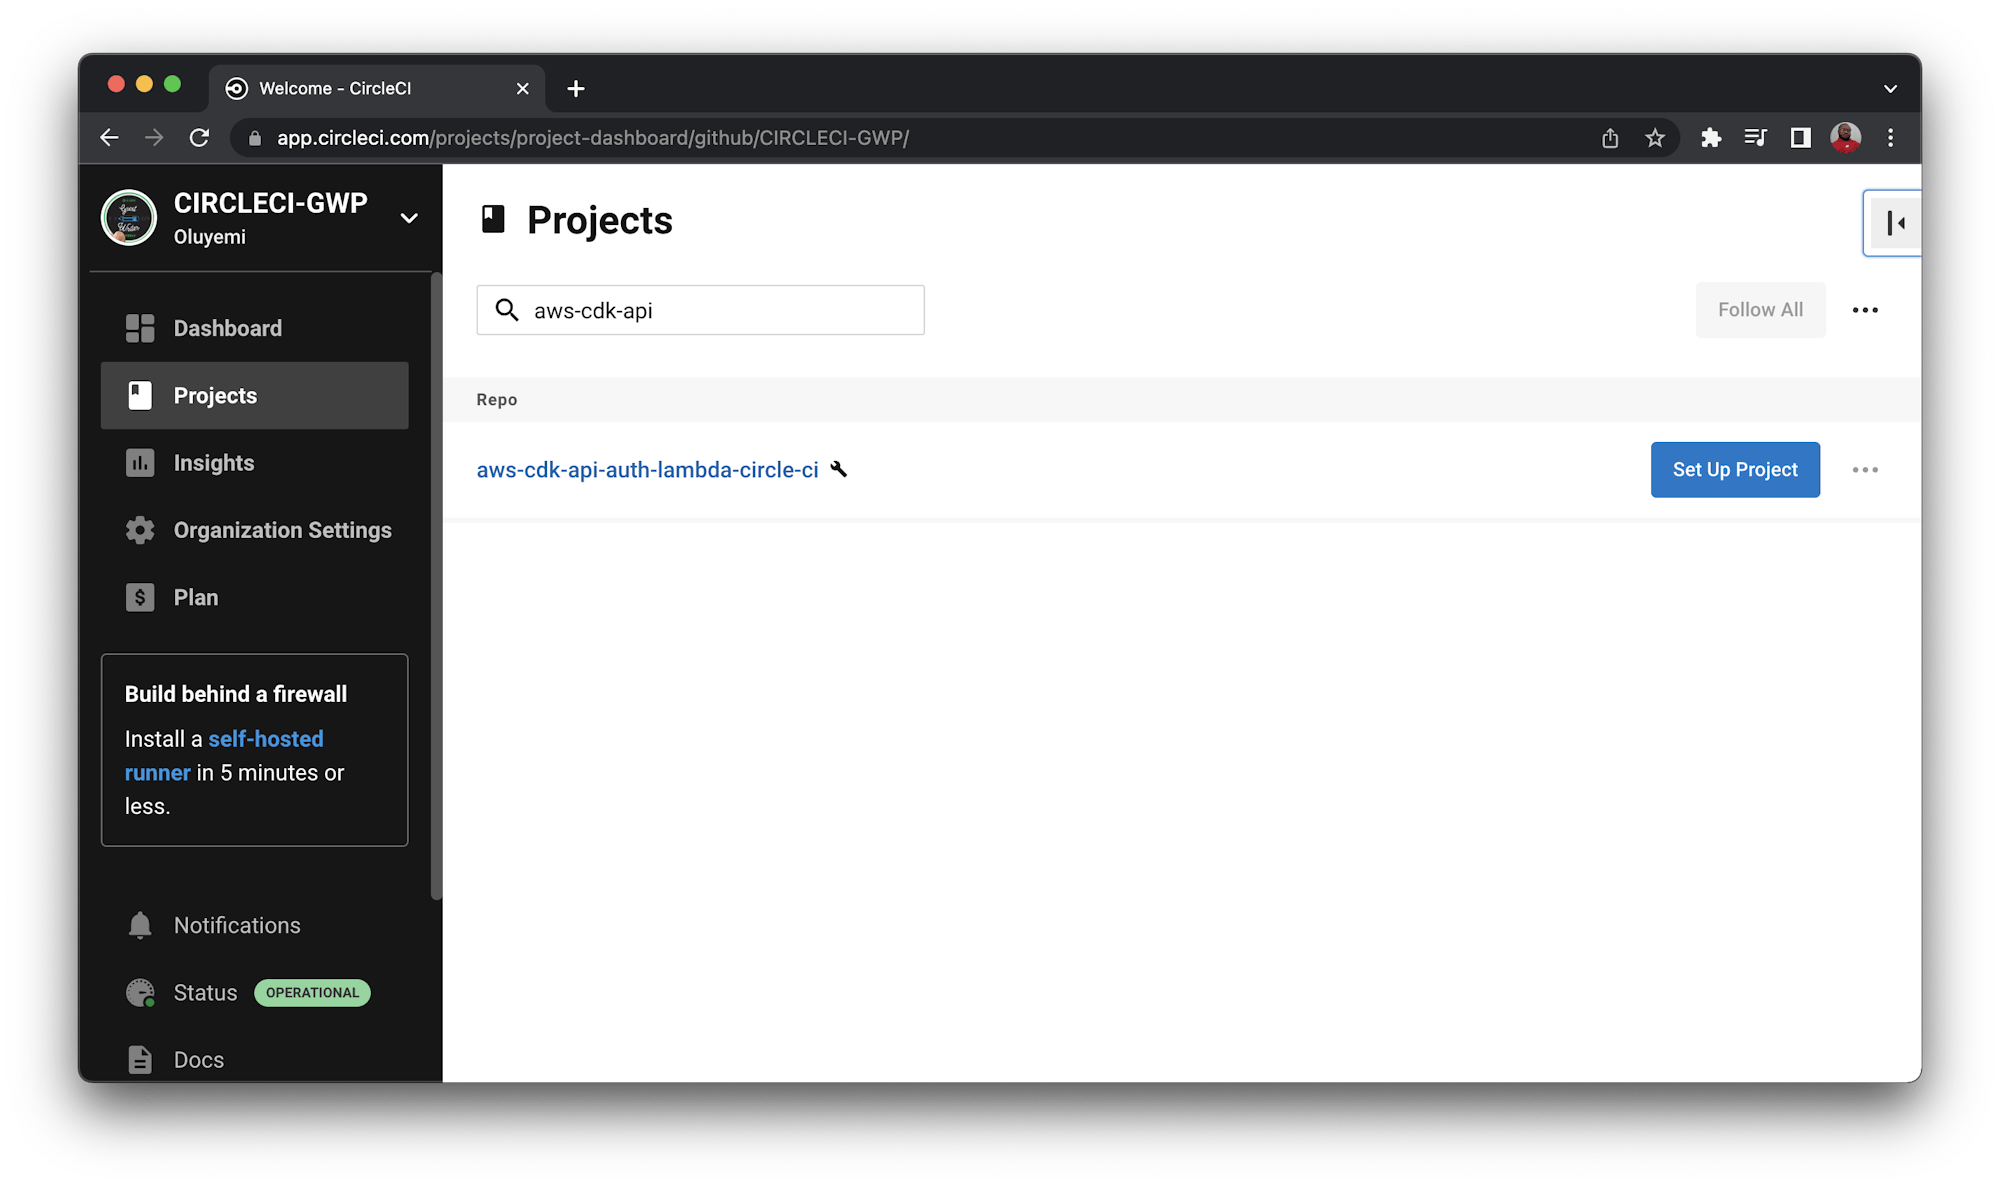
Creating a CircleCI project for the application
Set up the repository as a CircleCI project using the CircleCI console. On the CircleCI console, click the Projects tab and search for the GitHub repo name. Click the Set Up Project button for your project.
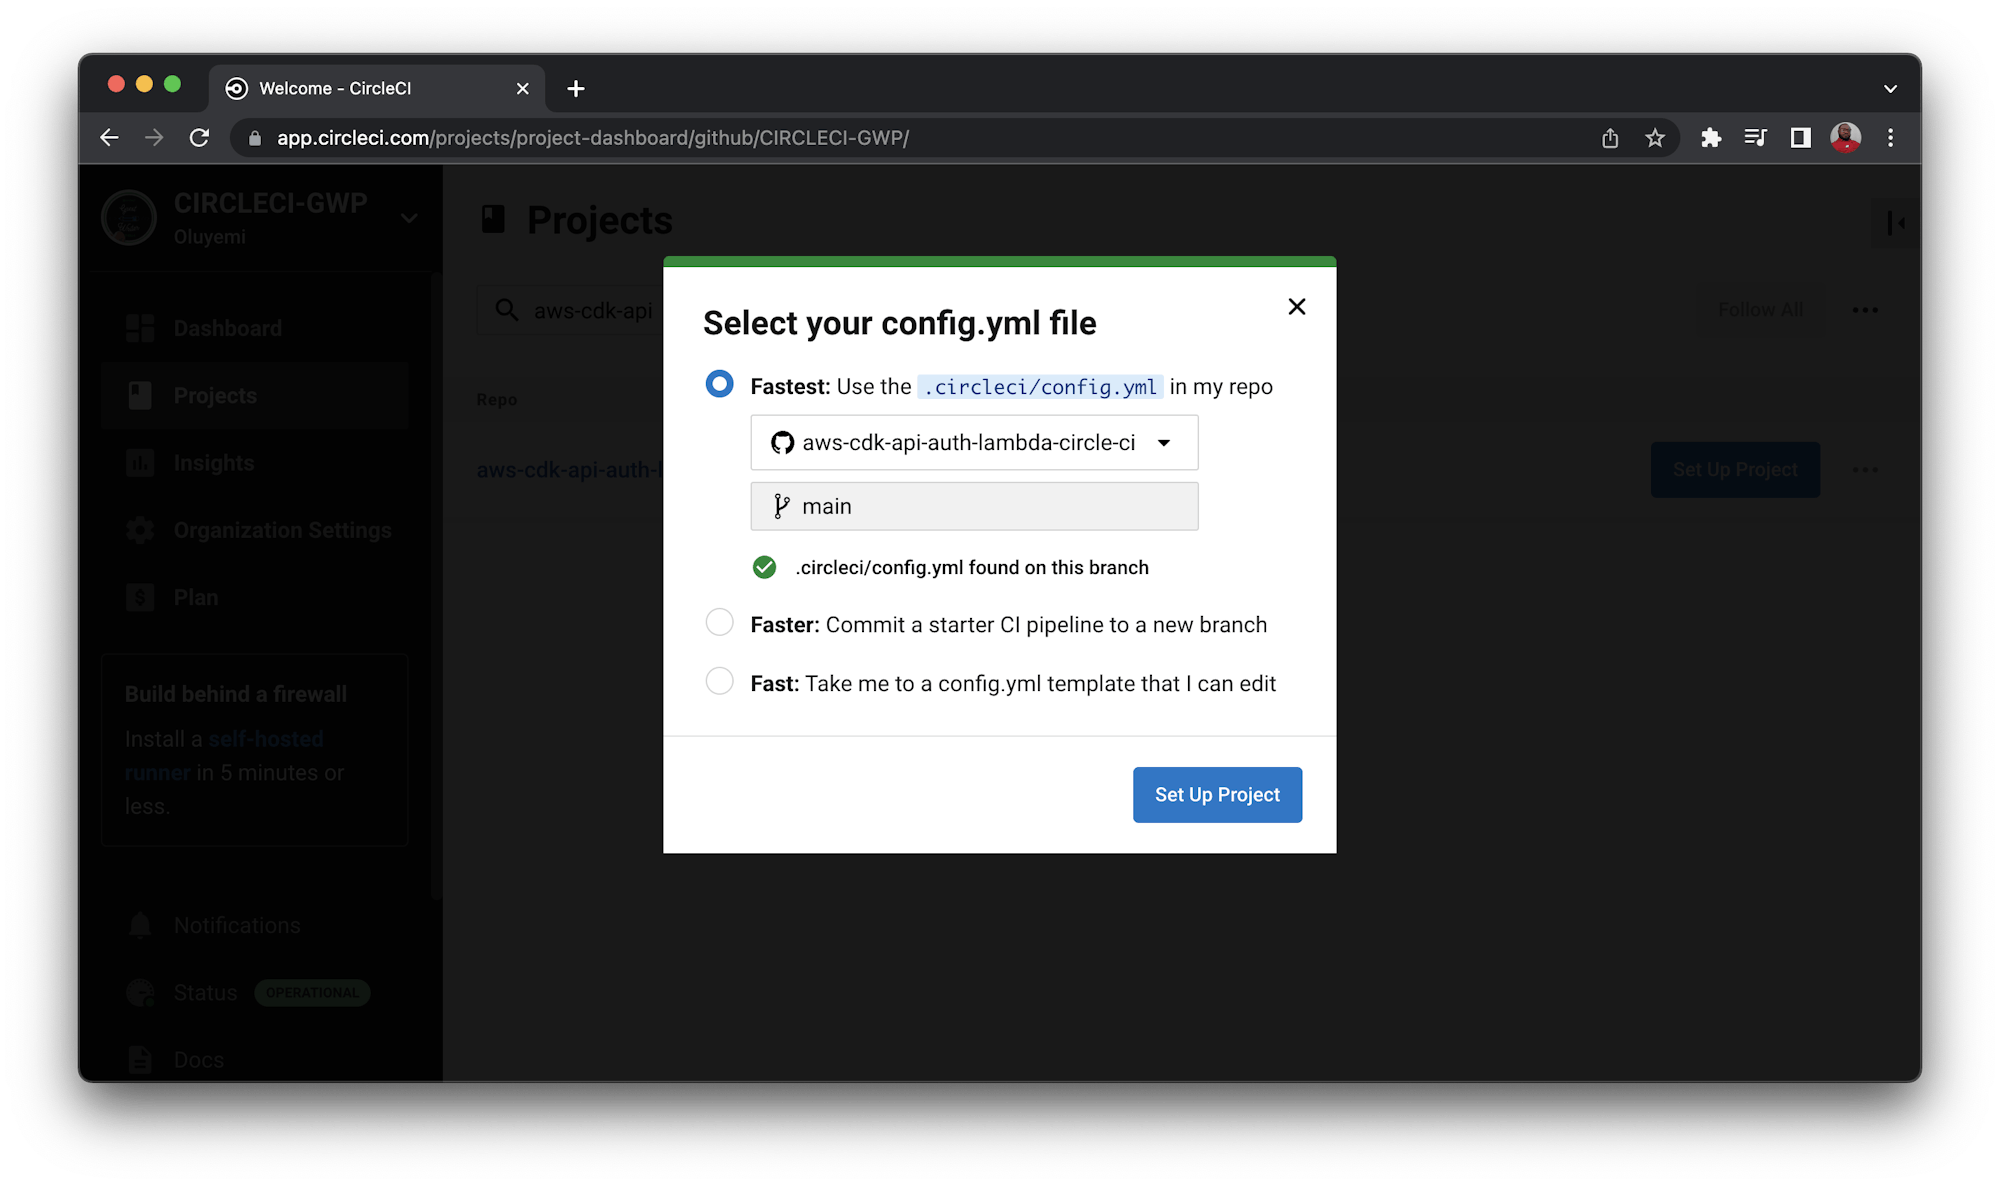
A prompt will ask whether you want to manually add a new configuration file or use an existing one. You have already pushed the required configuration file to the codebase, so select the Fastest option. Enter the name of the branch hosting your configuration file. Click Set Up Project to continue.
Completing the setup will automatically trigger the pipeline. The pipeline will fail in its first run. That’s to be expected because you haven’t defined the environment variables yet.
Setting up environment variables
Click Project settings from the project dashboard and click the Environment variables tab. Click the Add environment variable button to add these environment variables.
AWS_ACCESS_KEYwas obtained from the IAM role page in the AWS console.AWS_ACCESS_SECRETwas obtained from the IAM role page in the AWS console.AWS_REGION_NAMEis the region where you want to deploy your application.
Once you add the environment variables, the dashboard should display the key values.
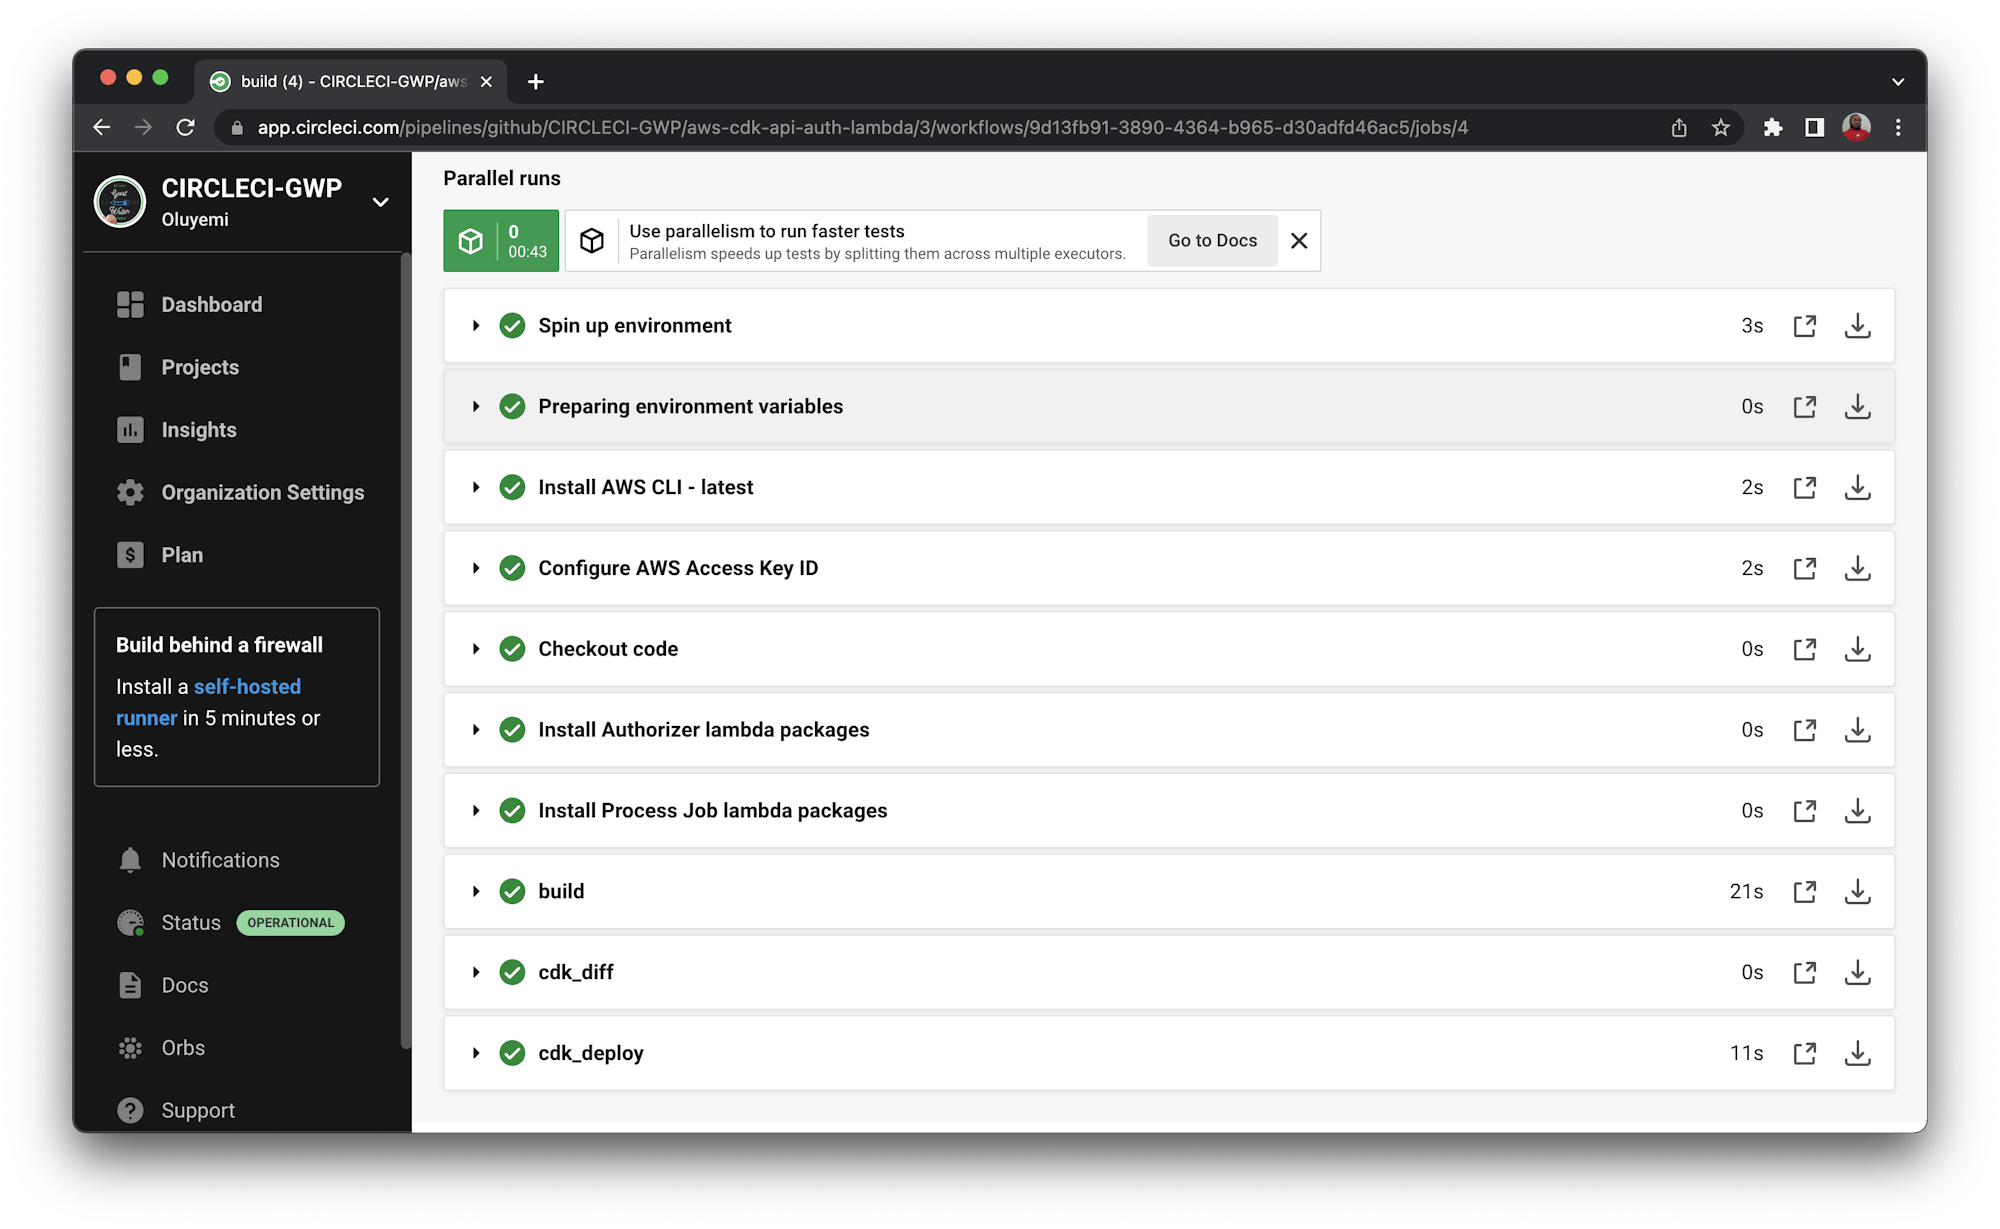
Now that the environment variables are configured, trigger the pipeline again. This time the build should succeed.
Conclusion
In this tutorial, you learned how to use AWS CDK constructs to deploy an application and expose its functionality using REST APIs. CDK can be used to easily plug in a Lambda-based custom authorizer and further customize the application experience by defining usage plans, API keys, and throttling limits. AWS CDK allows you to use familiar tools and programming languages for your IaC code. It also lets you write testable code and integrate the infrastructure code with your existing code review workflows.
Check out the full source code used in this tutorial on GitHub. You can also use the GitHub project as a template if you are trying to define a similar kind of stack.
Vivek Kumar Maskara is a Software Engineer at JP Morgan. He loves writing code, developing apps, creating websites, and writing technical blogs about his experiences. His profile and contact information can be found at maskaravivek.com.


