
Read the other blogs in this series:
- Tutorial 01 – Microservices Architectural Design by using Spring Boot
- Tutorial 02 – Spring Cloud – Netflix Eureka Server
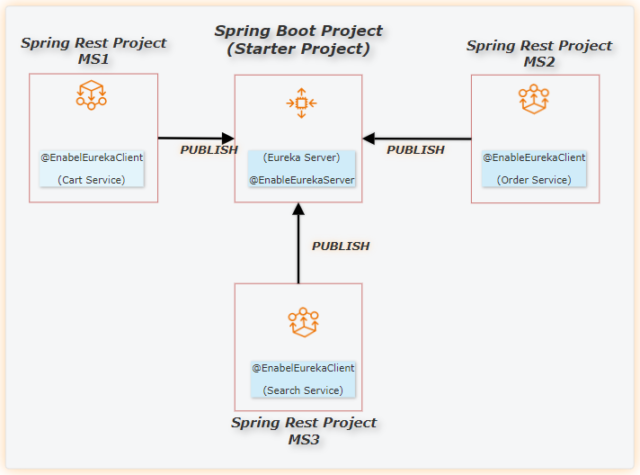
Publish Microservices to the Eureka Server
- Every Microservice must be published/ registered with Eureka Server (R&D Server) by becoming an Eureka Client
- We must create a microservice using Spring Rest Controller to offer support.
The @EnableEurekaClient annotation is not required anymore from spring 3.x onwards. Simply adding spring-cloud-starter-netflix-eureka-client to dependencies will enable the client. If you want to disable it, set the property value of eureka.client.enabled to false.
MS Development and Publishing with Eureka Server
Step 1:
Ensure one Spring Boot project is already developed and running as an Eureka Server. Make sure the Server is running on default port 8761. (Read the previous tutorial to learn how to create an Eureka Server)
Step 2:
Create a Spring Boot Starter project adding Spring We and “EurekaDiscoveryClient” Dependencies.
Step 3:

Place @EnableEurekaClient annotation on the top of the Main class.
package com.limit;

import org.springframework.boot.SpringApplication;
import org.springframework.boot.autoconfigure.SpringBootApplication;
import org.springframework.cloud.client.discovery.EnableDiscoveryClient;
import org.springframework.cloud.netflix.eureka.EnableEurekaClient;

@SpringBootApplication
@EnableEurekaClient
public class CurrencyExchangeServiceApplication {

    public static void main(String[] args) {
        SpringApplication.run(CurrencyExchangeServiceApplication.class, args);
    }

}
Step 4:
Add the following entries in the application.properties file
spring.application.name=currency-exchange-service
server.port = 8000
spring.cloud.config.enabled=false
eureka.client.service-url.default-zone=http://localhost:8761/eureka
Step 5:
- Develop a Rest Controller representing the microservices.
package com.limit.controller;

import org.springframework.http.HttpStatus;
import org.springframework.http.ResponseEntity;
import org.springframework.web.bind.annotation.RequestMapping;
import org.springframework.web.bind.annotation.RestController;

@RestController
@RequestMapping("/api/eureka")
public class CurrencyExchangeController1 {

    public ResponseEntity<String> showMessage() {
        return new ResponseEntity<String>("Welcome to Currency Exchange Microservice", HttpStatus.OK);
    }

}
Step 6:
Run the Microservice Project as a Spring Boot application. This process automatically publishes microservices to the Eureka Server.
Step 7:
Check out the instance section by refreshing the Eureka Server home page at [http://localhost:8761].

Intra Communication between Microservices
- To communicate, two microservices need to be published on the Eureka Server.
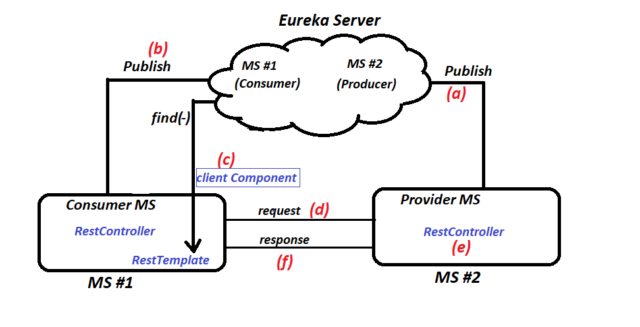
In this case, the Producer and Consumer services will be published to Eureka Server before any interaction occurs.
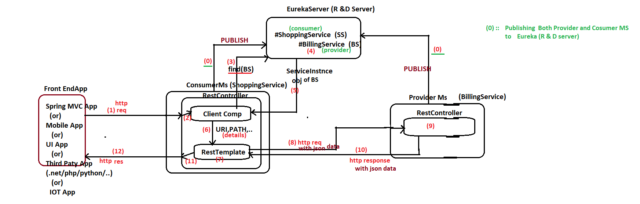
- Through the Eureka Server, the Consumer microservice will locate and obtain the Provider microservice’s details by providing its Service ID during intra-microservice communication. The “Client Component” is a unique component that the Consumer microservice needs to use.
- The Client component or Client type component also helps choose one Provider MS instance among the multiple instances based on Load Factor.
- The work of the client component is to obtain a producer microservice instance from the Eureka Server by supplying its services ID. (If necessary, does Load Balancing).
- Gather Producer microservice data such as URL/URI, method type, PATH, and so on from the Service Instance.
- Passing the above data to the Consumer microservice’s Rest Template to create a Rest Template that sends an HTTP request to the Producer microservice and receives an HTTP response from the Producer microservice.
In the Eureka Server environment, 3 “Client Component” types are possible:
- Discovery Client Component (Legacy, No support for Load Balancing).
- Load Balancer Client Component (Good, Perform Load Balancing).
- Feign Client Component (Best, Support all approached and Load Balancing).
Stay tuned for the next tutorial, which will cover Client Component types.