
In web development, making interfaces look good is vital. Next.js, a popular React framework, requires mastering styling techniques for excellence.
In this blog, we’ll delve into the world of styling in Next.js, focusing on importing global styles, adding styles at the component level, harnessing SASS support, and utilizing CSS-in-JS.
Global Styles
Simply import global styles into different parts of your app, such as layouts, pages, and components. This ensures a consistent look throughout your Next.js project.
To import global styles, create a CSS file (e.g., ‘global.css’) and import it in your ‘layout.js’ file inside the “app” directory.
An Illustration of Utilizing global.css
//Path: src/app/global.css

/* global.css */
body, h1, h2, h3, p {
  margin: 0;
  padding: 0;
}

h1, h2, h3,h4,h5,h6 {
  margin: 0;
}

a {
  color: #3498db;
  text-decoration: none;
}

a:hover {
  text-decoration: underline;
}

input {
  border: 1px solid #ccc;
  padding: 8px;
  border-radius: 4px;
}
In the root layout file (app/layout.js), bring in the global.css stylesheet to extend the styles across all routes in your application:
//Path: src/app/layout.js

import { Inter } from 'next/font/google'
import './globals.css'

const inter = Inter({ subsets: ['latin'] })

export const metadata = {
  title: 'Create Next App',
  description: 'Generated by create next app',
}

export default function RootLayout({ children }) {
  return (
    <html lang="en">
      <body className={inter.className}>{children}</body>
    </html>
  )
}
Any styles defined in ‘global.css’ will be applied across all pages.
Styling Components
Bringing Style to the Individual Level
Global styles maintain consistency, but component-level styles offer precise control over individual elements.
In Next.js, you can apply styles to components using inline styles, external style sheets, or leverage CSS-in-JS libraries.
An Illustration of Utilizing module.css Using Inline Styles
//Path: src/app/Product/page.js

const Page () => {
const cardWrapper = {
display: 'flex',
justifyContent: 'center',
flexDirection: 'column',
alignItems: 'center',
width: '100%',
flexWrap: 'wrap',
background: '#f2f2f2',
};
return
<>
<div className='cardWrapper' style={cardWrapper}> </div>
};
export default Page;
An Illustration of Utilizing module.css Using External Styles
Folder Structure
//Path: src/app/Product/Style/Product.module.css

.card-wrapper {
    display: flex;
    justify-content: center;
    flex-direction: column;
    align-items: center;
    width: 100%;
    flex-wrap: wrap;
    background: #f2f2f2;
}
.card {
    border: 1px solid #dadada;
    background-color: #fff;
    border-radius: 16px;
    flex: 1 1;
    padding: 20px;
    width: 45%;
    margin: 20px;
    overflow: hidden;
    display: flex;
    flex-direction: row;
}
.image .thumbnail {
    width: 300px;
    height: 250px;
  }

  .info {
    padding: 20px;
  }
  .info h1 {
    margin: 0 0 10px;
  }
  .info p {
    margin: 0 0 5px;
  }/*# sourceMappingURL=ProductCard.module.css.map */
//Path: src/app/Product/page.js

"use client"
// Importing the style module into the Product component
import style from './Style/Product.module.css';

const Page = () => {

    return (
        <>
            <div className={style['card-wrapper']}>
                <div className={style['card']}>
                    <div className={style['image']}>
                        <img className={style['thumbnail']} src="https://cdn.dummyjson.com/product-images/1/thumbnail.jpg" alt="Product Thumbnail" />
                    </div>
                    <div className={style['info']}>
                        <h1 className={style['title']}>iPhone</h1>
                        <p className={style['description']}>An apple mobile which is nothing like apple</p>
                        <p className={style['price']}>Price: $549 <span className={style['discount']}>Discount: 12.96%</span></p>
                        <p className={style['rating']}>Rating: 4.69</p>
                        <p className={style['stock']}>Stock: 10</p>
                        <p className={style['category']}>Category: Smartphones</p>
                        <p className={style['brand']}>Brand: Apple</p>
                    </div>
                </div>
            </div>
        </>
    );
};

export default Page;
Make sure the path in the import statement is correct based on the location of your Product.module.css file.
Output
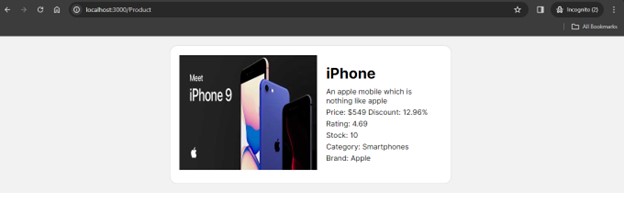
When you build your project, CSS modules combine and organize your styles into compact, separate files. This way, you can load only the styles needed for a specific component or page, improving performance by reducing unnecessary style loads.
SASS Support
Global SASS
You can create global SASS files in your project, such as styles/global.scss. These files will apply styles across your entire application.
Component-level SASS
If you want to scope styles to a specific component, you can use SASS modules. These files should be named with the .module.scss or .module.sass extension. For instance, app/Product/Style/Product.module.scss.
Installing the SASS Package

Before using SASS in your Next.js project, you must install the SASS package. You can do this using npm:
npm install sass
Configuration
Modifying the next.config.js file allows you to customize the behavior of the SASS compiler. For example, you can include paths for your SASS files. This is useful if you have a specific directory structure for your styles.
/** @type (import('next'). NextConfig} */
const path = require('path');
const nextConfig = {
sassOptions: {
},
includePaths: [path.join(__dirname, 'styles')],
};
module.exports = nextConfig;
In this example, the includePaths option specifies additional directories to include when compiling SASS. This option helps you organize and manage your SASS files.
Remember to restart your Next.js development server after making changes to the configuration.
With this setup, you can leverage the power of SASS to write more maintainable and structured styles for your Next.js application.
CSS-in-JS
Next.js embraces CSS-in-JS solutions like styled components or emotion, enabling you to write styles directly in your JavaScript files for a modular and component-driven styling approach.
Install a CSS-in-JS Library
Choose a CSS-in-JS library that suits your preferences. Some popular options are styled components, emotion, and @emotion/styled. Install the library using npm or yarn.
//Example with styled-components
npm install styled-components
Create a Styled Component
Create a new file for your styled component, such as app/Styled/StyledButton.js. Import the CSS-in-JS library and use it to create your styled component.
Folder Structure

//Path: app/Styled/StyledButton.js
import styled from 'styled-components';

const StyledButton = styled.button`
  background-color: #3498db;
  color: #ffffff;
  padding: 10px 20px;
  border: none;
  border-radius: 5px;
  cursor: pointer;

  &:hover {
    background-color: #2980b9;
  }
`;

export default StyledButton;
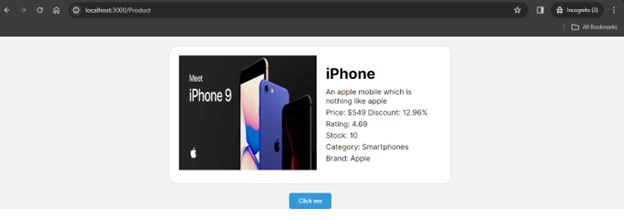
Use the Styled Component in Your Components
I’ve incorporated a button within the Product component and imported a styled component. Now, I’m utilizing this styled component in various pages and components.
//Path: src/app/Product/page.js

"use client"
// Importing the style module into the Product component
import style from './Style/Product.module.css';
// Import and use your styled component in your pages or components
import StyledButton from '../Styled/StyledButton';

const Page = () => {

    return (
        <>
            <div className={style['card-wrapper']}>
                <div className={style['card']}>
                    <div className={style['image']}>
                        <img className={style['thumbnail']} src="https://cdn.dummyjson.com/product-images/1/thumbnail.jpg" alt="Product Thumbnail" />
                    </div>
                    <div className={style['info']}>
                        <h1 className={style['title']}>iPhone</h1>
                        <p className={style['description']}>An apple mobile which is nothing like apple</p>
                        <p className={style['price']}>Price: $549 <span className={style['discount']}>Discount: 12.96%</span></p>
                        <p className={style['rating']}>Rating: 4.69</p>
                        <p className={style['stock']}>Stock: 10</p>
                        <p className={style['category']}>Category: Smartphones</p>
                        <p className={style['brand']}>Brand: Apple</p>
                    </div>
                </div>
                <StyledButton>Click me</StyledButton>
            </div>
        </>
    );
};

export default Page;
Output
Tailwind CSS
1. Install Tailwind CSS
- Install Tailwind CSS and Peer Dependencies
//Run the following npm command in your project directory

npm install -D tailwindcss postcss autoprefixer
- Initialize Tailwind CSS
npx tailwindcss init -p
- After installing Tailwind CSS and its peer dependencies, run the init command to generate configuration files:
- This command generates both tailwind.config.js and postcss.config.js files in your project directory.
That’s it! You’ve successfully installed Tailwind CSS and initialized its configuration files in your project. Now, you can start using Tailwind CSS in your project.
2. Adjust your template path configuration:
Once the installation is complete, you’ll find a “tailwind.config.js” file in your project directory. You can open this file and replace its contents with the following configuration. After making the changes, save the file.
//Path: tailwind.config.js

/** @type {import('tailwindcss').Config} */
module.exports = {
  content: [
    "./app/**/*.{js,ts,jsx,tsx,mdx}",
    "./pages/**/*.{js,ts,jsx,tsx,mdx}",
    "./components/**/*.{js,ts,jsx,tsx,mdx}",

    // Or if using `src` directory:
    "./src/**/*.{js,ts,jsx,tsx,mdx}",
  ],
  theme: {
    extend: {},
  },
  plugins: [],
}
3. Incorporate the Tailwind directives into your CSS code:
Add the @tailwind directives for each of Tailwind’s layers to your “globals.css” file.
Open the global.css file and paste the three lines at the top of this file.
@tailwind base;
@tailwind components;
@tailwind utilities;
4. Initiate your build process
After that, start up our development server again by running- npm run dev
After implementing Tailwind CSS, the screenshot will display a different styling than the “Font Optimization” screenshot. Tailwind removes all default styling, providing complete control over customization.
5. Begin integrating Tailwind into your project
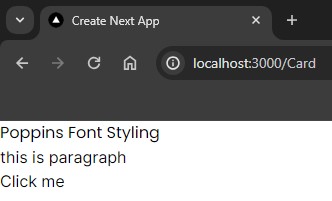
let’s incorporate Tailwind CSS classes to style the <h1> tag and the <button> element.
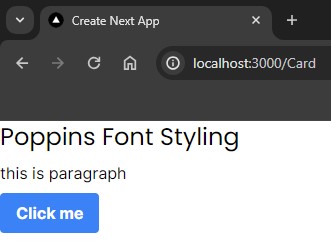
//Path: src/app/Card/page.js
const page = () => {
    return (
        <>
            <h1 className="text-base">Poppins Font Styling</h1>
            <p className="py-2">this is paragraph</p>
            <button className="bg-blue-500 text-white font-bold py-2 px-4 rounded">Click me</button>
        </>

    )
}

export default page
- For the <h1> tag, I’ve added the font-size class.
- The <p> tag remains unchanged.
- The <button> element styling is maintained per your provided classes for background color, text color, font weight, padding, and rounding.
Output
Conclusion
Mastering styling in Next.js involves leveraging global styles, component-level styling, SASS support, CSS-in-JS, and Tailwind CSS. These techniques ensure consistency, modularity, maintainability, and rapid development, enhancing the aesthetics and user experience of Next.js applications.