iOS Centralized and Decoupled Networking: AFNetworking Tutorial with a Singleton Class
The Model-View-Controller (MVC) design pattern is great for the longevity and maintainability of an iOS application’s codebase… but you may find yourself adding similar functions to multiple models as your app grows. In cases such as networking, moving common logic out of your model classes and into singleton helper classes can be a better approach. In this article, I’ll teach you how to set up a centralized singleton networking object that, decoupled from micro-level MVC components, can be reused throughout your application.
The Model-View-Controller (MVC) design pattern is great for the longevity and maintainability of an iOS application’s codebase… but you may find yourself adding similar functions to multiple models as your app grows. In cases such as networking, moving common logic out of your model classes and into singleton helper classes can be a better approach. In this article, I’ll teach you how to set up a centralized singleton networking object that, decoupled from micro-level MVC components, can be reused throughout your application.

James is a veteran, result-driven engineer with 7+ years of C-level experience. He is lead developer of a service with 8 million users.
Expertise
PREVIOUSLY AT

When it comes to iOS architecture patterns, the Model-View-Controller (MVC) design pattern is great for the longevity and maintainability of an application’s codebase. It allows classes to be easily reused or replaced to support various requirements by decoupling them from each other. This helps to maximize the advantages of Object Oriented Programming (OOP).
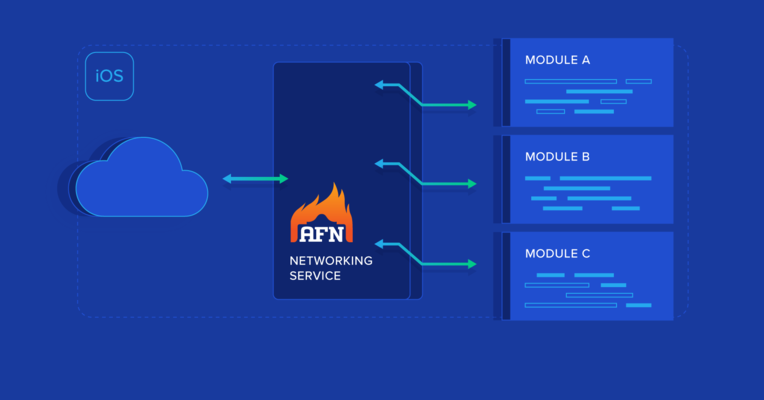
While this iOS application architecture works well on the micro level (individual screens/sections of an app), you may find yourself adding similar functions to multiple models as your app grows. In cases such as networking, moving common logic out of your model classes and into singleton helper classes can be a better approach. In this AFNetworking iOS tutorial, I’ll teach you how to set up a centralized singleton networking object that, decoupled from micro-level MVC components, can be reused throughout your decoupled architecture application.

The Problem with iOS Networking
Apple has done a great job of abstracting many of the complexities of managing mobile hardware in easy to use iOS SDKs, but in some cases, such as networking, Bluetooth, OpenGL, and multimedia processing, classes can be cumbersome due to their goal to keep the SDKs flexible. Thankfully, the rich iOS developer community has created high-level frameworks to simplify most common use cases in an effort to simplify application design and structure. A good programmer, employing ios app architecture best practices, knows which tools to use, why to use them, and when it is better to write your own tools and classes from scratch.
AFNetworking is a great networking example, and one of the most commonly used open source frameworks, which simplifies a developer’s day-to-day tasks. It simplifies RESTful API networking and creates modular request/response patterns with success, progress, and failure completion blocks. This eliminates the need for developer-implemented delegate methods and custom request/connection settings and can be included in any class very quickly.
The Problem with AFNetworking
AFNetworking is great, but its modularity can also lead to its use in fragmented ways. Common inefficient implementations may include:
-
Multiple network requests using similar methods and properties in a single view controller
-
Nearly identical requests in multiple view controllers which lead to distributed common variables that can get out of sync
-
Network requests in a class for data unrelated to that class
For applications with limited numbers of views, few API calls to implement, and ones that aren’t likely to change often, this may not be of great concern. However, more likely you are thinking big and have many years of updates planned. If your case is the latter, you’ll likely end up needing to handle:
-
API versioning to support multiple generations of an application
-
Addition of new parameters or changes to existing parameters over time to expand capability
-
Implementation of totally new APIs
If your networking code is scattered all over your codebase, this is now a potential nightmare. Hopefully, you have at least some of your parameters defined statically in a common header, but even then you may touch a dozen classes for even the most minor changes.
How Do We Address AFNetworking Limitations?
Create a networking singleton to centralize the handling of requests, responses, and their parameters.
A singleton object provides a global point of access to the resources of its class. Singletons are used in situations where this single point of control is desirable, such as with classes that offer some general service or resource. You obtain the global instance from a singleton class through a factory method. – Apple
So, a singleton is a class that you would only ever have one instance of in an application that exists for the life of the application. Additionally, because we know there is only one instance, it is easily accessible by any other class that needs to access its methods or properties.
Here’s why we should use a singleton for networking:
-
It is statically initialized so, once created, it will have the same methods and properties available to any class that attempts to access it. There is no chance for odd synchronization issues or requesting data from the wrong instance of a class.
-
You can limit your API calls to stay under a rate limit (e.g., when you have to keep your API requests under five per second).
-
Static properties such as hostname, port numbers, endpoints, API version, device type, persistent IDs, screen size, etc. can be co-located so one change affects all network requests.
-
Common properties can be reused between many network requests.
-
The singleton object does not take up memory until it is instantiated. This can be useful for singletons with very specific use cases that some users may never need, such as handling casting of video to a Chromecast if they don’t have the device.
-
Network requests can be completely decoupled from views and controllers so they can continue even after views and controllers are destroyed.
-
Network logging can be centralized and simplified.
-
Common events for failure such as alerts can be re-used for all requests.
-
The main structure of such a singleton could be reused on multiple projects with simple top-level static property changes.
Some reasons not to use singletons:
-
They can be overused to provide multiple responsibilities in a single class. For example, video-processing methods could be mixed with networking methods or user state methods. This would likely be a poor design practice and lead to hard-to-understand code. Instead, multiple singletons with specific responsibilities should be created.
-
Singletons cannot be subclassed.
-
Singletons can hide dependencies and thus become less modular. For example, if a singleton is removed and a class was missing an import that the singleton imported, it may lead to future problems (especially if there are external library dependencies).
-
A class can modify shared properties in singletons during long operations that are unexpected in another class. Without proper thought into this, results may vary.
-
Memory leaks in a singleton can become a significant issue since the singleton itself is never de-allocated.
However, using iOS app architecture best practices, these negatives can be alleviated. A few best practices include:
-
Each singleton should handle a single responsibility.
-
Do not use singletons to store data that will be rapidly changed by multiple classes or threads if you need high accuracy.
-
Build singletons to enable/disable features based upon available dependencies.
-
Do not store large amounts of data in singleton properties as they will persist for the life of your application (unless manually managed).
A Simple Singleton Example with AFNetworking
First, as a prerequisite, add AFNetworking to your project. The simplest approach is via Cocoapods and instructions are found on its GitHub page.
While you are at it, I’d suggest adding UIAlertController+Blocks and MBProgressHUD (again easily added with CocoaPods). These are clearly optional but this will greatly simplify progress and alerts should you wish to implement them in the singleton on the AppDelegate window.
Once AFNetworking is added, start by creating a new Cocoa Touch Class called NetworkManager as a subclass of NSObject. Add a class method for accessing the manager. Your NetworkManager.h file should look like the code below:
#import <Foundation/Foundation.h>
#import “AFNetworking.h”

@interface NetworkManager : NSObject

+ (id)sharedManager;

@end
Next, implement the basic initialization methods for the singleton and import the AFNetworking header. Your class implementation should look like the following (NOTE: This assumes you are using Automatic Reference Counting):
#import "NetworkManager.h"

@interface NetworkManager()

@end

@implementation NetworkManager

#pragma mark -
#pragma mark Constructors

static NetworkManager *sharedManager = nil;

+ (NetworkManager*)sharedManager {
    static dispatch_once_t once;
    dispatch_once(&once, ^
    {
        sharedManager = [[NetworkManager alloc] init];
    });
    return sharedManager;
}

- (id)init {
    if ((self = [super init])) {
    }
    return self;
}

@end
Great! Now we are cooking and ready to add properties and methods. As a quick test to understand how to access a singleton, let’s add the following to NetworkManager.h:
@property NSString *appID;

- (void)test;
And the following to NetworkManager.m:
#define HOST @”http://www.apitesting.dev/”
static const in port = 80;

…
@implementation NetworkManager
…

//Set an initial property to init:

- (id)init {
    if ((self = [super init])) {
	self.appID = @”1”;
    }
    return self;
}

- (void)test {
	NSLog(@”Testing out the networking singleton for appID: %@, HOST: %@, and PORT: %d”, self.appID, HOST, port);
}
Then in our main ViewController.m file (or whatever you have), import NetworkManager.h and then in viewDidLoad add:
[[NetworkManager sharedManager] test];
Launch the app and you should see the following in the output:
Testing our the networking singleton for appID: 1, HOST:
http://www.apitesting.dev/, and PORT: 80
Ok, so you likely won’t mix #define, static const, and @property all at once like this but simply showing for clarity your options. “static const” is a better declaration for type safety but #define can be useful in string building since it allows using macros. For what it’s worth, I’m using #define for brevity in this scenario. Unless you are using pointers, there isn’t much in-practice difference between these declaration approaches.
Now that you understand #defines, constants, properties, and methods, we can remove those and move on to more relevant examples.
A Networking Example
Imagine an application where the user must be logged in to access anything. Upon app launch, we’ll check if we’ve saved an authentication token and, if so, perform a GET request to our API to see if the token has expired or not.
In AppDelegate.m, let’s register a default for our token:
+ (void)initialize {
    NSDictionary *defaults = [NSDictionary dictionaryWithObjectsAndKeys:@"", @"token", nil];
    [[NSUserDefaults standardUserDefaults] registerDefaults:defaults];
}
We’ll add a token check to the NetworkManager and get feedback on the check via completion blocks. You can design these completion blocks however you like. In this example, I’m using success with the response object data and failure with the error response string and a status code. Note: Failure may be optionally left out if it doesn’t matter to the receiving side such as incrementing a value in analytics.
NetworkManager.h
Above @interface:
typedef void (^NetworkManagerSuccess)(id responseObject);
typedef void (^NetworkManagerFailure)(NSString *failureReason, NSInteger statusCode);
In @interface:
@property (nonatomic, strong) AFHTTPSessionManager *networkingManager;
- (void)tokenCheckWithSuccess:(NetworkManagerSuccess)success failure:(NetworkManagerFailure)failure;
NetworkManager.m:
Define our BASE_URL:
#define ENABLE_SSL 1
#define HOST @"http://www.apitesting.dev/"
#define PROTOCOL (ENABLE_SSL ? @"https://" : @"http://")
#define PORT @"80"
#define BASE_URL [NSString stringWithFormat:@"%@%@:%@", PROTOCOL, HOST, PORT]
We’ll add a few helper methods to make authenticated requests simpler as well as parsing errors (this example uses a JSON web token):
- (AFHTTPSessionManager*)getNetworkingManagerWithToken:(NSString*)token {
    if (self.networkingManager == nil) {
        self.networkingManager = [[AFHTTPSessionManager alloc] initWithBaseURL:[NSURL URLWithString:BASE_URL]];
        if (token != nil && [token length] > 0) {
            NSString *headerToken = [NSString stringWithFormat:@"%@ %@", @"JWT", token];
            [self.networkingManager.requestSerializer setValue:headerToken forHTTPHeaderField:@"Authorization"];
            // Example - [networkingManager.requestSerializer setValue:@"application/json" forHTTPHeaderField:@"Content-Type"];
        }
        self.networkingManager.requestSerializer = [AFJSONRequestSerializer serializer];
        self.networkingManager.responseSerializer.acceptableContentTypes = [self.networkingManager.responseSerializer.acceptableContentTypes setByAddingObjectsFromArray:@[@"text/html", @"application/json", @"text/json"]];
        self.networkingManager.securityPolicy = [self getSecurityPolicy];
    }
    return self.networkingManager;
}

- (id)getSecurityPolicy {
    return [AFSecurityPolicy defaultPolicy];
    /* Example - AFSecurityPolicy *policy = [AFSecurityPolicy policyWithPinningMode:AFSSLPinningModeNone];
    [policy setAllowInvalidCertificates:YES];
    [policy setValidatesDomainName:NO];
    return policy; */
}

- (NSString*)getError:(NSError*)error {
    if (error != nil) {
        NSData *errorData = error.userInfo[AFNetworkingOperationFailingURLResponseDataErrorKey];
        NSDictionary *responseObject = [NSJSONSerialization JSONObjectWithData: errorData options:kNilOptions error:nil];
        if (responseObject != nil && [responseObject isKindOfClass:[NSDictionary class]] && [responseObject objectForKey:@"message"] != nil && [[responseObject objectForKey:@"message"] length] > 0) {
            return [responseObject objectForKey:@"message"];
        }
    }
    return @"Server Error. Please try again later";
}
If you added MBProgressHUD, it can be used here:
#import "MBProgressHUD.h"

@interface NetworkManager()

@property (nonatomic, strong) MBProgressHUD *progressHUD;

@end

…

- (void)showProgressHUD {
    [self hideProgressHUD];
    self.progressHUD = [MBProgressHUD showHUDAddedTo:[[UIApplication sharedApplication] delegate].window animated:YES];
    [self.progressHUD removeFromSuperViewOnHide];
    self.progressHUD.bezelView.color = [UIColor colorWithWhite:0.0 alpha:1.0];
    self.progressHUD.contentColor = [UIColor whiteColor];
}

- (void)hideProgressHUD {
    if (self.progressHUD != nil) {
        [self.progressHUD hideAnimated:YES];
        [self.progressHUD removeFromSuperview];
        self.progressHUD = nil;
    }
}
And our token check request:
- (void)tokenCheckWithSuccess:(NetworkManagerSuccess)success failure:(NetworkManagerFailure)failure {
    NSUserDefaults *defaults = [NSUserDefaults standardUserDefaults];
    NSString *token = [defaults objectForKey:@"token"];
    if (token == nil || [token length] == 0) {
        if (failure != nil) {
            failure(@"Invalid Token", -1);
        }
        return;
    }
    [self showProgressHUD];
    NSMutableDictionary *params = [NSMutableDictionary dictionary];
    [[self getNetworkingManagerWithToken:token] GET:@"/checktoken" parameters:params progress:nil success:^(NSURLSessionTask *task, id responseObject) {
        [self hideProgressHUD];
        if (success != nil) {
            success(responseObject);
        }
    } failure:^(NSURLSessionTask *operation, NSError *error) {
        [self hideProgressHUD];
        NSString *errorMessage = [self getError:error];
        if (failure != nil) {
            failure(errorMessage, ((NSHTTPURLResponse*)operation.response).statusCode);
        }
    }];
}
Now, in the ViewController.m viewWillAppear method, we’ll call this singleton method. Notice the simplicity of the request and the tiny implementation on the View Controller side.
    [[NetworkManager sharedManager] tokenCheckWithSuccess:^(id responseObject) {
        // Allow User Access and load content
        //[self loadContent];
    } failure:^(NSString *failureReason, NSInteger statusCode) {
        // Logout user if logged in and deny access and show login view
        //[self showLoginView];
    }];
That’s it! Notice how this snippet could be used virtually in any application that needs to check authentication on launch.
Similarly, we can handle a POST request for login: NetworkManager.h:
- (void)authenticateWithEmail:(NSString*)email password:(NSString*)password success:(NetworkManagerSuccess)success failure:(NetworkManagerFailure)failure;
NetworkManager.m:
- (void)authenticateWithEmail:(NSString*)email password:(NSString*)password success:(NetworkManagerSuccess)success failure:(NetworkManagerFailure)failure {
    if (email != nil && [email length] > 0 && password != nil && [password length] > 0) {
        [self showProgressHUD];
        NSMutableDictionary *params = [NSMutableDictionary dictionary];
        [params setObject:email forKey:@"email"];
        [params setObject:password forKey:@"password"];
        [[self getNetworkingManagerWithToken:nil] POST:@"/authenticate" parameters:params progress:nil success:^(NSURLSessionTask *task, id responseObject) {
            [self hideProgressHUD];
            if (success != nil) {
                success(responseObject);
            }
        } failure:^(NSURLSessionTask *operation, NSError *error) {
            [self hideProgressHUD];
            NSString *errorMessage = [self getError:error];
            if (failure != nil) {
                failure(errorMessage, ((NSHTTPURLResponse*)operation.response).statusCode);
            }
        }];
    } else {
        if (failure != nil) {
            failure(@"Email and Password Required", -1);
        }
    }
}
We can get fancy here and add alerts with AlertController+Blocks on the AppDelegate window or simply send failure objects back to the view controller. Additionally, we could save the user credentials here or instead let the view controller handle that. Usually, I implement a separate UserManager singleton that handles credentials and permissions that can communicate with the NetworkManager directly (personal preference).
Once again, the view controller side is super simple:
- (void)loginUser {
    NSString *email = @"test@apitesting.dev";
    NSString *password = @"SomeSillyEasyPassword555";
    [[NetworkManager sharedManager] authenticateWithEmail:email password:password success:^(id responseObject) {
        // Save User Credentials and show content
    } failure:^(NSString *failureReason, NSInteger statusCode) {
        // Explain to user why authentication failed
    }];
}
Oops! We forgot to version the API and send the device type. Additionally, we’ve updated the endpoint from “/checktoken” to “/token”. Since we centralized our networking, this is super easy to update. We don’t need to dig through our code. Since we’ll use these parameters on all requests, we’ll create a helper.
#define API_VERSION @"1.0"
#define DEVICE_TYPE UI_USER_INTERFACE_IDIOM() == UIUserInterfaceIdiomPad ? @"tablet" : @"phone"

- (NSMutableDictionary*)getBaseParams {
    NSMutableDictionary *baseParams = [NSMutableDictionary dictionary];
    [baseParams setObject:@"version" forKey:API_VERSION];
    [baseParams setObject:@"device_type" forKey:DEVICE_TYPE];
    return baseParams;
}
Any number of common parameters can easily be added to this in the future. Then we can update our token check and authenticate methods like so:
…
    NSMutableDictionary *params = [self getBaseParams];
    [[self getNetworkingManagerWithToken:token] GET:@"/checktoken" parameters:params progress:nil success:^(NSURLSessionTask *task, id responseObject) {
…

…
        NSMutableDictionary *params = [self getBaseParams];
        [params setObject:email forKey:@"email"];
        [params setObject:password forKey:@"password"];
        [[self getNetworkingManagerWithToken:nil] POST:@"/authenticate" parameters:params progress:nil success:^(NSURLSessionTask *task, id responseObject) {
Wrapping Up Our AFNetworking Tutorial
We’ll stop here but, as you can see, we’ve centralized common networking parameters and methods in a singleton manager, which has greatly simplified our view controller implementations. Future updates will be simple and fast and, most importantly, it decouples our networking from the user experience. Next time the design team asks for a UI/UX overhaul, we will know our job is already done on the networking side!
In this article we focused on a networking singleton but these same principles could be applied to many other centralized functions such as:
- Handling user state and permissions
- Routing of touch actions to app navigation
- Video & Audio Management
- Analytics
- Notifications
- Peripherals
- and much much more…
We also focused on an iOS application architecture but this could just as easily be extended to Android and even JavaScript. As a bonus, by creating highly defined and function-oriented code, it makes porting apps to new platforms a much quicker task.
To sum up, by spending a little extra time in early project planning to establish key singleton methods, like the networking example above, your future code can be cleaner, simpler, and more maintainable.
Further Reading on the Toptal Blog:
Understanding the basics
What is AFNetworking?
AFNetworking is an open source networking library for iOS and macOS that simplifies a developer’s tasks with a RESTful networking API and creates modular request/response patterns with success, progress, and failure completion blocks. It has a very active developer community and is used in some of the best apps.
What is a singleton object?
A singleton object is a class that you would only ever have one instance of in an application that exists for the life of the application. Additionally, because we know there is only one instance, it is easily accessible by any other class that needs to access its methods or properties.
James Cahall
Carlsbad, CA, United States
Member since October 17, 2016
About the author
James is a veteran, result-driven engineer with 7+ years of C-level experience. He is lead developer of a service with 8 million users.
Expertise
PREVIOUSLY AT