Quality Assurance Testing Perfected: A User Flow Tutorial
As products and services deploy faster and faster, quality assurance (QA) has to adapt and deliver more coverage in less time while maintaining high quality.
In this article, Toptal Software Engineer Jade Russel Hancox examines how we can use the user flow to boost the speed and efficiency of QA processes without compromising on quality.

Jade is an award-winning quality assurance professional with extensive experience in manual QA and the automation of APIs, UIs, and databases.
Expertise
PREVIOUSLY AT

As products and services deploy faster and faster, quality assurance (QA) has to adapt to the evolving environment, sometimes achieving the same level of coverage in a shorter period of time. How do we avoid the mistake of Quantity over Quality? How do we cover more, increase efficiency, and still be effective in our work?
We all know test cases take a long time to create. We have to apply different techniques, test types, and document preconditions, steps, and expected results. Additionally, we have to create a test plan.
Quality assurance specialists often find themselves out of time, especially when they try to accomplish all the phases in the QA process. The biggest headache is the test planning and design phase, revolving around test case creation and test documentation. It can take hours, sometimes even days of effort to get all the work done, and usually, they choose to skip certain deliverables and summarize instead, leaving out important information that can lead to a test being forgotten. That also results in losing the benefit of knowledge sharing.
Traditional QA Testing Meets User Flow
I am a big fan of traditional test cases and test plans. They not only help identify tons of test cases but they also document the product really well. You can use them in training, and any person on the team understands them. You do not have to overly rely on experience for somebody to begin testing. Test plans have further information such as detailing the scope, the test items, the features you are testing, and those you are not. There is also a risk analysis that goes into the test plan. These are just some of the benefits, however, the overall time it takes is too long in many cases.
The purpose of a test plan is a way of communication and an agreement between project stakeholders. It helps detail the objectives, resources required, and any approach or strategy for testing the product. The plan helps ensure everything is being thought of and provides stakeholders with confidence the quality assurance process is strategically invested. There is no concrete rule that this plan must be 10 pages long. We can redefine it to fit a fast-paced team.
The alternative is to streamline the traditional test cases and test plan in a way that cuts down the time investment required but delivers the same, if not more, coverage and documentation that makes sense to all stakeholders. This involves a single source of truth, a user flow with a twist. By structuring and maintaining a user flow, you will have the bulk of your test case design already done for you. This can be applied to any product or team and is versatile in its way of detail and structure.
Using the flow method will help you achieve a faster turnaround time with your test documentation. This is not only for manual QA but for automation as well. The flow can also contribute to some sections of the test plan.
Going with the Flow
Without further delay, let us dive right into building a user flow for a simple messaging website.
We will first need a free mind mapping tool. I personally use XMind. Feel free to download any tool you are comfortable with—we will only be using basic features such as drawing out a flow diagram, adding “notes” to some of the topics, coloring different conditions, and using labels.
Our first step is to understand the product. Usually, you will reference mock-up images or wireframes. If none of these is available, a quick catch-up call with a developer will yield exactly what screens to expect. Feel free to follow along and practice as we proceed. The flow is not only limited to a user interface and can also be used to map out API-to-API calls, database diagrams, dependency structures, and more. The same principles apply.
Conditions, States, Actions
We restrict our flow by using only three actors. You will have a Condition, which is like a user with a particular role, a cleared cache, or a user logging in for the first time. Secondly, we have a State/Page, which is an actual GUI component, like a homepage or a sign-in window. Next comes the Action, which is a physical user interaction that causes the state to change. Let us see this in action.
Analyzing the Requirements
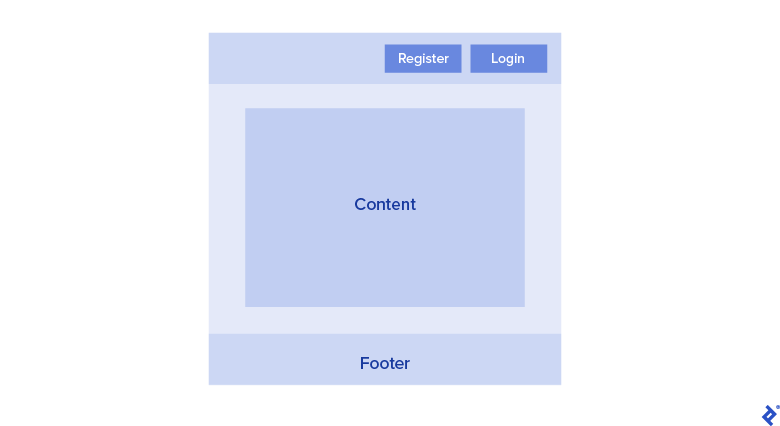
This is our homepage, which is the State. We have two possible Actions: Register and Login.
Then, we have the Sign In window, another State. The actions here are Back and Login. Note we do not classify the input fields as actions. You are more than welcome to do this. In my experience, I have found that when working on complex systems that run a few tenths deep, it gets a bit difficult to maintain, but for simple applications, it can be a great fit.

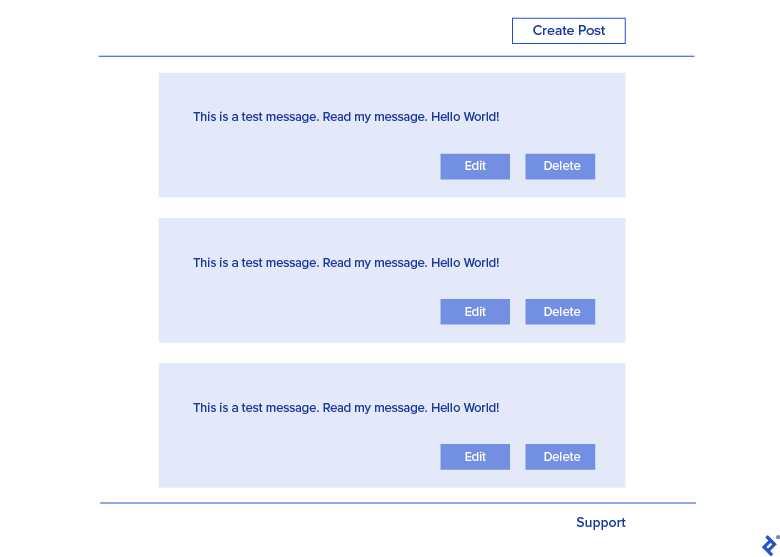
Lastly, we come to the dashboard the user will land on when they have successfully signed in. Here, we have three actions—we can Create, Edit, or Delete a message.
We now have enough information to begin the user flow. Let us summarize what we have. We note down the states of the product. From what we can see, there are four pages:
- Homepage
- Login Window
- Register Window
- Dashboard
We write down our actions on each page/state that can be “interacted” with:
-
Homepage
- Login
- Register
-
Login Window
- Sign in
- Cancel
-
Register Window
- TBD (depends on product)
-
Dashboard
- Create
- Edit
- Delete
We start with the Product Name, which can be changed to adapt to your environment, but this fits most teams and their products and also provides a good starting point. Below, we will notice a question mark next to Register.
Many times, you will come across a component in Agile that is not yet in scope or planned for a future release. Take note of its existence, but leave it as an unknown until we get more information.
Drawing Out the Flow Diagram
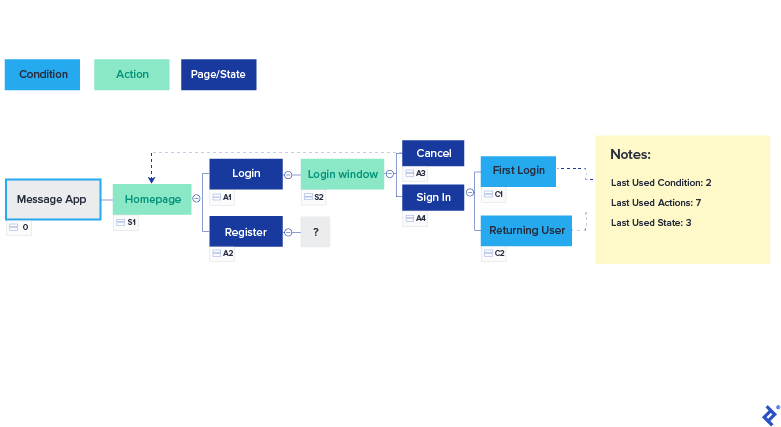
We draw out the above in XMind to look like:
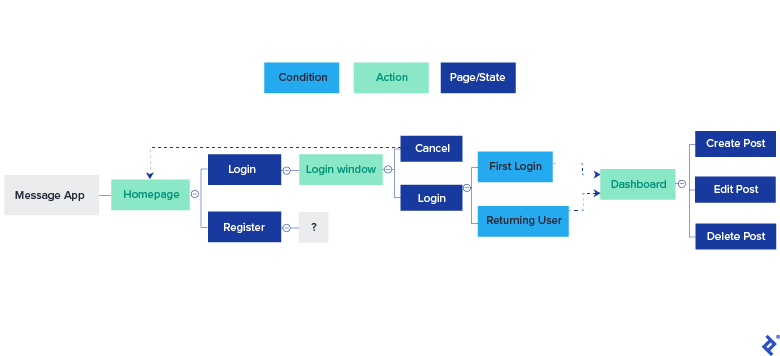
You will notice that I am simply color-coding what is a state and what is an action. I also added a line from the Cancel Action to the homepage to represent that flow accurately. We also see two conditions when a user selects “Login.” Although both go to the dashboard, we still want to test both possible conditions.
The nice thing with XMind is if we work on a large, complex application, we can create different levels of the diagram, so if you want to break up the flow into multiple flows but keep them linked, that is very easy to do with linking the topics to separate sheets. You can select to insert a hyperlink, and from the wizard popup, you can choose a “State” that the action leads to. This means if you select “Login” on XMind and it hyperlinks to “Dashboard,” your mouse cursor will jump to “Dashboard,” even if it’s on a different sheet. Pretty cool.
What our flow is missing are labels. We give the product a label of 0, as that is the root of the flow. Then, for each State (blue), we add an S# label, for each Action (green), we add an A# label, and lastly, for each Condition (cyan), we add a C# label. Each label must be unique. We end up with the below:

To track which number you last used—because as the product grows, trying to find the highest number can be challenging—I store this in the Root topic of the flow, like below:
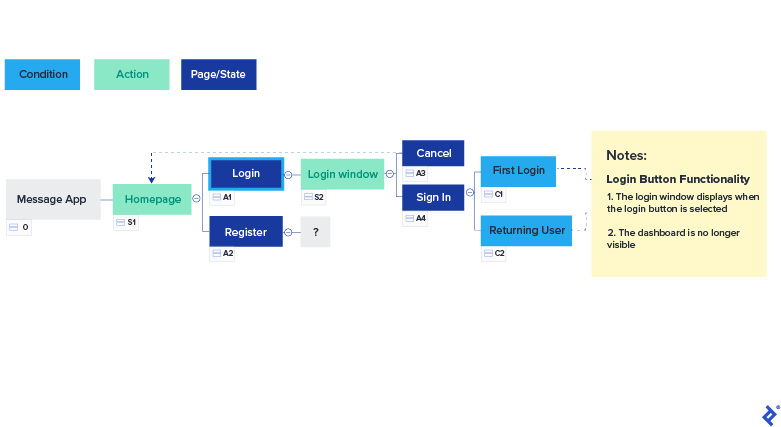
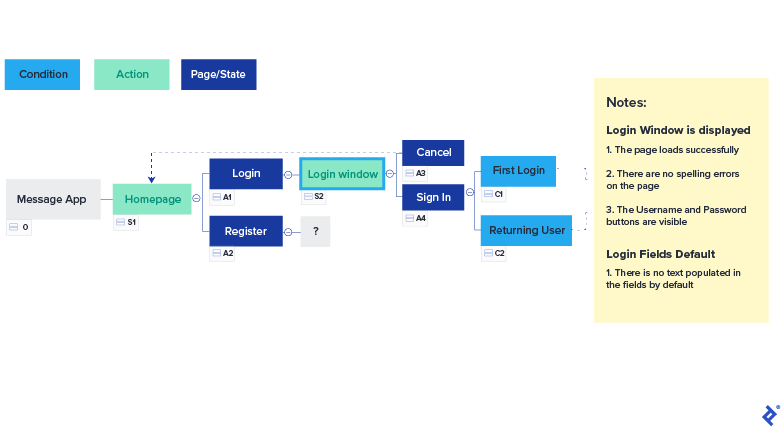
We now come to the part of creating test cases. We are going to focus on the Expected Results, which is probably the most important information in a test case and part of the acceptance criteria of the feature. I will add a title for each section or test and then list the expected results under it. I will do this for only a subset to keep this article concise:
Then, the Login Window:
Then, the Sign In Action:

It is really taking shape. Notice the boundary and security tests added. You may title this however you like, whichever is easiest for you to tag. I sometimes tag the title with a test type, such as Security – JS Inject – Email Field, then list the expected results below.
In most teams, we find changing requirements a hassle to maintain. No more. Let’s say we just learned that all first-time users must be presented with the Ts and Cs window and have to accept before proceeding to their dashboard—no problem. We can add the state and actions relatively easily, like below:

We now see the impact of adding a new state. Note that the numbering may be strange at first, but as long as we remember, the numbers are only to uniquely identify each actor—much like a Primary Key on a database. Do not forget to update your “Last Used” notes to keep track of the numbers you use.
Creating the Test Cases from the Flow
After all this progress, we now get to the easier part: test case creation. Let me highlight some important points. We have labels for every actor, we have titles for every test, and we have expected results for every test, with conditions embedded as part of our flow. This sounds like the recipe for a test case, don’t you agree?
All we do now is copy-paste what is on our flow into any test case management tool, Confluence site or Excel document you wish. I still use the good old trusty Excel. I keep a record of all my test cases in one file called “Baseline” - very original. Once I am done copy-pasting, I end up with the below:
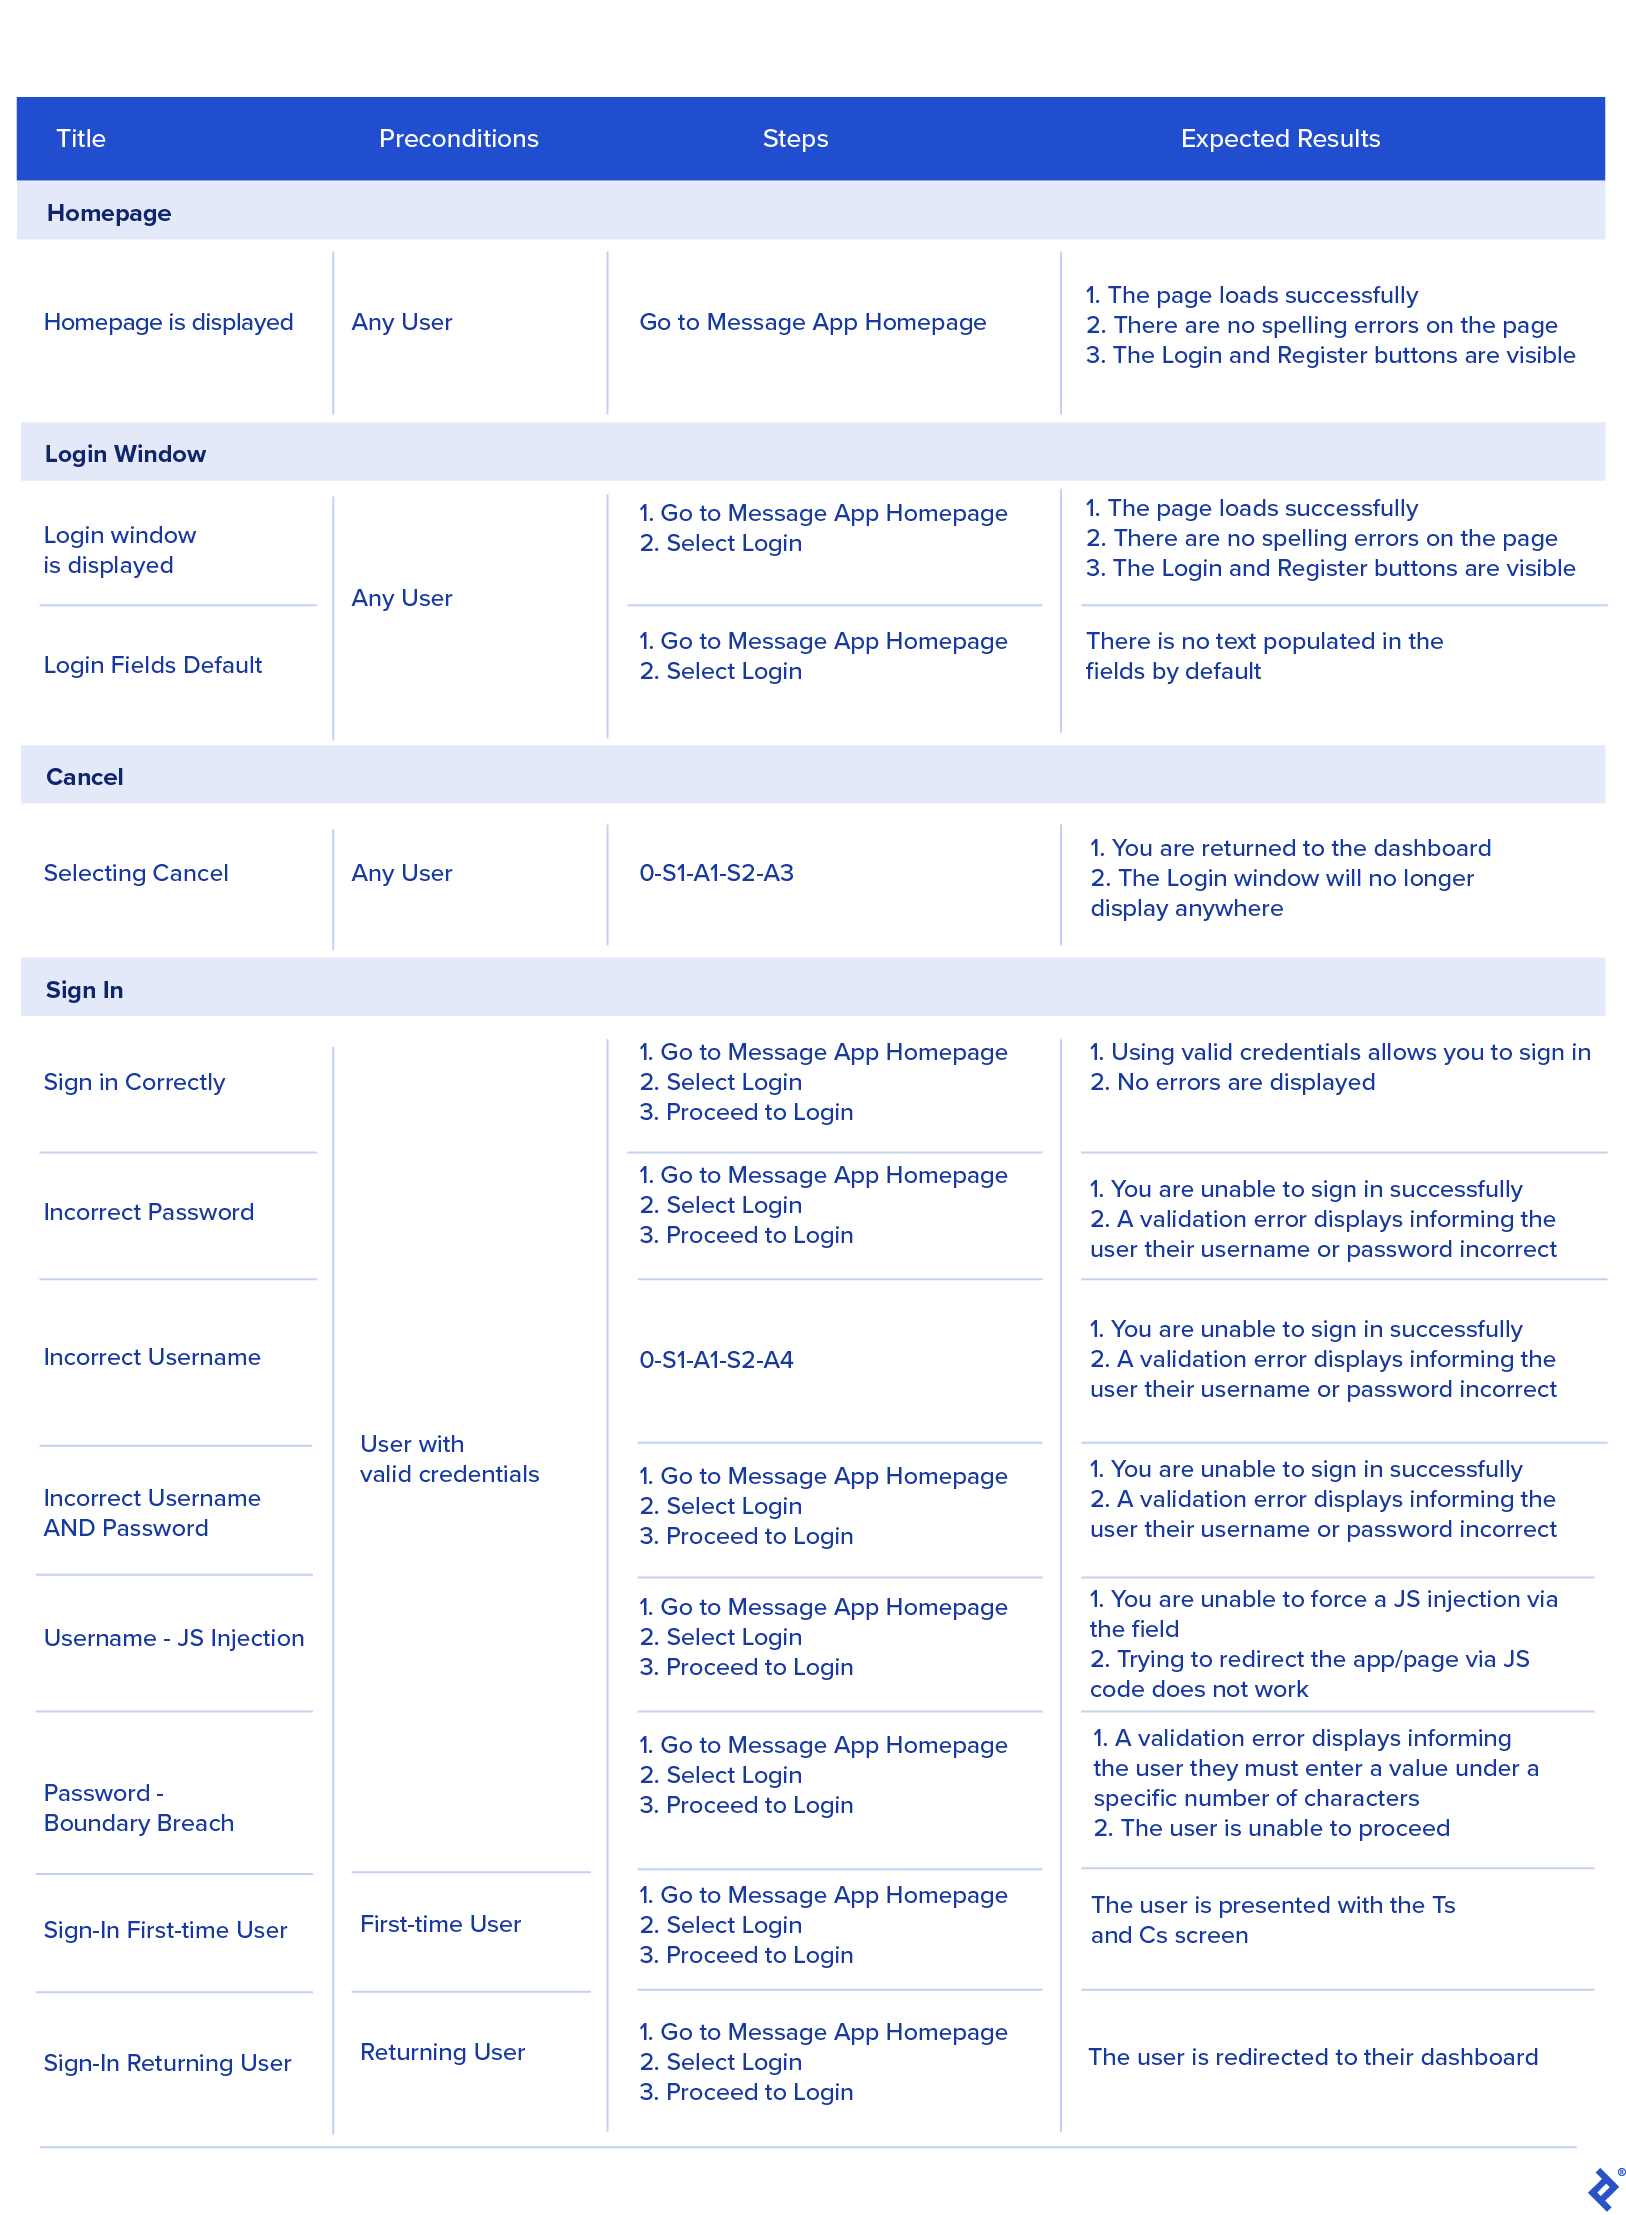
Feel free to add columns for test types, test status, and test configurations as required. The conditions may be better placed before the “Sign In” action, however, there is no right or wrong way to do it, it’s down to personal preference and how you organize yourself.
There are a few things to highlight. One is that I have merged cells that share the same information—no need to repeatedly copy-paste, it wastes time and is more difficult to maintain. Another item is the Steps. You will notice that two of the tests have steps that incorporate the State and Action numbers. This can be used when you have the flow as part of the SDLC in your team. All stakeholders then contribute to the flow by providing information, mock-ups, raising risks, etc. This means by stating the flow numbers, anybody in the team will know what to do, and if there is a new team member, it’s as easy as “follow the trail, reference the notes.”
This also helps automation. You can give each step or action a unique reference. By creating an automation pack that is structured like your flow, you will find that the automation framework you can build has the potential to be highly robust, modular, and compatible across the app. It will be utilizing paging objects on a grander scale, which will reduce maintenance time and allow you to swap out test functions for new ones.
The flow can be the single source of truth for all product documentation, including tech specs, functional specs, test cases, state transition, data flows, etc.
The Streamlined Test Plan Approach
So what about test plans?, you must be thinking. This is simple. A Test Plan contains sections like:
- Introduction & scope
- Test items
- Features to be tested
- Features not to be tested
- Assumptions
- Entry criteria
- Exit criteria
- WBS
- Risks
- Environment requirements
The Introduction and scope will be the JIRA story or any task or story in another tool. The test items are simply the software versions or commit numbers currently deployed on your environment, which you can link to the JIRA ticket or on your test run either on Confluence or the test management tool.
Features to be tested and Features not to be tested are actually your test cases. The test cases chosen to be executed for this JIRA story are “Features to be tested,” and anything not listed is “Features not to be tested.” Quite simply, list the States and Actions you will be testing on the story ticket.
Assumptions, Risks, and even Environment requirements can be compiled in a doc or added to the comments on JIRA, sometimes even placed on Confluence and linked to the story.
A WBS is an estimate you assign to the story in terms of story points or hours, depending on your project. Entry and Exit criteria will already be part of the story.
If you want to be close to “traditional” test plans, you can ask the developer or other stakeholders to comment on the story with a Yes or No to see if they agree with the QA plan or not. This technically serves as your digital signature. All this can be included in your QA process rather easily and help you streamline your QA documentation.
What Have We Learned?
The user flow with the above approach and test plans streamlined to use available tools today will help us reduce repetitive work and assist QA to achieve a faster turnaround time without sacrificing quality.
This approach has been instrumental in guiding me to stay organized, cover every basis, and build documentation the entire team understands. In Agile, this will really come in handy, and the best part of it is we are still abiding by one of the Agile approaches: “Simplify Documentation.”
I truly hope the information has been helpful. It’s all up to you as the reader. This is not a concrete set of rules to follow, these are only guidelines to give you ideas to grow and improve your efficiency. No technique will fit every project, team, or product, but it may pave the way for another innovative idea.
Further Reading on the Toptal Blog:
Understanding the basics
What is the difference between user journey and user flow?
The journey will deal more with the possible ways a user can interact with a product, whereas a user flow describes the actual routes a user can take. To sum up, the user journey is the tour guide that leads a user to their destination. User flow is the actual tool, e.g., the structure of the UI component.
What is a user flow diagram?
A user flow diagram is a flow chart that details the routes a user can take through an application, from each screen they will see to each button or function they can interact with. The user flow is geared toward showing the different user paths in a program and how they will achieve their goals using the product.
What is another name for the user flow diagram?
It has been referred to as “User Interface Flow” and “Task Flow” diagrams in the past.
Why is quality assurance important?
QA helps a company meet its clients’ demands and expectations. QA will actively report on the quality of a product, which can raise or lower the confidence level stakeholders have in the product until they are happy to release it into production. QA can save costs and fix issues early in the development phases.
Jade Russel Hancox
Durban, KwaZulu-Natal, South Africa
Member since March 10, 2020
About the author
Jade is an award-winning quality assurance professional with extensive experience in manual QA and the automation of APIs, UIs, and databases.
Expertise
PREVIOUSLY AT