
Introduction:
In today’s world, we see that many businesses are emerging everywhere. It can be of any type. It establishes and grows. And, to grow, it requires customers and customers require satisfaction. Both things are interdependent. To keep a healthy relationship with customers, businesses use CRM (Customer Relationship Management) tool. Collecting feedbacks from customers is a smart way to keep good relationship with customers.
To do this, Salesforce has brought a new tool called as “Salesforce Surveys”. Using salesforce survey form, organizations can collect insights from their customers very easily.
In this blog, we’ll delve into the world of Salesforce Surveys – a dynamic tool that empowers businesses to harness the power of feedback and transform it into actionable insights.
Salesforce Surveys:
In simple terms, Salesforce Surveys are the survey forms that organizations send to their users, simply customers. Using these forms, organizations can collect feedback or data about their products from customers. Organizations store this data and analyze it by professionally trained groups of individuals to make their products better and better.
You can use Salesforce to view survey data, creating reports and dashboards based on collected feedback and can share insights with your company.
How to create a Salesforce Survey form?
To create a survey form, first you need to enable “survey” in your org, give some permissions to profile and other few things. After this you are good to go with creating survey forms.
So, let’s get started.
Enable Survey:
To enable survey, follow the below steps.
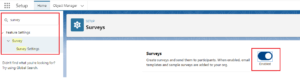
- Go to the Quick find box and enter “Survey”.
- Click “Survey Settings”.
- Enable the Surveys option as shown in figure below.
In this way you’ve enabled they Survey Setting in your org.
Now we can directly jump on creating Survey Form.
Create Survey Form:
Let’s create a survey form for any shopping website. To create Survey form, follow the below steps.
- Go to the App Launcher and enter Survey.
- Click Survey Tab. It will redirect you to the Survey record page, where you can survey records.
- Click New.
- Give the Name to your survey form. Here I’m giving name as “Shopping Website Survey”.
- Click Continue.
You will come to the Survey Builder page where you can build your survey form.
Let’s Understand the Functionalities of This Page First.
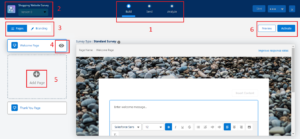
- Pages – The survey form contains three pages namely build page, send page, analyze page.
a. Build Page: On this Builder page, we create our actual survey form. All the highlighted options are under this particular page.
b. Send Page: In this page, you can generate “survey invitations” for your customers either using a link or by sending an email.
c. Analyze Page: In this page, you can analyze the survey data which help your organization to take important decisions. - Name and Version – Here, you can see the name of your survey form. Also, by clicking on dropdown, you can switch on any version of your survey form.
- Pages and Branding – This feature plays a vital role in creating survey.
a. Pages – It includes Welcome page, Thank you page and middle survey pages. It also consists of display logic, branching logic, etc. which will we see further while creating form.
b. Branding – It includes progress options like Auto-Progress and Progress bar. Also, it has options like uploading background image and logo of your choice. Here, you can change image color, opacity, button labels and many more options are available here which is required for branding. - Display welcome page – Here, by clicking this eye icon, you can enable and disable the visibility of welcome page.
- Add Page – On clicking this “+” add sign, you can add multiple pages according to your requirement.
- Preview and Activate – The last but important steps.
a. Preview – Once you are done with your form, you can check how it looks by clicking this preview button.
b. Activate – When you are done with all the things with your form, activate it.
Note: You won’t be able to make any changes further once you activate the survey.
Now, with this you’ve got basic understanding of functionalities on builder page.
So, let’s a create our Survey form for Shopping website.
Welcome Page:

Add the following message to the welcome page as shown below.
1. Enter message: Hello and welcome to our online survey for our shopping website! Thank you for participating in this survey. Let’s get started! (Adjust the alignment, font, font size, etc.)
2. Click “Save”.
You can also skip it if it is not in your requirement. We already discussed above how you can disable the welcome page. Let’s move further.
Add Page:
Click “+” to add a new page where we are going to write questions for the survey.
Page 1:
- Click “Add Question”. A list will be open showing the different types of options to frame survey questions as shown below.
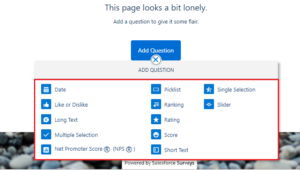
2. You will get know about every type as we’ll move further with this.
3. For now, select picklist.
4. Enter a question: How did you hear about our shopping website?
5. Enter choices: WhatsApp, Facebook, Instagram, Twitter.
6. Click Save.
For 2nd question: –
- Click “Add question”.
- Select “Rating” as the question type.
- Enter a question: How easy is it to navigate our website?
- Enter description. (optional)
- Click Save.
Page 2:
- Click “Add Page”. Here we are going to ask customers their experience, adding display logic as well as branching logic.
- Click “Add Question”.
- Select “Like or Dislike” option as question type.
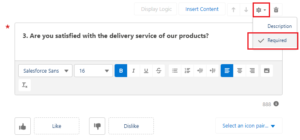
- Enter question: Are you satisfied with the delivery service of our products?
- Click gear icon as shown in figure below and select “Required” to make the question required.
- Click Save.
For 4th question: –
- Click “Add Question”.
- Select “Rating” as question type.
- Enter question: How satisfied are you with the quality of our products?
- Description is optional.
- Click Save.
For 5th question: –
- Click “Add Question”.
- Select “NPS-Net Promoter Score”.
- Enter question: How would you rate the customer service, overall experience you received when interacting with our website?

- Click “Display Logic” as shown in above figure above and add the following conditions.
Select Conditions: All conditions are met.
Question: 4. How satisfied are you with the quality of our product.
Operator: is greater than
Response: 3 - Click “Save Logic”.
- Click Save. Save your form often incase you refresh it without saving.
Let’s understand what we’ve done here. We applied ‘display logic’ to que no. 5, means according to our logic when que 4 will get rating greater than 3 then only que 5 will get display. If not, then it won’t display.
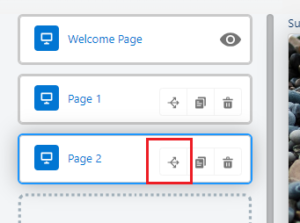
Branching Logic:
We are done with display logic condition. Now, we’ll apply branching logic.
- Click “Page Branching Logic icon” on Page 2 as shown in figure.
- Define the conditions as follow.
a. Select “Based on conditions”.
b. Select Page: Thank You Page.
c. Select Condition: All conditions are met.
d. Logic Type: Response to question.
e. Question: 5. How would rate the customer service, overall experience you received when interacting with our website.
f. Operator: is greater than or equal to.
g. Response: 7. - Click “Create Rule”.
- Click “Save Logic”.
- Click “Save”. (Save your survey)
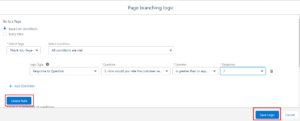
Let’s understand what we’ve done here. We applied branching logic to que 5. It checks the conditions, and when response will be greater than or equal to 7, then it will redirect the customer to thank you page without letting them know each page and each question.
Page 3:
It will be the last page. If the customer does not give then good rating (under 7) to que 5, then user will come to this page.
- Click “Add page”.
- Click “Add Question”.
- Select “Long Text” as question type.
- Enter question: Any suggestion would you like to give our website.
- Click “Save”.
- Thank You Page: This is the final part of our survey form.
- Go to the thank you page.
- Enter the message: Thank you for participating in our online survey for our shopping website. Visit Again!! (Adjust the alignment, font, font size, etc.)
- Click “Save”.
With all these simple steps, you are done with your survey form. Let’s preview it before activating.
If you’ve previewed and all done with your survey form, you can “Activate” it. Keep in mind that if you activate it, you won’t be able to edit or make any changes.
In the next part of this blog, we’ll learn various methods to send your survey form to your customers.
Conclusion:
Salesforce surveys empower businesses to truly understand their customers’ sentiments, preferences, and their thoughts about product. Surveys serve as a link between businesses and their customers. Also, it facilitates open communication and foster a culture of improvement. The ability to gather real-time feedback not only enhances the customer experience but also provides invaluable insights for refining products, services, and overall business strategies.
To be Continued !!