
In today’s digital age, businesses are always looking for new, creative ways to communicate with their clients, partners, and staff. Salesforce Experience Cloud is one potent tool that has become very popular. With the help of this innovative platform, businesses can build vibrant, interesting, and useful online communities that promote deeper relationships and productive interactions. In this blog post, we’ll examine Salesforce Experience Cloud’s main features and advantages, as well as how it makes it possible to build engaging, branded online communities.
Understanding Salesforce Experience Cloud
Salesforce Community Cloud is a platform where users can share and record data, connect, and collaborate.
Companies can build branded communities of their own. You get a domain name that specifically represents your business; you also have color palettes that kind of represent your business website; and you also have a logo that you can put in your communities. You can extend that or show that to your customers, so that’s how you would build your own branded communities.
Steps to Create Branded Online Communities with Salesforce Community Cloud
Steps to Enable Digital Experience
- Go to Setup, search for the Digital Experience setting in the Quick Find Box, and open it
- Click on Settings under Digital Experience
- Select the checkbox to enable Digital Experience.
- Click Save
Steps for Creating a Community Page
- Search for All Sites in the Quick Find Box and open it
- Click on New to create a new Experience Site
- Select a Pre-defined Template
- Click on Get Started
- Give a Name to your community and add a unique value to the URL field
- Click on the Create button
Experience Workspaces includes the following workspace options:
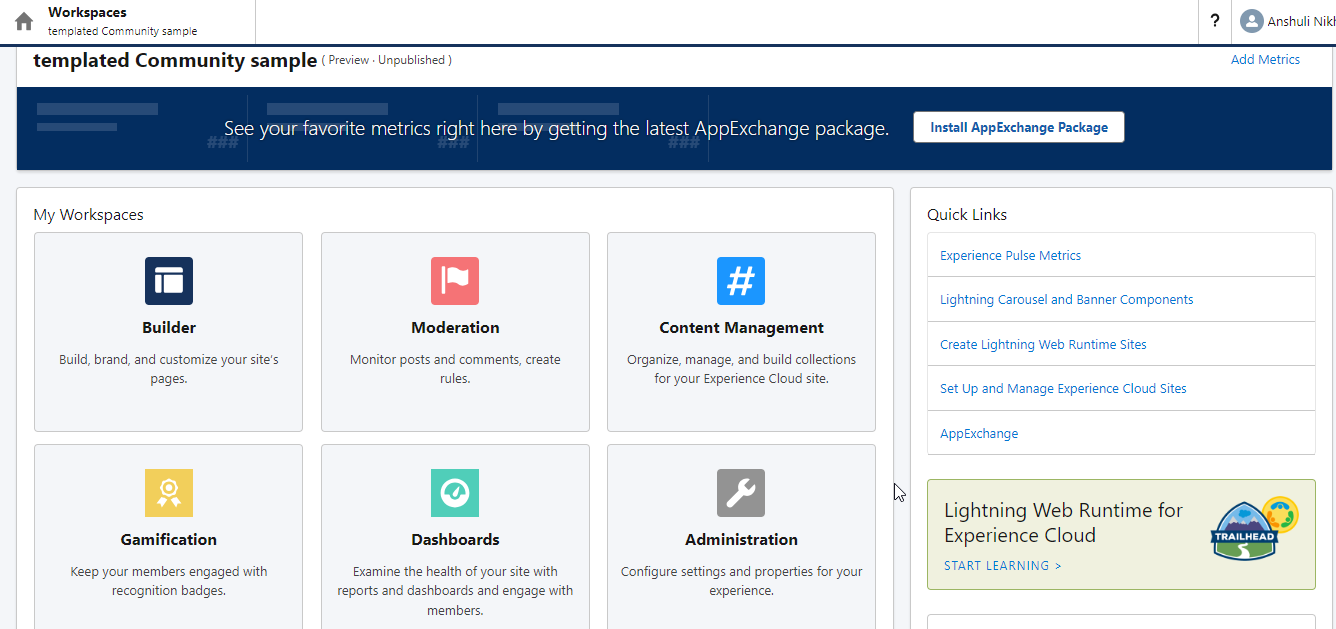
Builder: Builder Navigation allows you to define the structure and layout of your community page. It creates navigation menus, sets up page hierarchies, and configures how users navigate through your community.
Moderation: In this moderation, if you want to moderate the kind of comments people can post, you don’t want anybody to post any violent comments or spam, so you can monitor the post and comments.
Content Management: You can manage your content here. If you want to publish some articles or blogs, you can maintain them through content management.
Gamification: Gamification tools are used for recognition badges and reputation to keep your members engaged on your site.
Dashboards: Dashboards will give you the health of your site, which means they will help you understand what kind of people are coming to your site, how much traffic you have, and how much engagement is there. So anything related to analyzing or reporting, then you can go and come over here.
Administration: You can make changes to your site’s basic configuration from the Administration workspace. if you want to configure or administer the site by setting a few properties.
How do we add ‘Chat Session’ to the experience cloud?

Live Agent is a service cloud feature that allows organizations to provide real-time chat support to their customers directly from within the Salesforce platform.
We are going to explore how we can enable the chat pop-up, and through this chatbot, customers will be able to communicate with the call center agent.
Let’s see how to configure chat.
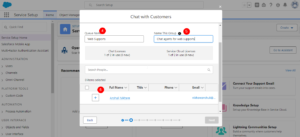
1. Create a Queue
Steps
- Go to Salesforce Setup, then click on ‘Service Setup’
- To enable chat with the customer, click view all next to the recommended setup
- Search and select chat with customer
- Enter the Queue Name and Group Name
- Add User as a chat agent
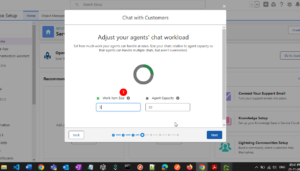
- Adjust your agent capacity and work item size
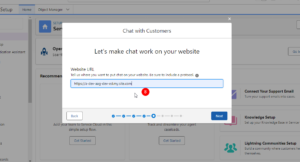
- Add Website URL
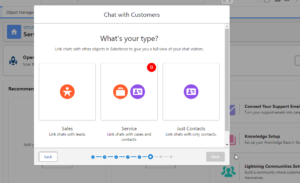
- Add chats with other objects in Salesforce to give a full view to the chat visitors

2. Configure chat agent
Steps
- Go to setup
- Search and select Live Agent Configurations
- Click New
- Define the configuration as follows:
Live Agent Configuration Name: Web Support Configuration
Developer Name: Web_Support_Configuration - In the Assign Profiles area, add System Administrator, Custom: Support Profile, and Standard User.
- Click Save.
- Create a Live agent chat button
3. Add the chat agent to the service console
Steps
- Go to the ‘App Manager’
- Search Service Console
- Click Edit
- Click Navigation Items and add ‘Chat Session’ to the selected items column
- Click on the save button.
4. Embed chat on the experience cloud site
Steps
- Click on Components from the left panel
- Scroll down, drag, and drop ‘Embedded service chat’ to the right-bottom side of the site
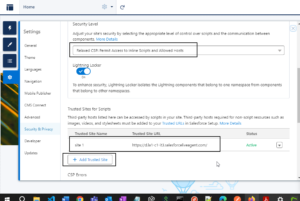
NOTE: Make sure the omnichannel is available in the service console. Add the trusted site to the settings. Please refer to the attached screenshots.
Publishing and Activating the Experience Cloud site or publishing the changes to your site
- To ensure your website looks as expected, preview it in Experience Builder.
- To preview the site in a browser window, In the toolbar, click Preview.
- Once your edits are complete, select Publish from the toolbar.
Activate your Site to make it accessible to members
To activate a site:
- From Setup, enter Digital Experiences in the global search box. Select Sites.
- Open Experience
- Click .
- Click Activate.
- Click OK.
Conclusion:
Salesforce Community Cloud empowers businesses to create branded online communities that foster engagement, collaboration, and loyalty. By offering dedicated spaces for customers, partners, and employees to connect, share, and learn, organizations can strengthen relationships and provide value beyond traditional interactions. With careful planning, customization, and a focus on user engagement, you can build a thriving online community that drives positive outcomes for your brand and its stakeholders. So, take the leap into the world of Salesforce Community Cloud and create a compelling, branded online community that leaves a lasting impact.
Reference:
https://www.thecloudfountain.com/how-to-configure-live-agent-in-communities/
https://www.udemy.com/course/salesforce-experience-cloud-certification-training/