An Introduction to Spring Cloud Streams
If you want to build event-based applications, it’s important to explore the foundations of Spring Cloud Stream. In this post, we’ll learn more about the main building blocks of Spring Cloud Stream, its core components, and the basic configuration that enables us to produce and consume events through different applications.
A Brief Introduction to Spring Cloud Stream
Spring Cloud Stream is a project under the Cloud umbrella that allows developers to build standalone event-centric applications that can be easily integrated with external messaging systems. This helps you to build modern event pipelines that connect multiple applications in a decoupled fashion.
Building Blocks
Spring Cloud Stream is built primarily on top of Spring Boot, which enables developers to configure and start building event-based applications very easily. The image below illustrates the main building blocks of Spring Cloud Stream and its main capabilities.
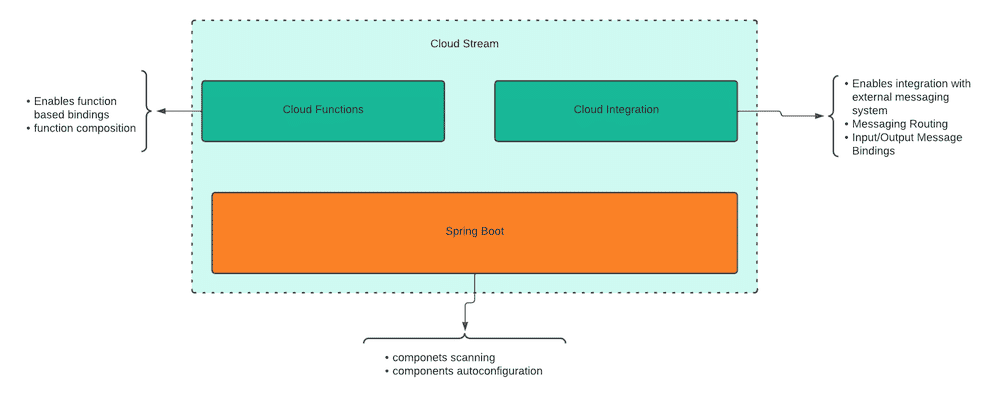
Spring Cloud Streams has some core components that make the project easy to extend and configure. In this section we explore these components in a nutshell, then we’re going to expand the explanation when we’re walking through our project setup.
Project Structure and Requirements
Overview
We’re going to explore some of the core concepts and components of Spring Cloud Stream throughout the building of a small project.
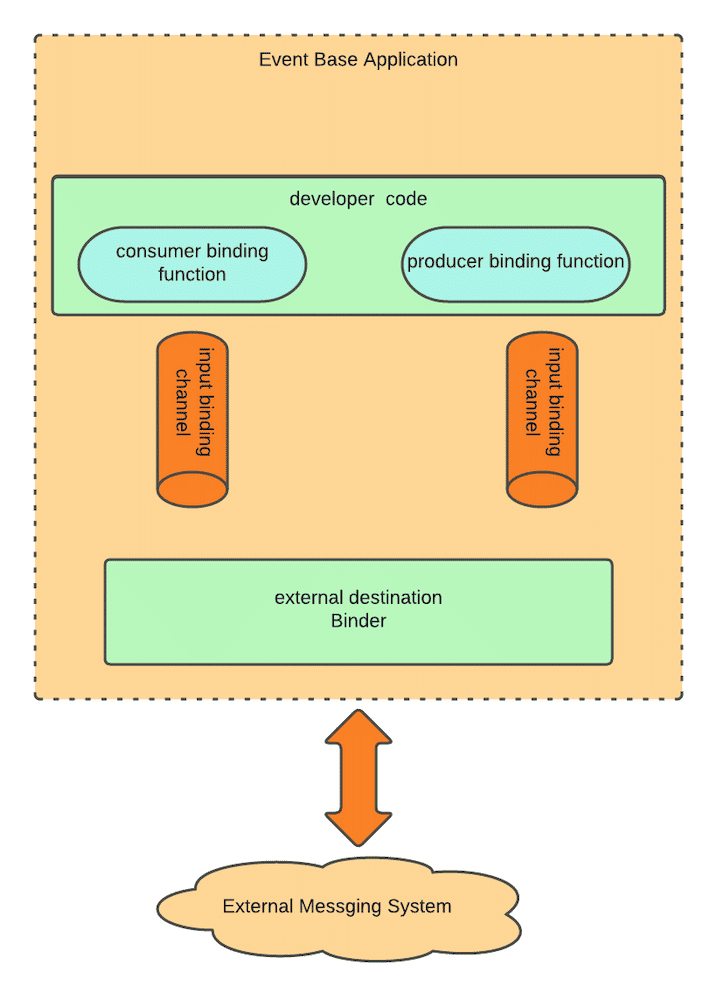
The project consists of two services: one that publishes raw user events to Rabbitmq, and another that consumes those events from the same messaging system and logs them to the console.
Project’s high-level diagram

System Requirements
Project Setup
For this tutorial, we’ll need two services: one for producing events and the other for consuming them.
You can download the project here, or follow the tutorial and create the project as you progress.
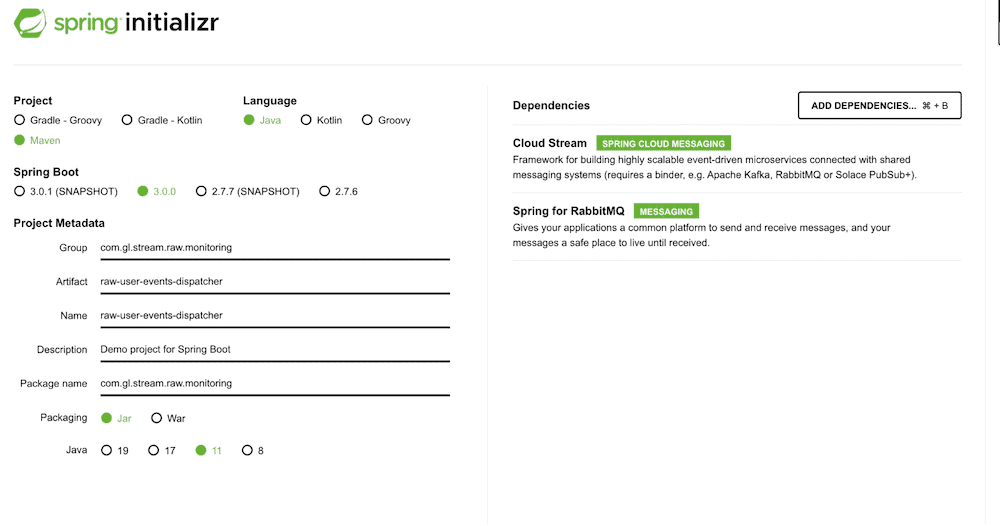
To create the project services on your own, the easiest way is to start with Spring initializr. It will help you choose the required dependencies and the right project structure for your needs. Please select the following setup for both projects:
- Java 8+
- Maven (can use Gradle)
- Cloud stream
- Spring for Rabbitmq
For the Group and Artifact, you can use any name you want. You just need to make sure both Cloud Stream and Spring for RabbitMQ dependencies are included as the following image shows.
User Event Producer Service
For this project to work, we’ll need to add a couple of files that will serve as support to the publishing logic.
- Create a new class called EventLoaderSupplier which will read a list of events from an external .json file and return a single random user event. You can download the code here.
- Create three new POJO classes(Product.java, User.java, RawUserEvent.java). They will make up the user event payload model, and you can download the code here.
- Then, we need to create a json file under the /resources directory so EventLoaderSupplier can read and load the event from there. You can download the .json file here.
Now that we have added the required classes, let’s start the configuration to produce events.
Producing Events
Spring Cloud Stream has two mechanisms to publish events to external messaging systems. In this section, we’re going to explore these approaches in detail.
Functional Approach
This approach allows us to produce events without the need of binding to any inbound event source that triggers the execution of the Supplier Function. On the other hand, the Spring Cloud stream has a pollable component that triggers the function every second.
Definition Of Producer Binding Function
- Create a new configuration class annotated with “@Configuration.”
- Create a new method annotated with @Bean in order to declare a new bean class of type Supplier. The class should look like the following:

So far, we’ve defined the producer binding function. Now, let’s customize the output binding channel so you can declare the Rabbitmq Exchange name and the routing key for the event.
Output Binding Channel Configuration
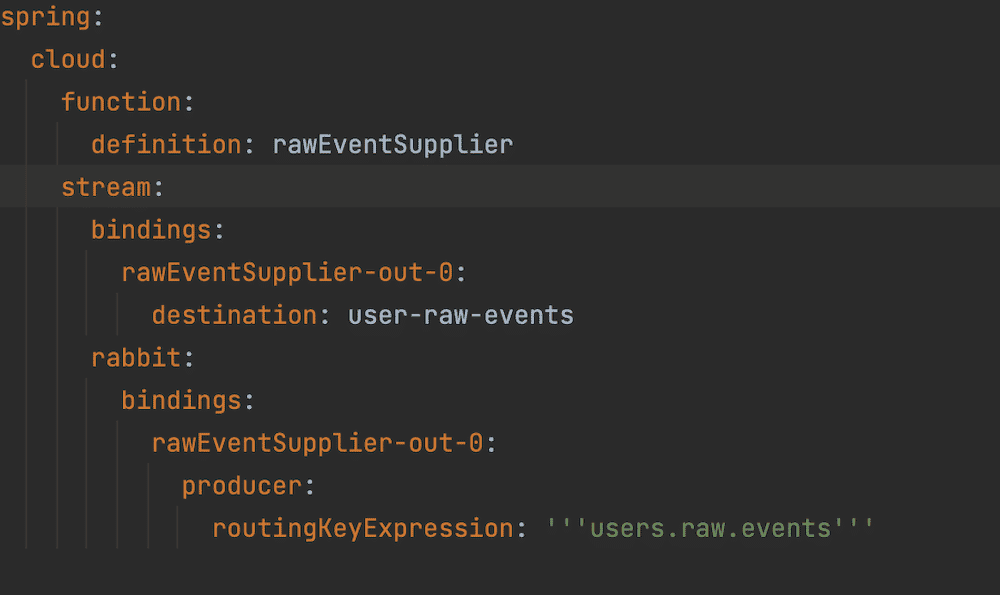
- spring.cloud.function.definition
- This configuration is only required when you have more than one Function of type [Supplier/Function/Consumer] and is used by Spring to discover and create the binding channels. However, it’s considered a good practice to provide this property.
- spring.cloud.stream.bindings.rawEventSupplier-out-0.destination
- Used as the name for RabbitMQ Exchange or Kafka topic (depending on the binder added to the project).
- spring.cloud.stream.rabbit.bindings.rawEventSupplier-out-0.producer.routingKeyExpression
- This configuration is specific for RabbitMQ binder and declares the routing key for the message published through this output channel.
Don’t worry if you don’t understand the naming convention for the binding channels—we’ll explore this in later sections.
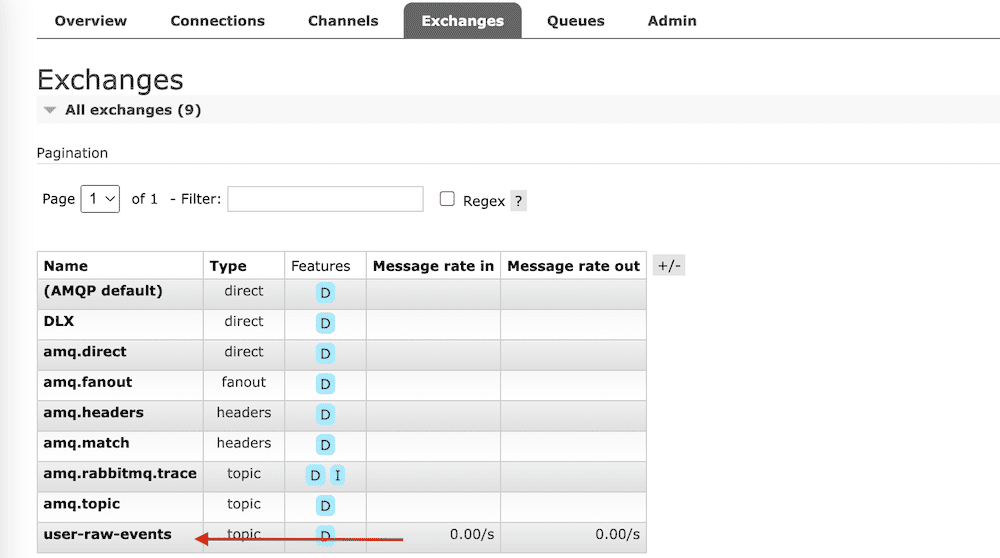
The image below shows the exchange created in Rabbitmq. This is done by Spring during the service startup.
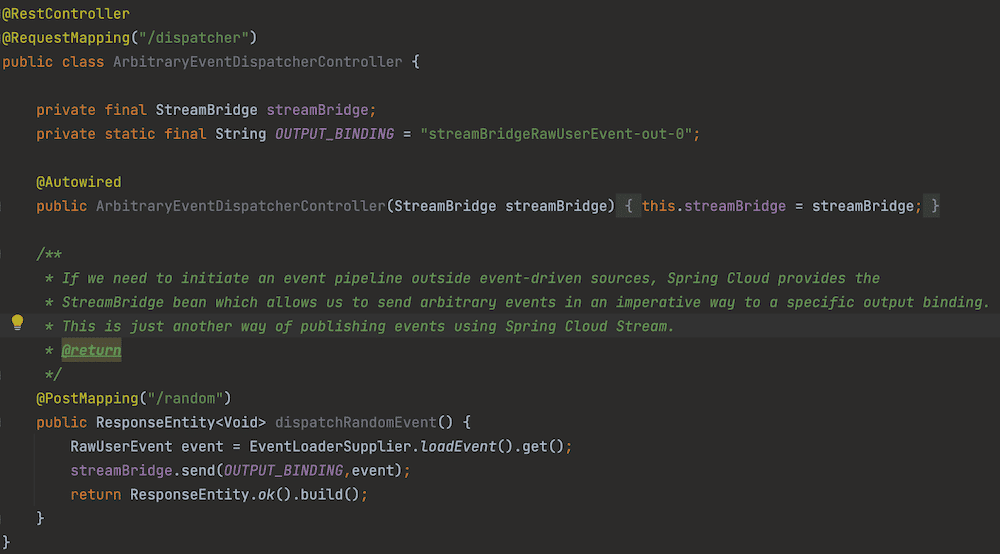
Stream Bridge Approach
StreamBridge helps us to send arbitrary events from outside any binding function, which is useful when the events are generated in foreign systems, such as the invocation of a web endpoint.
To illustrate this scenario, let’s implement a simple web endpoint that publishes random user events.
Output Binding Channel Configuration
The configuration of the output channel to be used by StreamBridge is the same as the one for the supplier approach; in fact, both channels use the same Exchange created in Rabbitmq.
Here, we’re going to focus on the spring.cloud.stream.source property to instruct Spring to create the output binding channel. This is required when using StreamBridge, and since we don’t have a Supplier function, Spring can use it to discover and create the channel automatically.
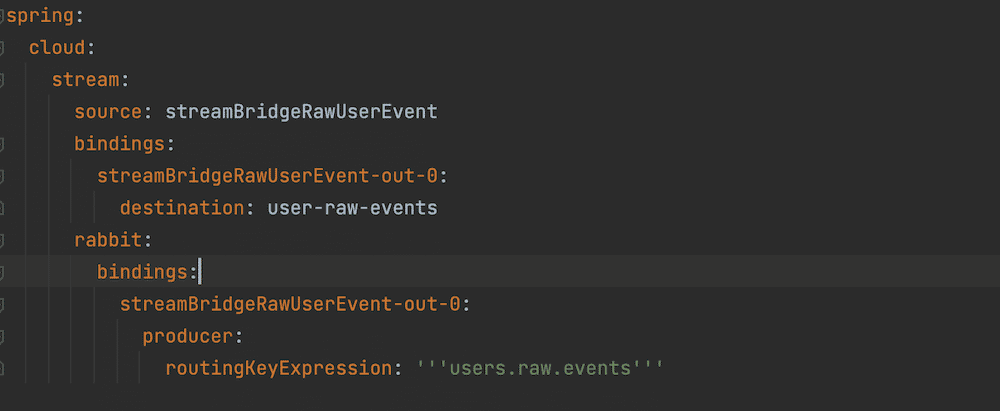
The image above shows how the configuration of the output channel used by StreamBridge looks.
Now we can go ahead and start the application, and we should see the output binding created during the application startup and the exchange created in Rabbitmq. For the sake of simplicity, we’re going to focus only on the Functional Supplier approach.

- The output channel Spring created to send events to the external Messaging System.
- The Pollable bean used to call and execute the Functional Supplier bean every second.
The next image shows the activity monitor of the exchange created. You can see the peaks in yellow that represent the messages published to the exchange, and the ones in light blue are the messages consumed by the queue bound to this exchange (more on this later).
Now let’s explore how to configure the consumer service to consume these events.
User Events Consumer Service
The goal of this service is to consume the user’s raw events and log them to the console. We want to keep this as simple as possible, focusing only on the core configuration to make this possible.
Consuming Events
Spring Cloud Stream supports [Consumer/Function] types as consumer binding functions. For now, we’ll focus on the Consumer functional type for simplicity. If you want to explore how to use the Function, please check this page.
NOTE: For context, the Function type works as a processor where it receives an incoming event and publishes a new event as a result. It binds to one input channel and one output channel in order to send the resulting event downstream.
To consume the event, we need to declare the input binding function, which will be in charge of consuming the events and log them to the console.
Defining Consumer Binding Function
- Create a class and annotate it with @Configuration.
- Define a function that returns the Consumer that will consume the event and annotate the method definition with @Bean.
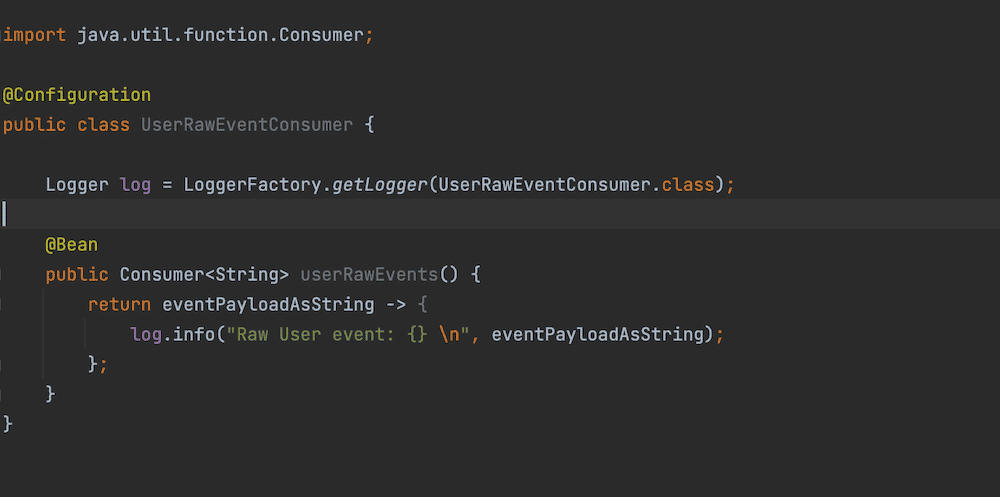
Notice the consumer bean receives a String type as an event payload; this is possible due to the content negotiation capability of Spring Cloud Stream, so it can recognize and try to convert the event payload to the type the binding function expects.
Input Binding Channel Configure
Now we’re going to configure the input channel so that the consumer function can consume events from the Rabbitmq exchange created by Spring during the startup of the producer service:
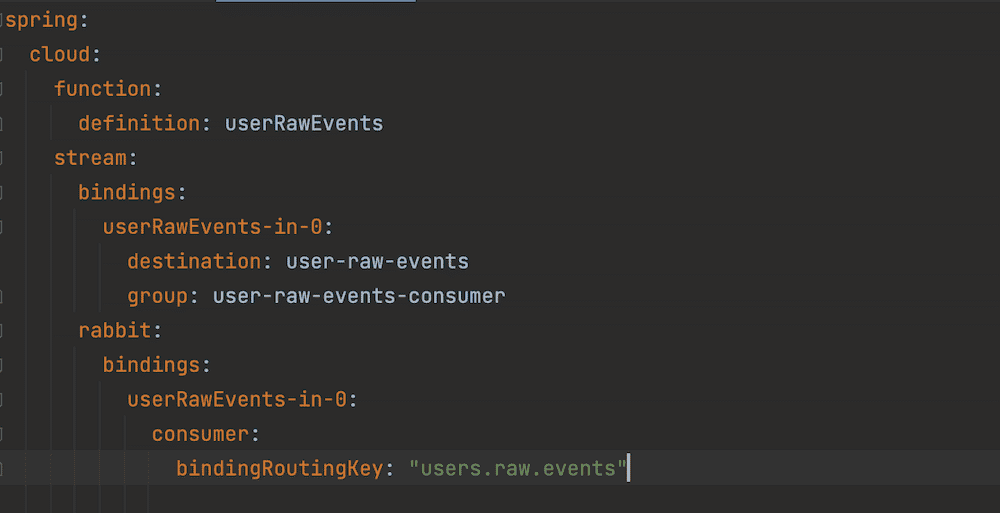
- spring.cloud.function.definition
- As mentioned before, it’s considered a good practice to be explicit about what function bean you want Spring to discover and use as binding functions.
- spring.cloud.stream.bindings.userRawEvent-in-0.destination
- Which exchange the input channel will consume the event from in Rabbitmq.
- This property is used along the group property to create the Queue in Rabbitmq and binds it to the target exchange.
- spring.cloud.stream.bindings.userRawEvent-in-0.group
- Spring has the notion of event partitioning, allowing multiple services instances to consume events as a single event stream app; for this, it uses the group property to know what services belong to the same group and ensure the event is only consumed once within a group. The event partitioning is out of the scope of this post.
- spring.cloud.stream.rabbit.bindings .userRawEvents-in-0.consumer.bindingRoutingKey
- Makes reference to the routing key the queue in Rabbitmq will use to consume events from the exchange.
Now that we have the consumer service fully configured, let’s run it and see the consumer service in action. To run a Spring application, let’s execute the following command on the project’s root directory: mvn spring-boot:run
The next image shows how Spring automatically creates and binds the queue to the target exchange using the declared routing key from the configuration.
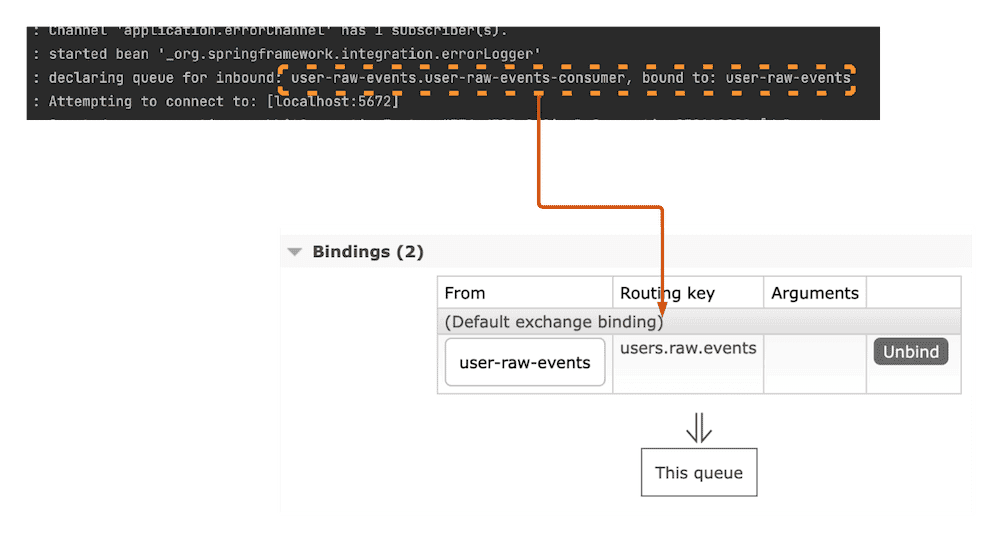
The image below shows the queue name and who it’s made up of.
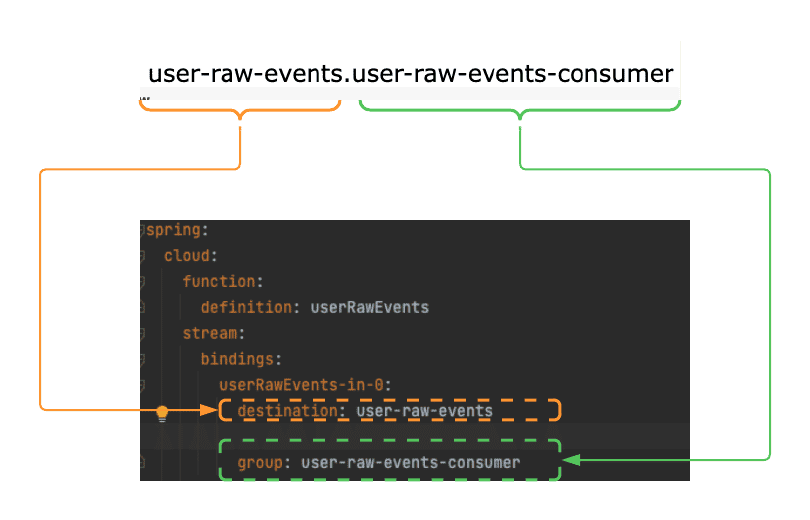
Notice the destination property and group property are used by Spring Cloud Stream to create the queue and assign the name.
Best Practice: Even when the group isn’t required, it’s considered a good practice otherwise Spring will assign a auto generated random name to the queue, which will make the work of tracking the created queues hard to follow, also it’s required if you plan to have more than one instance of the same application.
Now, if you don’t have the publisher service running, let’s run it and see how the events are printed on the console.
The image below shows the event being printed in the console, this means the consumer function is bound correctly to the input channel which is bound to the queue in rabbitmq and consumes the event from it before passing the incoming events to the consumer function.

Input/Output Binding Channels
Last, but not least, let’s explore how the input and output binding names are created by Spring.
Binding Channels can be used for the output and input of events. We’re going to use the output binding channel for the raw user events as an example.
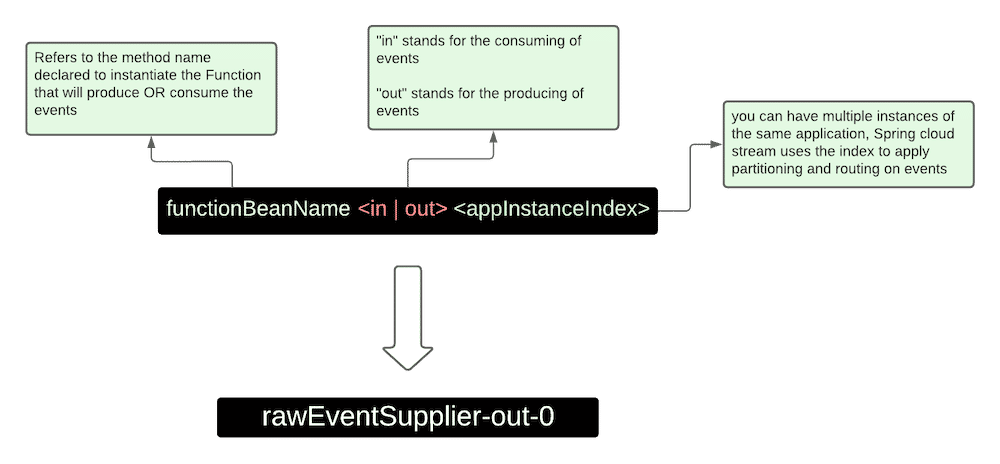
In case you don’t customize the binding’s destination property, Spring will use the binding name as the exchange/topic name.
This is where we’ll leave you for our initial introduction into Spring Cloud Stream. If you’re interested in another article diving deeper into this system, let us know your biggest questions and we’ll write a follow-up post!


