Sending OpenTelemetry Data From AWS Lambda to Honeycomb
By Chris Lasher | Last modified on March 4, 2024In this post, I describe how to send OpenTelemetry (OTel) data from an AWS Lambda instance to Honeycomb. I will be showing these steps using a Lambda written in Python and created and deployed using AWS Serverless Application Model (AWS SAM).
TL;DR
Here is a summary of the required steps:
- Add the AWS Distro for OpenTelemetry (ADOT) Lambda layer.
- Add a Collector configuration file into the Lambda’s source directory, and configure the exporter to send data to Honeycomb using your Honeycomb environment’s API key.
- Add your Honeycomb environment’s API key to AWS Secrets Manager. (Optional, but recommended.)
- Add OTel and Honeycomb environment variables to your template configuration for your Lambda.
Why
Why did I write this?
AWS Lambda, Honeycomb, and OpenTelemetry all provide thorough documentation. Nevertheless, making them all work together wasn’t obvious to me. Some documentation seemed to assume prior knowledge I lacked. Other documentation linked out to other references that required further reading, which could link out to yet more documentation. At times, I felt discouraged, thinking that, in order to first understand anything, I had to understand everything.
I know in my experience, seeing a working example helps me narrow down what knowledge I need now, versus knowledge I can defer to gaining later. I hope this document helps others use this set of technologies—or a similar set—and shortens your learning journey, so you can be more effective at accomplishing what you would like to.
Why Honeycomb?
You might be aware that AWS offers their own distributed tracing product, AWS X-Ray. If your only goal is to send telemetry data to X-Ray, you’ll need fewer steps to accomplish this than what is described here; you will probably find what you need in AWS existing documentation on using AWS Lambda with X-Ray.
Honeycomb provides their own observability platform useful for understanding the behavior of software systems. In my experience, Honeycomb provides the richest query experience, as they’ve designed their product around observability first.
Why OpenTelemetry?
Whether you end up using Honeycomb, X-Ray, or a different product for consuming your telemetry data, these days, I recommend using OpenTelemetry to instrument your software. As a mature standard, it provides a portable and vendor-neutral way to send telemetry signals (traces, metrics, and logs) to your provider of choice. If your goal is to use OpenTelemetry to send telemetry data to AWS X-Ray, you will need fewer steps than what is described here. You might learn enough by reading the AWS Distro for OpenTelemetry (ADOT) for Lambda documentation.
Why AWS SAM?
I chose AWS SAM because the SAM Hello World template provides a consistent jumping-off point. It also allows us to focus on the problem of getting OpenTelemetry data to Honeycomb with few distractions.
Why Python?
I chose the Python programming language because AWS SAM, AWS Lambda, and OpenTelemetry all have strong first-party support in the language.
Getting started
Prerequisites
I am going to assume that you already have some awareness of—but not prior experience with—AWS Lambda, instrumenting with OpenTelemetry, or/and AWS SAM.
I also assume you have the following:
- Access to a role with Administrator permissions in AWS (Administrator permissions are necessary for the creation of a role during the initial deployment of the Hello World SAM project).
- An installation of the AWS SAM CLI, along with its prerequisite installation and configuration of the AWS CLI.
- An account with Honeycomb.
- A Honeycomb API key for your respective environment.
Companion repository
I have published a companion Git repository to GitHub that captures these steps. The commit history may help clarify some of the steps if my prose lacks clarity.
Initialize the SAM Hello World project
Let’s start with the SAM Hello World template. Follow all the steps, starting with selecting your parent directory and creating a new project with sam init, but ending before sam delete.
I have chosen to name the project sam-hello-world; here are my responses to the sam init prompts:
❯ sam init

You can preselect a particular runtime or package type when using the `sam init` experience.
Call `sam init --help` to learn more.

Which template source would you like to use?
        1 - AWS Quick Start Templates
        2 - Custom Template Location
Choice: 1

Choose an AWS Quick Start application template
        1 - Hello World Example
        2 - Data processing
        3 - Hello World Example with Powertools for AWS Lambda
        4 - Multi-step workflow
        5 - Scheduled task
        6 - Standalone function
        7 - Serverless API
        8 - Infrastructure event management
        9 - Lambda Response Streaming
        10 - Serverless Connector Hello World Example
        11 - Multi-step workflow with Connectors
        12 - GraphQLApi Hello World Example
        13 - Full Stack
        14 - Lambda EFS example
        15 - Hello World Example With Powertools for AWS Lambda
        16 - DynamoDB Example
        17 - Machine Learning
Template: 1

Use the most popular runtime and package type? (Python and zip) [y/N]: y

Would you like to enable X-Ray tracing on the function(s) in your application?  [y/N]:

Would you like to enable monitoring using CloudWatch Application Insights?
For more info, please view https://docs.aws.amazon.com/AmazonCloudWatch/latest/monitoring/cloudwatch-application-insights.html [y/N]:

Would you like to set Structured Logging in JSON format on your Lambda functions?  [y/N]:

Project name [sam-app]: sam-hello-world

    -----------------------
    Generating application:
    -----------------------
    Name: sam-hello-world
    Runtime: python3.9
    Architectures: x86_64
    Dependency Manager: pip
    Application Template: hello-world
    Output Directory: .
    Configuration file: sam-hello-world/samconfig.toml

    Next steps can be found in the README file at sam-hello-world/README.md


Commands you can use next
=========================
[*] Create pipeline: cd sam-hello-world && sam pipeline init --bootstrap
[*] Validate SAM template: cd sam-hello-world && sam validate
[*] Test Function in the Cloud: cd sam-hello-world && sam sync --stack-name {stack-name} --watch
You should end with being able to invoke your Lambda function and see output like the following:
❯ sam remote invoke HelloWorldFunction --stack-name sam-hello-world
Invoking Lambda Function HelloWorldFunction
START RequestId: dae4dde2-21cb-4727-aab9-3a9473a15ec2 Version: $LATEST
END RequestId: dae4dde2-21cb-4727-aab9-3a9473a15ec2
REPORT RequestId: dae4dde2-21cb-4727-aab9-3a9473a15ec2  Duration: 2.00 ms       Billed Duration: 2 ms   Memory Size: 128 MB     Max Memory Used: 37 MB  Init Duration: 127.97 ms
{"statusCode": 200, "body": "{\"message\": \"hello everyone!\"}"}%
If you deleted your project’s assets in AWS by issuing the sam delete, you can reconstruct it with sam build && sam deploy.
Adding the ADOT Lambda Layer
With our Lambda successfully deployed with SAM and running on AWS, our next step is to add the OpenTelemetry Lambda layer provided by the AWS Distro for OpenTelemetry. We will wrap our Lambda in this layer to get it ready to export our OTel data to Honeycomb. Our goal in this step is to set up that wrapper without altering the production behavior of our Lambda. That is, it should still continue to execute successfully and to send back a response of:
{"statusCode": 200, "body": "{\"message\": \"hello everyone!\"}"}
The ADOT Lambda layer gives Lambda functions access to an OpenTelemetry Collector. Recall the OTel Collector has three responsibilities:
- To receive OpenTelemetry data from producers—our Lambda function, in this case.
- To process the received data, if needed.
- To export the data to zero or more vendors (e.g., Honeycomb, AWS X-Ray, Datadog).
I will not cover any OTel processing in this article. We will be configuring the data export in the step following this one, to make sure our OTel data goes to Honeycomb.
Adding the layer to the SAM template
First, we need to find the appropriate Lambda layer ARN. Visit the ADOT Python Lambda Layer documentation page, where you should find a section with the current ARN to use. At the time of writing, the ARN format is arn:aws:lambda:<region>:901920570463:layer:aws-otel-python-<architecture>-ver-1-21-0:1, where <region> and <architecture> are placeholders. We will use SAM template substitution to take care of the correct value for <region>. For the correct value of <architecture>, the default value that SAM sets is x86_64. You can find this in the architectures: entry in your SAM function definition:
Resources:
  HelloWorldFunction:
    Type: AWS::Serverless::Function # More info about Function Resource: https://github.com/awslabs/serverless-application-model/blob/master/versions/2016-10-31.md#awsserverlessfunction
    Properties:
      [...]
      Architectures:
        - x86_64
      Events:
        HelloWorld:
          [...]
The x86_64 architecture value translates to amd64 in the layer value. So, if you’re following along from the SAM Hello World tutorial, the layer entry we need to add to our SAM template for HelloWorldFunction is:
      Layers:
        - !Sub 'arn:aws:lambda:${AWS::Region}:901920570463:layer:aws-otel-python-amd64-ver-1-21-0:1'
Shown in full context, here is what our function definition in our template.yaml file should now look like:
Resources:
  HelloWorldFunction:
    Type: AWS::Serverless::Function # More info about Function Resource: https://github.com/awslabs/serverless-application-model/blob/master/versions/2016-10-31.md#awsserverlessfunction
    Properties:
      CodeUri: hello_world/
      Handler: app.lambda_handler
      Runtime: python3.9
      Architectures:
        - x86_64
      Layers:
        - !Sub 'arn:aws:lambda:${AWS::Region}:901920570463:layer:aws-otel-python-amd64-ver-1-21-0:1'
      Events:
        HelloWorld:
          Type: Api # More info about API Event Source: https://github.com/awslabs/serverless-application-model/blob/master/versions/2016-10-31.md#api
          Properties:
            Path: /hello
            Method: get
After running sam build && sam deploy, you should now see output from sam remote invoke like the following:
❯ sam remote invoke HelloWorldFunction --stack-name sam-hello-world
Invoking Lambda Function HelloWorldFunction
{"level":"info","ts":1705350349.692486,"msg":"Launching OpenTelemetry Lambda extension","version":"v0.35.0"}
{"level":"info","ts":1705350349.7066438,"logger":"telemetryAPI.Listener","msg":"Listening for requests","address":"sandbox.localdomain:53612"}
{"level":"info","ts":1705350349.706754,"logger":"telemetryAPI.Client","msg":"Subscribing","baseURL":"http://127.0.0.1:9001/2022-07-01/telemetry"}
TELEMETRY       Name: collector State: Subscribed       Types: [Platform]
2024/01/15 20:25:49 attn: users of the prometheusremotewrite exporter please refer to https://github.com/aws-observability/aws-otel-collector/issues/2043 in regards to an ADOT Collector v0.31.0 breaking change
{"level":"info","ts":1705350349.7094772,"logger":"telemetryAPI.Client","msg":"Subscription success","response":"\"OK\""}
{"level":"info","ts":1705350349.7207298,"caller":"service@v0.90.1/telemetry.go:86","msg":"Setting up own telemetry..."}
{"level":"info","ts":1705350349.7366786,"caller":"service@v0.90.1/telemetry.go:203","msg":"Serving Prometheus metrics","address":"localhost:8888","level":"Basic"}
{"level":"info","ts":1705350349.7374542,"caller":"exporter@v0.90.1/exporter.go:275","msg":"Deprecated component. Will be removed in future releases.","kind":"exporter","data_type":"metrics","name":"logging"}
{"level":"info","ts":1705350349.757077,"caller":"service@v0.90.1/service.go:148","msg":"Starting aws-otel-lambda...","Version":"v0.35.0","NumCPU":2}
{"level":"info","ts":1705350349.7571328,"caller":"extensions/extensions.go:34","msg":"Starting extensions..."}
{"level":"info","ts":1705350349.7572682,"caller":"otlpreceiver@v0.90.1/otlp.go:83","msg":"Starting GRPC server","kind":"receiver","name":"otlp","data_type":"traces","endpoint":"localhost:4317"}
{"level":"info","ts":1705350349.7575185,"caller":"otlpreceiver@v0.90.1/otlp.go:101","msg":"Starting HTTP server","kind":"receiver","name":"otlp","data_type":"traces","endpoint":"localhost:4318"}
{"level":"info","ts":1705350349.7576272,"caller":"service@v0.90.1/service.go:174","msg":"Everything is ready. Begin running and processing data."}
EXTENSION       Name: collector State: Ready    Events: [INVOKE, SHUTDOWN]
START RequestId: 235571eb-5649-495d-ac56-3340a4f2fdac Version: $LATEST
END RequestId: 235571eb-5649-495d-ac56-3340a4f2fdac
REPORT RequestId: 235571eb-5649-495d-ac56-3340a4f2fdac  Duration: 40.74 ms      Billed Duration: 41 ms  Memory Size: 128 MB     Max Memory Used: 75 MB  Init Duration: 390.96 ms
{"statusCode": 200, "body": "{\"message\": \"hello everyone!\"}"}%
Note the additional output indicating the application of the OpenTelemetry Lambda extension.
At this point, our Lambda is emitting some OTel data. However, it’s not exporting to Honeycomb. Let’s tackle this next.
Exporting to Honeycomb
The remaining steps form the bulk of the work necessary to get our OTel data to Honeycomb.
Adding the OTel Collector configuration
My understanding is that there exists a default OpenTelemetry Collector configuration that the ADOT Lambda Layer accesses by default. However, we need to do our own configuration to get our data out from AWS to Honeycomb. To do this, we will create a new YAML configuration file for the OTel Collector inside the hello_world Lambda function directory.
I’m not aware of a default filename for the OTel Collector configuration, so we’ll be explicit. Create a new file: hello_world/otel-collector-config.yaml (this is the same file name currently suggested by the Honeycomb documentation on configuring the OTel Collector). Note that this file is located in the contents of the hello_world Lambda (where the Lambda code is), and not at the top level of our SAM project.
Now, add the following contents to hello_world/otel-collector-config:
receivers:
  otlp:
    protocols:
      grpc:
      http:

processors:

exporters:
  otlp:
    endpoint: api.honeycomb.io:443
    headers:
      "x-honeycomb-team": ${env:HONEYCOMB_API_KEY}

service:
  extensions: []
  pipelines:
    traces:
      receivers: [otlp]
      processors: []
      exporters: [otlp]
The exporters/otlp subsection provides the critical pieces we need for sending our data to Honeycomb. We want to send our OTel data to Honeycomb over OTLP. Consult Honeycomb’s documentation on the Honeycomb OpenTelemetry Endpoint for the most up-to-date information on the OTLP endpoint appropriate for your region. I’m using an AWS region in the US, so api.honeycomb.io:443 is the appropriate OTLP endpoint for me.
Honeycomb also requires an API Key to receive OTLP requests, which is transmitted via the x-honeycomb-team header value. We can enter that value into our otel-collector-config.yaml file, however, I recommend you treat your key like any other secret configuration value (e.g., database password). Instead, we will inject the value at run time using an environment variable HONEYCOMB_API_KEY. James Gregory documented this approach in his article on keeping API keys out of OpenTelemetry configurations.
We will work on populating the value of this environment variable in a later step. For now, our OpenTelemetry configuration file is complete.
Adding the Honeycomb API key to AWS Secrets Manager
We need a place to securely store the value for the HONEYCOMB_API_KEY environment variable we will populate for the OpenTelemetry Collector. AWS provides a managed service called AWS Secrets Manager that interfaces well with AWS SAM and Lambda. In this step, we’ll add our Honeycomb API key to AWS Secrets Manager so we can access them from SAM.
First, you’ll need to find the Honeycomb API key for the destination environment. Consult Honeycomb’s API Key documentation for information on how to retrieve the appropriate value for your key.
Once you have your key, we’re ready to add it to AWS Secrets Manager. I prefer to add it using the AWS CLI. First, we’ll set the key to an environment variable in our shell:
export HONEYCOMB_API_KEY='<YOUR KEY VALUE HERE>'
Substitute <YOUR KEY VALUE HERE> with the actual key value from Honeycomb. Next, set the environment name in your shell:
export HONEYCOMB_ENVIRONMENT='<YOUR ENVIRONMENT NAME>'
Substitute <YOUR ENVIRONMENT NAME> with the name of your Honeycomb environment to which the key belongs. For example, my Honeycomb environment is named “test,” so I put export HONEYCOMB_ENVIRONMENT='test'.
Now, send the value to AWS Secrets Manager with the following AWS CLI command, which uses the values for the API key and environment that we set above:
aws secretsmanager create-secret \
  --name "honeycomb-$HONEYCOMB_ENVIRONMENT" \
  --secret-string '{"key": "$HONEYCOMB_API_KEY"}' \
  --description "Key to Honeycomb API." \
  --tags "[{\"Key\": \"environment\", \"Value\": \"$HONEYCOMB_ENVIRONMENT\"}]"
This will create a secret named honeycomb-<YOUR ENVIRONMENT NAME> (e.g., honeycomb-test) in AWS Secrets Manager. Keep this name in mind; we will refer to it in our SAM project’s template file.
Adding environment variables to the SAM template
In this step, we’ll complete the configuration for the Lambda OTel Collector to send the data to Honeycomb. In the template.yaml file, add the following subsection to the Resources/HelloWorldFunction/Properties subsection:
      Environment:
        Variables:
          AWS_LAMBDA_EXEC_WRAPPER: /opt/otel-instrument
          OPENTELEMETRY_COLLECTOR_CONFIG_FILE: /var/task/otel-collector-config.yaml
          OTEL_SERVICE_NAME: sam-hello-world
          OTEL_PROPAGATORS: tracecontext
          HONEYCOMB_API_KEY: '{{resolve:secretsmanager:<YOUR SECRET NAME>:SecretString:APIKey}}'
Again, substitution <YOUR SECRET NAME> with the name of your AWS Secrets Manager secret created above (e.g., honeycomb-test). Here’s what that looks like in the broader context of my template.yaml:
Resources:
  HelloWorldFunction:
    Type: AWS::Serverless::Function # More info about Function Resource: https://github.com/awslabs/serverless-application-model/blob/master/versions/2016-10-31.md#awsserverlessfunction
    Properties:
      CodeUri: hello_world/
      Handler: app.lambda_handler
      Runtime: python3.9
      Architectures:
        - x86_64
      Layers:
        - !Sub 'arn:aws:lambda:${AWS::Region}:901920570463:layer:aws-otel-python-amd64-ver-1-21-0:1'
      Environment:
        Variables:
          AWS_LAMBDA_EXEC_WRAPPER: /opt/otel-instrument
          OPENTELEMETRY_COLLECTOR_CONFIG_FILE: /var/task/otel-collector-config.yaml
          OTEL_SERVICE_NAME: sam-hello-world
          OTEL_PROPAGATORS: tracecontext
          HONEYCOMB_API_KEY: '{{resolve:secretsmanager:honeycomb-test:SecretString:APIKey}}'
      Events:
        HelloWorld:
          Type: Api # More info about API Event Source: https://github.com/awslabs/serverless-application-model/blob/master/versions/2016-10-31.md#api
          Properties:
            Path: /hello
            Method: get
Let’s examine these new environment variables, starting with those documented by ADOT. AWS_LAMBDA_EXEC_WRAPPER comes directly from the ADOT Lambda Layer documentation, and wraps our Lambda invocation in boilerplate to connect it to the Lambda Collector. OPENTELEMETRY_COLLECTOR_CONFIG_FILE specifies the location of the configuration file to the Lambda Collector. The files in our hello_world directory get mounted to /var/run/ so the Lambda can access them at run time.
Next, we have environment variables documented by Honeycomb’s AWS Lambda documentation. We define OTEL_SERVICE_NAME to be sam-hello-world so that the service.name value is the same between deployments and instances of our Lambda function. As the Honeycomb documentation warns,
By default, the AWS Lambda Layer uses the Lambda name for the
service.nameresource attribute. If you want to keep datasets together for related Lambdas, this default behavior can cause problems.
Setting OTEL_PROPAGATORS to tracecontext is also a recommendation from the Honeycomb AWS Lambda documentation, to preserve root spans in traces.
Finally, we have HONEYCOMB_API_KEY. We make a reference here to the AWS Secrets Manager secret we created above. You can visit AWS’ documentation on retrieving Secrets Manager secrets in CloudFormation for more information on how the value of this line is constructed. At the end of the day, it will populate your Lambda’s HONEYCOMB_API_KEY key with the value you stored in your secret above.
As a side note, if you change the value of your API key in Secrets Manager, you will still have to redeploy your Lambda to refer to the new value. Unfortunately, it’s not dynamic. So, this solution is not robust, however, it is more secure than putting your secrets directly into configuration files. The OpenTelemetry Collector maintainers have an ongoing discussion for a longer term solution to secure secrets access.
Wrapping up
We’re nearly there! Let’s rebuild and redeploy:
sam build && sam deploy
After your new stack successfully deploys, invoke your Lambda again:
sam remote invoke HelloWorldFunction --stack-name sam-hello-world
If after doing so, you invoke your function, you might see something like the following:
❯ sam remote invoke HelloWorldFunction --stack-name sam-hello-world
Invoking Lambda Function HelloWorldFunction
entelemetry/instrumentation/distro.py", line 62, in load_instrumentor
instrumentor: BaseInstrumentor = entry_point.load()
File "/opt/python/pkg_resources/__init__.py", line 2516, in load
return self.resolve()
File "/opt/python/pkg_resources/__init__.py", line 2522, in resolve
module = __import__(self.module_name, fromlist=['__name__'], level=0)
File "/opt/python/opentelemetry/instrumentation/botocore/__init__.py", line 84, in <module>
from botocore.client import BaseClient
File "/var/runtime/botocore/client.py", line 15, in <module>
from botocore import waiter, xform_name
File "/var/runtime/botocore/waiter.py", line 18, in <module>
from botocore.docs.docstring import WaiterDocstring
File "/var/runtime/botocore/docs/__init__.py", line 15, in <module>
from botocore.docs.service import ServiceDocumenter
File "/var/runtime/botocore/docs/service.py", line 14, in <module>
from botocore.docs.client import ClientDocumenter, ClientExceptionsDocumenter
File "/var/runtime/botocore/docs/client.py", line 17, in <module>
from botocore.docs.example import ResponseExampleDocumenter
File "/var/runtime/botocore/docs/example.py", line 13, in <module>
from botocore.docs.shape import ShapeDocumenter
File "/var/runtime/botocore/docs/shape.py", line 19, in <module>
from botocore.utils import is_json_value_header
File "/var/runtime/botocore/utils.py", line 37, in <module>
import botocore.httpsession
File "/var/runtime/botocore/httpsession.py", line 22, in <module>
from urllib3.util.ssl_ import (
ImportError: cannot import name 'DEFAULT_CIPHERS' from 'urllib3.util.ssl_' (/var/task/urllib3/util/ssl_.py)
Failed to auto initialize opentelemetry
Traceback (most recent call last):
File "/opt/python/opentelemetry/instrumentation/auto_instrumentation/sitecustomize.py", line 39, in initialize
_load_instrumentors(distro)
File "/opt/python/opentelemetry/instrumentation/auto_instrumentation/_load.py", line 91, in _load_instrumentors
raise exc
File "/opt/python/opentelemetry/instrumentation/auto_instrumentation/_load.py", line 87, in _load_instrumentors
distro.load_instrumentor(entry_point, skip_dep_check=True)
File "/opt/python/opentelemetry/instrumentation/distro.py", line 62, in load_instrumentor
instrumentor: BaseInstrumentor = entry_point.load()
File "/opt/python/pkg_resources/__init__.py", line 2516, in load
return self.resolve()
File "/opt/python/pkg_resources/__init__.py", line 2522, in resolve
module = __import__(self.module_name, fromlist=['__name__'], level=0)
File "/opt/python/opentelemetry/instrumentation/botocore/__init__.py", line 84, in <module>
from botocore.client import BaseClient
File "/var/runtime/botocore/client.py", line 15, in <module>
from botocore import waiter, xform_name
File "/var/runtime/botocore/waiter.py", line 18, in <module>
from botocore.docs.docstring import WaiterDocstring
File "/var/runtime/botocore/docs/__init__.py", line 15, in <module>
from botocore.docs.service import ServiceDocumenter
File "/var/runtime/botocore/docs/service.py", line 14, in <module>
from botocore.docs.client import ClientDocumenter, ClientExceptionsDocumenter
File "/var/runtime/botocore/docs/client.py", line 17, in <module>
from botocore.docs.example import ResponseExampleDocumenter
File "/var/runtime/botocore/docs/example.py", line 13, in <module>
from botocore.docs.shape import ShapeDocumenter
File "/var/runtime/botocore/docs/shape.py", line 19, in <module>
from botocore.utils import is_json_value_header
File "/var/runtime/botocore/utils.py", line 37, in <module>
import botocore.httpsession
File "/var/runtime/botocore/httpsession.py", line 22, in <module>
from urllib3.util.ssl_ import (
ImportError: cannot import name 'DEFAULT_CIPHERS' from 'urllib3.util.ssl_' (/var/task/urllib3/util/ssl_.py)
EXTENSION       Name: collector State: Ready    Events: [INVOKE, SHUTDOWN]
START RequestId: ff758efb-d812-49c5-aa89-0d2e603e058d Version: $LATEST
END RequestId: ff758efb-d812-49c5-aa89-0d2e603e058d
REPORT RequestId: ff758efb-d812-49c5-aa89-0d2e603e058d  Duration: 280.67 ms     Billed Duration: 281 ms Memory Size: 128 MB     Max Memory Used: 115 MB Init Duration: 1614.35 ms
{"statusCode": 200, "body": "{\"message\": \"hello everyone!\"}"}%
The key issue is this line:
ImportError: cannot import name 'DEFAULT_CIPHERS' from 'urllib3.util.ssl_' (/var/task/urllib3/util/ssl_.py)
This ImportError is tangential to OpenTelemetry and Honeycomb. You might already see your data in Honeycomb at this point. However, this is noisy and can be quickly resolved. Let’s fix it.
Detour: fixing urllib3 support
There is an issue with the requests dependency in the hello_world Lambda using a newer version of urllib3 than supported by botocore that is causing our ImportError. To resolve this, we can add the following line to hello_world/requirements.txt:
urllib3 < 2
Now rebuild and redeploy, and re-invoke the Lambda:
sam build && sam deploy
sam remote invoke HelloWorldFunction --stack-name sam-hello-world
Verifying Honeycomb has received our data
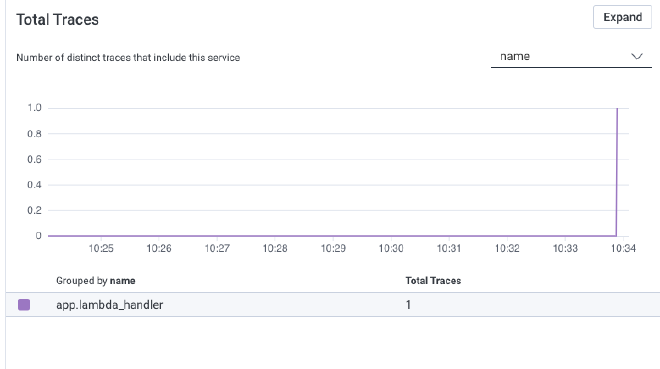
At this point, our data should reach Honeycomb. If you visit your Honeycomb dashboard for the environment that matches your API key, you should see a dataset called sam-hello-world. In that dataset, you should see one or more traces, like the following:
Congratulations! You’re now on your way to observability into your Lambda-powered OpenTelemetry and Honeycomb!
Conclusion
We cobbled together quite a handful of technologies to get this all working. A quick survey shows we touched the following:
- AWS SAM
- AWS Lambda
- The OpenTelemetry Collector
- Honeycomb
I appreciate your time following this article. I hope you found it helpful. If you find any improvements, feel free to reach out to me and let me know!
References and further reading
I consulted a number of documents from AWS, Honeycomb, the OpenTelemetry project, and third-party sites to bring this solution together. If you’d like to know more, I encourage you to have a look at the following resources.
- The AWS Distro for OpenTelemetry (ADOT) technical docs and ADOT Lambda docs.
- Honeycomb’s documentation on the OpenTelemetry Collector.
- OpenTelemetry Collector’s configuration documentation.
- James Gregory’s guide to keeping API keys out of your Lambda’s OpenTelemetry config.
- Observability Engineering by Charity Majors, Liz Fong-Jones, and George Miranda.
Related Posts
Real User Monitoring With a Splash of OpenTelemetry
You're probably familiar with the concept of real user monitoring (RUM) and how it's used to monitor websites or mobile applications. If not, here's the...
Transitioning to OpenTelemetry
This article touches on how we at Birdie handled our transition from logs towards using OpenTelemetry as the primary mechanism for achieving world-class observability of...
Instrumenting a Demo App With OpenTelemetry and Honeycomb
A few days ago, I was in a meeting with a prospect who was just starting to try out OpenTelemetry. One of the things that...