Unity AI Development: A Finite-state Machine Tutorial
Ever wonder how game developers deliver entertaining interplay with the non-player characters they create? Learn how to develop them yourself in our finite-state machine tutorial.

Ever wonder how game developers deliver entertaining interplay with the non-player characters they create? Learn how to develop them yourself in our finite-state machine tutorial.

Garegin is an accomplished Unity and C# game developer. He created a networking protocol for gamified playground equipment, served as the CTO of an educational gaming startup, and was a game developer on a multinational social-casino team.
PREVIOUSLY AT

In the competitive world of gaming, developers strive to offer an entertaining user experience for those who interact with the non-player characters (NPCs) that we create. Developers can deliver this interactivity by using finite-state machines (FSMs) to create AI solutions that simulate intelligence in our NPCs.
AI trends have shifted to behavioral trees, but FSMs remain relevant. They’re incorporated—in one capacity or another—into virtually every electronic game.
Anatomy of an FSM
An FSM is a model of computation in which only one of a finite number of hypothetical states can be active at one time. An FSM transitions from one state to another, responding to conditions or inputs. Its core components include:
| Component | Description |
|---|---|
| State | One of a finite set of options indicating the current overall condition of an FSM; any given state includes an associated set of actions |
| Action | What a state does when the FSM queries it |
| Decision | The logic establishing when a transition takes place |
| Transition | The process of changing states |
While we will focus on FSMs from the perspective of AI implementation, concepts such as animation state machines and general game states also fall under the FSM umbrella.
Visualizing an FSM
Let’s consider the example of the classic arcade game Pac-Man. In the game’s initial state (the “chase” state), the NPCs are colorful ghosts that pursue and eventually outpace the player. The ghosts transition into the evade state whenever the player eats a power pellet and experiences a power-up, gaining the ability to eat the ghosts. The ghosts, now blue in color, evade the player until the power-up times out and the ghosts transition back to the chase state, in which their original behaviors and colors are restored.
A Pac-Man ghost is always in one of two states: chase or evade. Naturally, we must provide two transitions—one from chase to evade, the other from evade to chase:

The finite-state machine, by design, queries the current state, which queries the decision(s) and action(s) of that state. The following diagram represents our Pac-Man example and shows a decision that checks the status of the player’s power-up. If a power-up has begun, the NPCs transition from chase to evade. If a power-up has ended, the NPCs transition from evade to chase. Finally, if there is no power-up change, no transition occurs.

Scalability
FSMs free us to build modular AI. For instance, with just a single new action, we can create an NPC with a new behavior. Thus, we can ascribe a new action—the eating of a power pellet—to one of our Pac-Man ghosts, giving it the ability to eat power pellets while evading the player. We can reuse existing actions, decisions, and transitions to support this behavior.
Since the resources required to develop a unique NPC are minimal, we are well positioned to meet the evolving project requirements of multiple unique NPCs. On the other hand, an excessive number of states and transitions can get us tangled up in a spaghetti-state machine—an FSM whose overabundance of connections makes it difficult to debug and maintain.
Implementing an FSM in Unity
To demonstrate how to implement a finite-state machine in Unity, let’s create a simple stealth game. Our architecture will incorporate ScriptableObjects, which are data containers that can store and share information throughout the application, so that we do not need to reproduce it. ScriptableObjects are capable of limited processing, such as invoking actions and querying decisions. In addition to Unity’s official documentation, the older Game Architecture with Scriptable Objects talk remains an excellent resource if you want to dive deeper.
Before we add AI to this initial ready-to-compile project, consider the proposed architecture:

In our sample game, the enemy (an NPC represented by a blue capsule) patrols. When the enemy sees the player (represented by a gray capsule), the enemy starts following the player:

In contrast with Pac-Man, the enemy in our game will not return to the default state (“patrol”) once it follows the player.
Creating Classes
Let’s begin by creating our classes. In a new scripts folder, we will add all of the proposed architectural building blocks as C# scripts.
Implementing the BaseStateMachine Class
The BaseStateMachine class is the only MonoBehavior that we will add to access our AI-enabled NPCs. For simplicity’s sake, our BaseStateMachine will be bare-bones. If we wanted to, however, we could add an inherited custom FSM that stores additional parameters and references to additional components. Note that the code will not compile properly until we have added our BaseState class, which we’ll do later in our tutorial.
The code for BaseStateMachine refers to and executes the current state to perform the actions and see if a transition is warranted:
using UnityEngine;

namespace Demo.FSM
{
    public class BaseStateMachine : MonoBehaviour
    {
        [SerializeField] private BaseState _initialState;

        private void Awake()
        {
            CurrentState = _initialState;
        }

        public BaseState CurrentState { get; set; }

        private void Update()
        {
            CurrentState.Execute(this);
        }
    }
}
Implementing the BaseState Class
Our state is of the type BaseState, which we derive from a ScriptableObject. BaseState includes a single method, Execute, taking BaseStateMachine as its argument and passing to it actions and transitions. This is how BaseState looks:
using UnityEngine;

namespace Demo.FSM
{
    public class BaseState : ScriptableObject
    {
        public virtual void Execute(BaseStateMachine machine) { }
    }
}
Implementing the State and RemainInState Classes
We now derive two classes from BaseState. First, we have the State class, which stores references to actions and transitions, includes two lists (one for actions, the other for transitions), and overrides and calls the base Execute on actions and transitions:
using System.Collections.Generic;
using UnityEngine;

namespace Demo.FSM
{
    [CreateAssetMenu(menuName = "FSM/State")]
    public sealed class State : BaseState
    {
        public List<FSMAction> Action = new List<FSMAction>();
        public List<Transition> Transitions = new List<Transition>();

        public override void Execute(BaseStateMachine machine)
        {
            foreach (var action in Action)
                action.Execute(machine);

            foreach(var transition in Transitions)
                transition.Execute(machine);
        }
    }
}
Second, we have the RemainInState class, which tells the FSM when not to perform a transition:
using UnityEngine;

namespace Demo.FSM
{
    [CreateAssetMenu(menuName = "FSM/Remain In State", fileName = "RemainInState")]
    public sealed class RemainInState : BaseState
    {

    }
}
Note that these classes will not compile until we have added the FSMAction, Decision, and Transition classes.
Implementing the FSMAction Class
In the Proposed FSM Architecture diagram, the base FSMAction class is labeled “Action.” However, we will create the base FSMAction class and use the name FSMAction (since Action is already in use by the .NET System namespace).
FSMAction, a ScriptableObject, cannot process functions independently, so we will define it as an abstract class. As our development progresses, we may require a single action to serve more than one state. Fortunately, we can associate FSMAction with as many states from as many FSMs as we wish.
The FSMAction abstract class looks like this:
using UnityEngine;

namespace Demo.FSM
{
    public abstract class FSMAction : ScriptableObject
    {
        public abstract void Execute(BaseStateMachine stateMachine);
    }
}
Implementing the Decision and Transition Classes
To finish up our FSM, we will define two more classes. First, we have Decision, an abstract class from which all other decisions would define their custom behavior:
using UnityEngine;

namespace Demo.FSM
{
    public abstract class Decision : ScriptableObject
    {
        public abstract bool Decide(BaseStateMachine state);
    }
}
The second class, Transition, contains the Decision object and two states:
- A state to transition to if the
Decisionyields true. - Another state to transition to if the
Decisionyields false.
It looks like this:
using UnityEngine;

namespace Demo.FSM
{
    [CreateAssetMenu(menuName = "FSM/Transition")]
    public sealed class Transition : ScriptableObject
    {
        public Decision Decision;
        public BaseState TrueState;
        public BaseState FalseState;

        public void Execute(BaseStateMachine stateMachine)
        {
            if(Decision.Decide(stateMachine) && !(TrueState is RemainInState))
                stateMachine.CurrentState = TrueState;
            else if(!(FalseState is RemainInState))
                stateMachine.CurrentState = FalseState;
        }
    }
}
Everything we have built up to this point should compile without any errors. If you experience issues, check your Unity Editor version, which can cause errors if out of date. Ensure that all files have been properly cloned from the original project folder and that all publicly accessed variables are not declared private.
Creating Custom Actions and Decisions
Now, with the heavy lifting done, we are ready to implement custom actions and decisions in a new scripts folder.
Implementing the Patrol and Chase Classes
When we analyze the Core Components of Our Sample Stealth Game FSM diagram, we see that our NPC can be in one of two states:
-
Patrol state — Associated with the state are:
- One action: NPC visits random patrol points around the world.
- One transition: NPC checks whether the player is in sight and, if so, transitions to the chase state.
- One decision: NPC checks whether the player is in sight.
-
Chase state — Associated with the state is:
- One action: NPC chases the player.
We can reuse our existing transition implementation via Unity’s GUI, as we’ll discuss later. This leaves two actions (PatrolAction and ChaseAction) and a decision for us to code.
The patrol state action (which derives from the base FSMAction) overrides the Execute method to get two components:
-
PatrolPoints, which tracks patrol points. -
NavMeshAgent, Unity’s implementation for navigation in 3D space.
The override then checks whether the AI agent has reached its destination and, if so, moves to the next destination. It looks like this:
using Demo.Enemy;
using Demo.FSM;
using UnityEngine;
using UnityEngine.AI;

namespace Demo.MyFSM
{
    [CreateAssetMenu(menuName = "FSM/Actions/Patrol")]
    public class PatrolAction : FSMAction
    {
        public override void Execute(BaseStateMachine stateMachine)
        {
            var navMeshAgent = stateMachine.GetComponent<NavMeshAgent>();
            var patrolPoints = stateMachine.GetComponent<PatrolPoints>();

            if (patrolPoints.HasReached(navMeshAgent))
                navMeshAgent.SetDestination(patrolPoints.GetNext().position);
        }
    }
}
We may want to consider caching the PatrolPoints and NavMeshAgent components. Caching would allow us to share ScriptableObjects for actions among agents without the performance impact of running GetComponent on each query of the finite-state machine.
To be clear, we cannot cache component instances in the Execute method. So instead, we’ll add a custom GetComponent method to BaseStateMachine. Our custom GetComponent would cache the instance the first time it is called, returning the cached instance on consecutive calls. For reference, this is the implementation of BaseStateMachine with caching:
using System;
using System.Collections.Generic;
using UnityEngine;

namespace Demo.FSM
{
    public class BaseStateMachine : MonoBehaviour
    {
        [SerializeField] private BaseState _initialState;
        private Dictionary<Type, Component> _cachedComponents;
        private void Awake()
        {
            CurrentState = _initialState;
            _cachedComponents = new Dictionary<Type, Component>();
        }

        public BaseState CurrentState { get; set; }

        private void Update()
        {
            CurrentState.Execute(this);
        }

        public new T GetComponent<T>() where T : Component
        {
            if(_cachedComponents.ContainsKey(typeof(T)))
                return _cachedComponents[typeof(T)] as T;

            var component = base.GetComponent<T>();
            if(component != null)
            {
                _cachedComponents.Add(typeof(T), component);
            }
            return component;
        }

    }
}
Like its counterpart PatrolAction, the ChaseAction class overrides the Execute method to get PatrolPoints and NavMeshAgent components. In contrast, however, after checking whether the AI agent has reached its destination, the ChaseAction class action sets the destination to Player.position:
using Demo.Enemy;
using Demo.FSM;
using UnityEngine;
using UnityEngine.AI;

namespace Demo.MyFSM
{
    [CreateAssetMenu(menuName = "FSM/Actions/Chase")]
    public class ChaseAction : FSMAction
    {
        public override void Execute(BaseStateMachine stateMachine)
        {
            var navMeshAgent = stateMachine.GetComponent<NavMeshAgent>();
            var enemySightSensor = stateMachine.GetComponent<EnemySightSensor>();

            navMeshAgent.SetDestination(enemySightSensor.Player.position);
        }
    }
}
Implementing the InLineOfSightDecision Class
The final piece is the InLineOfSightDecision class, which inherits the base Decision and gets the EnemySightSensor component to check if the player is in the line of sight of the NPC:
using Demo.Enemy;
using Demo.FSM;
using UnityEngine;
namespace Demo.MyFSM
{
    [CreateAssetMenu(menuName = "FSM/Decisions/In Line Of Sight")]
    public class InLineOfSightDecision : Decision
    {
        public override bool Decide(BaseStateMachine stateMachine)
        {
            var enemyInLineOfSight = stateMachine.GetComponent<EnemySightSensor>();
            return enemyInLineOfSight.Ping();
        }
    }
}
Attaching Behaviors to States
We are finally ready to attach behaviors to the Enemy agent. These are created in the Unity Editor’s Project window.
Adding the Patrol and Chase States
Let’s create two states and name them “Patrol” and “Chase”:
- Right Click > Create > FSM > State
While here, let’s also create a RemainInState object:
- Right Click > Create > FSM > Remain In State
Now, it’s time to create the actions we just coded:
- Right Click > Create > FSM > Action > Patrol
- Right Click > Create > FSM > Action > Chase
To code the Decision:
- Right Click > Create > FSM > Decisions > In Line of Sight
To enable a transition from PatrolState to ChaseState, let’s first create the transition scriptable object:
- Right Click > Create > FSM > Transition
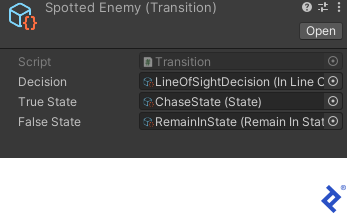
- Choose a name you like. I called mine Spotted Enemy.
We’ll populate the resulting inspector window as follows:
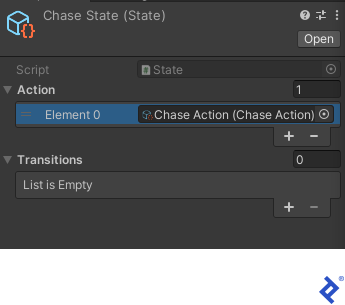
Then we’ll complete the Chase State inspector dialog as follows:
Next, we’ll complete the Patrol State dialog:

Finally, we’ll add the BaseStateMachine component to the enemy object: In the Unity Editor’s Project window, open the SampleScene asset, select the Enemy object from the Hierarchy panel, and, in the Inspector window, select Add Component > Base State Machine:

For any issues, double-check that your game objects are configured correctly. For example, confirm that the Enemy object includes the PatrolPoints script component and objects Point1, Point2, etc. This information can be lost with incorrect editor versioning.
Now you are ready to play the sample game and observe that the enemy will follow the player when the player steps into the enemy’s line of sight.
Using FSMs to Create a Fun, Interactive User Experience
In this finite-state machine tutorial, we created a highly modular FSM-based AI (and corresponding GitHub repo) that we can reuse in future projects. Thanks to this modularity, we can always add power to our AI by introducing new components.
But our architecture also paves the way for graphical-first FSM design, which would elevate our developer experience to a new level of professionalism. We could then create FSMs for our games more rapidly—and with better creative accuracy.
Further Reading on the Toptal Blog:
Understanding the basics
What is a finite-state machine?
A finite-state machine (FSM) is a model of computation. In an FSM, just one of a finite number of hypothetical states can be active at any given time.
How does a finite-state machine work?
A finite-state machine transitions from one state to another as it responds to inputs or conditions.
Is a computer a finite-state machine?
A computer is not a finite-state machine. A computer is a physical object, while a finite-state machine is a model of computation.
How is a finite-state machine implemented?
A finite-state machine is implemented by coding and adding AI: coding classes, creating custom actions and decisions, and attaching behaviors.
Garegin Tadevosyan
Yerevan, Armenia
Member since July 1, 2021
About the author
Garegin is an accomplished Unity and C# game developer. He created a networking protocol for gamified playground equipment, served as the CTO of an educational gaming startup, and was a game developer on a multinational social-casino team.
PREVIOUSLY AT